
Im Maileon Help-Center finden Sie umfassende Dokumentationen zu unserem System.
Beliebte Suchanfragen: Importe | Rest-API | Integrationen | SMS
Google Firebase Push Node V5
1. Introduction
Google Firebase enables real-time data management, authentication, and cloud-based infrastructure for modern applications. In Maileon, it powers push notification services that can be integrated directly into marketing automation workflows, allowing businesses to send targeted push messages to specific contacts. The content of these push notifications (title, content and click URL) can be personalized with contact data and with data from the contact event that starts the automation.
Firebase helps Maileon deliver faster, more personalized customer engagement through automated push notifications, real-time connectivity, and scalable cloud infrastructure.
To help you understand how to leverage the Google Firebase integration within your Maileon marketing automation workflows, here are three example scenarios showing how customer data and real-time events translate into highly personalized mobile push notifications.
1.1. Example scenario 1: Abandoned cart (Behavior-Based Trigger)
- Situation: A customer browses your mobile fashion app in the evening, adds a jacket to their shopping cart, but gets distracted and closes the app without completing the purchase.
- What Maileon & Firebase Do: The app tracks the “Cart Abandoned” event. Your Maileon automation workflow registers this event, waits for a predefined period (e.g., 2 hours), and automatically triggers a push notification via Firebase.
- The Result on the Customer’s Phone: The customer receives a highly relevant notification: “Hi [First Name]! Is your new jacket still waiting for you?” Tapping the message instantly opens the app and routes them directly back to their populated shopping cart to finish checkout.
1.2. Example scenario 2: The “Delivery Update” (Real-Time Event Data)
- Situation: A customer has ordered an item from your online store and is eagerly waiting for its arrival.
- What Maileon & Firebase Do: As soon as your logistics partner updates the shipping status to “Out for Delivery,” this external event data is passed to Maileon in real time. Maileon dynamically extracts the delivery window from the event data and instructs Firebase to fire the notification immediately.
- The Result on the Customer’s Phone: The customer sees a timely update: “Great news! Your package is on its way and is expected to arrive between 11:00 AM and 1:00 PM.” Clicking the notification opens the app and takes them straight to the live parcel tracking map.
1.3. Example scenario 3: The “Exclusive Birthday Offer” (Contact Profile Data)
- Situation: It is a registered subscriber’s birthday.
- What Maileon & Firebase Do: Your automated daily campaign checks your contact database. When it finds profiles where the “Birthdate” field matches today’s date, Maileon initiates the birthday workflow and sends a personalized message payload to Firebase.
- The Result on the Customer’s Phone: The customer is greeted on their phone’s home screen: “Happy Birthday, [First Name]! Here is a 15% discount just for you.” Tapping the notification opens a personalized landing page within the app where their unique discount code is already applied and ready to use.
2. Google Firebase Configuration
To establish a connection between Maileon and Google Firebase, you need the following from the Google Firebase Console: a private key for the Firebase Admin SDK, the configuration of a registered web app and a Web Push certificate (VAPID key).
2.1. Generating the Firebase Admin SDK Private Key
Open the Google Firebase Console and select the relevant project. Go to Project Settings (gear icon) and click Service accounts (fig. 1).
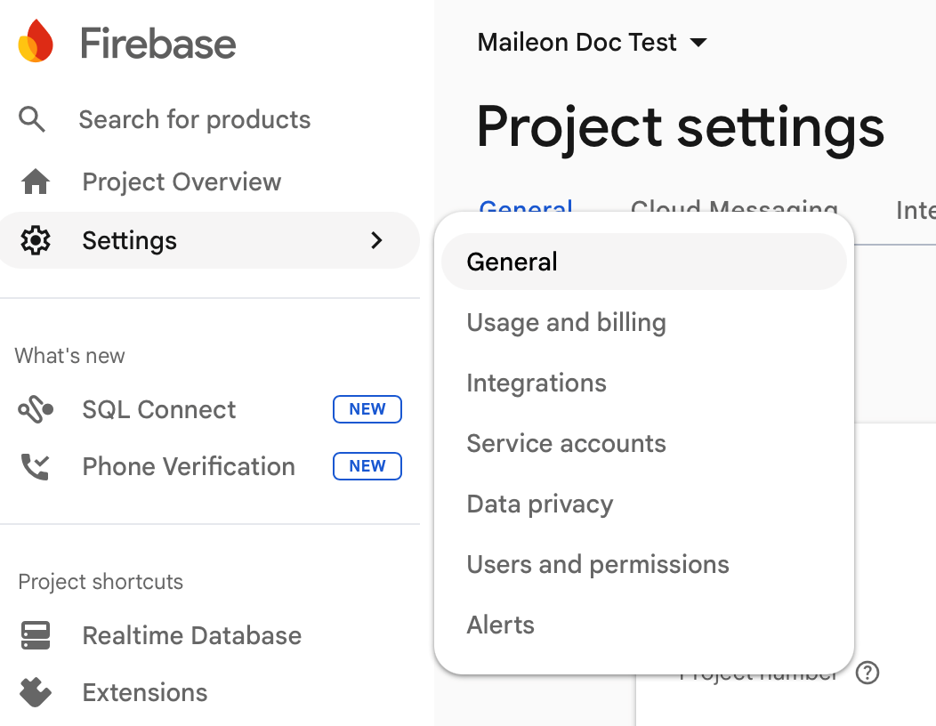
fig. 1: Open your Firebase project in the Google Firebase Console, then go to ‘Project Settings’ → ‘Service accounts’.
Select the Firebase Admin SDK tab and click Generate new private key (fig. 2).
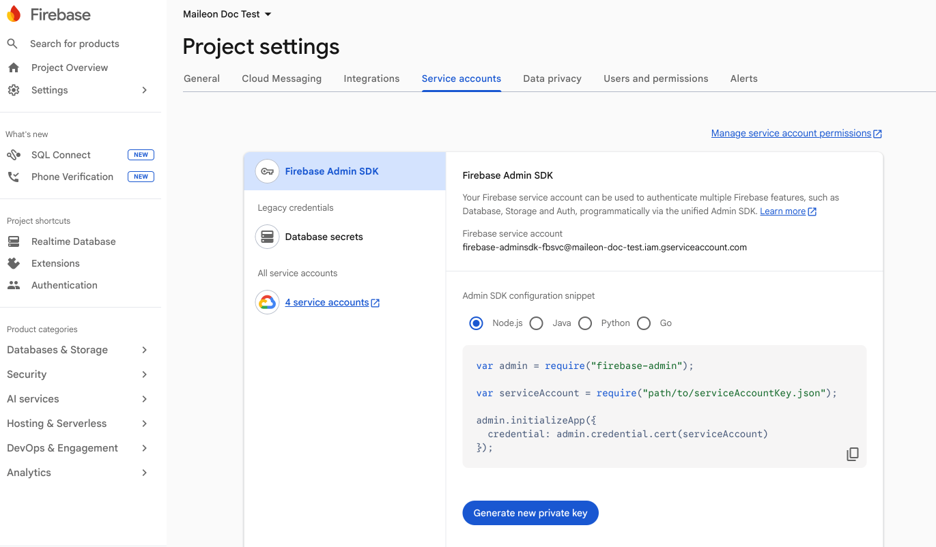
fig. 2: Select the ‘Firebase Admin SDK’ tab and generate a new private key.
Confirm the action to download a JSON file containing the required configuration credentials (including project_id, client_email and private_key) (fig. 3).
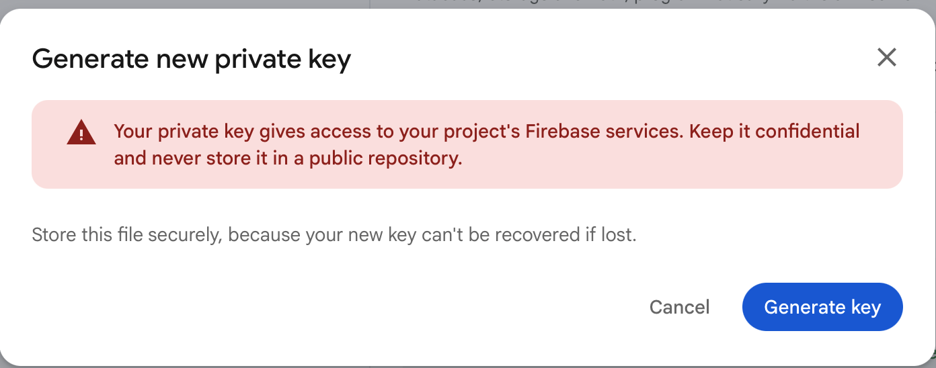
fig. 3: Confirm the download of the JSON file containing the configuration credentials.
Store the JSON file securely. It grants administrative access to your Firebase project, so do not share it or commit it to a code repository.
2.2. Registering a Web App
The web application implementation (see Section 5) requires the public configuration of a web app registered in your Firebase project.
In Project Settings, open the General tab. Under Your apps, click the web icon (</>) (fig. 4).
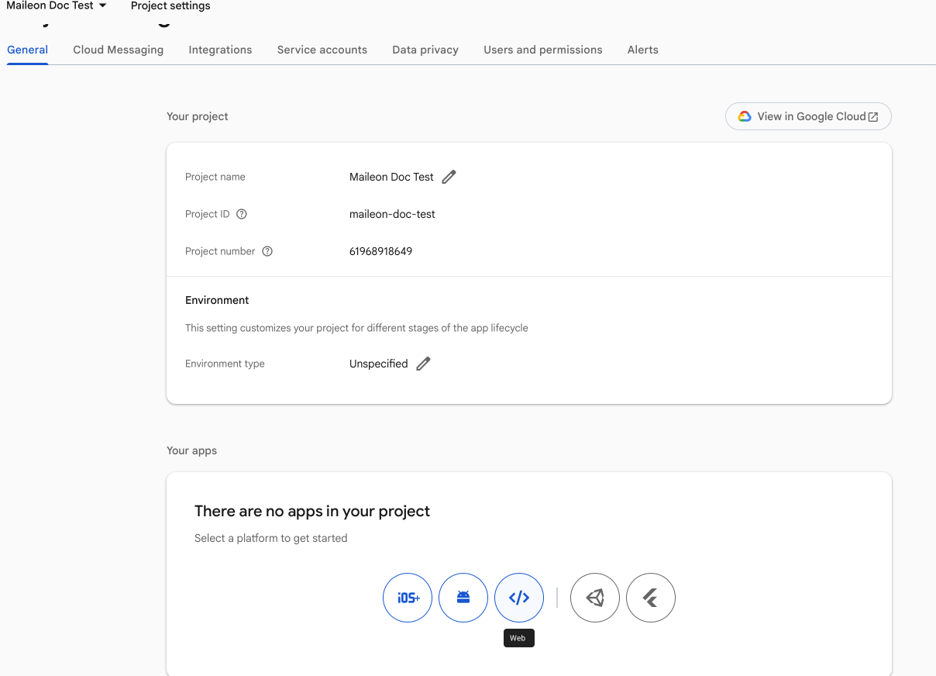
fig. 4: Click ‘Web’ to start registering the web app in ‘Project Settings’ → ‘General’ → ‘Your apps’.
Add an App nickname and click Register app (fig. 5). If a web app is already registered, select it and continue with the next step.
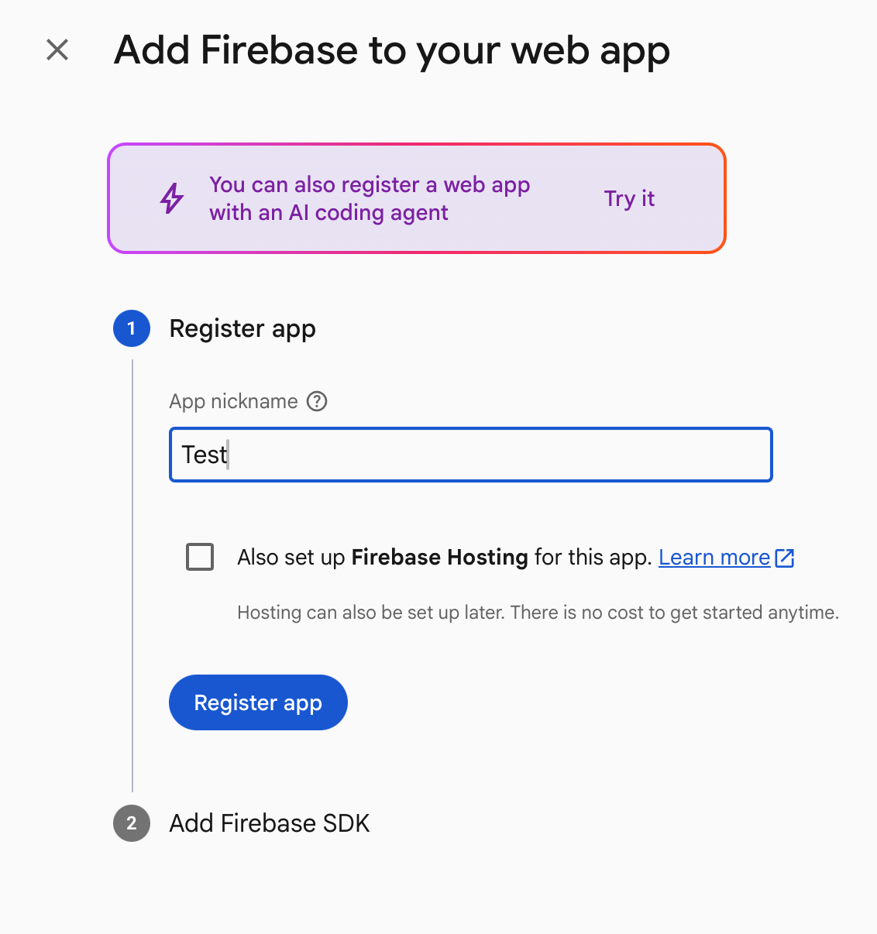
fig. 5: Click ‘Register app’ after adding the nickname of the app.
Firebase displays a code snippet for adding the SDK. You only need the firebaseConfig object from it, which contains the apiKey, authDomain, projectId, messagingSenderId and appId values.
Copy the firebaseConfig object from the Firebase Console (fig. 6):
const firebaseConfig = {
apiKey: 'YOUR_API_KEY',
authDomain: 'YOUR_AUTH_DOMAIN',
projectId: 'YOUR_PROJECT_ID',
messagingSenderId: 'YOUR_MESSAGING_SENDER_ID',
appId: 'YOUR_APP_ID',
};
fig. 6: Copy the displayed firebaseConfig object.
Replace the placeholders with the values from the Firebase Console. You will use these values in the service worker (Section 5.1) and in the web application (Section 5.2).
2.3. Generating the Web Push Certificate (VAPID Key)
In Project Settings of the Firebase Console, open the Cloud Messaging tab and locate Web Push certificates in the Web configuration section.
Click Generate key pair (fig. 7). This key pair is required for the web application implementation and is commonly referred to as the VAPID key.
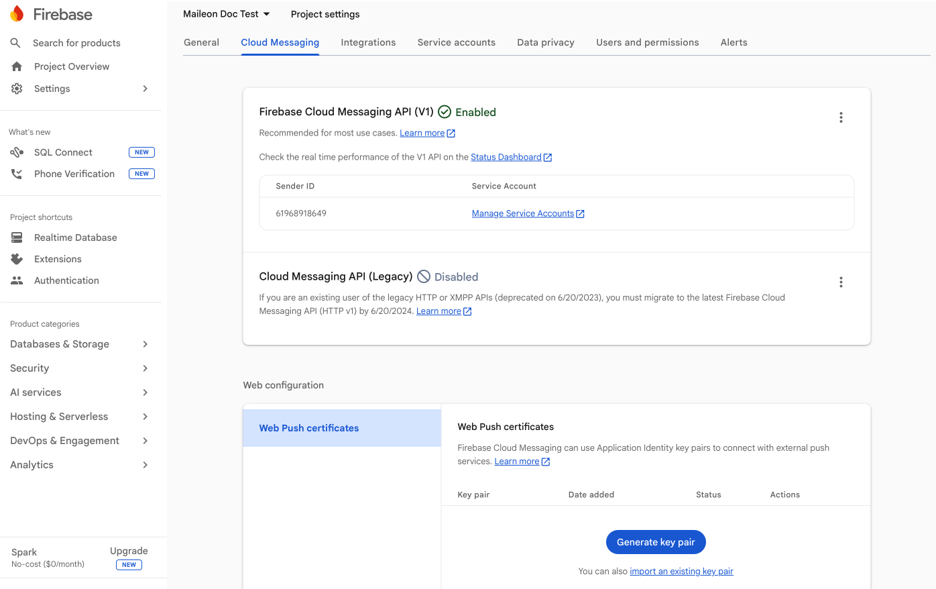
fig. 7: Generate the key pair (VAPID key) required for the web application implementation.
3. Maileon Platform Configuration
Configure the integration in Settings → Plugins → Google Firebase (fig. 8). Enter the Project ID, Client Email and Private Key from the JSON file you downloaded in Section 2.1.
Note: When entering the Private key, copy the entire string, including the header and footer lines (—–BEGIN PRIVATE KEY—– and —–END PRIVATE KEY—–).
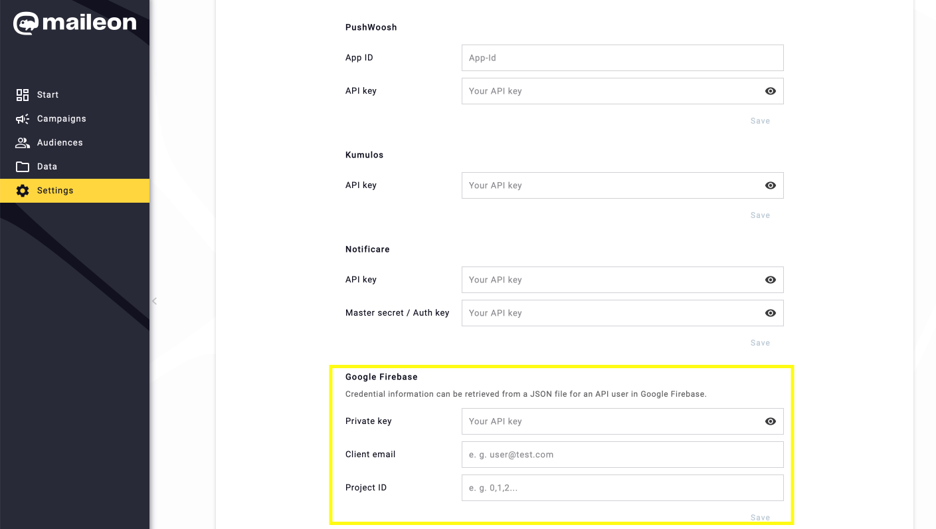
fig. 8: Configure the integration in ‘Settings’ → ‘Plugins’ → ‘Google Firebase’.
After you save, Maileon checks that the Firebase credentials are complete and valid, and shows the connection as active (fig. 9). This check does not send a test message, so an invalid project or a revoked key becomes visible only when the first notification is sent.
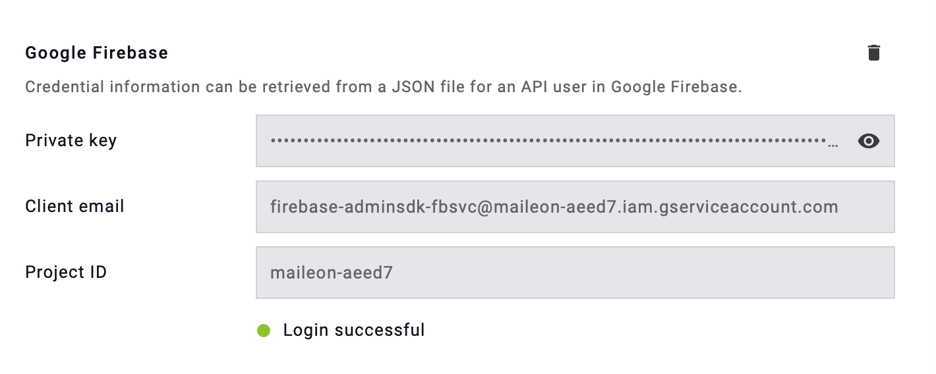
fig. 9: After verification, Firebase and Maileon are connected.
4. Contact Field and Event Creation
Create a new custom contact field to store the unique Firebase Cloud Messaging registration token (FCM registration token) for each contact. Name the field FCM_TOKEN, because the code examples in Section 5.3 use this name.
This token identifies a messaging registration for a specific app instance. It is neither a persistent user ID nor a unique identifier for an individual person.
Navigate to Audiences → Contact management → Profile data → + Add new contact field and create a new contact field of type String (shown as Text in the example) (fig. 10). Click Save.
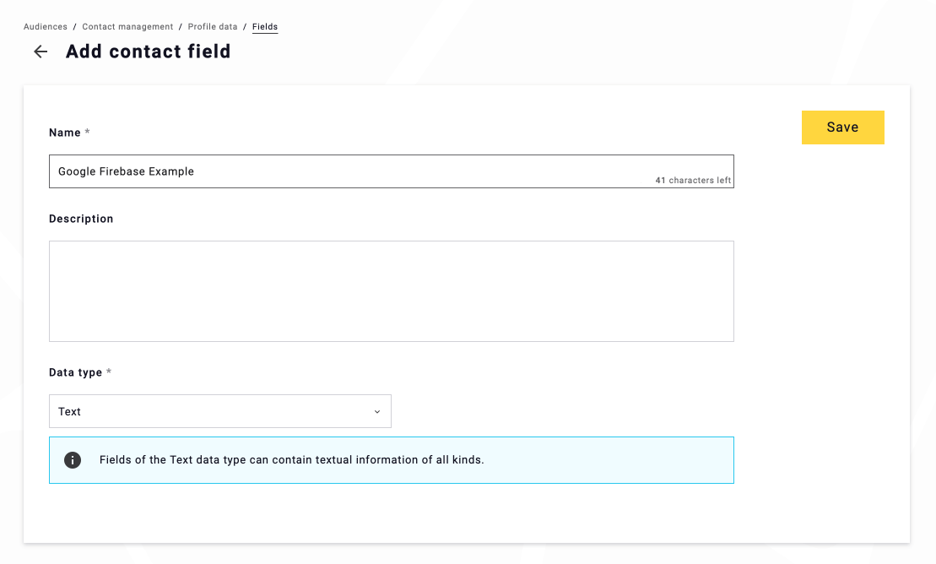
fig. 10: Create a new contact field of type String.
Note: A contact field can store only one FCM registration token, so each contact can receive push notifications on only one browser or device. Firebase Cloud Messaging supports multiple registration tokens per user, but this setup uses one token per Maileon contact.
Next, define a new Contact Event. This event will start the automation flow (see Section 6). No additional attributes are required for the standard setup (fig. 11). If you want to use event data in the push notification, for example an individual voucher code, add the corresponding attributes to the contact event (see Section 6.1). Click Save.
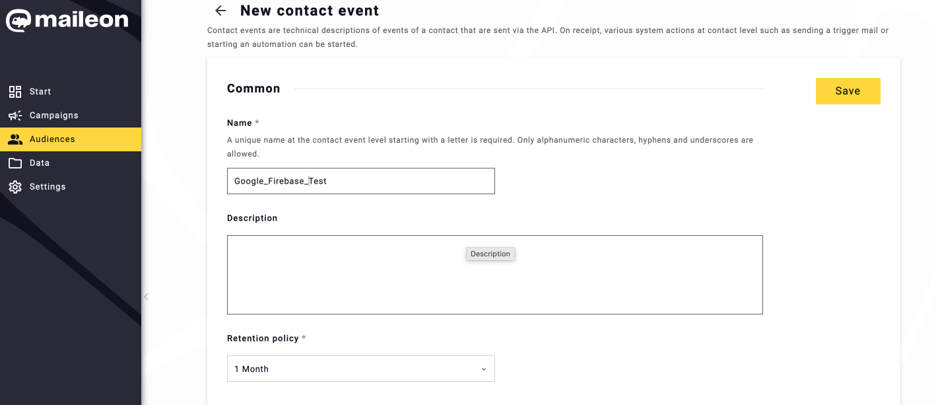
fig. 11: Define a new Contact Event with no additional attributes required for standard setup.
5. Web Application Implementation & Service Worker Setup
To collect user-specific FCM registration tokens, configure your web application to request notification permission from the browser and to retrieve the token.
Requirements:
- The website must be served over HTTPS (localhost is allowed for testing).
- The browser must support web push notifications. On iOS and iPadOS (16.4 or later), web push notifications only work if the user has added the website to the Home Screen.
5.1. Service Worker Setup
Create a service worker file to receive push messages in the background. This file must contain the public configuration of the web app registered in Section 2.2 (apiKey, authDomain, projectId, messagingSenderId and appId).
The service worker script must be structured as follows:
importScripts(‚https://www.gstatic.com/firebasejs/13.3.0/firebase-app-compat.js‘);
importScripts(‚https://www.gstatic.com/firebasejs/13.3.0/firebase-messaging-compat.js‘);
firebase.initializeApp({
apiKey: 'YOUR_API_KEY',
authDomain: 'YOUR_AUTH_DOMAIN',
projectId: 'YOUR_PROJECT_ID',
messagingSenderId: 'YOUR_MESSAGING_SENDER_ID',
appId: 'YOUR_APP_ID',
});

firebase.messaging();
Name the file firebase-messaging-sw.js. By default, Firebase looks for a service worker with this name.
Deployment requirement: Due to browser security guidelines, this .js file must be placed directly in the root directory of the web application (e.g., the /public folder), so that it is available at https:///firebase-messaging-sw.js.
Use the same version of the Firebase JavaScript SDK in the service worker and in the web application.
5.2. Token Generation and Import
Initialize Firebase in your web application with the same configuration as in the service worker (see Section 2.2). Then request the notification permission and generate the FCM registration token with the VAPID key from Section 2.3:
Note: Replace the placeholders with the values from the Firebase Console. The sample code uses Firebase SDK version 13.3.0. Test the code with your own configuration before using it in production, because behavior may differ between versions.
// Firebase SDK (compat, version 13.3.0) loaded, e.g. via script tags
const firebaseConfig = {
apiKey: 'YOUR_API_KEY',
authDomain: 'YOUR_AUTH_DOMAIN',
projectId: 'YOUR_PROJECT_ID',
messagingSenderId: 'YOUR_MESSAGING_SENDER_ID',
appId: 'YOUR_APP_ID',
};

// Prevent errors if Firebase has already been initialized by another script
if (!firebase.apps.length) {
firebase.initializeApp(firebaseConfig);
}

const messaging = firebase.messaging();

// Call this function after a user action, e.g. a button click
async function enablePushNotifications() {
const permission = await Notification.requestPermission();
if (permission !== 'granted') {
return;
}

const registration = await navigator.serviceWorker.register('/firebase-messaging-sw.js');

const token = await messaging.getToken({
vapidKey: 'YOUR_VAPID_KEY',
serviceWorkerRegistration: registration,
});

if (token) {
// Store the token in the Maileon contact field (see Section 5.3)
}
}
The browser asks the user to allow notifications. Request the permission after a user action, for example a button click, because some browsers block prompts that appear automatically on page load. If the user allows it, an FCM registration token is generated.
Once the token is generated, your backend saves it in the Maileon contact field created in Section 4 (see Section 5.3).
Keeping the token up to date: The FCM registration token can change, for example when the visitor clears the browser data. On each visit, call getToken() again if notification permission is granted, and update the contact field if the token has changed. If the visitor revokes the permission, the stored token is no longer valid.
5.3. Transferring the token to Maileon
Maileon does not collect FCM registration tokens. Your website or app collects the token and stores it in the Maileon contact field created in Section 4. Use one of these methods:
- Maileon REST API: create or update the contact and write the token to the custom field. The contact is identified by its email address or external ID.
- Contact import: a regular contact import that includes the token field.
To store the token from your backend, use the Maileon REST API. Send the token as a value of the contact field created in Section 4, using the field name in the custom_fields object. The example below creates or updates a contact identified by your external ID (YOUR_EXTERNAL_ID) and writes the token to the contact field FCM_TOKEN:
POST https://api.maileon.com/1.0/contacts/externalid/YOUR_EXTERNAL_ID
Content-Type: application/vnd.maileon.api+json
{
"email": "customer@example.com",
"custom_fields": {
"FCM_TOKEN": "THE_FCM_REGISTRATION_TOKEN"
}
}
Use your own API key for authentication, as described in the Maileon API documentation. Do not send the API key from the browser. A custom field value must not be empty or null. To clear a value, set it to an empty string („“).
Security: The browser must not call the Maileon API directly, because a Maileon API key must never be exposed in browser code. Send the token from the browser to your own backend, and let the backend call the Maileon API.
Verification: Open the contact in Maileon and check the token field, or read the contact back through the REST API with the custom field requested.
Errors: If the contact does not exist or the call fails, Maileon returns an error response. Maileon does not retry failed calls, so your backend must handle them, for example by creating the contact or retrying. Contacts with an empty token field do not receive push notifications.
6. Automation Flow Configuration
The final step is to set up the marketing automation flow.
Navigate to Campaigns → Automations and click + Create automation (fig. 12).
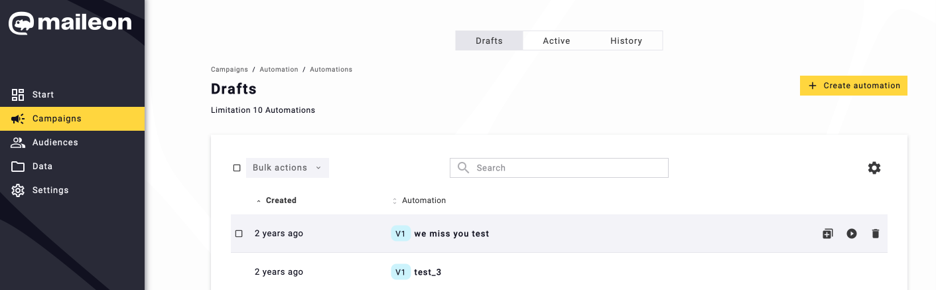
fig. 12: Start creating an automation flow after the integration is completed.
After naming the automation, select Contact event as the Start Node (fig. 13).
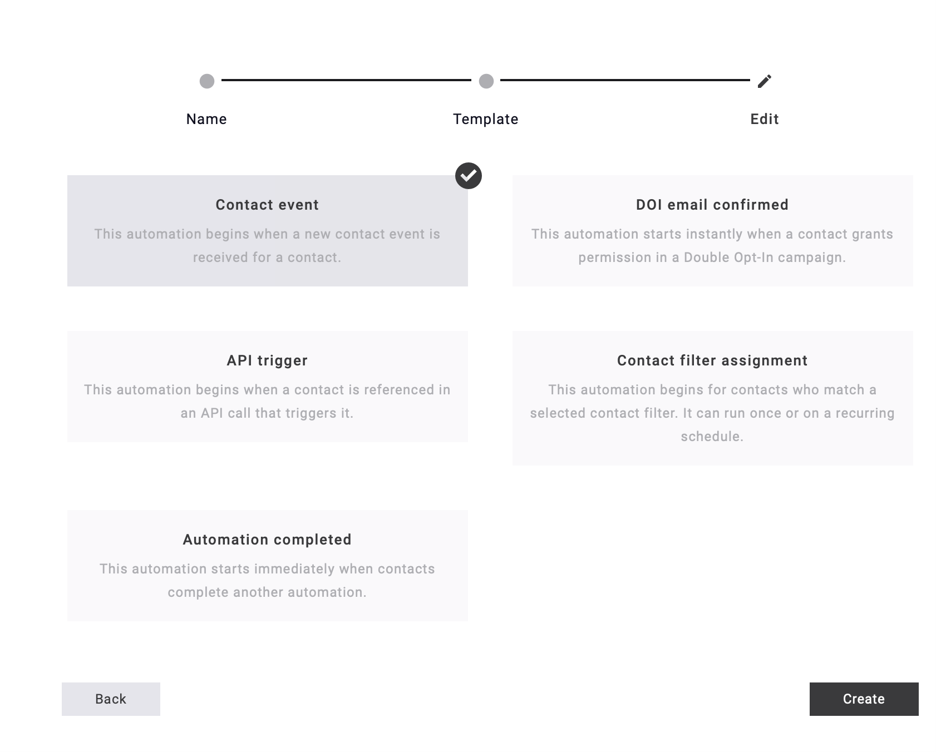
fig. 13: Start the automation with ‘Contact event’ as Start Node.
Assign the specific contact event created in Section 4. Click Apply (fig. 14).
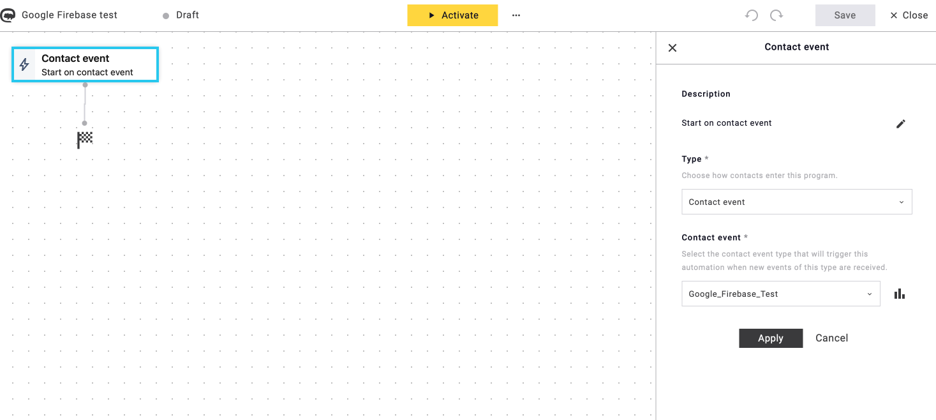
fig. 14: Assign the created contact event to the Start Node.
Select Push notifications → Google Firebase as the Action Node. Drag and drop the action node into the automation (fig. 15).
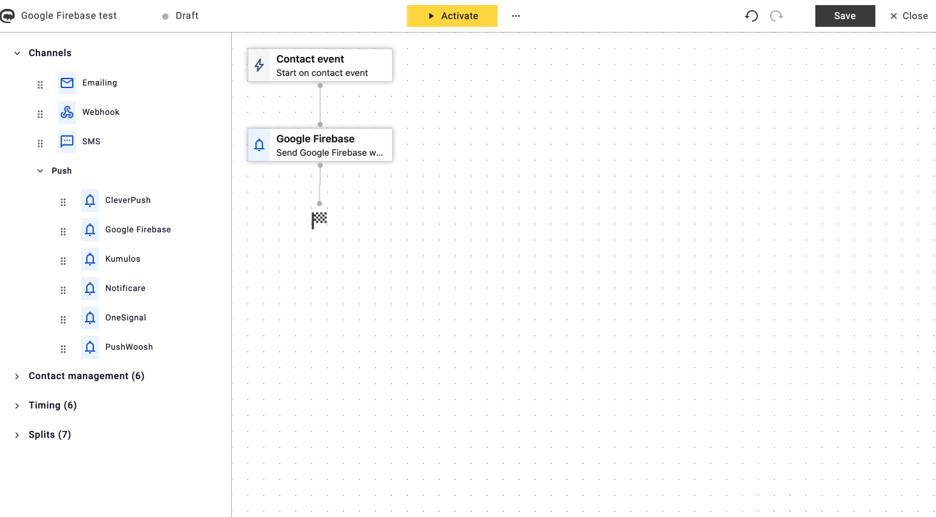
fig. 15: Select ‘Google Firebase’ under ‘Push notifications’ as the action node.
In the Google Firebase User ID field, select the contact field that contains the FCM registration token (fig. 16). Add the title, content and click URL of the push notification. These fields can be personalized by clicking the Insert placeholder { } icon (see Section 6.1). Click Apply.
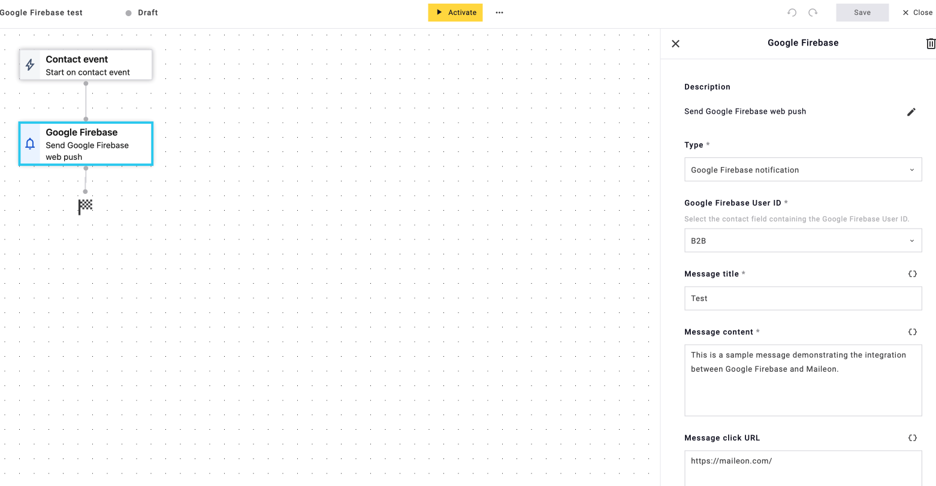
fig. 16: Set the Action Node based on the previously created contact field.
Activate the automation flow (fig. 17). Once the automation is active, send the contact event created in Section 4 for a contact to trigger the push notification. Contact events are usually sent through the Maileon REST API, or come from other sources such as imports or integrations. The token cannot be taken from a contact event; it must already be stored in the contact field.
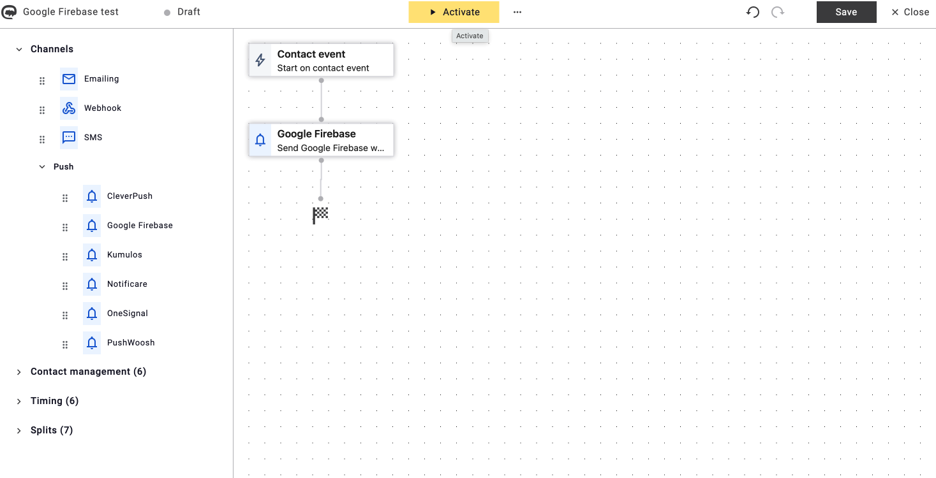
fig. 17: The workflow can be activated or extended.
6.1. Personalizing Push Notifications
The title, content and click URL of a Google Firebase push notification can be personalized by clicking the Insert placeholder { } icon (see fig. 16).
Two data sources are available:
- Contact data: standard and custom contact fields, for example the contact’s first name.
- Data of the starting contact event: attributes sent with the contact event that started the automation. For example, if the contact event contains an individual voucher code, the code can be shown in the push notification or added to the click URL (fig. 18).
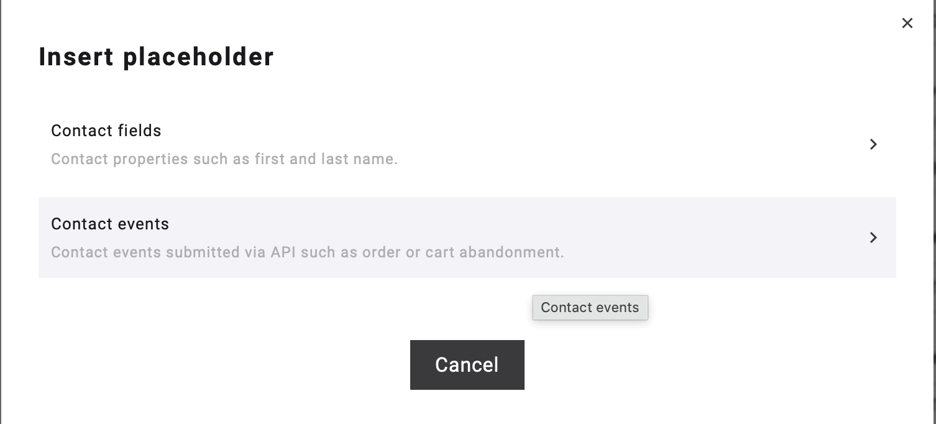
fig. 18: ‘Contact fields’ and ‘Contact events’ data can be used as placeholders.
Note: Only direct placeholder substitutions are supported. Personalization functions cannot be used in Google Firebase push notifications.
Data protection and best practices:
- Push notifications can appear on lock screens and in notification centers, where others may see them. Do not use sensitive data (e.g. health or financial information) in push notifications, and include only the data the message needs.
- Give every placeholder a fallback value. In the Insert placeholder { } window, select the contact field or event attribute, tick Use default value, and enter the text to show when the data is missing (for example, Dear customer for the first name). Alternatively, use only contact fields and event attributes that are always filled for all contacts entering the automation. A contact is skipped and no notification is sent if a placeholder cannot be filled, or if the title or content is empty after personalization. These cases are recorded as personalization errors.
- If the click URL contains personalized values, check that the resulting URL is valid and points to the intended destination.
- Before using the automation with real contacts, send test notifications to test contacts with realistic data and check the title, content and click URL (see Section 7).
7. Testing and Delivery Behavior
Before triggering full automation flows, individual test push notifications can be executed directly from the Google Firebase Console using a specific FCM registration token to verify connection validity. To do this, create a notification in the Messaging section of the Firebase Console, click Send test message and enter the FCM registration token.
Foreground visibility limitation: By default, due to browser and Firebase behavior, push notifications are not displayed while the target website is active and visible in the foreground. To verify delivery during testing, minimize the browser or switch to another tab. To display notifications in the foreground as well, handle incoming messages with messaging.onMessage() and display them in the web application, for example with the Notification API.
Testing personalized notifications: Send the contact event (for example, through the Maileon REST API) to a test contact with all attributes used in the notification. Then check that the title, content and click URL contain the expected values.
Reports and logs: In the automation report, each Google Firebase node shows the number of notifications handed over to Firebase and a list of personalization errors per contact. This number means handed over to Firebase, not delivered. Delivery results, such as invalid or expired tokens, are shown only in the Firebase Console under Cloud Messaging reports.
For any questions or requests, please contact us at support@xqueue.com.
8. Extension: Common Infrastructure Issues
If the service worker is not reachable at https:///firebase-messaging-sw.js, push notifications cannot be delivered.
In this supplement, you will find a table listing the technical factors that can affect the delivery and testing of push notifications (fig. 19).
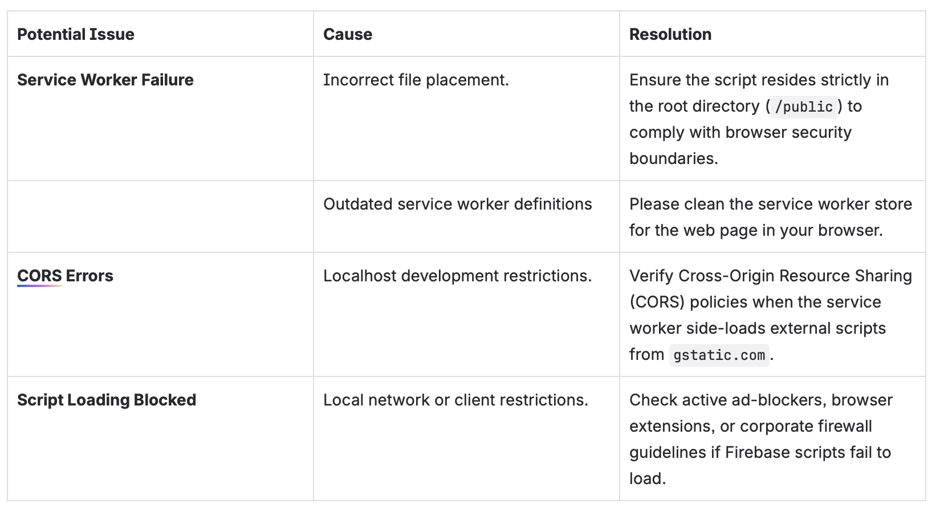
fig. 19: This table provides a general overview of the technical factors that can affect the delivery and testing of push notifications.