
Im Maileon Help-Center finden Sie umfassende Dokumentationen zu unserem System.
Beliebte Suchanfragen: Importe | Rest-API | Integrationen | SMS
-
Maileon Anleitungen
-
-
-
-
- 1. Basiseinstellungen
- 2. Template Editor2.0
- 3. Inhalt im Editor2.0 bearbeiten
- 3a - Editor 2.0 - App Panel Widgets
- 3b - Accessible Tables in the WYSIWYG Editor
- 3b - Barrierefreie Tabellen im WYSIWYG Editor (DE)
- 3d - SmartContent - Shopware 6 (DE)
- 3e - SmartContent - Shopware 6 (EN)
- 3f - Addition of Anchor-Links
- 4. Verteilerliste auswählen
- 5. Qualitätssicherung
- 6. Newsletter-Versand
-
- Bald verfügbar
-
-
-
-
- Bald verfügbar
-
FAQs
-
Grundlagen
-
Für Entwickler
-
-
- Adding Unsubscription Reason to Already Unsubscribed Contact
- Contacts
- Count Active Contacts By Filter ID
- Count Contacts By Filter ID
- Create Contact
- Create Contact (JSON)
- Create Contact by External ID
- Create Contact by External ID (JSON)
- Create Contact Preference
- Create Contact Preference Category
- Create Custom Field
- Custom Contact Fields
- Delete All Contacts
- Delete Contact By Email
- Delete Contact By Maileon ID
- Delete Contact Preference
- Delete Contact Preference Category
- Delete Contacts By External ID
- Delete Custom Field
- Delete Custom Field Values
- Delete Standard Field Values
- Delete Unsubscription-Marker
- Get Blocked Contacts
- Get Contact By Email
- Get Contact By Maileon ID
- Get Contact Preference
- Get Contact Preference Categories
- Get Contact Preference Category by Name
- Get Contacts
- Get Contacts By Email
- Get Contacts By External Id
- Get Contacts By Filter Id
- Get Count Contacts
- Get Custom Fields
- Get Preferences of Contact Preferences Category
- Get Unsubscription-Marker
- Rename Custom Field
- Set Unsubscription-Marker
- Standard Contact Fields
- Synchronize Contacts
- Synchronize Contacts Error Codes
- Unsubscribe Contact By Maileon Id
- Unsubscribe Contacts By Email
- Unsubscribe Contacts by External Id
- Update Contact By Email
- Update Contact By External ID
- Update Contact By Maileon ID
- Update Contact Preference
- Update Contact Preference Category
- Alle Artikel anzeigen ( 34 ) Artikel zusammenklappen
-
- Get Blocks
- Get Bounces
- Get Clicks
- Get Conversions
- Get Filtered Contacts
- Get Mailing Summaries
- Get Opens
- Get Recipients
- Get Replies
- Get Revenue
- Get Subscribers
- Get Unique Bounces
- Get Unique Clicks
- Get Unique Conversions
- Get Unique Opens
- Get Unsubscription Reasons
- Get Unsubscriptions
- Social Networks List
- Alle Artikel anzeigen ( 3 ) Artikel zusammenklappen
-
- Add Mailing Blacklist to Mailing
- Copy Mailing
- Create Dispatching
- Create Mailing
- Delete Mailing
- Delete Mailing Blacklist from Mailing
- Delete Trigger
- Get CMS2 Mailing As Zip
- Get Dispatching
- Get limit on number of contacts
- Get Mailing Archive URL
- Get Mailing Blacklists for Mailing
- Get Mailing ID By Name
- Get Mailing Report URL
- Get Mailing Thumbnail
- Get Mailing Thumbnail URL
- Get Mailings By Creator Name
- Get Mailings By Keywords
- Get Mailings By Schedule Time
- Get Mailings By States
- Get Mailings By Subject
- Get Mailings By Types
- Get Preview
- Get Preview Text
- Get Template
- Get Templates for CMS2
- Get The Reply-To Address
- Mailing – Add Attachment
- Mailing – Add Custom Mailing Properties
- Mailing – Copy Attachments
- Mailing – Create Schedule
- Mailing – Delete Attachment
- Mailing – Delete Attachments
- Mailing – Delete Schedule
- Mailing – Disable QoS Checks
- Mailing – Enable Target Group Update
- Mailing – Fill RSS SmartMailing Tags
- Mailing – Get “Ignore Permission” State
- Mailing – Get “Post Sendout Cleanup” State
- Mailing – Get Archival Duration
- Mailing – Get Attachment
- Mailing – Get Attachments
- Mailing – Get Count Attachments
- Mailing – Get DOI Mailing Key
- Mailing – Get HTML
- Mailing – Get List of Custom Mailing Properties
- Mailing – Get Locale
- Mailing – Get Mailing Domain
- Mailing – Get Max Attachment Size
- Mailing – Get Max Content Size
- Mailing – Get Name
- Mailing – Get Recipient Alias
- Mailing – Get result for Link Quality Check
- Mailing – Get result for Message Size Quality Check
- Mailing – Get result for Personalization Quality Check
- Mailing – Get result for Spam Quality Check
- Mailing – Get results for Approval Sendout Quality Check
- Mailing – Get results for Bounce Quality Check
- Mailing – Get results for Display Quality Check
- Mailing – Get results for Image Quality Check
- Mailing – Get results for Test Mail Sendout
- Mailing – Get Schedule
- Mailing – Get Sender Address
- Mailing – Get Sender Alias
- Mailing – Get Speed Level
- Mailing – Get State
- Mailing – Get Subject
- Mailing – Get Tags
- Mailing – Get Target Group Id
- Mailing – Get Target Group Update status
- Mailing – Get Text
- Mailing – Get Tracking Duration
- Mailing – Get Tracking Strategy
- Mailing – Get Type
- Mailing – Is Sealed
- Mailing – Remove Custom Mailing Property
- Mailing – Send Approval Mail to Targetgroup
- Mailing – Send Now
- Mailing – Send Testmail to Single Emailaddress
- Mailing – Send Testmail to Targetgroup
- Mailing – Set “Ignore Permission” State
- Mailing – Set “Post Sendout Cleanup” State
- Mailing – Set DOI Mailing Key
- Mailing – Set Html
- Mailing – Set Locale
- Mailing – Set Name
- Mailing – Set Recipient Alias
- Mailing – Set Sender Address
- Mailing – Set Sender Alias
- Mailing – Set Speed Level
- Mailing – Set Subject
- Mailing – Set Tags
- Mailing – Set Target Group Id
- Mailing – Set Text
- Mailing – Set Tracking Strategy
- Mailing – Start Bounce Quality Check
- Mailing – Start Image Quality Check
- Mailing – Start Link Quality Check
- Mailing – Start Message Size Quality Check
- Mailing – Start Personalization Quality Check
- Mailing – Start Quality Check
- Mailing – Update Custom Mailing Property
- Mailing – Update Schedule
- Reset Contents to Template
- Save CMS2 Mailing to Media Library
- Set limit on number of contacts before sending mailing
- Set Preview Text
- Set Template
- Set Template for CMS2 Mailing
- Set The Reply-To Address
- Upload CMS2 Mailing Contents
- Alle Artikel anzeigen ( 96 ) Artikel zusammenklappen
-
- Bald verfügbar
Contact Export Via FTPS Server In UI2
Contact Export Via FTPS Server In UI2
1. General information
The abbreviation FTPS stands for “File Transfer Protocol Secure.” It is a common file transfer method that allows data to be transferred quickly, easily, and securely, regardless of the operating system or connection method used. In the Maileon system, contact data can be imported and exported using either an internal or external FTPS server. Once activated and configured, this eliminates the need for manual file handling.
Increased security with FTPS: Your data is encrypted during transmission using TLS (Transport Layer Security), providing an additional layer of security.
2. Enable FTPS contact exports
To create automatic contact exports, you must first enable contact exports via FTPS in your account settings. Go to Settings > Audiences > FTPS Server (fig. 1).
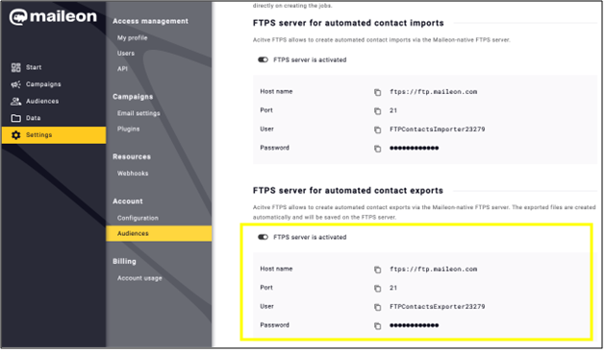
fig. 1: Activate contact exports via FTPS server in your account settings.
3. Create a new automatic contact export
Navigate to Audiences > Contact Exports > Automated contact exports and click + Add automated contact export to create a new FTPS contact export (fig. 2).

fig. 2: Navigate to ‘+Add automated contact export’ in ‘Audiences’ > ‘Contact exports’ > ‘Automated contact export’ to start a new process.
Various automated contact exports are available:
- Automated contact export
- Automated unsubscriber export
- Automated voucher export
Click Automated contact export, which enables to export a file containing a list of contacts provided on FTPS server.
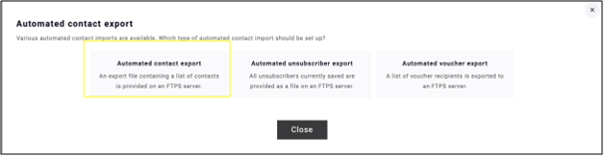
fig. 3: Click ’Automated contact export’ to export a contact list file to the FTPS server.
Decide whether to import contacts via the Maileon FTPS server or from an external FTPS server (fig. 4).

fig. 4: There are two ways to start the export process: via Maileon or via an external FTPS server.
3.1. If you choose the contact export from an external FTPS server, add the Common information, such as Label (name), Execution interval (Choose to import hourly, daily, weekly, or monthly), Day of the week and Time.
Enter the required details of the FTPS server settings, such as the URL and the Contact file path. Enter the exact file path where you will be uploading the contact file. Optionally, you can modify the User and the Password, then click Next (fig. 5).
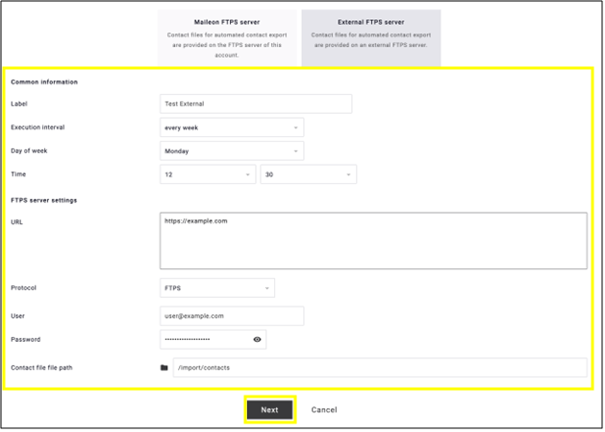
fig. 5: Enter the common information and FTPS server settings, including the contact file path, then click ‘Next’.
The rest of the process is the same as importing contacts via the Maileon server. To continue, please see the steps below.
3.2. To export contacts via Maileon FTPS server, select this option in the popup window (fig. 6).
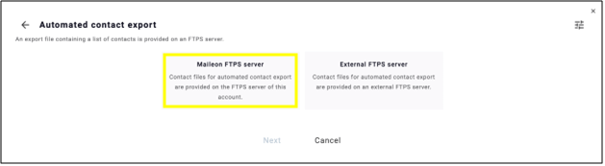
fig. 6: Select ’Maileon FTPS server’ in the popup window to export contacts via the Maileon FTPS server.
Add the Common information, such as Label (name), Execution interval (Choose to import hourly, daily, weekly, or monthly), Day of the week and Time (fig. 7). Click Next.
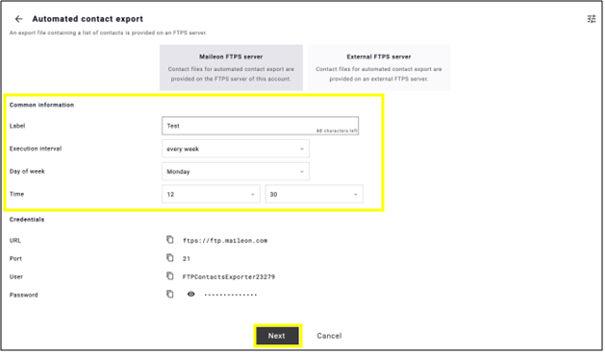
fig. 7: Enter the export label, execution interval, day, and time.
The list of contacts included in the contact export can be filtered using contact filters. These filters are updated automatically before the export file is generated.
Select the Contact filter and configure the file contents. This includes selecting the contact fields to export (e.g. address, email address), specifying your Preferences (e.g. Books – only new books), and selecting the Response information (e.g. unique opens in the last 4 weeks) (fig. 8).
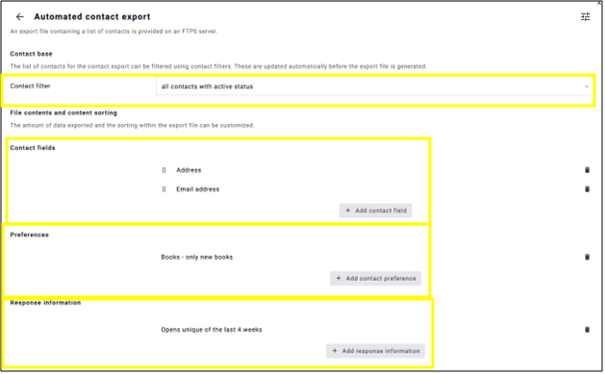
fig. 8: Filter the contacts to be exported and configure the contact fields, preferences and response information.
After selecting the File content and content sorting, set the File preview (fig. 9), where the system shows a preview of what the final export file will look like.
Here you can configure the final format of the export file before creating or running the export.

fig. 9: Configure the format of the export file in the ‘File preview’ section.
Clicking on the pencil icon you can set
- The availability of the Headline
- Charset
- Separator
- Decimals (fig. 10).
Use this step to verify how the contact data will appear in the export file before creating or running the export. The preview allows you to check a few sample rows and verify that:
- the selected fields appear in the correct order and format;
- the delimiter separates the data correctly, even if a field contains the delimiter character (e.g.: a semicolon);
- preference and response data columns are displayed correctly.
This preview serves as a final checkpoint before the export is generated or downloaded. If you notice any issues, such as columns being shifted due to an incorrect delimiter, you can return to the settings and adjust them before finalising the export.
Once you have made the changes, click Save.
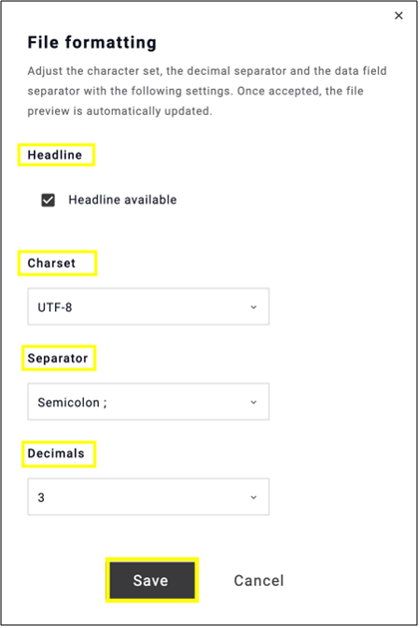
fig. 10: Set the formatting options in the ‘File formatting step’ to ensure that Maileon correctly interprets the contact file and separates the data into fields.
The process will then return to the Automated contact exports tab, where you will find the automated contact export you have created (fig. 11).
The import can be paused, resumed, or cancelled at any time using the icons displayed in the same row as the import name (triangle, square, and bin icons).
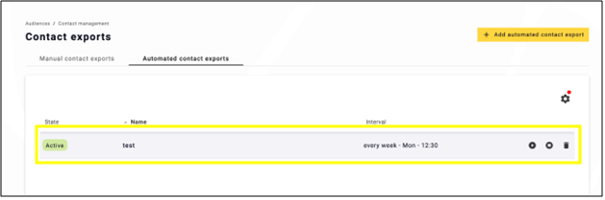
fig. 11: Find your automated import under the ‘Automated contact imports’ tab and use the icons to pause, resume, or cancel it.
Click on the name of the contact import, and under Settings tab, you can reconfigure the contact export (fig. 12). Finalise the changes by clicking Save at the bottom of the page.
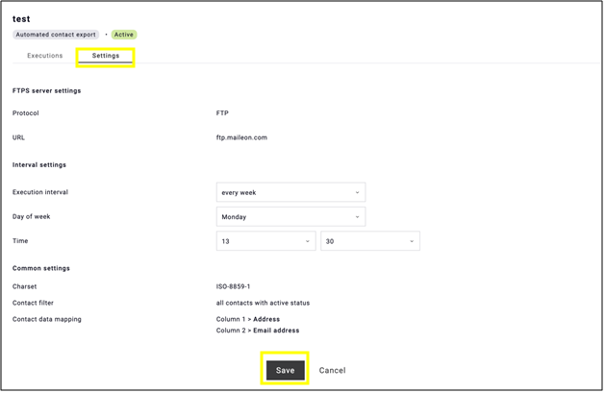
fig. 12: Click the name of the contact import and go to the ‘Settings’ tab to reconfigure the export.