
Im Maileon Help-Center finden Sie umfassende Dokumentationen zu unserem System.
Beliebte Suchanfragen: Importe | Rest-API | Integrationen | SMS
-
Maileon Anleitungen
-
-
-
-
- 1. Basiseinstellungen
- 2. Template Editor2.0
- 3. Inhalt im Editor2.0 bearbeiten
- 3a - Editor 2.0 - App Panel Widgets
- 3b - Accessible Tables in the WYSIWYG Editor
- 3b - Barrierefreie Tabellen im WYSIWYG Editor (DE)
- 3d - SmartContent - Shopware 6 (DE)
- 3e - SmartContent - Shopware 6 (EN)
- 3f - Addition of Anchor-Links
- 4. Verteilerliste auswählen
- 5. Qualitätssicherung
- 6. Newsletter-Versand
-
- Bald verfügbar
-
-
-
-
- Bald verfügbar
-
FAQs
-
Grundlagen
-
Für Entwickler
-
-
- Adding Unsubscription Reason to Already Unsubscribed Contact
- Contacts
- Count Active Contacts By Filter ID
- Count Contacts By Filter ID
- Create Contact
- Create Contact (JSON)
- Create Contact by External ID
- Create Contact by External ID (JSON)
- Create Contact Preference
- Create Contact Preference Category
- Create Custom Field
- Custom Contact Fields
- Delete All Contacts
- Delete Contact By Email
- Delete Contact By Maileon ID
- Delete Contact Preference
- Delete Contact Preference Category
- Delete Contacts By External ID
- Delete Custom Field
- Delete Custom Field Values
- Delete Standard Field Values
- Delete Unsubscription-Marker
- Get Blocked Contacts
- Get Contact By Email
- Get Contact By Maileon ID
- Get Contact Preference
- Get Contact Preference Categories
- Get Contact Preference Category by Name
- Get Contacts
- Get Contacts By Email
- Get Contacts By External Id
- Get Contacts By Filter Id
- Get Count Contacts
- Get Custom Fields
- Get Preferences of Contact Preferences Category
- Get Unsubscription-Marker
- Rename Custom Field
- Set Unsubscription-Marker
- Standard Contact Fields
- Synchronize Contacts
- Synchronize Contacts Error Codes
- Unsubscribe Contact By Maileon Id
- Unsubscribe Contacts By Email
- Unsubscribe Contacts by External Id
- Update Contact By Email
- Update Contact By External ID
- Update Contact By Maileon ID
- Update Contact Preference
- Update Contact Preference Category
- Alle Artikel anzeigen ( 34 ) Artikel zusammenklappen
-
- Get Blocks
- Get Bounces
- Get Clicks
- Get Conversions
- Get Filtered Contacts
- Get Mailing Summaries
- Get Opens
- Get Recipients
- Get Replies
- Get Revenue
- Get Subscribers
- Get Unique Bounces
- Get Unique Clicks
- Get Unique Conversions
- Get Unique Opens
- Get Unsubscription Reasons
- Get Unsubscriptions
- Social Networks List
- Alle Artikel anzeigen ( 3 ) Artikel zusammenklappen
-
- Add Mailing Blacklist to Mailing
- Copy Mailing
- Create Dispatching
- Create Mailing
- Delete Mailing
- Delete Mailing Blacklist from Mailing
- Delete Trigger
- Get CMS2 Mailing As Zip
- Get Dispatching
- Get limit on number of contacts
- Get Mailing Archive URL
- Get Mailing Blacklists for Mailing
- Get Mailing ID By Name
- Get Mailing Report URL
- Get Mailing Thumbnail
- Get Mailing Thumbnail URL
- Get Mailings By Creator Name
- Get Mailings By Keywords
- Get Mailings By Schedule Time
- Get Mailings By States
- Get Mailings By Subject
- Get Mailings By Types
- Get Preview
- Get Preview Text
- Get Template
- Get Templates for CMS2
- Get The Reply-To Address
- Mailing – Add Attachment
- Mailing – Add Custom Mailing Properties
- Mailing – Copy Attachments
- Mailing – Create Schedule
- Mailing – Delete Attachment
- Mailing – Delete Attachments
- Mailing – Delete Schedule
- Mailing – Disable QoS Checks
- Mailing – Enable Target Group Update
- Mailing – Fill RSS SmartMailing Tags
- Mailing – Get “Ignore Permission” State
- Mailing – Get “Post Sendout Cleanup” State
- Mailing – Get Archival Duration
- Mailing – Get Attachment
- Mailing – Get Attachments
- Mailing – Get Count Attachments
- Mailing – Get DOI Mailing Key
- Mailing – Get HTML
- Mailing – Get List of Custom Mailing Properties
- Mailing – Get Locale
- Mailing – Get Mailing Domain
- Mailing – Get Max Attachment Size
- Mailing – Get Max Content Size
- Mailing – Get Name
- Mailing – Get Recipient Alias
- Mailing – Get result for Link Quality Check
- Mailing – Get result for Message Size Quality Check
- Mailing – Get result for Personalization Quality Check
- Mailing – Get result for Spam Quality Check
- Mailing – Get results for Approval Sendout Quality Check
- Mailing – Get results for Bounce Quality Check
- Mailing – Get results for Display Quality Check
- Mailing – Get results for Image Quality Check
- Mailing – Get results for Test Mail Sendout
- Mailing – Get Schedule
- Mailing – Get Sender Address
- Mailing – Get Sender Alias
- Mailing – Get Speed Level
- Mailing – Get State
- Mailing – Get Subject
- Mailing – Get Tags
- Mailing – Get Target Group Id
- Mailing – Get Target Group Update status
- Mailing – Get Text
- Mailing – Get Tracking Duration
- Mailing – Get Tracking Strategy
- Mailing – Get Type
- Mailing – Is Sealed
- Mailing – Remove Custom Mailing Property
- Mailing – Send Approval Mail to Targetgroup
- Mailing – Send Now
- Mailing – Send Testmail to Single Emailaddress
- Mailing – Send Testmail to Targetgroup
- Mailing – Set “Ignore Permission” State
- Mailing – Set “Post Sendout Cleanup” State
- Mailing – Set DOI Mailing Key
- Mailing – Set Html
- Mailing – Set Locale
- Mailing – Set Name
- Mailing – Set Recipient Alias
- Mailing – Set Sender Address
- Mailing – Set Sender Alias
- Mailing – Set Speed Level
- Mailing – Set Subject
- Mailing – Set Tags
- Mailing – Set Target Group Id
- Mailing – Set Text
- Mailing – Set Tracking Strategy
- Mailing – Start Bounce Quality Check
- Mailing – Start Image Quality Check
- Mailing – Start Link Quality Check
- Mailing – Start Message Size Quality Check
- Mailing – Start Personalization Quality Check
- Mailing – Start Quality Check
- Mailing – Update Custom Mailing Property
- Mailing – Update Schedule
- Reset Contents to Template
- Save CMS2 Mailing to Media Library
- Set limit on number of contacts before sending mailing
- Set Preview Text
- Set Template
- Set Template for CMS2 Mailing
- Set The Reply-To Address
- Upload CMS2 Mailing Contents
- Alle Artikel anzeigen ( 96 ) Artikel zusammenklappen
-
- Bald verfügbar
Subdomain Configuration (deutsch)
Häufig gestellte Fragen (FAQ) zur Subdomain-Konfiguration
In diesem Bereich finden Sie Antworten auf die am häufigsten gestellten Fragen zur Konfiguration von Subdomains. Wir freuen uns über Ihr Feedback, um diese Ressource kontinuierlich zu verbessern und zu erweitern.
Was ist eine Subdomain?
In der Hierarchie des Domain Name Systems (DNS) ist eine Subdomain eine Erweiterung einer primären (Haupt-)Domain. Sie wird erstellt, indem der Hauptdomain ein Präfix hinzugefügt wird, getrennt durch einen Punkt (z. B. shop.beispiel.de).
Subdomains ermöglichen es Ihnen, Webinhalte basierend auf spezifischen Zwecken zu organisieren und zu trennen – etwa für einen Blog, einen Online-Shop oder einen Support-Bereich. Für spezialisierte Dienste wie den Versand von High-Volume-Newslettern ist die Verwendung einer Subdomain oft technisch zwingend erforderlich.
Weitere Informationen finden Sie in dieser Ressource: Wikipedia-Eintrag zu Subdomains
Kann ich meine Hauptdomain für den Versand verwenden?
Nein, im Allgemeinen ist dies nicht möglich. Wenn Sie ausschließlich Ihre Hauptdomain (= Top-Level-Domain) für den Versand nutzen, kann dies dazu führen, dass Ihre Webseite nicht mehr erreichbar ist und Sie keine E-Mails mehr empfangen können, die an Adressen mit dieser Endung gesendet werden.
Eine reguläre Hauptdomain kann nur dann verwendet werden, wenn sie exklusiv für MAILEON reserviert ist. In diesem Fall würde dennoch eine spezifische Subdomain für die E-Mail-Marketing-Plattform eingerichtet werden.
Wie ist eine Subdomain strukturiert?
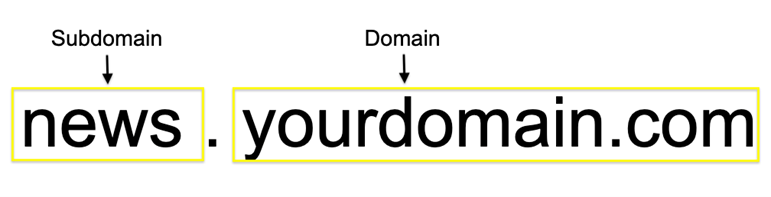
Das Subdomain-Präfix wird vor den Namen der Hauptdomain gesetzt. Zum Beispiel:
- Hauptdomain: google.com
- Subdomain: maps.google.com
In diesem Fall ist „maps“ die Subdomain, die Nutzer gezielt zum Kartendienst leitet, während sie gleichzeitig Teil der übergeordneten Markendomain bleibt.
Wie überprüfe ich, ob meine Subdomain korrekt eingerichtet ist?
Sie können Ihre Einstellungen ganz einfach mit dem MAILEON Domain-Check-Tool überprüfen. Geben Sie dort einfach die Subdomain ein, die Sie mit Ihrem Konto verknüpfen möchten.
Hinweis: Falls das Tool Fehler anzeigt, wenden Sie sich bitte an Ihre IT-Abteilung oder Ihren Web-Administrator. Da die DNS-Einstellungen auf Ihrer Seite verwaltet werden, kann XQueue diese Konfigurationen nicht vornehmen oder direkten technischen Support für Ihre interne DNS-Verwaltung leisten.
Wen muss ich kontaktieren, um die Subdomain einzurichten?
Bitte wenden Sie sich an Ihren internen IT-Administrator oder Ihren Webhosting-Anbieter. Diese verwalten Ihre Domain-Einträge und verfügen über den erforderlichen Zugriff, um die notwendigen DNS-Records zu erstellen.
Ist meine Subdomain sofort aktiv und einsatzbereit?
Nein, es gibt eine technisch bedingte Verzögerung:
- DNS-Propagierung: Es dauert in der Regel bis zu 48 Stunden, bis DNS-Änderungen weltweit wirksam werden und von MAILEON erkannt werden.
- SSL-Verschlüsselung: Für eine sichere Kommunikation ist ein SSL-Zertifikat (z. B. via Let’s Encrypt) erforderlich, das erst nach Verifizierung des DNS-Setups ausgestellt wird.
Hinweis: Wenn Sie sofort ein Mailing versenden müssen, können Sie zunächst eine Shared Subdomain von XQueue nutzen und später auf Ihre eigene Subdomain umsteigen.