
Im Maileon Help-Center finden Sie umfassende Dokumentationen zu unserem System.
Beliebte Suchanfragen: Importe | Rest-API | Integrationen | SMS
-
Maileon Anleitungen
-
-
-
-
- 1. Basiseinstellungen
- 2. Template Editor2.0
- 3. Inhalt im Editor2.0 bearbeiten
- 3a - Editor 2.0 - App Panel Widgets
- 3b - Accessible Tables in the WYSIWYG Editor
- 3b - Barrierefreie Tabellen im WYSIWYG Editor (DE)
- 3d - SmartContent - Shopware 6 (DE)
- 3e - SmartContent - Shopware 6 (EN)
- 3f - Addition of Anchor-Links
- 4. Verteilerliste auswählen
- 5. Qualitätssicherung
- 6. Newsletter-Versand
-
- Bald verfügbar
-
-
-
-
- Bald verfügbar
-
FAQs
-
Grundlagen
-
Für Entwickler
-
-
- Adding Unsubscription Reason to Already Unsubscribed Contact
- Contacts
- Count Active Contacts By Filter ID
- Count Contacts By Filter ID
- Create Contact
- Create Contact (JSON)
- Create Contact by External ID
- Create Contact by External ID (JSON)
- Create Contact Preference
- Create Contact Preference Category
- Create Custom Field
- Custom Contact Fields
- Delete All Contacts
- Delete Contact By Email
- Delete Contact By Maileon ID
- Delete Contact Preference
- Delete Contact Preference Category
- Delete Contacts By External ID
- Delete Custom Field
- Delete Custom Field Values
- Delete Standard Field Values
- Delete Unsubscription-Marker
- Get Blocked Contacts
- Get Contact By Email
- Get Contact By Maileon ID
- Get Contact Preference
- Get Contact Preference Categories
- Get Contact Preference Category by Name
- Get Contacts
- Get Contacts By Email
- Get Contacts By External Id
- Get Contacts By Filter Id
- Get Count Contacts
- Get Custom Fields
- Get Preferences of Contact Preferences Category
- Get Unsubscription-Marker
- Rename Custom Field
- Set Unsubscription-Marker
- Standard Contact Fields
- Synchronize Contacts
- Synchronize Contacts Error Codes
- Unsubscribe Contact By Maileon Id
- Unsubscribe Contacts By Email
- Unsubscribe Contacts by External Id
- Update Contact By Email
- Update Contact By External ID
- Update Contact By Maileon ID
- Update Contact Preference
- Update Contact Preference Category
- Alle Artikel anzeigen ( 34 ) Artikel zusammenklappen
-
- Get Blocks
- Get Bounces
- Get Clicks
- Get Conversions
- Get Filtered Contacts
- Get Mailing Summaries
- Get Opens
- Get Recipients
- Get Replies
- Get Revenue
- Get Subscribers
- Get Unique Bounces
- Get Unique Clicks
- Get Unique Conversions
- Get Unique Opens
- Get Unsubscription Reasons
- Get Unsubscriptions
- Social Networks List
- Alle Artikel anzeigen ( 3 ) Artikel zusammenklappen
-
- Add Mailing Blacklist to Mailing
- Copy Mailing
- Create Dispatching
- Create Mailing
- Delete Mailing
- Delete Mailing Blacklist from Mailing
- Delete Trigger
- Get CMS2 Mailing As Zip
- Get Dispatching
- Get limit on number of contacts
- Get Mailing Archive URL
- Get Mailing Blacklists for Mailing
- Get Mailing ID By Name
- Get Mailing Report URL
- Get Mailing Thumbnail
- Get Mailing Thumbnail URL
- Get Mailings By Creator Name
- Get Mailings By Keywords
- Get Mailings By Schedule Time
- Get Mailings By States
- Get Mailings By Subject
- Get Mailings By Types
- Get Preview
- Get Preview Text
- Get Template
- Get Templates for CMS2
- Get The Reply-To Address
- Mailing – Add Attachment
- Mailing – Add Custom Mailing Properties
- Mailing – Copy Attachments
- Mailing – Create Schedule
- Mailing – Delete Attachment
- Mailing – Delete Attachments
- Mailing – Delete Schedule
- Mailing – Disable QoS Checks
- Mailing – Enable Target Group Update
- Mailing – Fill RSS SmartMailing Tags
- Mailing – Get “Ignore Permission” State
- Mailing – Get “Post Sendout Cleanup” State
- Mailing – Get Archival Duration
- Mailing – Get Attachment
- Mailing – Get Attachments
- Mailing – Get Count Attachments
- Mailing – Get DOI Mailing Key
- Mailing – Get HTML
- Mailing – Get List of Custom Mailing Properties
- Mailing – Get Locale
- Mailing – Get Mailing Domain
- Mailing – Get Max Attachment Size
- Mailing – Get Max Content Size
- Mailing – Get Name
- Mailing – Get Recipient Alias
- Mailing – Get result for Link Quality Check
- Mailing – Get result for Message Size Quality Check
- Mailing – Get result for Personalization Quality Check
- Mailing – Get result for Spam Quality Check
- Mailing – Get results for Approval Sendout Quality Check
- Mailing – Get results for Bounce Quality Check
- Mailing – Get results for Display Quality Check
- Mailing – Get results for Image Quality Check
- Mailing – Get results for Test Mail Sendout
- Mailing – Get Schedule
- Mailing – Get Sender Address
- Mailing – Get Sender Alias
- Mailing – Get Speed Level
- Mailing – Get State
- Mailing – Get Subject
- Mailing – Get Tags
- Mailing – Get Target Group Id
- Mailing – Get Target Group Update status
- Mailing – Get Text
- Mailing – Get Tracking Duration
- Mailing – Get Tracking Strategy
- Mailing – Get Type
- Mailing – Is Sealed
- Mailing – Remove Custom Mailing Property
- Mailing – Send Approval Mail to Targetgroup
- Mailing – Send Now
- Mailing – Send Testmail to Single Emailaddress
- Mailing – Send Testmail to Targetgroup
- Mailing – Set “Ignore Permission” State
- Mailing – Set “Post Sendout Cleanup” State
- Mailing – Set DOI Mailing Key
- Mailing – Set Html
- Mailing – Set Locale
- Mailing – Set Name
- Mailing – Set Recipient Alias
- Mailing – Set Sender Address
- Mailing – Set Sender Alias
- Mailing – Set Speed Level
- Mailing – Set Subject
- Mailing – Set Tags
- Mailing – Set Target Group Id
- Mailing – Set Text
- Mailing – Set Tracking Strategy
- Mailing – Start Bounce Quality Check
- Mailing – Start Image Quality Check
- Mailing – Start Link Quality Check
- Mailing – Start Message Size Quality Check
- Mailing – Start Personalization Quality Check
- Mailing – Start Quality Check
- Mailing – Update Custom Mailing Property
- Mailing – Update Schedule
- Reset Contents to Template
- Save CMS2 Mailing to Media Library
- Set limit on number of contacts before sending mailing
- Set Preview Text
- Set Template
- Set Template for CMS2 Mailing
- Set The Reply-To Address
- Upload CMS2 Mailing Contents
- Alle Artikel anzeigen ( 96 ) Artikel zusammenklappen
-
- Bald verfügbar
3. Test Lists
Test Lists in UI1
Test lists are used to test emailings before sending them to the full recipient list.
To create a test list, go to Lists and Contacts → Target groups → Tests Lists and click create test list (fig. 1).
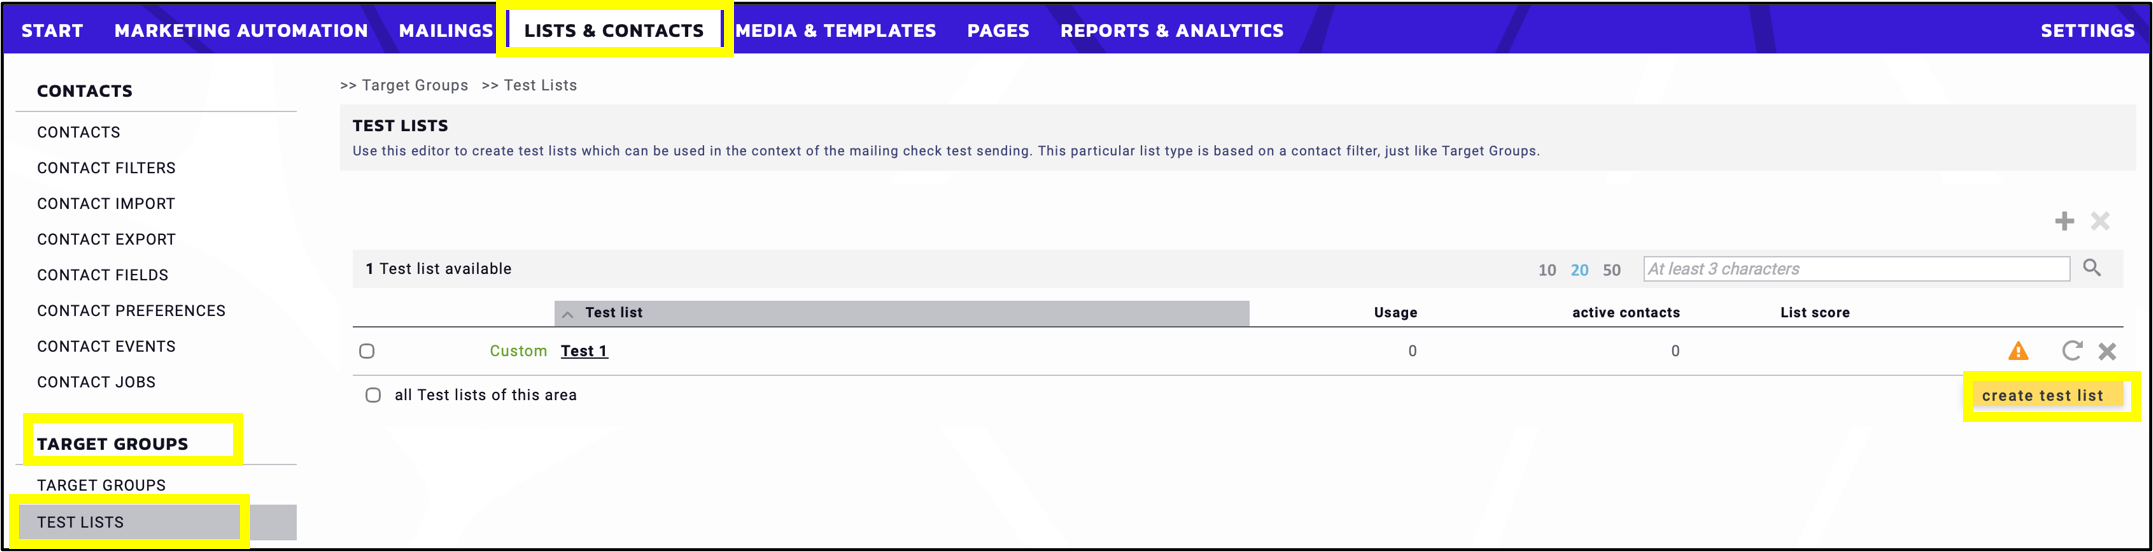
fig. 1: To create a test list click create ‘Test list’ in ‘Contacts’ → ‘Target groups’ → ‘Tests Lists’.
Add a description and choose the contact filter (fig. 2).
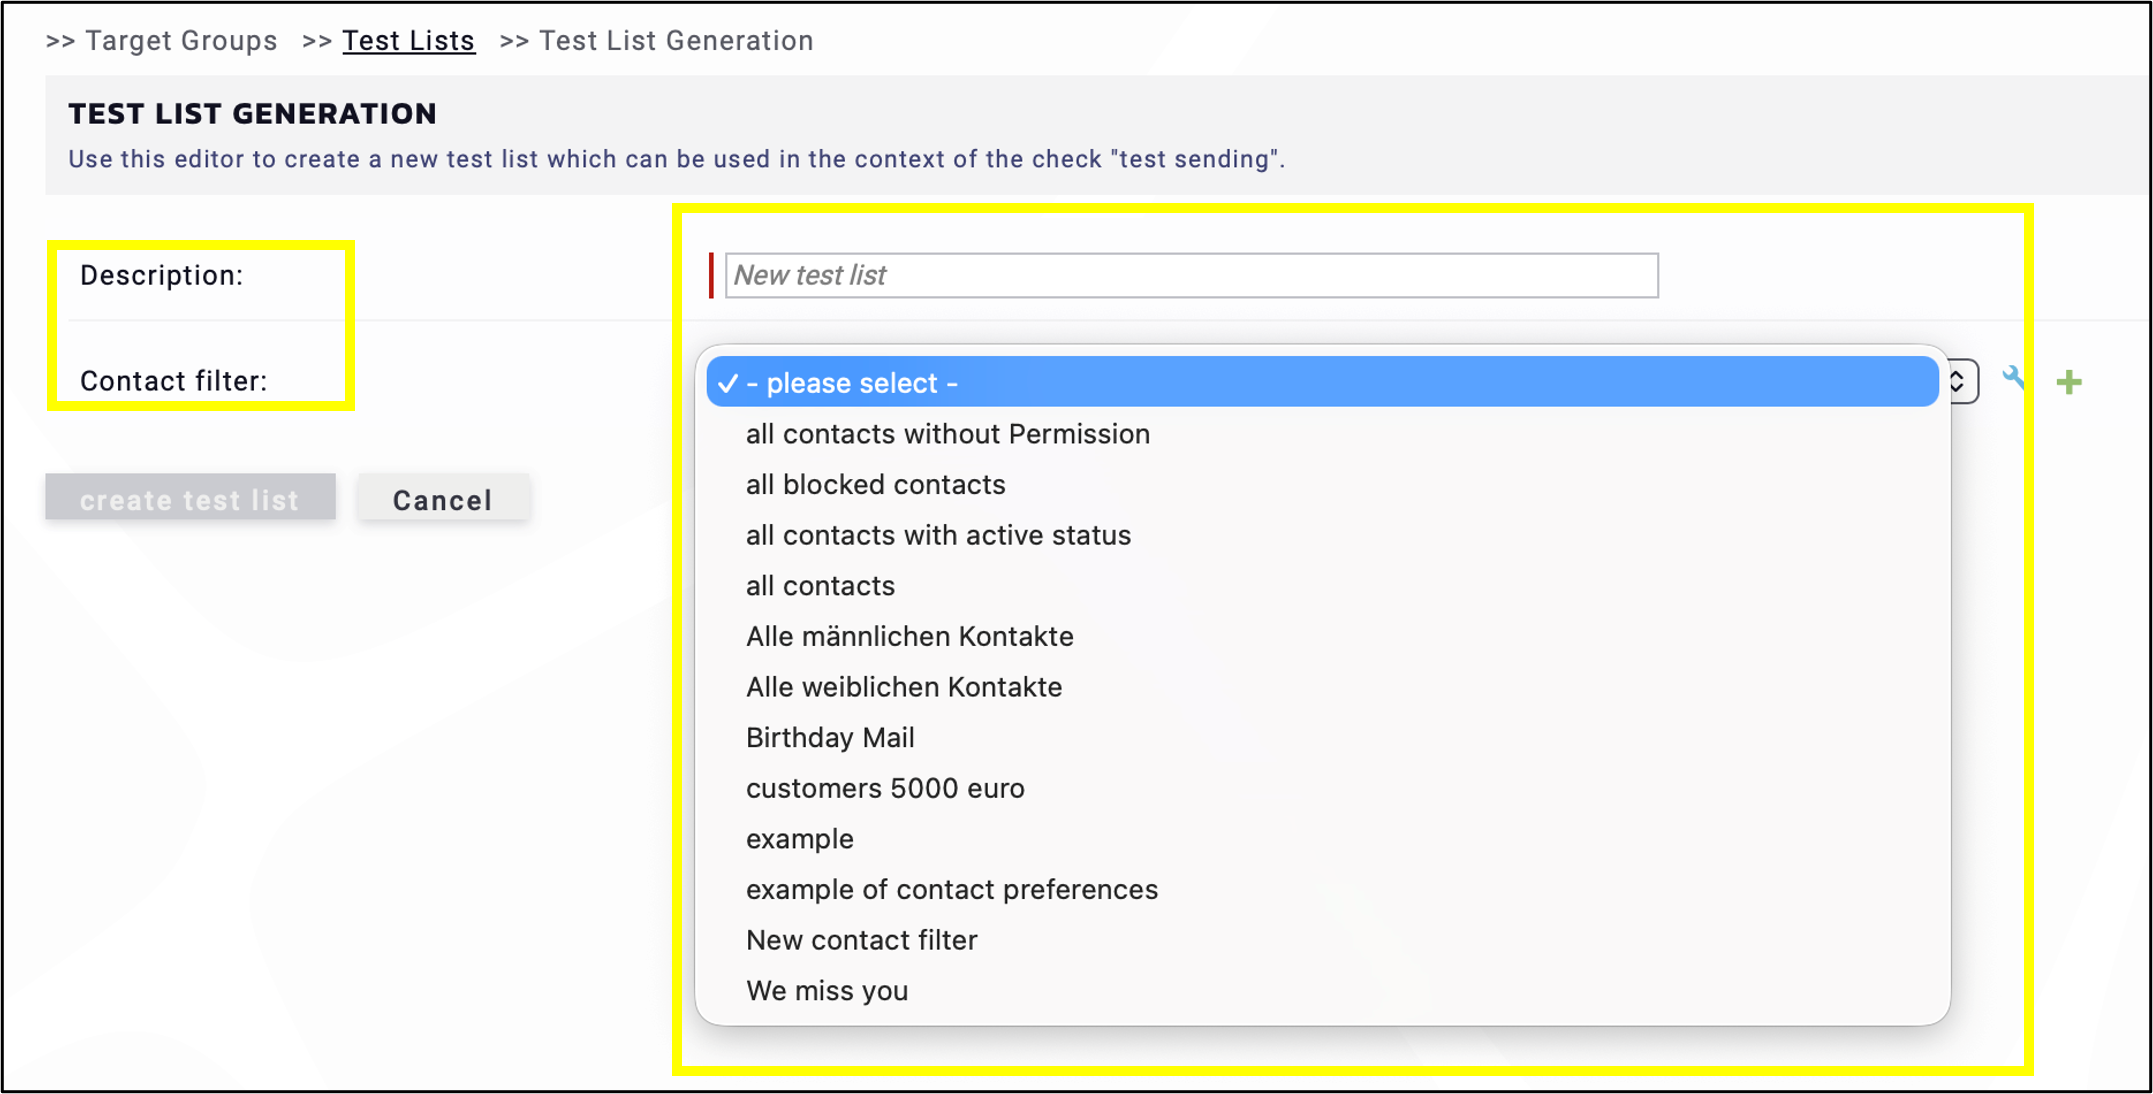
fig. 2: Add a description and choose/create a contact filter.
If no contact filter exists yet, create one by clicking the green plus icon (fig 3).
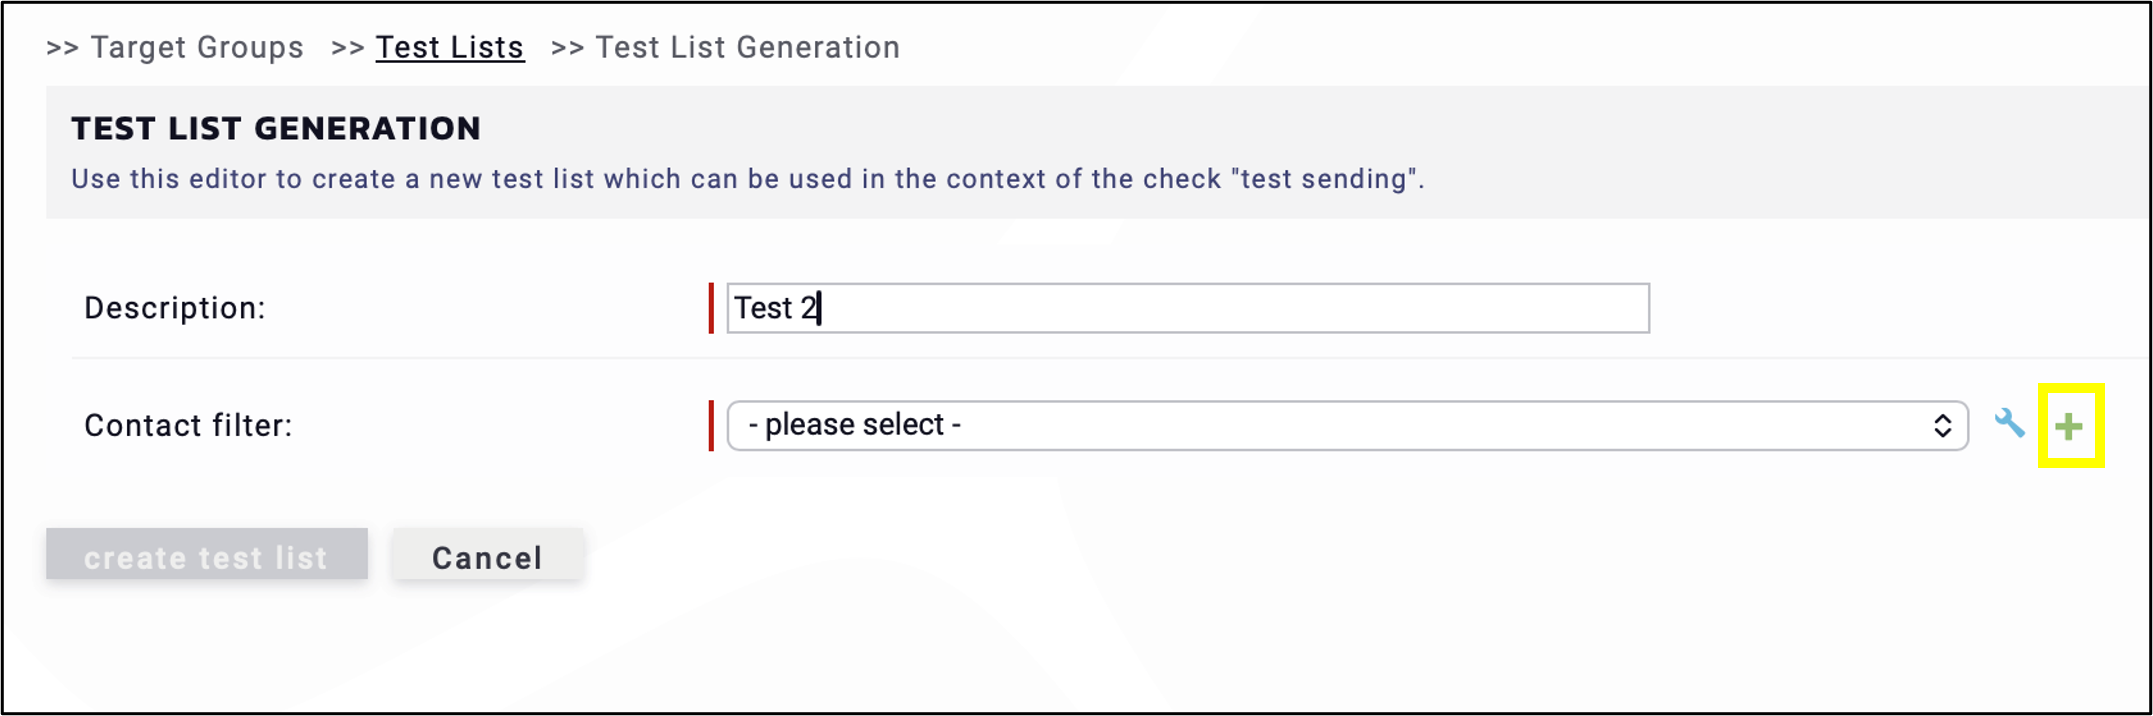
fig. 3: Start creating a contact filter by clicking on the plus icon.
Add the description of the contact filter and click Add new filter (fig. 4).
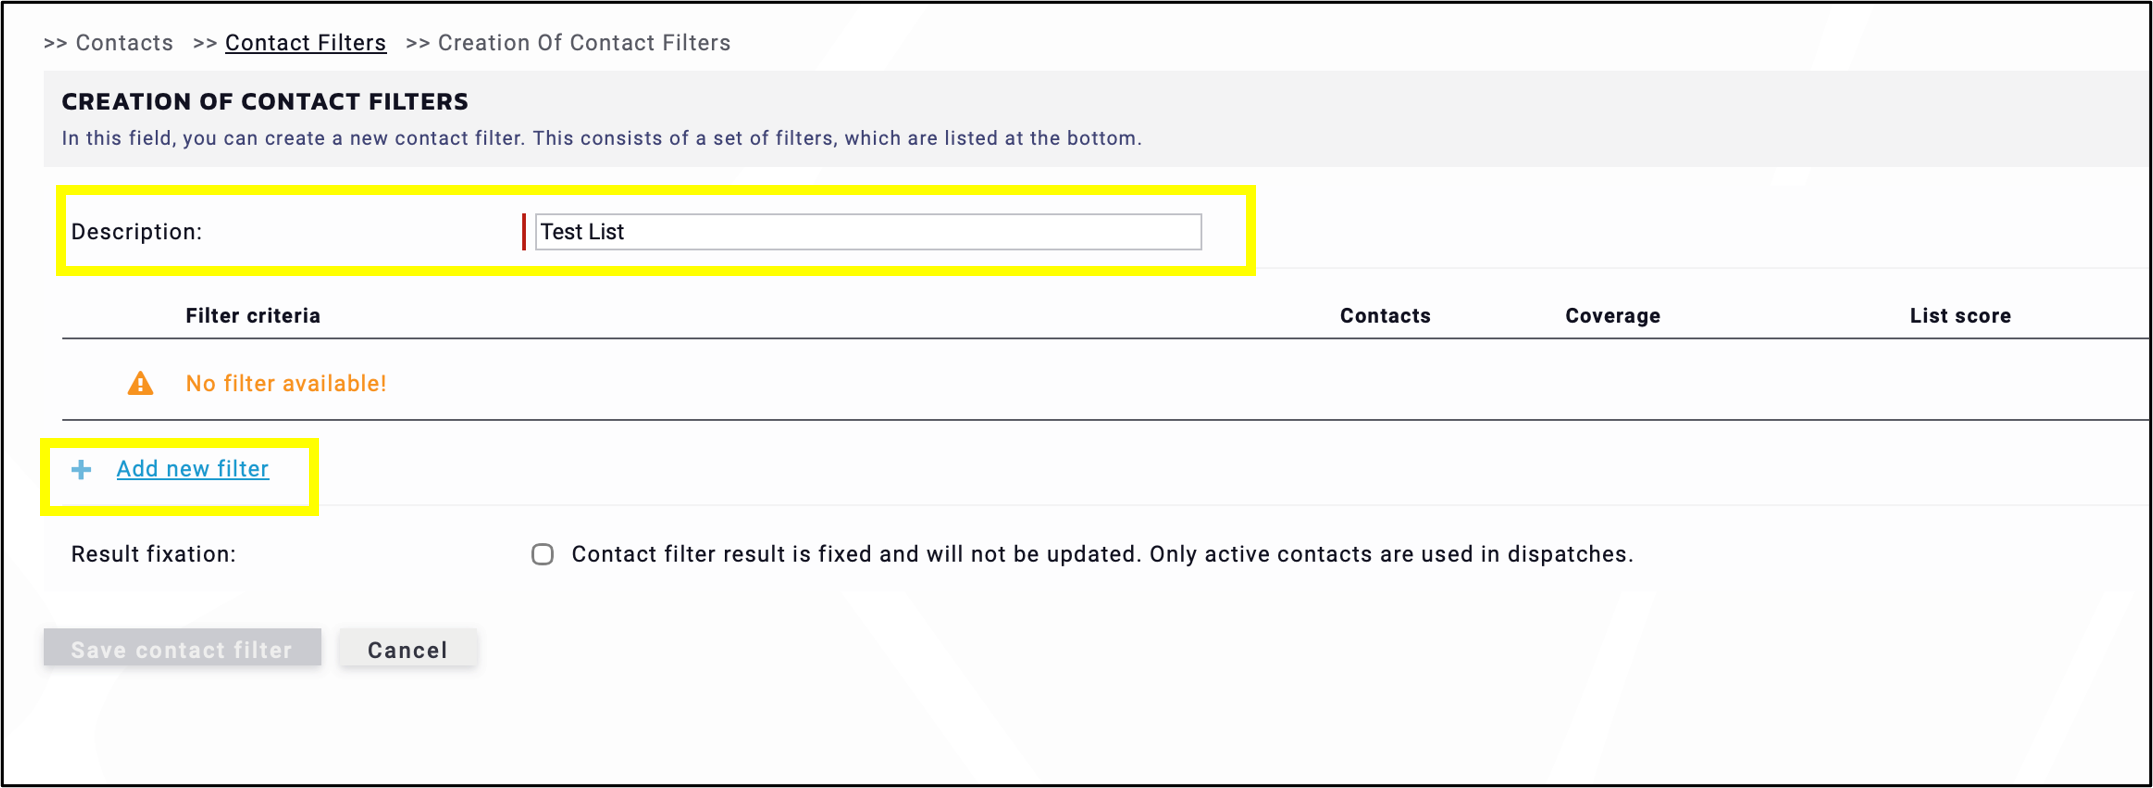
fig. 4: Add a description of the contact filter and click ‘Add new filter’.
Contact Filter Setup
In the criterion editor (fig. 5):
- Starting number: 0
- Set operation: add contacts
- Basis of Selection: contact field value
- Criterion: email address
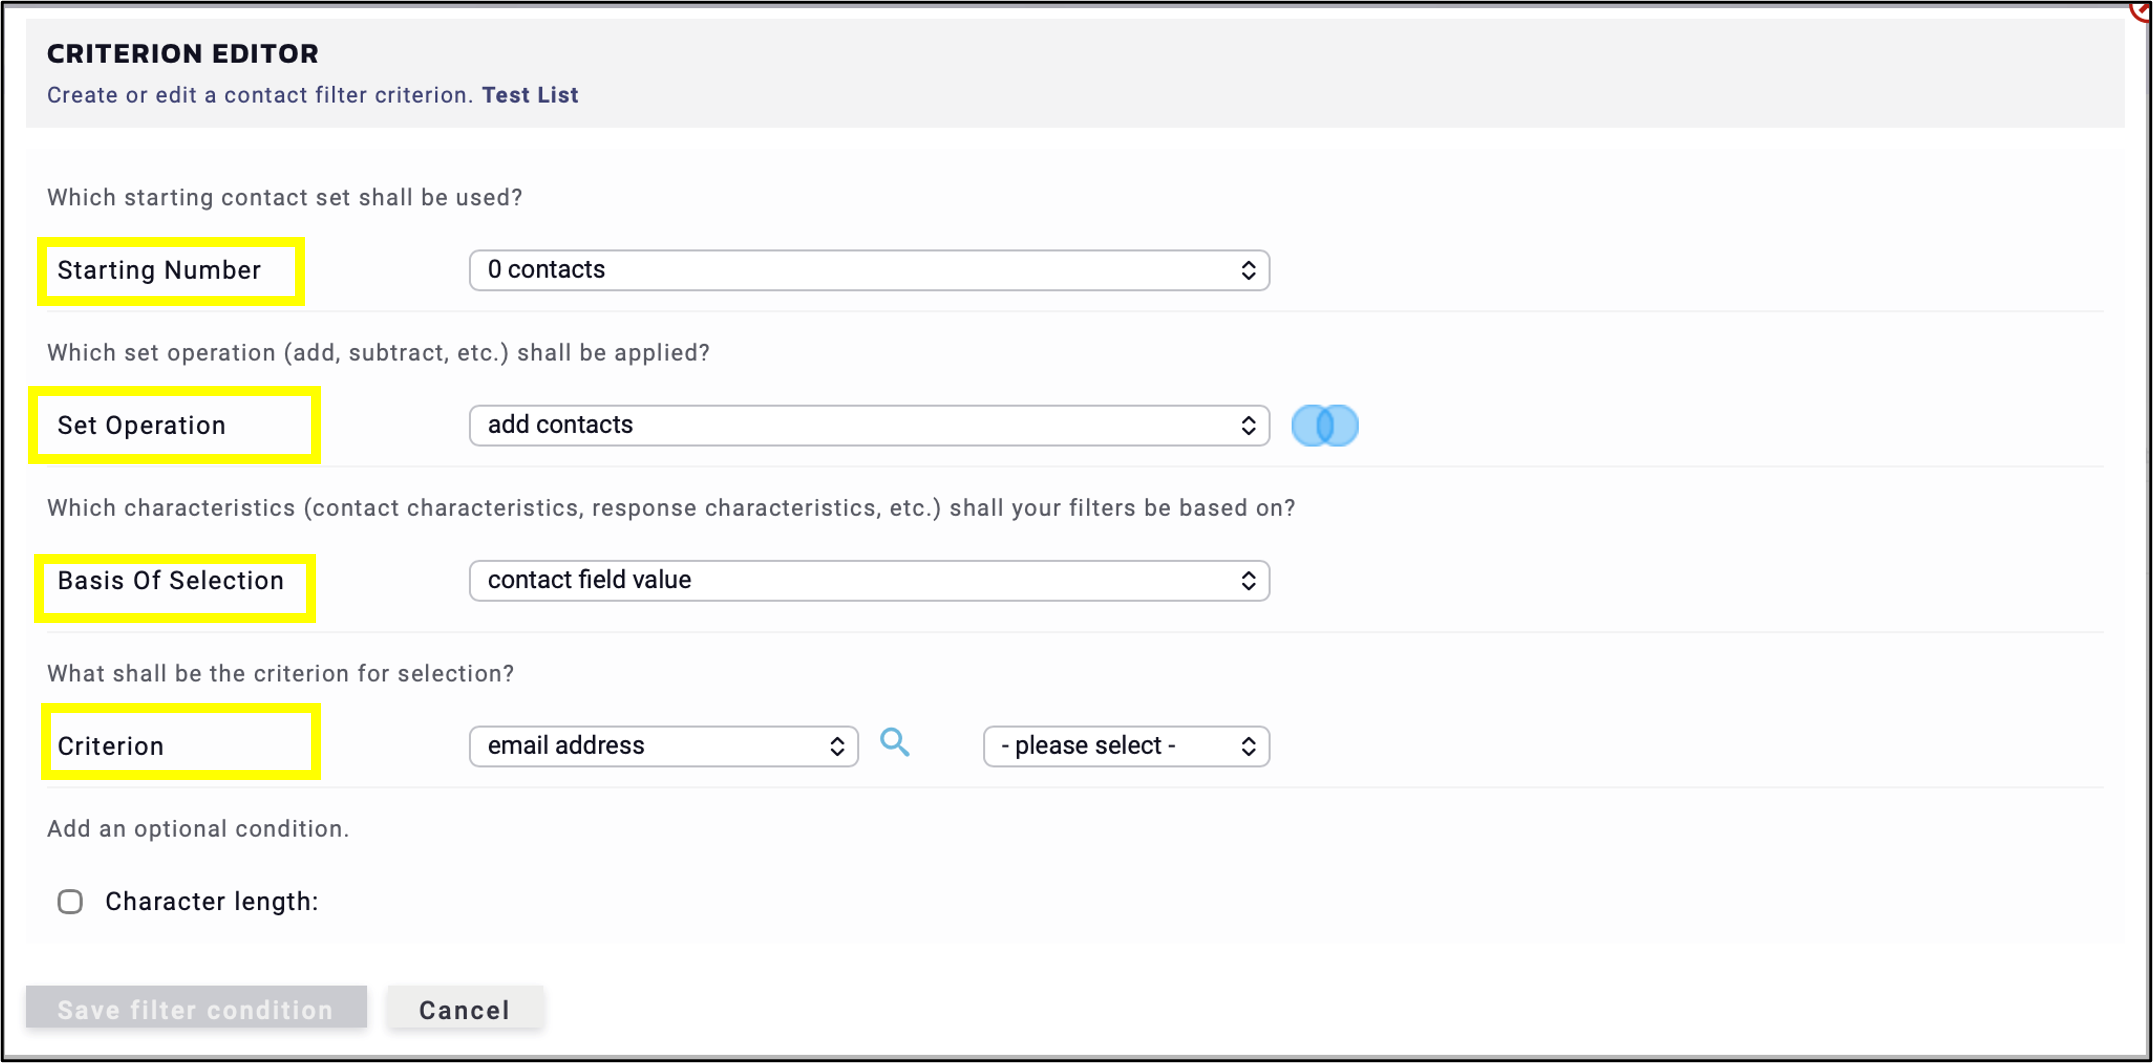
fig. 5: Set the values of the criterion editor.
Note: If only one emailing address is needed, use the condition is equal to and add that address (fig. 6). Click Save filter condition.
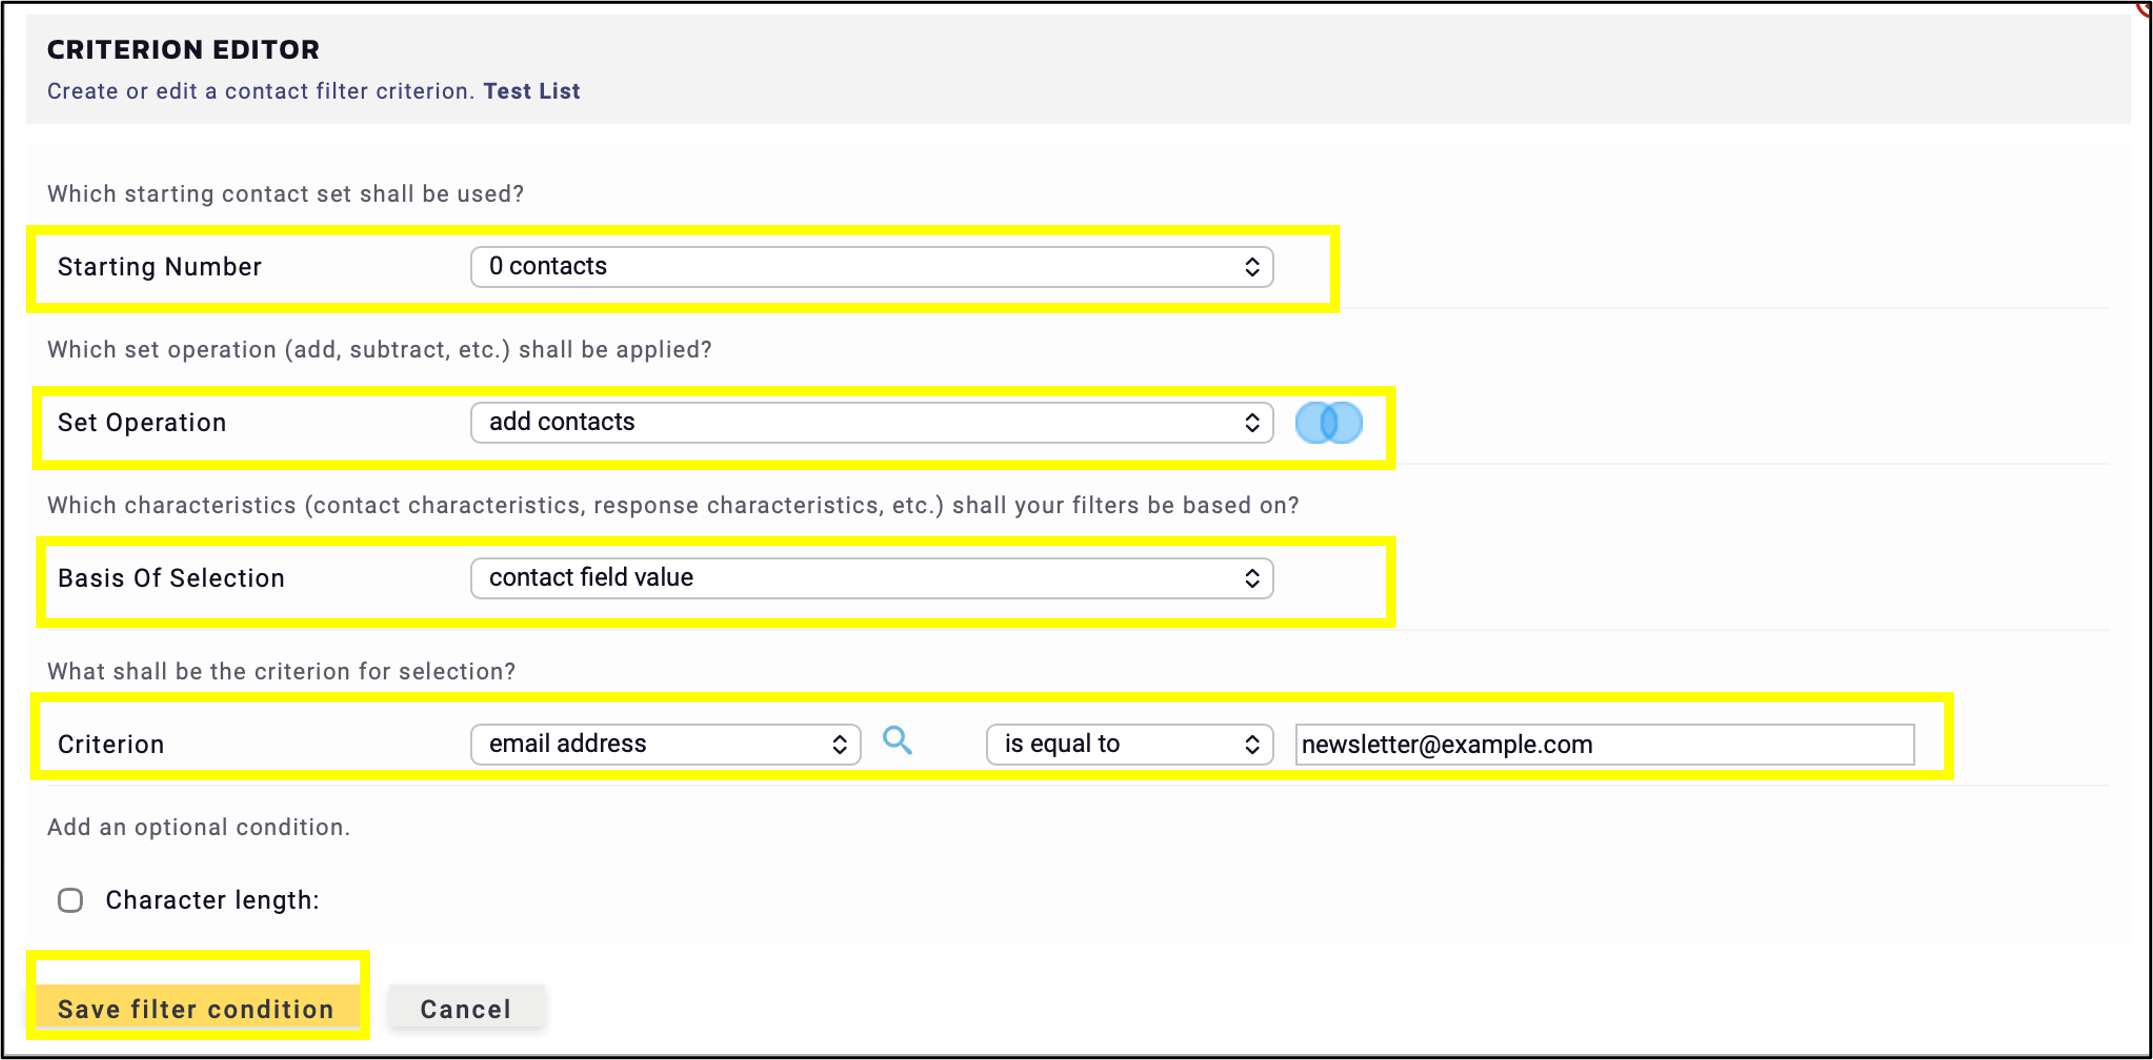
fig. 6: Enter the email address using the ‘is equal to’ checkbox, then click the ‘Save filter condition’.
For a more realistic test, use the condition in the list and add 2 to 3 emailing addresses (fig. 7). Click Save filter condition.
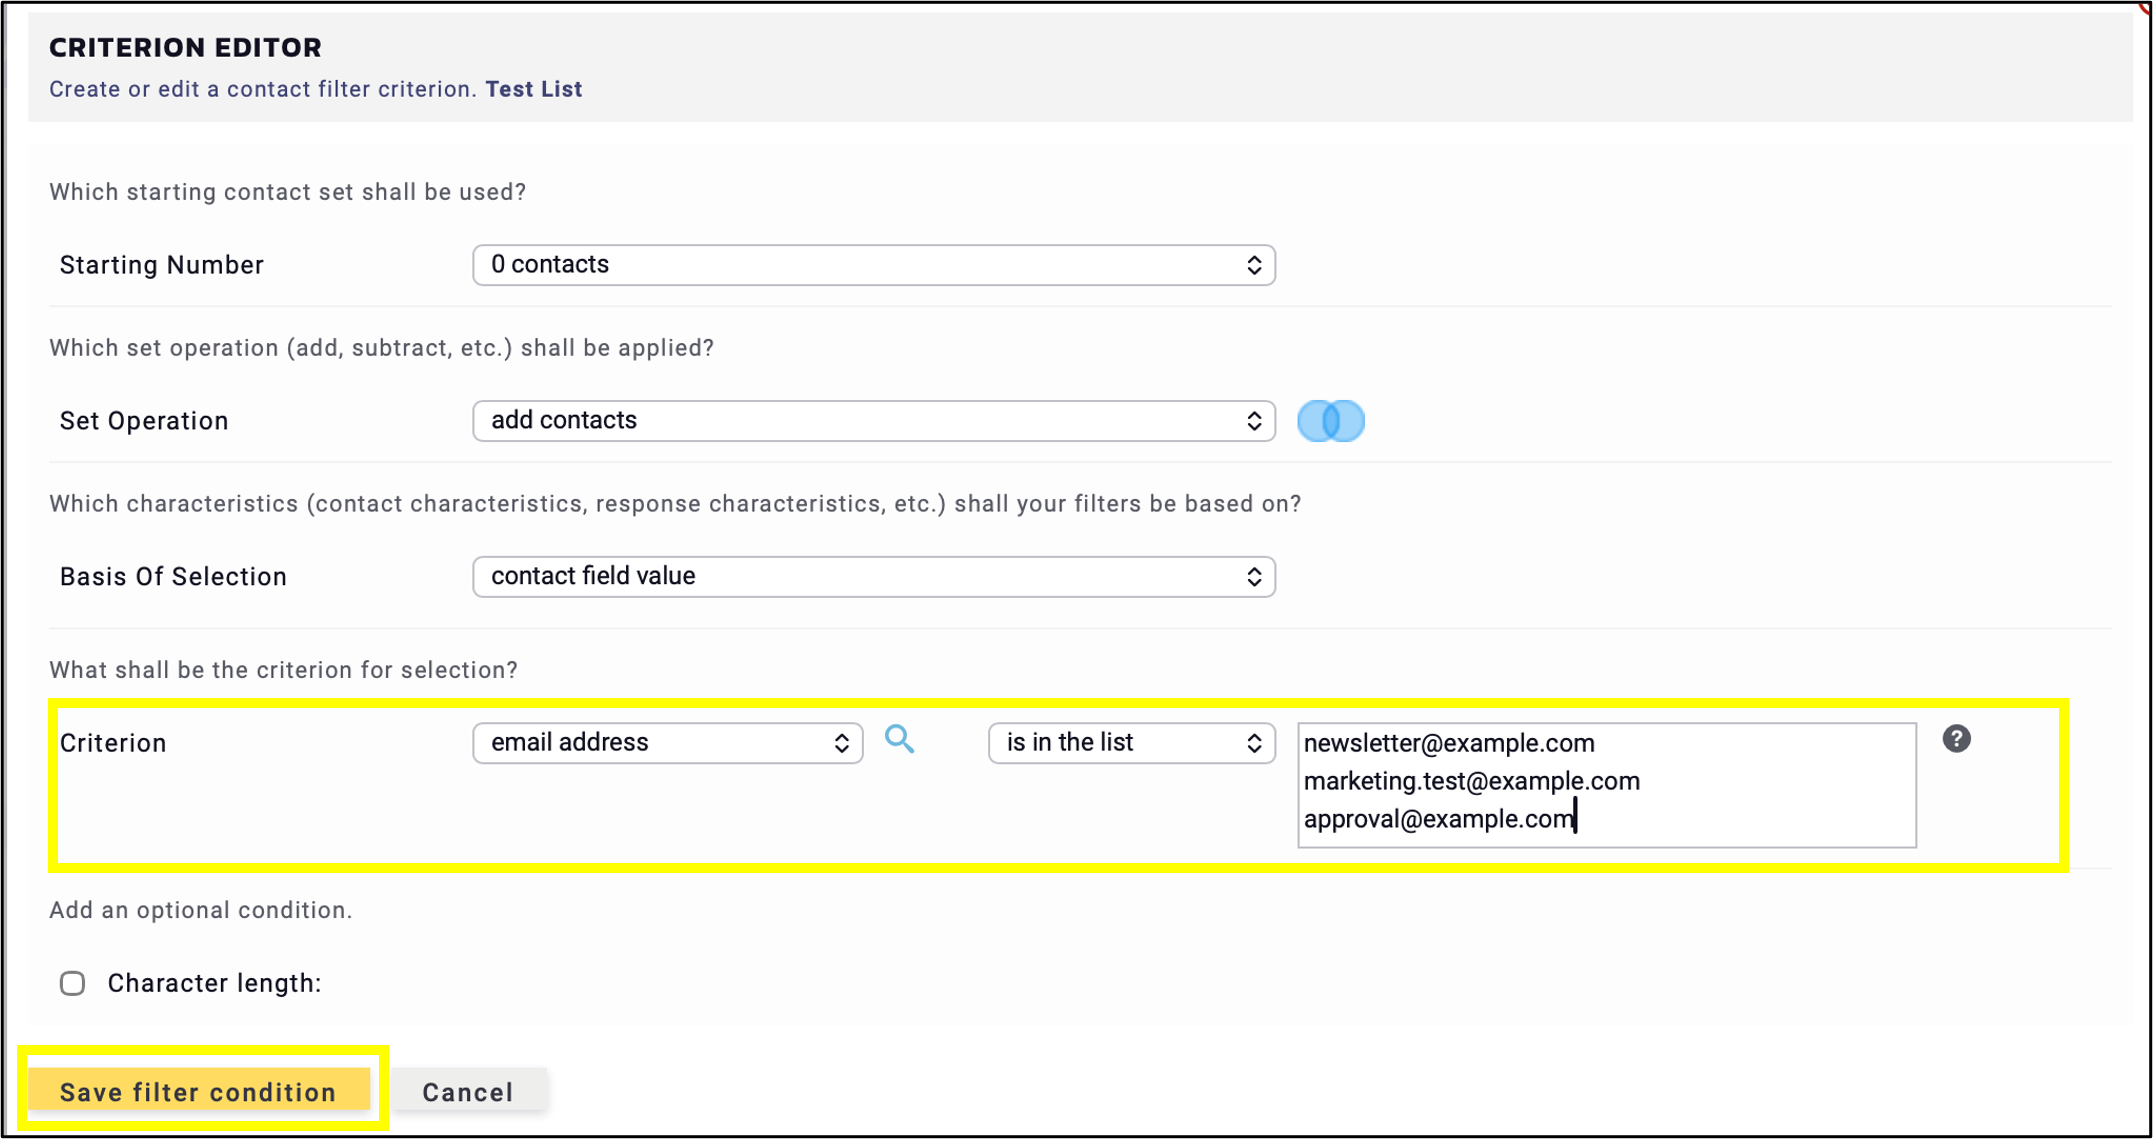
fig. 7: Use ‘in the list’ condition for better tests and add 2 to 3 emailing addresses.
Note: These emailing addresses must be created as individual contacts in the system before they can be used in the test list.
Click Save contact filter (fig. 8).
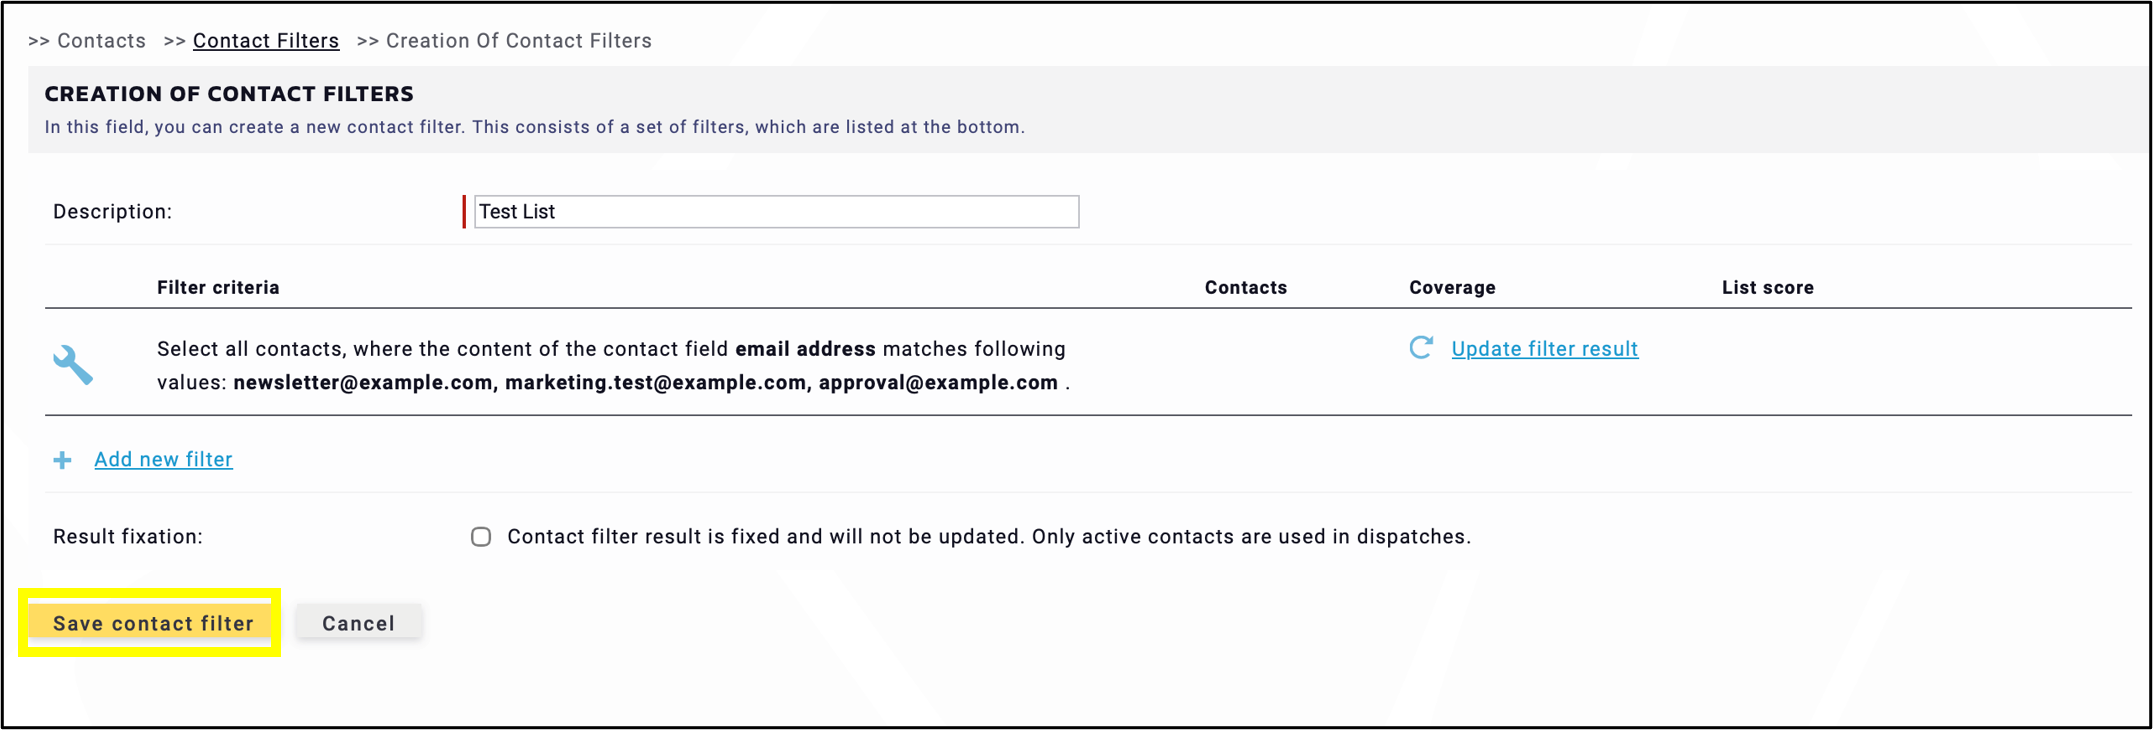
fig. 8: Once the values have been added, click ‘Save contact filter’.
Add the new contact filter to your test list and click create test list (fig. 9).
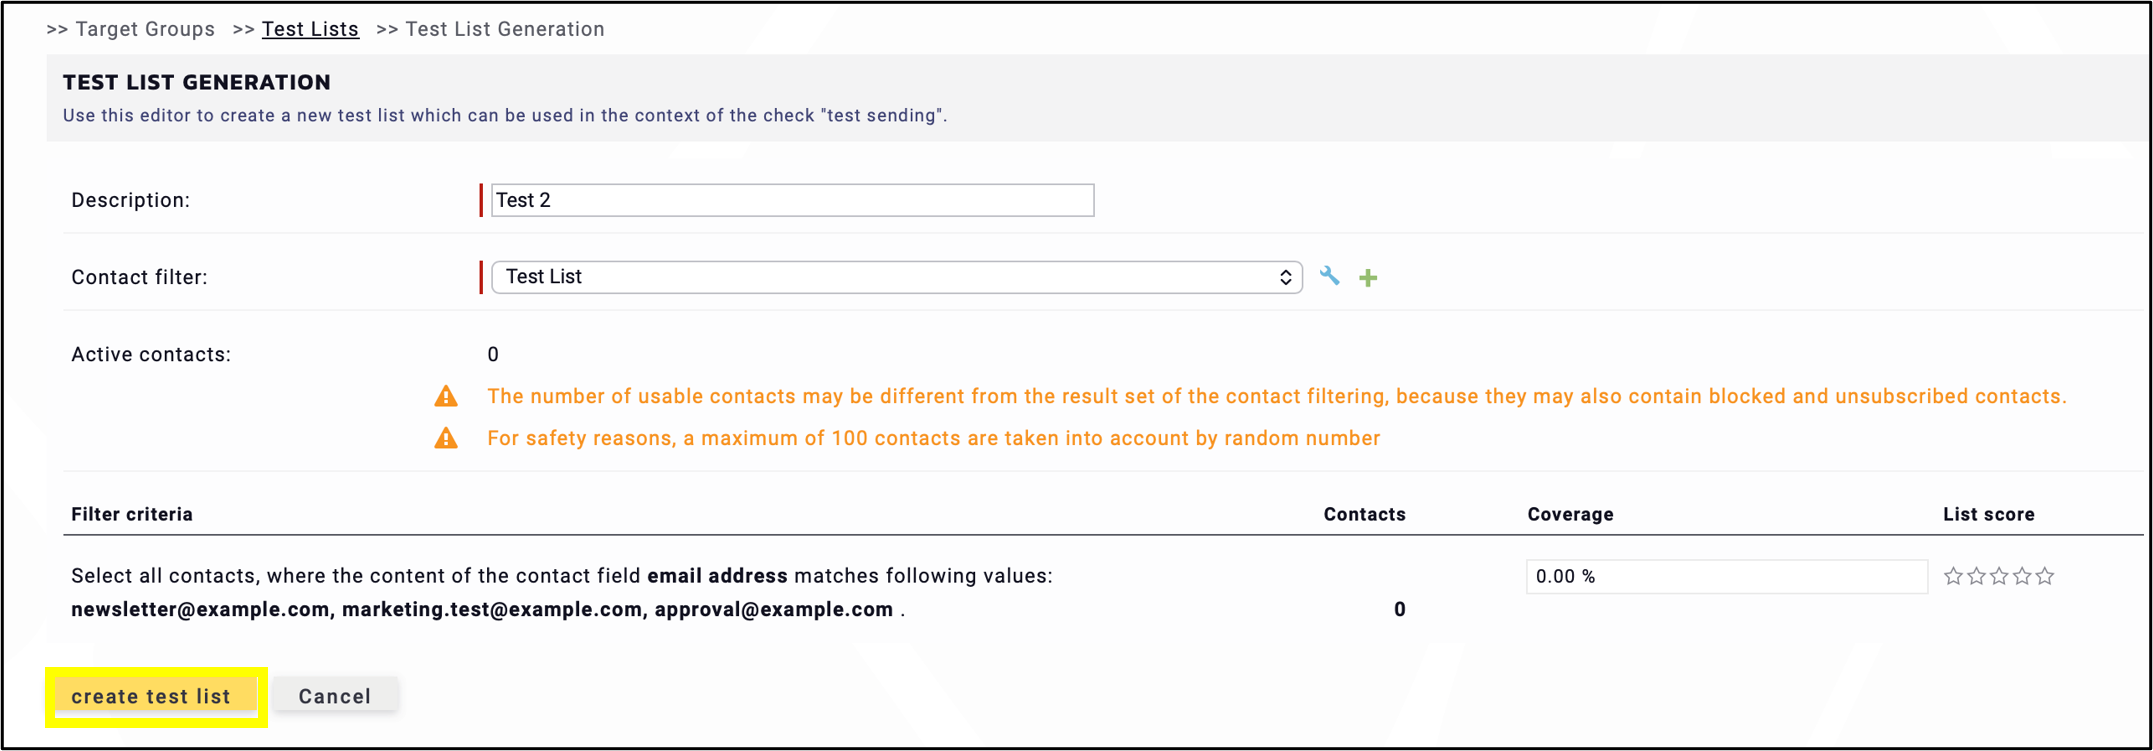
fig. 9: Click ‘create test list’ to finish the process.
The test list is now complete (fig. 10).
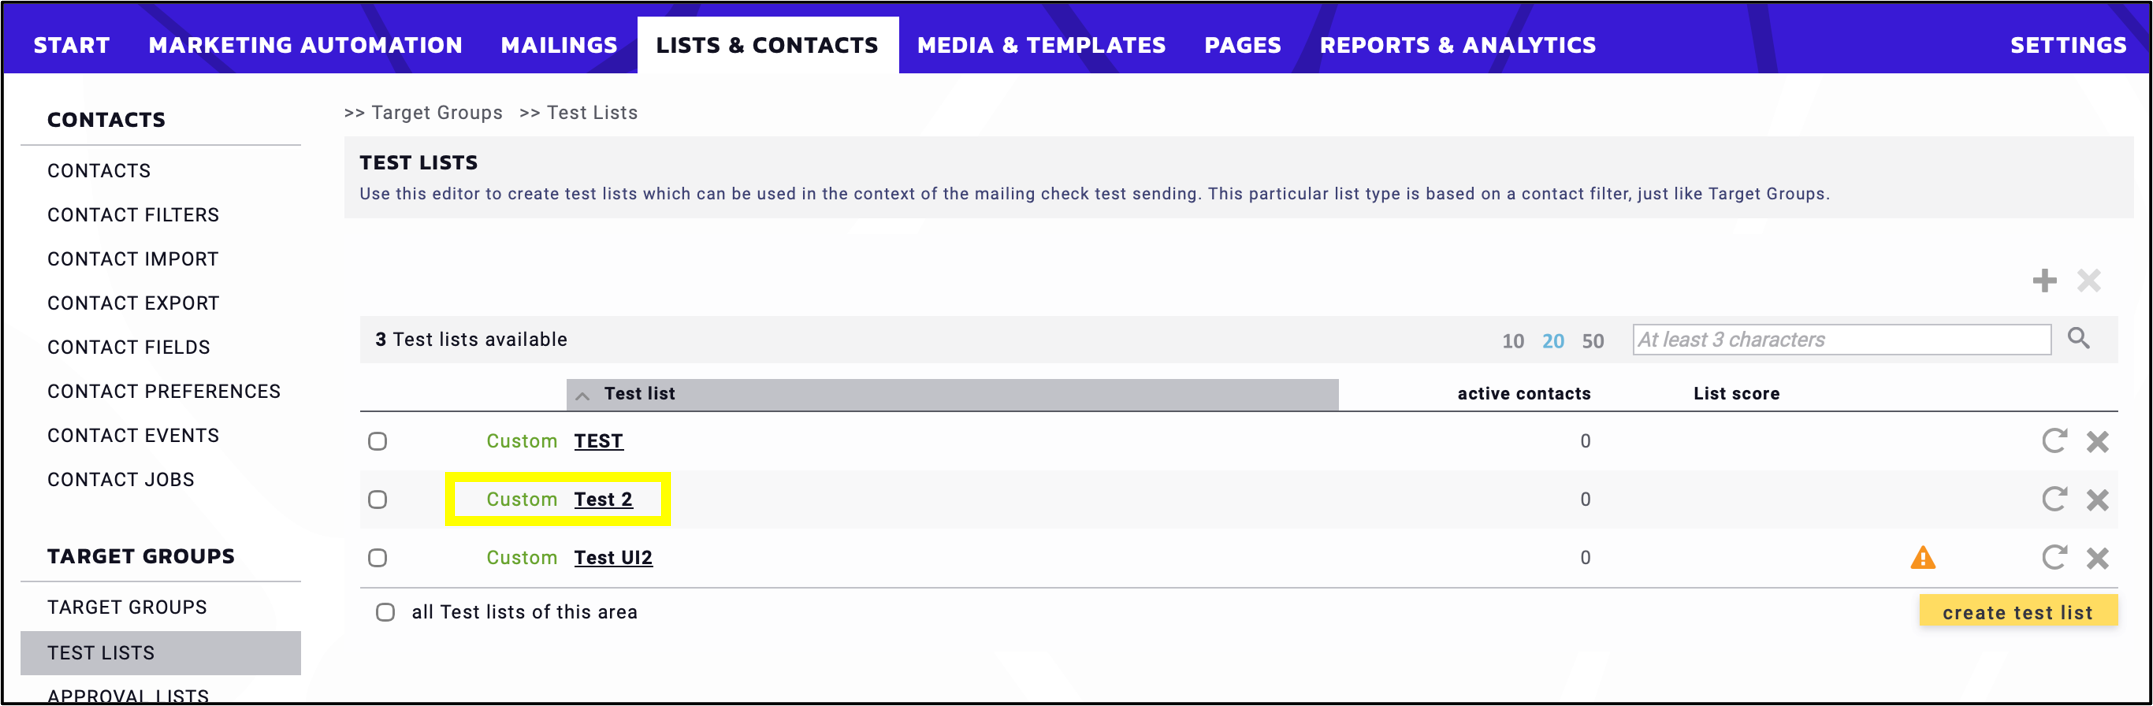
fig. 10: The test list is completed.
In Mailings → Trigger Drafts, open the emailing to be sent to the test list and click Checks & Tests tab (fig. 11). At the bottom of the column, locate the Test mailing option and click the perform icon (a triangle enclosed by a circle) at the end of the row.
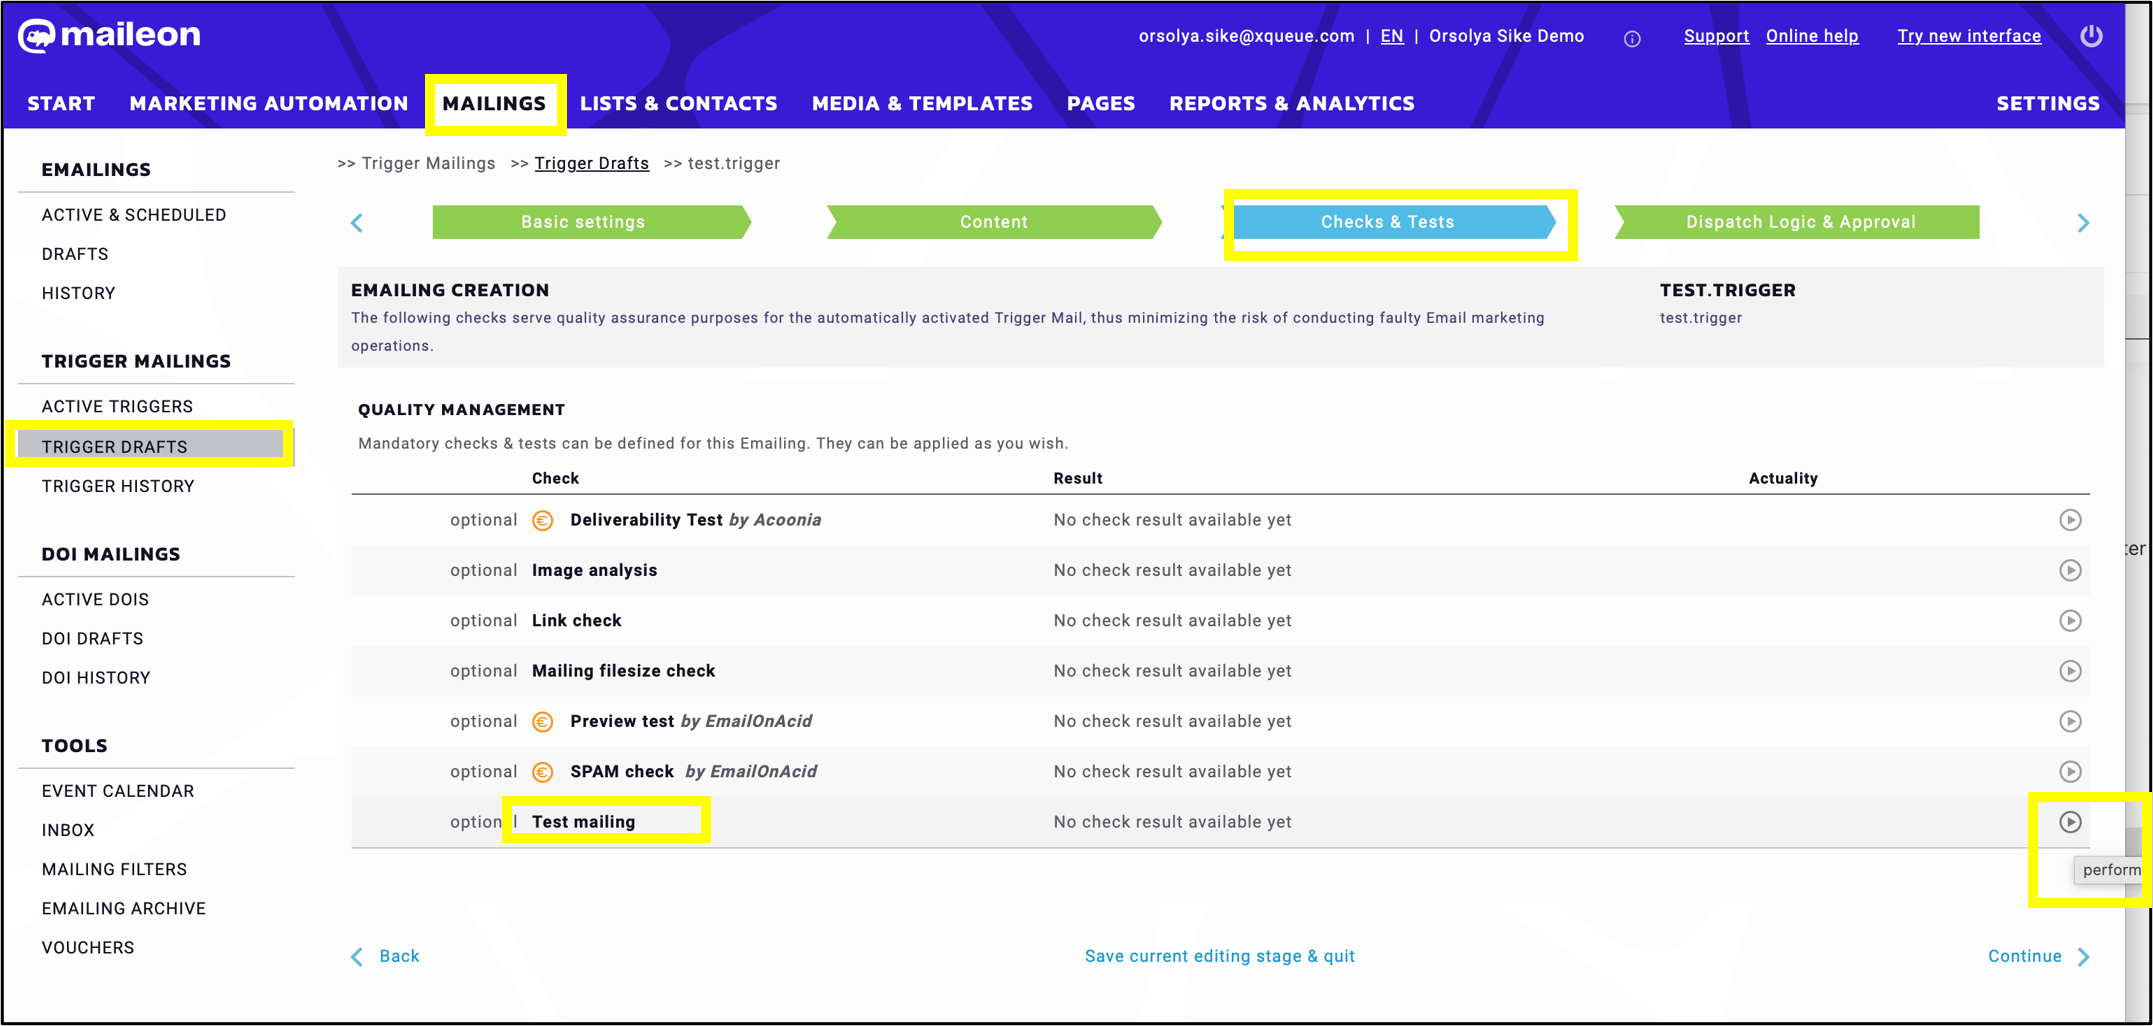
fig. 11: Open the emailing in ‘Mailings’ → ‘Trigger Drafts’, go to ‘Checks & Tests’ and click the perform icon next to ‘Test mailing’.
Select the test list to which you want to send the test emailing (only one list is available in this example), then click Start delivery test (fig. 12).
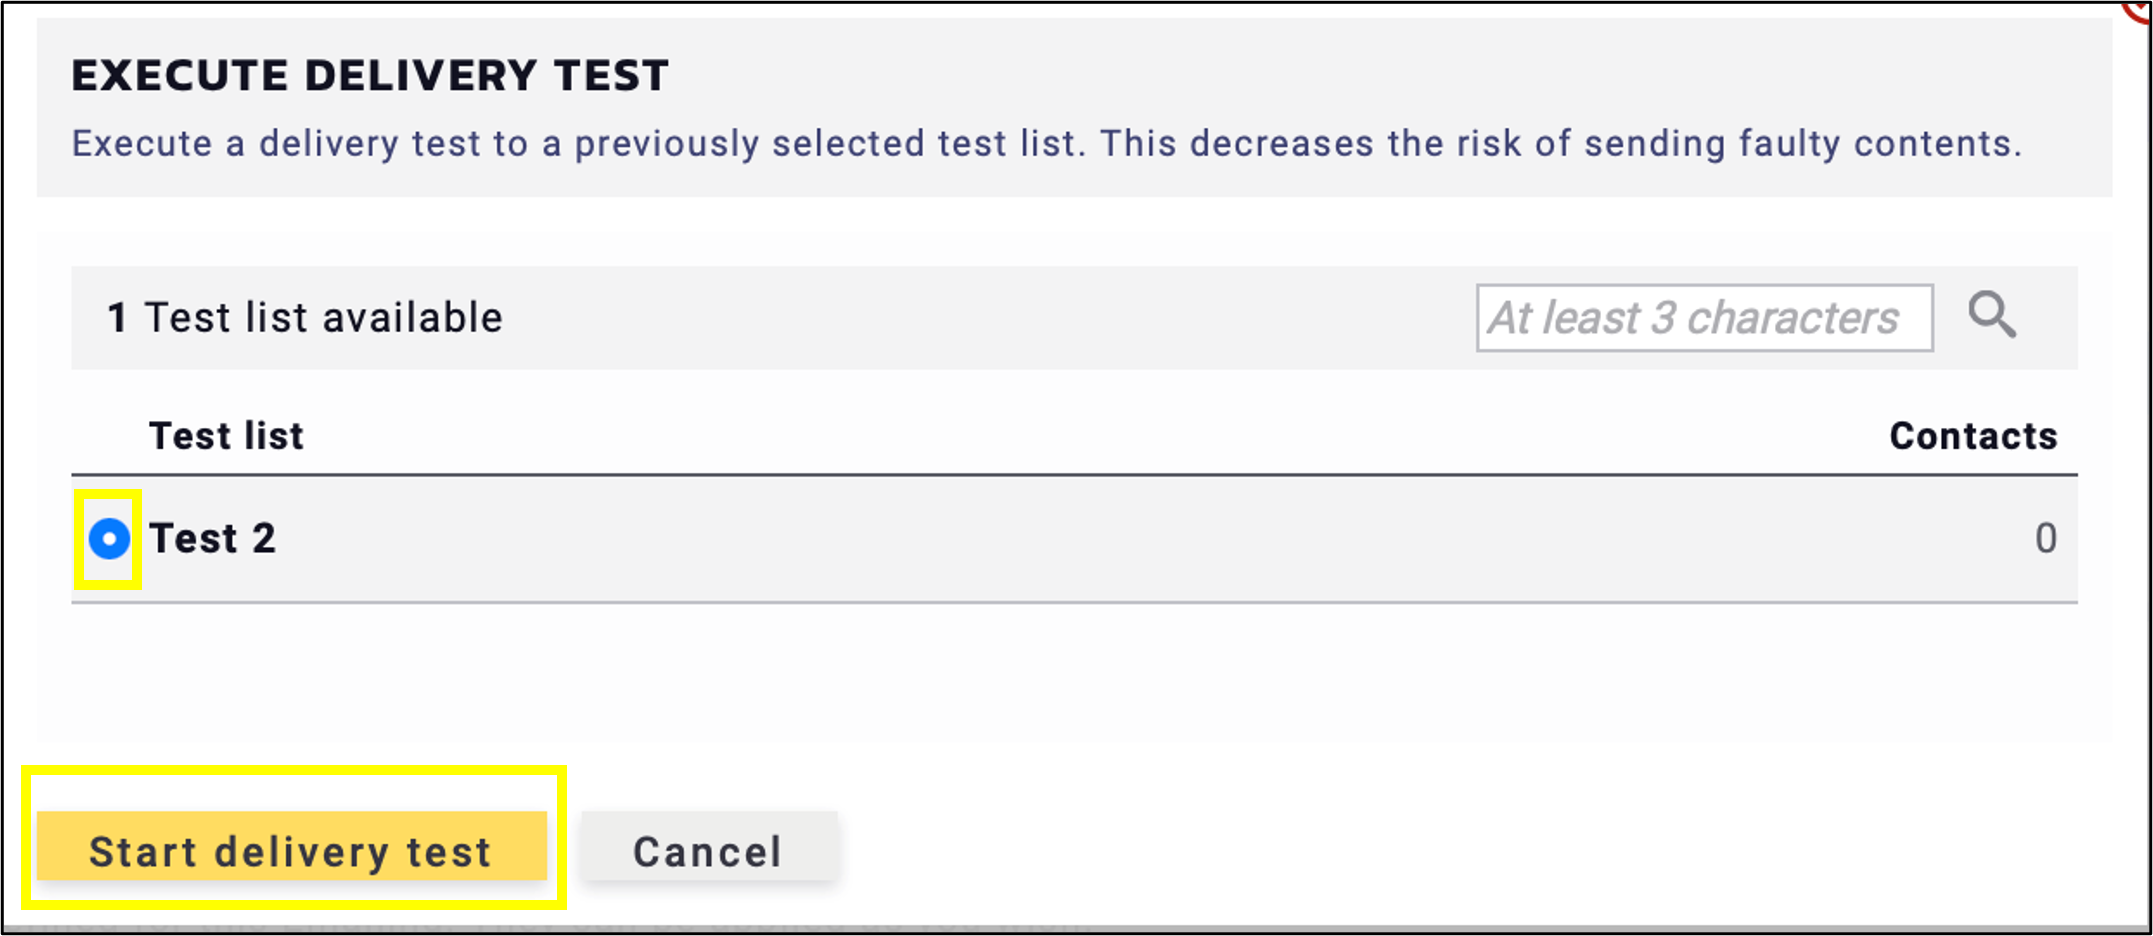
fig. 12: Select the certain test list and click ‘Start delivery test’.
The system highlights the completed test and the dispatch date in green (fig. 13).
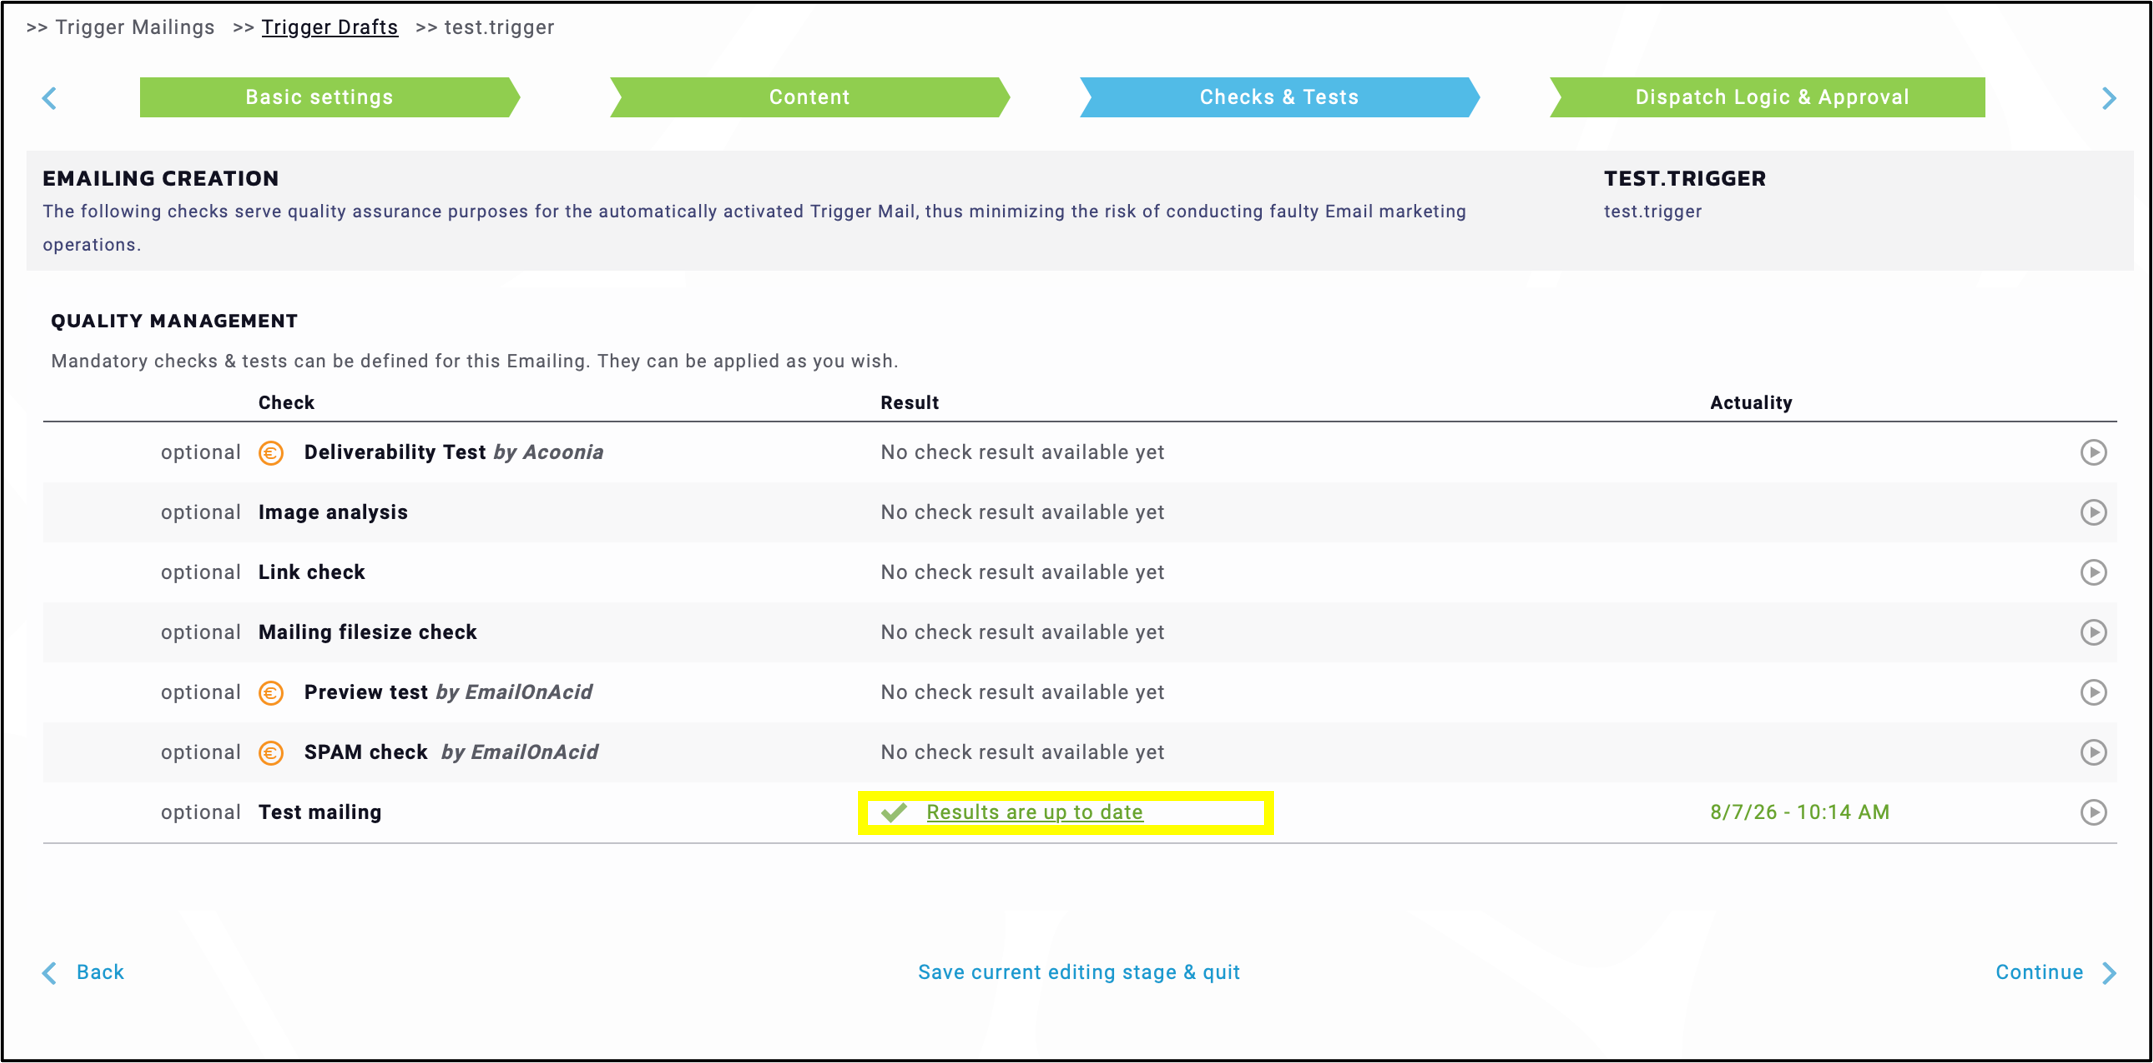
fig. 13: The system sends out the test in real time.
Click the succesfully finished link to view detailed statistics and access the resend option (fig. 14).
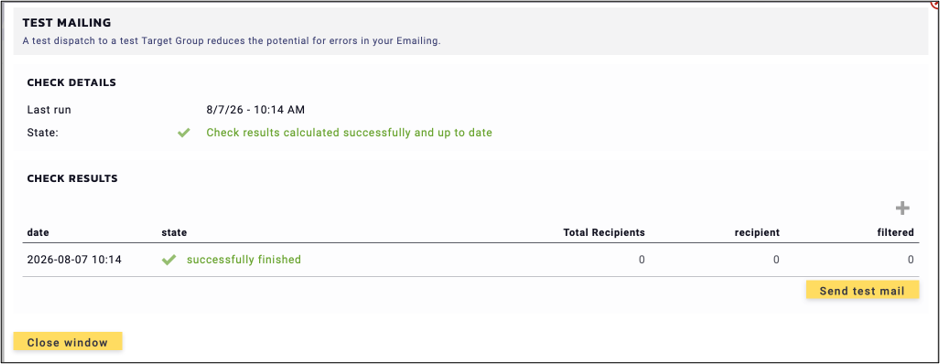
fig. 14: Click ‘successfully finished’ to view the statistics and access the resend option.