Im Maileon Help-Center finden Sie umfassende Dokumentationen zu unserem System.
Beliebte Suchanfragen: Importe | Rest-API | Integrationen | SMS
Marketing Automation 2
Introduction
Marketing Automation is a versatile, multi-channel tool to help you to communicate with your customers and create series of automated campaigns fast and easy – structured and timed as you like. Use this feature after purchases, for cart abandonments, in welcome and reactivation campaigns, etc.
As with other Maileon features, the drag and drop method helps you to set up the elements of your automation.
This documentation presents the updated version of the Marketing Automation in the new design (MA2).
It has been designed and developed to make Marketing Automation more practical, user-friendly and transparent. This guide provides an overview of the basic features of the new interface.Detailed examples and use cases of the automation process can be found in the documentation for the standard version.
The new Marketing Automation features full-screen capabilities, clearer structure, well-verifiable steps and more practical functionalities to streamline your workflows. Additionally, the updated Marketing Automation aligns with the new user interface design standards.
The main changes and benefits of the new interface:
- full screen mode,
- a new method for managing automation termination (Program End Node),
- more customer-friendly construction,
- easier and faster processes to manage.
Marketing Automation is the ideal platform for building processes using data fields, contact filters, and email content to maximise efficiency.
Since each user is unique with their own target group, this practical tool can be used in various ways. To make the best of its potential, clearly define the purpose for which you intend to use Marketing Automation.
Please note the following:
- Although the content of the process can be changed, the logic is fixed,
- the same process can be implemented in several ways,
- it is not possible to load previous automation programs in the standard version. These are marked with an asterisk (*) in the Draft, Active, and History sections.
Marketing Automation (UI2): Step Zero
As with the standard version of Marketing Automation (UI1), the first step to run the process is to click on the Trigger Drafts box under the Mailings tab to activate the automation at the Type of the Mailing Logic.
This step is not required for building the Marketing Automation, but necessary to run the process, because it allows to send trigger mailings from the system.
 Fig. 1: Activate the process to run at ’Mailing > Trigger Drafts > Mailing Logic > Type’.
Please click the button activate Trigger Mailing in the bottom right corner.
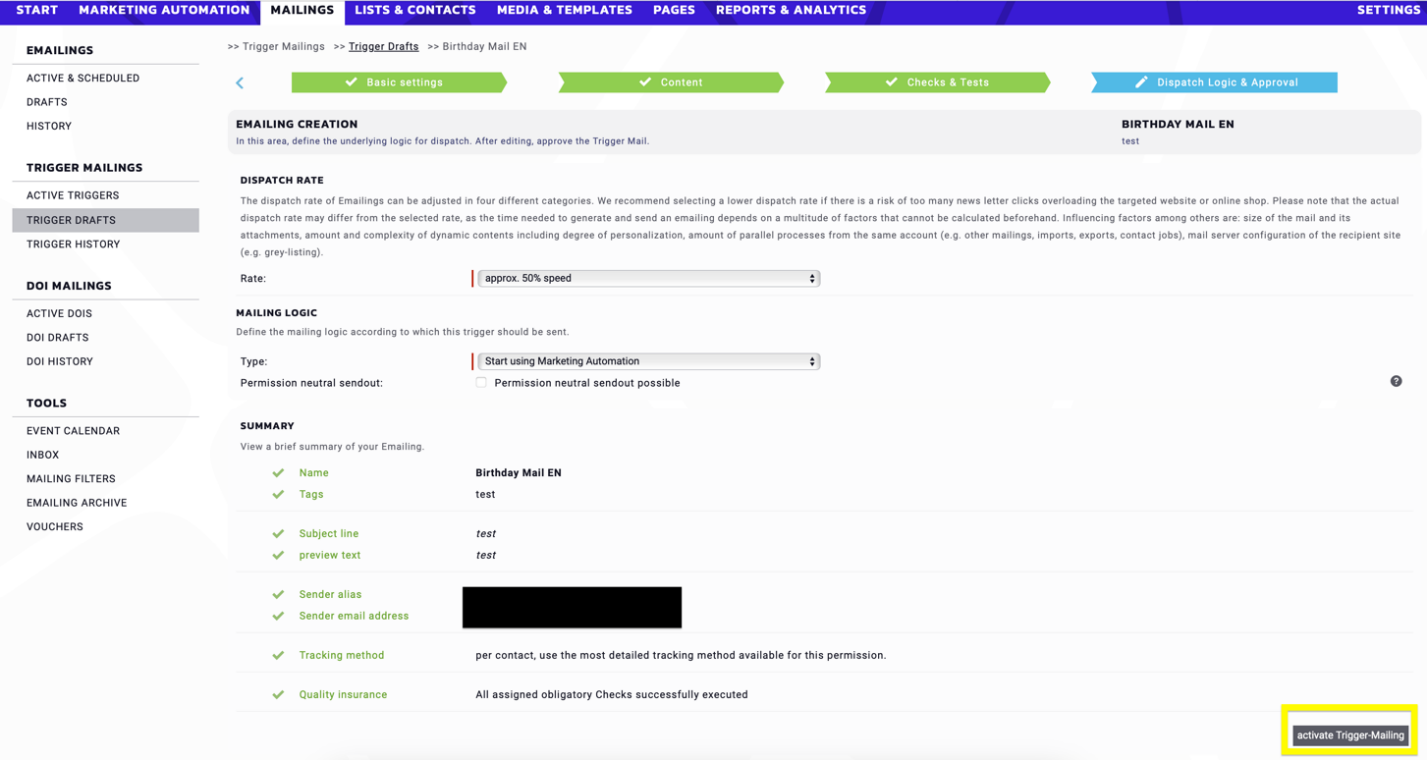 Fig. 2: The activation of the ’Trigger Mailing‚ is not required for building the Marketing Automation, but necessary to run it.
In the new design
A simple step takes you to the new design of Marketing Automation. Start a Marketing Automation creation process by clicking on the + sign (Create program) in the top right corner.

Click on the New automation editor which transfers you directly in the new design of Marketing Automation.
Once you have chosen a version, there is no possibility to change it due to compatibility reasons.

After clicking on the New automation editor button, you will see the workflow process on a three-step scale, with each step shown below.
Regardless of the platform you are coming from, the following steps remain the same. Define the name of your draft in step 1. The character limit is 128, with the first 3 characters being mandatory.
Note: Selecting the checkbox marked with an asterisk is mandatory.

As step 2, click on the From scratch icon to access Start Nodes.

A new feature compared to the standard version of Marketing Automation is to select the Start Node at this stage as step 3, prior to entering the editing interface.

At this point you may decide which Start Node will be the first step of your automation.
Note: in this case you have the option to switch it during the editing process.
As in the previous version of Marketing Automation, the system offers the following Start Nodes as a starting point (from left to right, from top to bottom):
- Contact event: contact-event-based automation, where the process starts instantly for a contact.
- API request: Any process can be built using API call. This is not triggered when an event is run.
- Passing Program End: The automation is triggered by another one that has already been completed. Please select the program in this area.
- Permission consent: The starting condition is a given consent of permission in a double-opt-in campaign. The automation will be started instantly for a contact.
- Contact filter: The starting condition is an affiliation to a contact filter. The automation will be started one-time or by interval. Before every start the contact filter is updated.
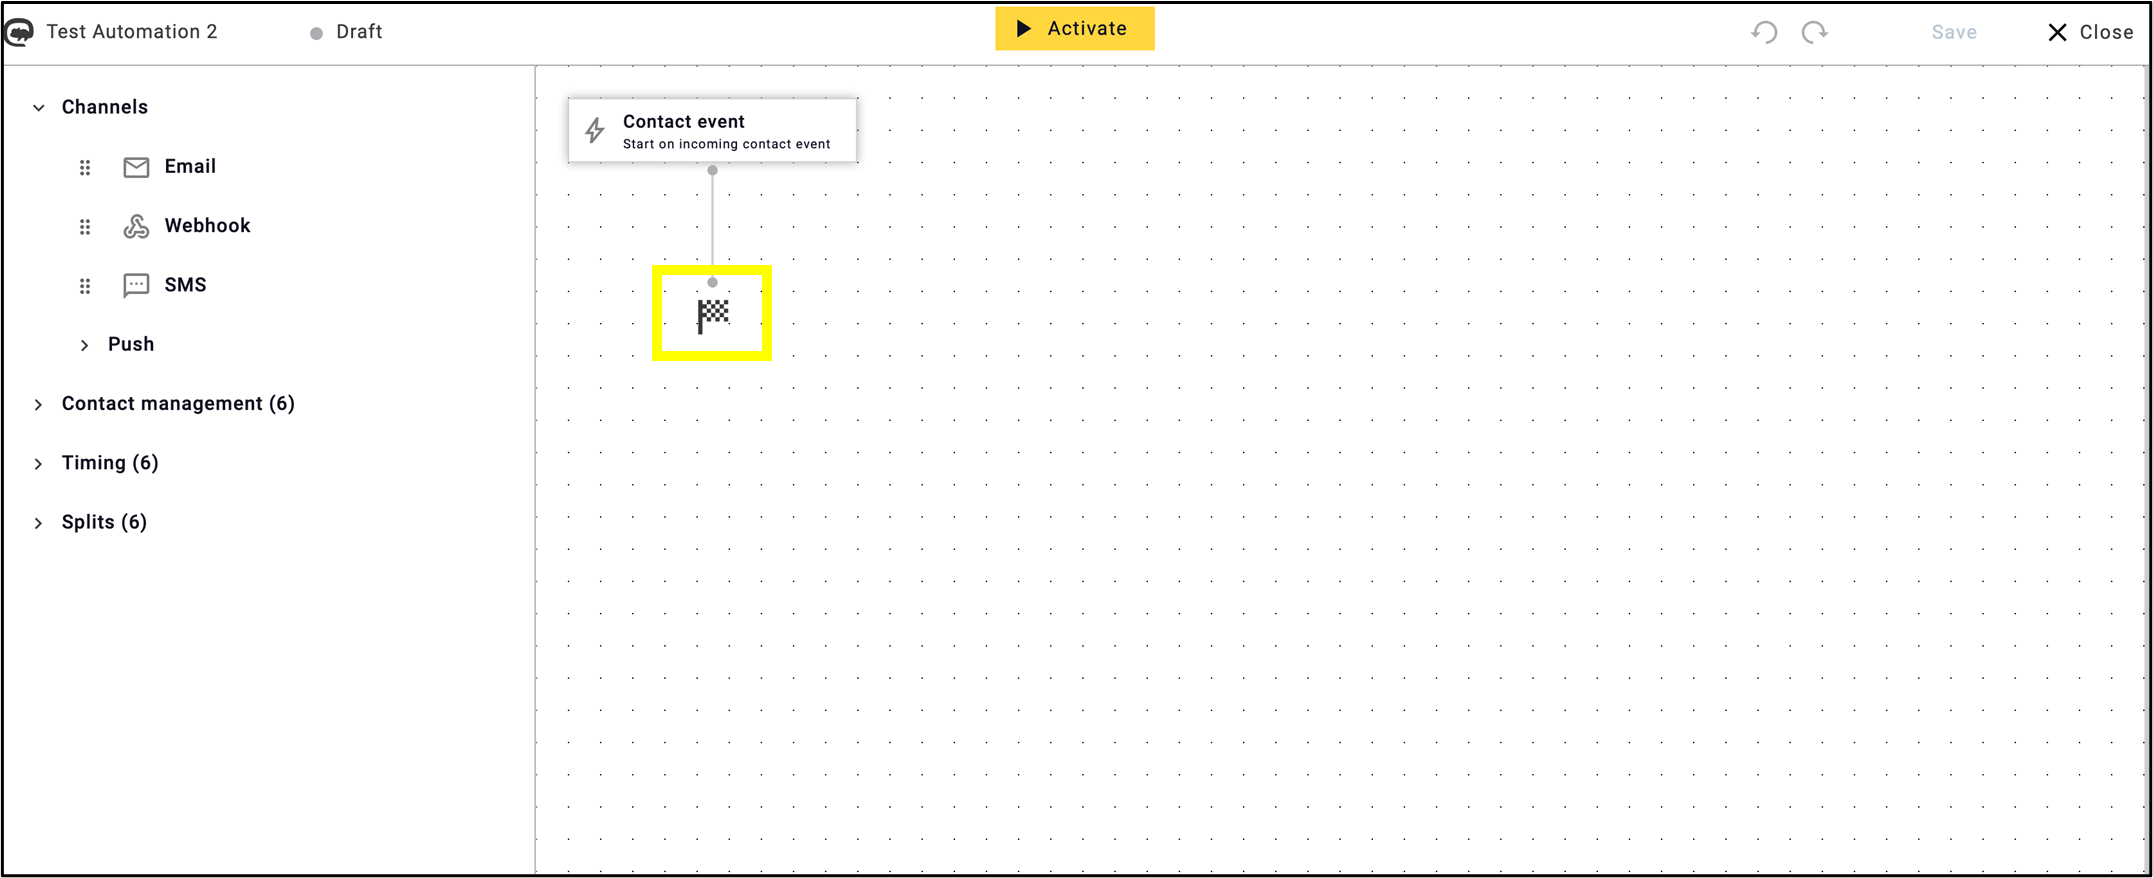
Choose one of the Start Nodes to start and then click on Save and exit. The example below shows the structure of a contact-event-based automation since that is the most commonly used starting point.
Before you start, please take a look at the tool bar on the top.

Next to the Maileon logo, the name of the automation appears. The dot indicates that you are in the draft version – as it is described as well. The yellow Activate button with the black triangle is required to validate, then activate the automation once the draft version is complete.
At the end of the line, undo and redo arrows allow navigation through each sub-process, while buttons are provided to Save and Close the program.
Below you can see the new full-screen interface, which is divided into two parts: Content Part editor panel (larger part of the screen on the right with the small dots) and Drag panel (menu bar on the left).

The Content Part editor panel is the editing area, where you can create and build your automation.
A new feature compared to the standard version is the flag icon, which is already built into the interface and does not need to be added separately. This icon indicates the end of the process, which is mandatory (fig. 14). With this feature it won’t be missed.
The workflow is also improved by automatically connecting the nodes, which are the key elements of the automation.
The Drag panel includes all the blocks of nodes you need to configure your automation. These blocks contain the Marketing Automation elements that make up your process.

Linking nodes
In comparison to the standard version of Marketing Automation, the linking of nodes has been simplified and made easier to handle. When a new node is dragged into the editing interface, a blue ‘cross’ sign (+) appears, indicating where the node can connect to the previous one.
New division
In Marketing Automation 2.0 the nodes, which are the building blocks of the automation, have been rearranged into different categories compared to the standard version. The new layout is designed to make the nodes more compact and transparent.
The different nodes in the new interface are divided as follows:
- Channels,
- Contact management,
- Timing, and
- Splits are listed separately.
Use and combine these elements as you desire. Although the elements of each category have no upper limit, overuse slows down the process.
Channels
Channels serve as the primary nodes of Marketing Automation, alongside the Start Node. They are the pathways through which the message reaches the user.
Choose channels that are consistent with the message. While emailing remains the primary channel, incorporating additional channels that complement the process can improve its efficiency.

The following Channel Nodes can be used for the process by drag & drop method:
- Email,
- Webhook, and
- SMS,
which are available in the standard version as well.
Note: All Channel Nodes can be paired with every individual starting point. However, certain nodes rely on the starting point or other nodes, such as the Split by Contact Event Value and the Contact Event as starting point.
Push notifications
Below Channel Nodes settings, you will find a collection of different Push notifications.
Note: This tool is not available to all users. It is an optional feature, which can be set for additional cost. If you wish to activate this service, please contact our sales department.
Please find a general description below of the Push notifications.

These nodes are brief, real-time alerts or messages sent directly to a user’s device.
Like other nodes, push notifications provide editing and configuration options in the right-hand menu bar after being dragged into the interface.
As with the standard version of Marketing Automation, the multiple Push Notification options remain unchanged.
Push notifications are as follows:
- Clever Push,
- Push Woosh,
- Kumulos,
- Notificare, and
- One Signal messages.
Rename the push notification as desired in the Description section.

You have the option to change the type of the push node in the Type section at this stage as desired.

At this point, the menu is divided into two sections: the Message and the Credentials section.
In the Message section, depending on the type of notification, the content of the message, the required ID and the information of the recipients must be set. The example below demonstrates the required settings for a Notificare push node, where you must set the:
- Action: if the notification goes to the contact or device,
- Type: alert, URL, video, image, etc., the
- Title, and the
- Content.

Required settings for the Message section of the different types of Push notifications:
- Clever Push (Channel ID, URL, Subscription ID, Title and Content),
- Push Woosh (User ID, Content),
- Kumulos (Install ID, Title, Content),
- Notificare (Action, Type, Title, Content),
- One Signal messages (Player ID, Title, Content, URL)
The fields marked with an asterisk (*) are mandatory.
To make setup easier, each setting displays the required format. Brackets allow you to specify the necessary input, such as adding a placeholder.

As in the standard version, it is necessary to set Credentials for all types of push notifications. This requires an App key in every case, which you receive when you register your personal account.

Required settings for the Credentials section of the different types of Push notifications:
- Clever Push (App key),
- Push Woosh (App ID, App key),
- Kumulos (App ID, Server key),
- Notificare (App key, Master secret),
- One Signal messages (App ID, App key, Master secret).
The fields marked with an asterisk (*) are mandatory.
Note: as we indicated above, the technical aspects of Push nodes are consistent in all cases, but the settings are specific to each instance depending on the type of Push node.
Contact management
In the new version of Marketing Automation, the action nodes are named Contact management. The elements of Contact management define the steps of the automation process as the specific cause and purpose of the automation. Utilise them thoughtfully and in line with the desired processes to maintain transparency and ease of management. Each step can be employed multiple times, and there’s no upper limit to using these icons, although overuse them slows down the process.

This category contains
- Contact field function,
- Contact field value,
- Update contact preference,
- Unsubscribe contact,
- Blocklist contact, and
- Delete contact.
These elements help you to decide how to manage your contacts, in line with the objectives of the automation. The construction and extension of it can be flexibly designed, constructed and continued, according to your specific requirements and preferences.
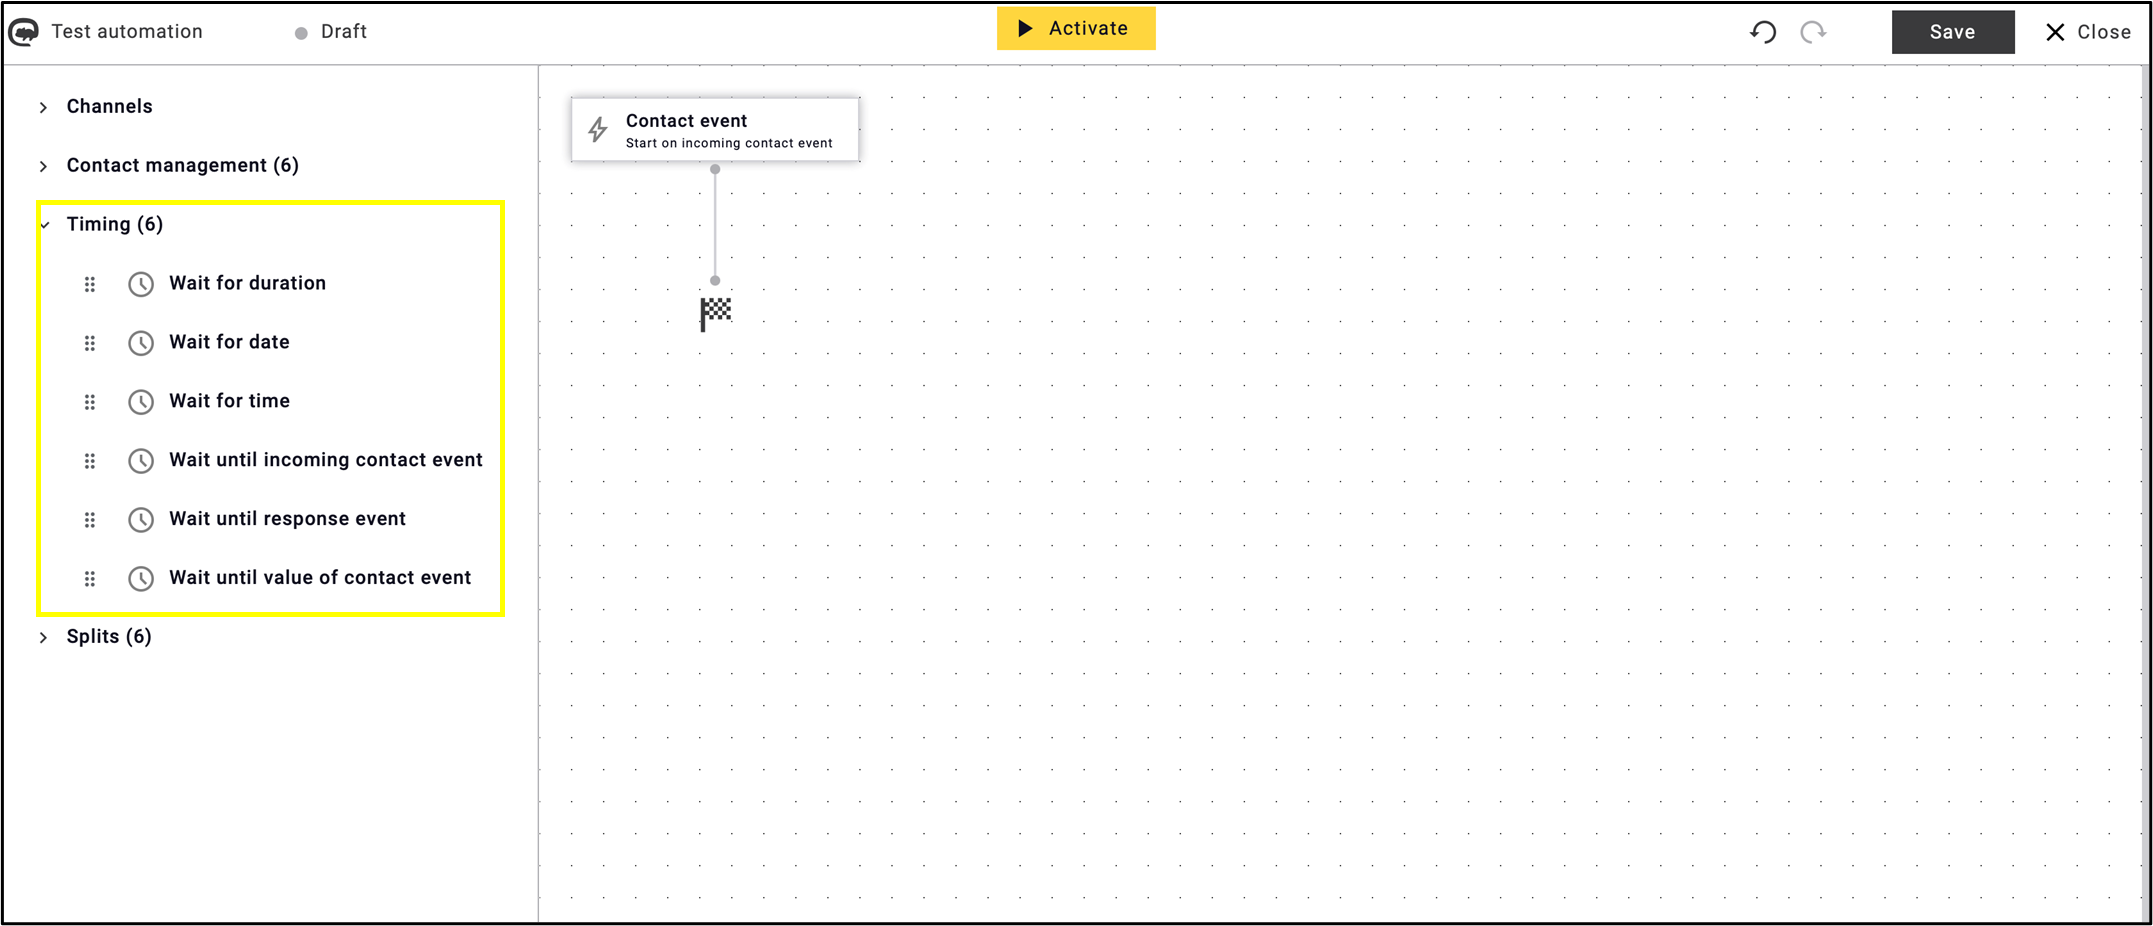
Timing
As in the standard version, multiple Timing nodes can be assigned to the steps of the automation process. To ensure this process is as seamless and transparent as possible, timing-related functions have now been assigned to a separate category.
Use Timing nodes to determine
- the contact event or fixed dates to which the automation should be linked,
- the frequency with which each element and step of the automation is repeated,
- and the type of time interval with which they should be associated.
Options to choose for timing are:
- Wait for duration,
- Wait for date,
- Wait for time,
- Wait until incoming contact event,
- Wait until response event, or
- Wait until value of contact event.
Each Timing node requires custom settings in the Description section, which can be configured in the right-hand menu bar that appears by dragging the node into the interface.
Here you have the option to edit the name of the node, select the type and set additional custom selections. The following example is for the Wait for duration node.

For Timing nodes where the running of another event sets the time interval, several conditions must be set, such as the type of campaign or contact event, and the corresponding outgoing edges.
The example of figure below shows the settings for Wait until incoming contact event.

Splits
The last category on the Drag Panel is the Splits, which helps you to decide and establish the direction and the logic of the automation process at any point.
This tool can extend the process across multiple pathways. The elements allow segmentation, A/B testing, comparing opening rates, etc.

For the use of split nodes, it is particularly important to
- know your customers,
- specify which segments of the costumers you would like to know even better,
- have enough mailing history about your customers in your account to set up proper selections.
The options of splitting are:
- by Contact Field Value,
- by Contact Preference Value,
- by Contact Event Value,
- by Contact Event Existence,
- by Random Split, and
- by Split Test.
Each split node requires custom settings in the Description section, which can be configured in the right-hand menu bar that appears by dragging the node into the interface.
Here you have the option to edit the name of the node, select the Type and set additional custom selections. The following example is for the Random split node, where you have the option to edit the name of the node and set the outgoing edges.

The settings of the split nodes are similar to the standard version. The new interface makes the settings easier and more transparent.
The example below demonstrates the settings for Split by contact preference value.

Note: not all processes and data need splits, while the possibilities for it are wide and specific. The necessity of its use depending on your campaigns, your data, your product, etc.
Structural Summary
In summary: all nodes are editable by dragging or clicking on the selected element, which opens the side bar on the right.
Here you have the option to
- add description to the node – don’t forget to click on the tick at the end of the process:

- change the type of the node:

- select and set up the type and the other custom settings of the node, then click on Apply to finish the setting process:

Examples of individual settings
Finally, here are some specific examples of node settings.
The example below illustrates a Wait for duration timing node setting, which may vary depending on the node but generally follows a similar structure and design. As with channel nodes, each node can be modified through the right-hand menu bar.

To make the set up easier, the format of the element settings is immediately visible.

As in the standard version, you can specify whether the time interval should include weekends or be limited to weekdays.

The essence of the automation is Trigger Mailing which can be set up with a few clicks. After dragging and dropping it to the process, edit the description in a similar way to the previous node. After selecting the appropriate trigger mailing, use the Apply button to finalise the configuration.

The process can be continued as desired along the given structure. Use the elements to build any process you desire, just as in the standard version of Marketing Automation.
On the picture below have a look at the example of the Contact field value node settings.

The illustration below shows the Random Split node settings.

Mobility
As shown in the previous figures, each node can be moved by a simple mouseover. In the new version of Marketing Automation, in addition to moving individual elements, the entire interface can be moved and resized as desired.
Note: don’t forget to save the program at any point by clicking the Save button.

Deletion
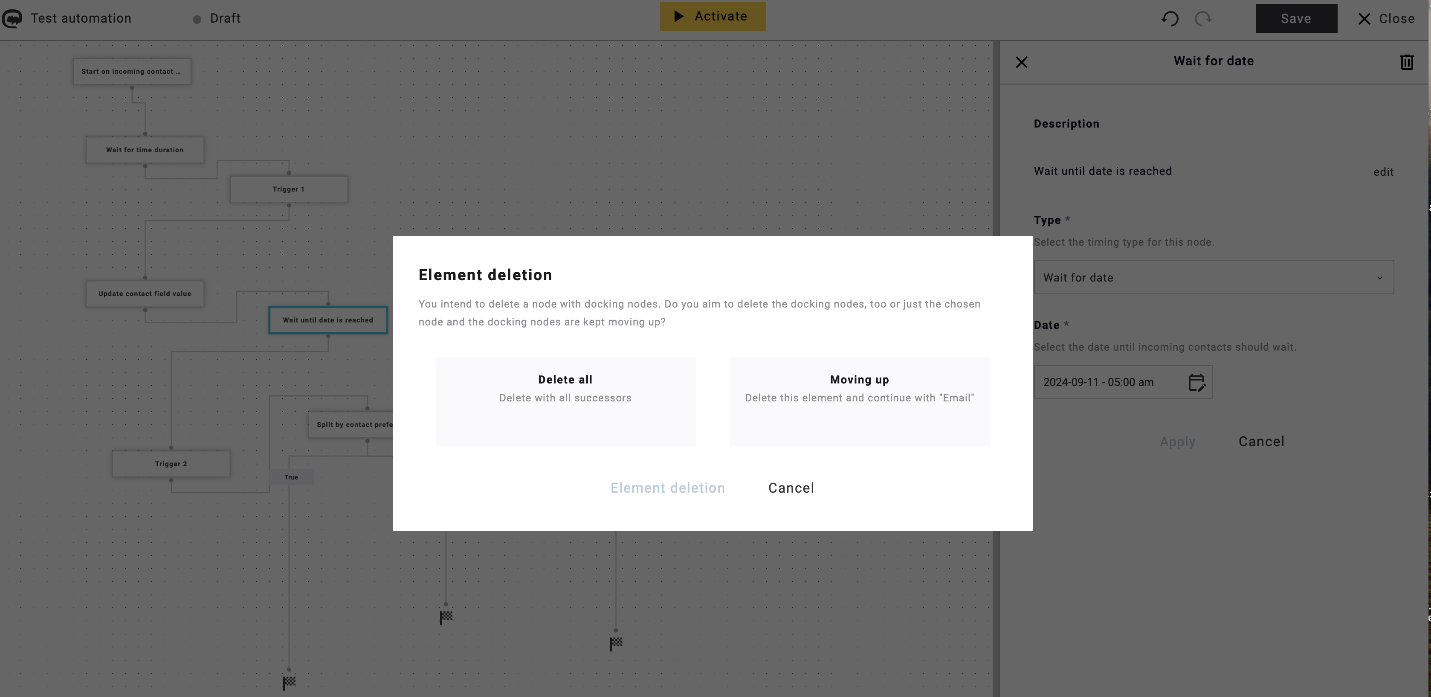
Each node of the process can be deleted with a single click on the trash can icon in the top right corner.

In this case, you will be prompted to choose whether to delete all docking nodes or only the selected element.
Validation
As in the previous version of Marketing Automation, the system automatically validates the process after clicking on the Activate button.
The pop-up window displays a list of the corrections required for activation.

Once the corrections have been made, the automation is ready for activate. Before clicking the Start button, you may choose to start the automation immediately or schedule it for later. Furthermore, there is an option to schedule its termination.


After clicking the Start button the draft version moves to Active Programs.
Active programs
Active programs can be accessed by clicking on the first tab (Active programs) from the tabs at the left corner of the screen.
In this interface you can gather data on actively running automations.
Each column shows the (from left to right):
- status,
- name, and the
- number of the started, active and finished automations.
With the square drawn in the circle you can pause or activate the automation again.
The magnifier icon provides details about the selected automation, while with the double envelope you can create a copy of it.

Similar to the start, the termination of the automation can either be stopped immediately or scheduled. This can be configured in a pop-up after clicking the pause button.

Clicking on the name of the active program terminates you to the Content Part editor panel, where you find more detailed statistics on the process by clicking on a node.
You may also pause active automation here with a single click, by pushing the yellow button on the top.
Note: the example is for illustration.

On the same page, you can also edit some nodes of active programs by clicking the Settings button on the right.
The following nodes can be modified with active programs:
- Email,
- SMS
- and Test/split.

Stop Single Contact Automation
You can stop one or more contacts from an active automation in Marketing Automation UI2. Open the automation and click the number in the Active column to filter the list.

Select the contact or contacts for which you want to stop the automation from the pop-up list. Then click on the square icon in the circle to stop the process for this certain contact or contacts.

Program History
Deactivated and archived automations are stored in the History section, which shows information about all historical automation programs in this account. This section contains automations that are permanently inactive. The structure of the interface is the same as for active programs.

As for the standard version, you can duplicate inactive automation in History by clicking on the double envelope icon, allowing it to be edited and moved to the Drafts.
