
Im Maileon Help-Center finden Sie umfassende Dokumentationen zu unserem System.
Beliebte Suchanfragen: Importe | Rest-API | Integrationen | SMS
-
Maileon Anleitungen
-
-
-
-
- 1. Basiseinstellungen
- 2. Template Editor2.0
- 3. Inhalt im Editor2.0 bearbeiten
- 3a - Editor 2.0 - App Panel Widgets
- 3b - Accessible Tables in the WYSIWYG Editor
- 3b - Barrierefreie Tabellen im WYSIWYG Editor (DE)
- 3d - SmartContent - Shopware 6 (DE)
- 3e - SmartContent - Shopware 6 (EN)
- 3f - Addition of Anchor-Links
- 4. Verteilerliste auswählen
- 5. Qualitätssicherung
- 6. Newsletter-Versand
-
- Bald verfügbar
-
-
-
-
- Bald verfügbar
-
FAQs
-
Grundlagen
-
Für Entwickler
-
-
- Adding Unsubscription Reason to Already Unsubscribed Contact
- Contacts
- Count Active Contacts By Filter ID
- Count Contacts By Filter ID
- Create Contact
- Create Contact (JSON)
- Create Contact by External ID
- Create Contact by External ID (JSON)
- Create Contact Preference
- Create Contact Preference Category
- Create Custom Field
- Custom Contact Fields
- Delete All Contacts
- Delete Contact By Email
- Delete Contact By Maileon ID
- Delete Contact Preference
- Delete Contact Preference Category
- Delete Contacts By External ID
- Delete Custom Field
- Delete Custom Field Values
- Delete Standard Field Values
- Delete Unsubscription-Marker
- Get Blocked Contacts
- Get Contact By Email
- Get Contact By Maileon ID
- Get Contact Preference
- Get Contact Preference Categories
- Get Contact Preference Category by Name
- Get Contacts
- Get Contacts By Email
- Get Contacts By External Id
- Get Contacts By Filter Id
- Get Count Contacts
- Get Custom Fields
- Get Preferences of Contact Preferences Category
- Get Unsubscription-Marker
- Rename Custom Field
- Set Unsubscription-Marker
- Standard Contact Fields
- Synchronize Contacts
- Synchronize Contacts Error Codes
- Unsubscribe Contact By Maileon Id
- Unsubscribe Contacts By Email
- Unsubscribe Contacts by External Id
- Update Contact By Email
- Update Contact By External ID
- Update Contact By Maileon ID
- Update Contact Preference
- Update Contact Preference Category
- Alle Artikel anzeigen ( 34 ) Artikel zusammenklappen
-
- Get Blocks
- Get Bounces
- Get Clicks
- Get Conversions
- Get Filtered Contacts
- Get Mailing Summaries
- Get Opens
- Get Recipients
- Get Replies
- Get Revenue
- Get Subscribers
- Get Unique Bounces
- Get Unique Clicks
- Get Unique Conversions
- Get Unique Opens
- Get Unsubscription Reasons
- Get Unsubscriptions
- Social Networks List
- Alle Artikel anzeigen ( 3 ) Artikel zusammenklappen
-
- Add Mailing Blacklist to Mailing
- Copy Mailing
- Create Dispatching
- Create Mailing
- Delete Mailing
- Delete Mailing Blacklist from Mailing
- Delete Trigger
- Get CMS2 Mailing As Zip
- Get Dispatching
- Get limit on number of contacts
- Get Mailing Archive URL
- Get Mailing Blacklists for Mailing
- Get Mailing ID By Name
- Get Mailing Report URL
- Get Mailing Thumbnail
- Get Mailing Thumbnail URL
- Get Mailings By Creator Name
- Get Mailings By Keywords
- Get Mailings By Schedule Time
- Get Mailings By States
- Get Mailings By Subject
- Get Mailings By Types
- Get Preview
- Get Preview Text
- Get Template
- Get Templates for CMS2
- Get The Reply-To Address
- Mailing – Add Attachment
- Mailing – Add Custom Mailing Properties
- Mailing – Copy Attachments
- Mailing – Create Schedule
- Mailing – Delete Attachment
- Mailing – Delete Attachments
- Mailing – Delete Schedule
- Mailing – Disable QoS Checks
- Mailing – Enable Target Group Update
- Mailing – Fill RSS SmartMailing Tags
- Mailing – Get “Ignore Permission” State
- Mailing – Get “Post Sendout Cleanup” State
- Mailing – Get Archival Duration
- Mailing – Get Attachment
- Mailing – Get Attachments
- Mailing – Get Count Attachments
- Mailing – Get DOI Mailing Key
- Mailing – Get HTML
- Mailing – Get List of Custom Mailing Properties
- Mailing – Get Locale
- Mailing – Get Mailing Domain
- Mailing – Get Max Attachment Size
- Mailing – Get Max Content Size
- Mailing – Get Name
- Mailing – Get Recipient Alias
- Mailing – Get result for Link Quality Check
- Mailing – Get result for Message Size Quality Check
- Mailing – Get result for Personalization Quality Check
- Mailing – Get result for Spam Quality Check
- Mailing – Get results for Approval Sendout Quality Check
- Mailing – Get results for Bounce Quality Check
- Mailing – Get results for Display Quality Check
- Mailing – Get results for Image Quality Check
- Mailing – Get results for Test Mail Sendout
- Mailing – Get Schedule
- Mailing – Get Sender Address
- Mailing – Get Sender Alias
- Mailing – Get Speed Level
- Mailing – Get State
- Mailing – Get Subject
- Mailing – Get Tags
- Mailing – Get Target Group Id
- Mailing – Get Target Group Update status
- Mailing – Get Text
- Mailing – Get Tracking Duration
- Mailing – Get Tracking Strategy
- Mailing – Get Type
- Mailing – Is Sealed
- Mailing – Remove Custom Mailing Property
- Mailing – Send Approval Mail to Targetgroup
- Mailing – Send Now
- Mailing – Send Testmail to Single Emailaddress
- Mailing – Send Testmail to Targetgroup
- Mailing – Set “Ignore Permission” State
- Mailing – Set “Post Sendout Cleanup” State
- Mailing – Set DOI Mailing Key
- Mailing – Set Html
- Mailing – Set Locale
- Mailing – Set Name
- Mailing – Set Recipient Alias
- Mailing – Set Sender Address
- Mailing – Set Sender Alias
- Mailing – Set Speed Level
- Mailing – Set Subject
- Mailing – Set Tags
- Mailing – Set Target Group Id
- Mailing – Set Text
- Mailing – Set Tracking Strategy
- Mailing – Start Bounce Quality Check
- Mailing – Start Image Quality Check
- Mailing – Start Link Quality Check
- Mailing – Start Message Size Quality Check
- Mailing – Start Personalization Quality Check
- Mailing – Start Quality Check
- Mailing – Update Custom Mailing Property
- Mailing – Update Schedule
- Reset Contents to Template
- Save CMS2 Mailing to Media Library
- Set limit on number of contacts before sending mailing
- Set Preview Text
- Set Template
- Set Template for CMS2 Mailing
- Set The Reply-To Address
- Upload CMS2 Mailing Contents
- Alle Artikel anzeigen ( 96 ) Artikel zusammenklappen
-
- Bald verfügbar
LPE – Use Case 2
How can I trigger a contact event?
Trigger a contact event in the Maileon system by the Landing Page Editor quickly and easily.
This process is useful for storing data in contact event properties and for immediately sending a trigger mailing or starting a marketing automation flow after a form is submitted on a landing page created with the Landing Page Editor.
1. Choose or create a contact event
Choose the proper contact event or create a new one to start the process. Navigate to List & Contacts and click on Contact Events on the left.
Select the one which you would like to trigger or create a new one (fig. 1).
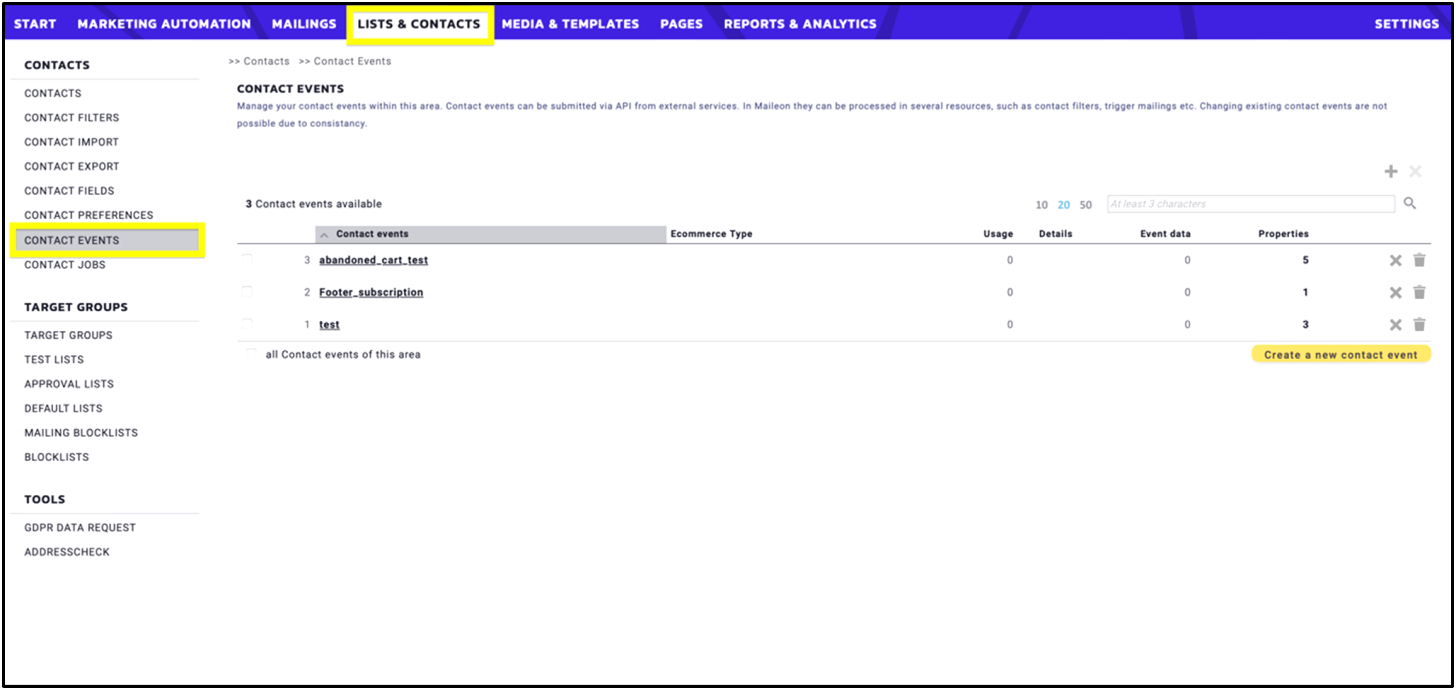
Fig. 1: First step: Choose a contact event.
When you create a contact event please assign a name and a description to it. Avoid using underscores and dots (fig. 2).

Fig. 2: Add name and description to the contact event.
Select Further processing checkbox if you only want to store the data without using it in contact filters and/or marketing automations (fig. 3).
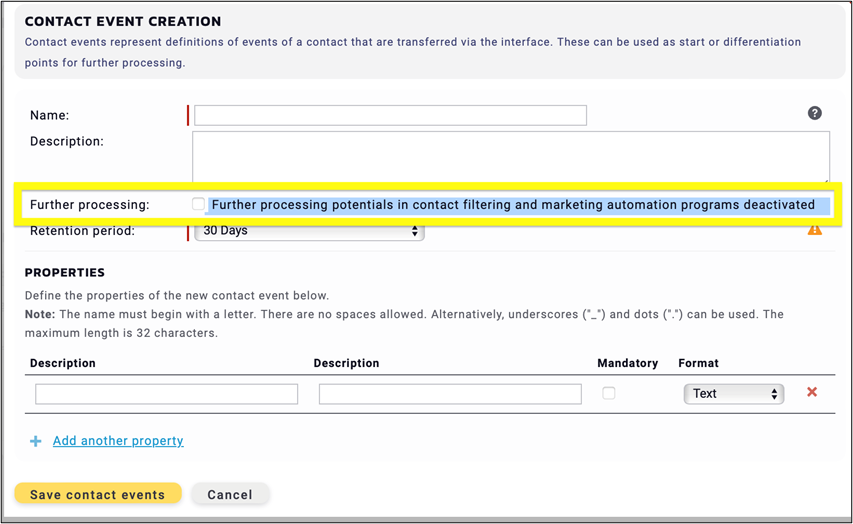
Fig. 3: Selecting the ‘Further processing’ checkbox is an option to store data.
Please note: If you set the retention period Not specified, the contact event remains without expiring (fig. 4).
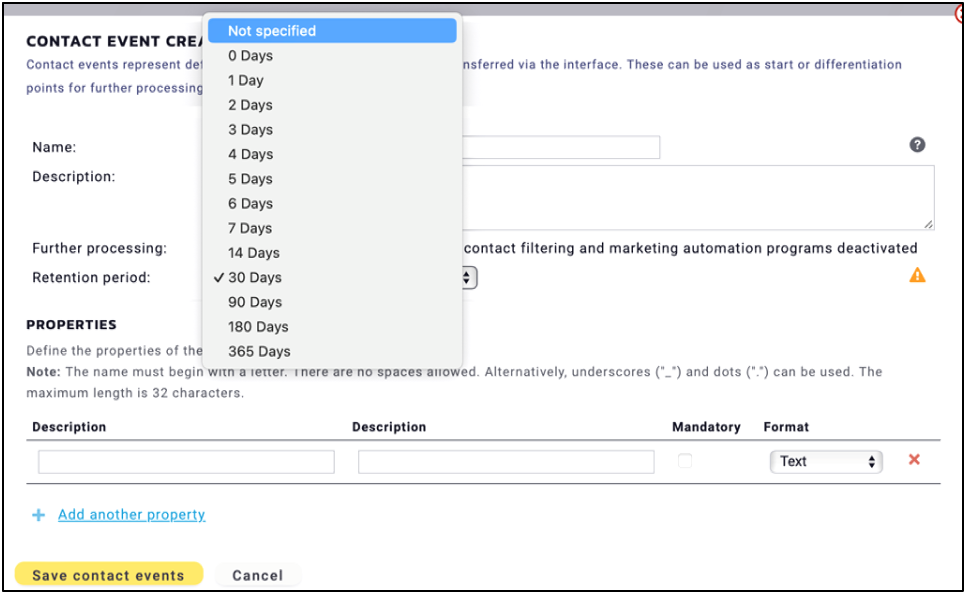
Fig. 4: Selecting the retention period ’Not specified’ means the contact event will remain without an expiration date.
Add properties into your contact event with descriptions and formats. There can be several, depending on the type of event. Here are some examples (fig. 5-7).
Contact event of abandoned cart:

Fig. 5.: Abandoned cart contact event.
Contact event of a questionnaire:

Fig. 6. Questionnaire contact event.
Contact event of a competition:
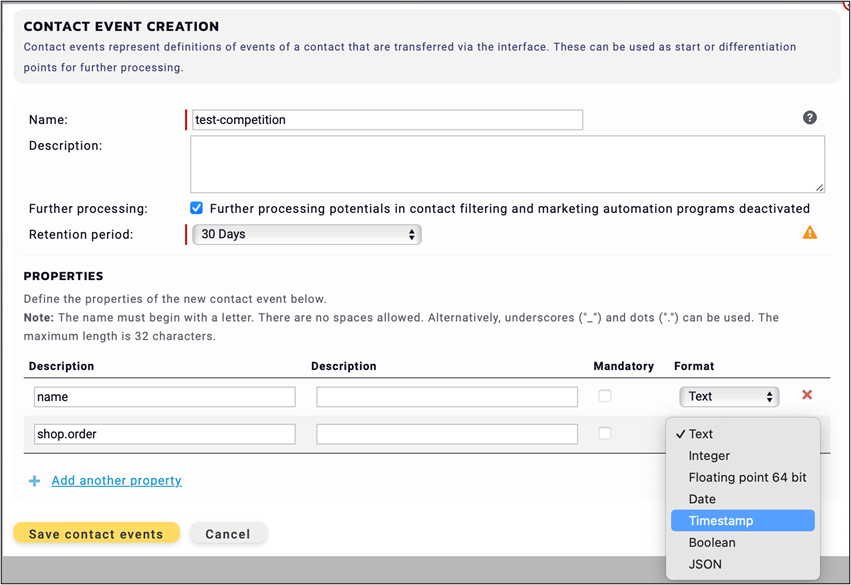
Fig. 7: Competition contact event.
The following section outlines the process of creating fields in the Landing Page Editor to capture a contact event for a competition, including name and timestamp.
2. Create fields in the LPE
After selecting or creating the appropriate contact event, navigate to Pages, where you’ll find all the landing pages you previously created. Convert a published page back to draft and start editing or create a new one by clicking on the plus icon click the plus icon (  ) to start creating a page.
Name and select the type of page you desire. Since almost all forms , select any type – except the Unsubscription form (fig. 8).
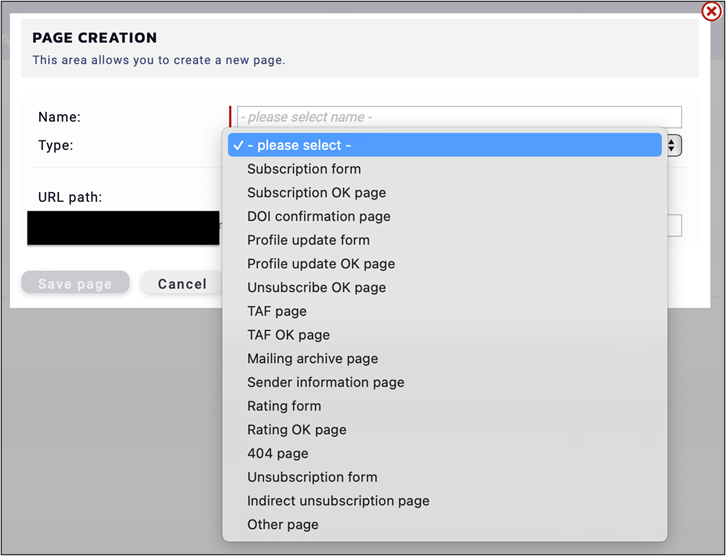
Fig. 8: Select any type of form, except the unsubsciption one.
Choose a blank page and start to build up your page From Scratch or use
- a previously edited page from the Page Library,
- a template from the Page Gallery.
All predefined templates are editable.
This example works From Scratch to make the process transparent (fig. 9).
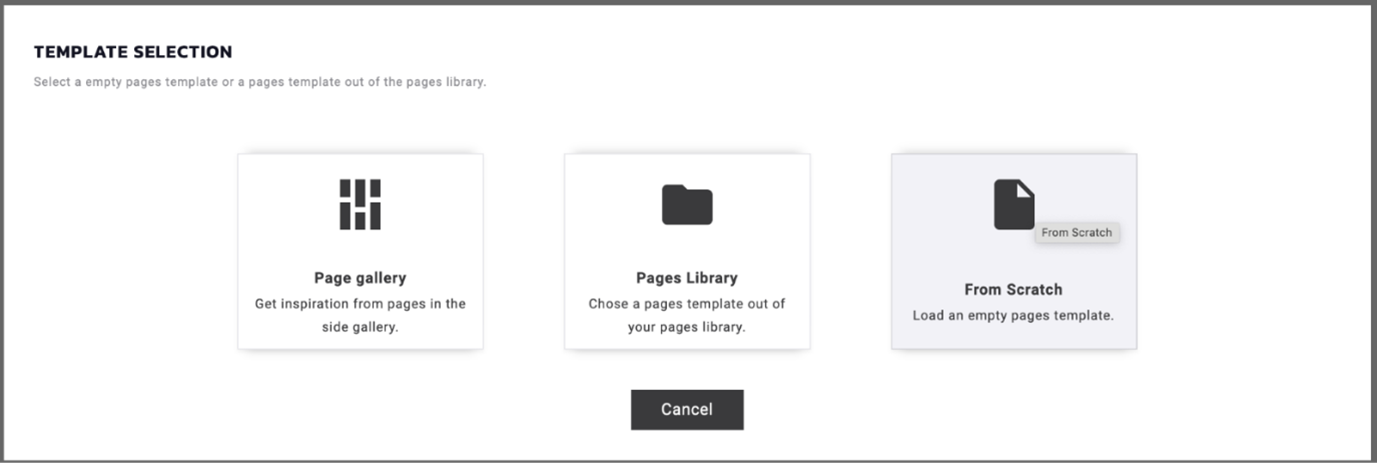
Fig. 9: First step in building a page from scratch.
When entering the editor, use the Form element from the predefined Article Templates in the tool panel serve. This element is editable, formatted according to the relevant data (fig. 10).
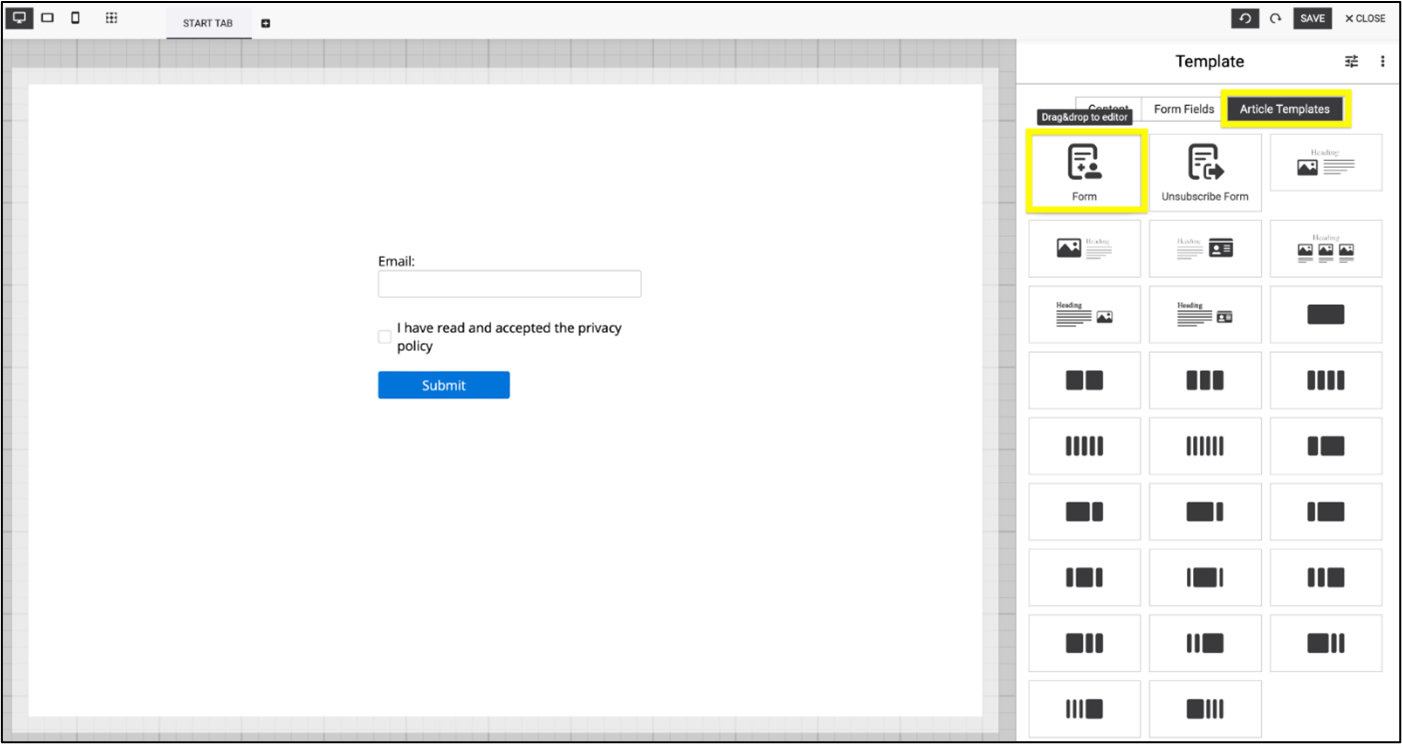
Fig. 10: The ’Form’ element is editable and serves as a useful starting point.
Duplicate the element by choosing the Duplicate block icon from the context menu bar next to the element (fig. 11).
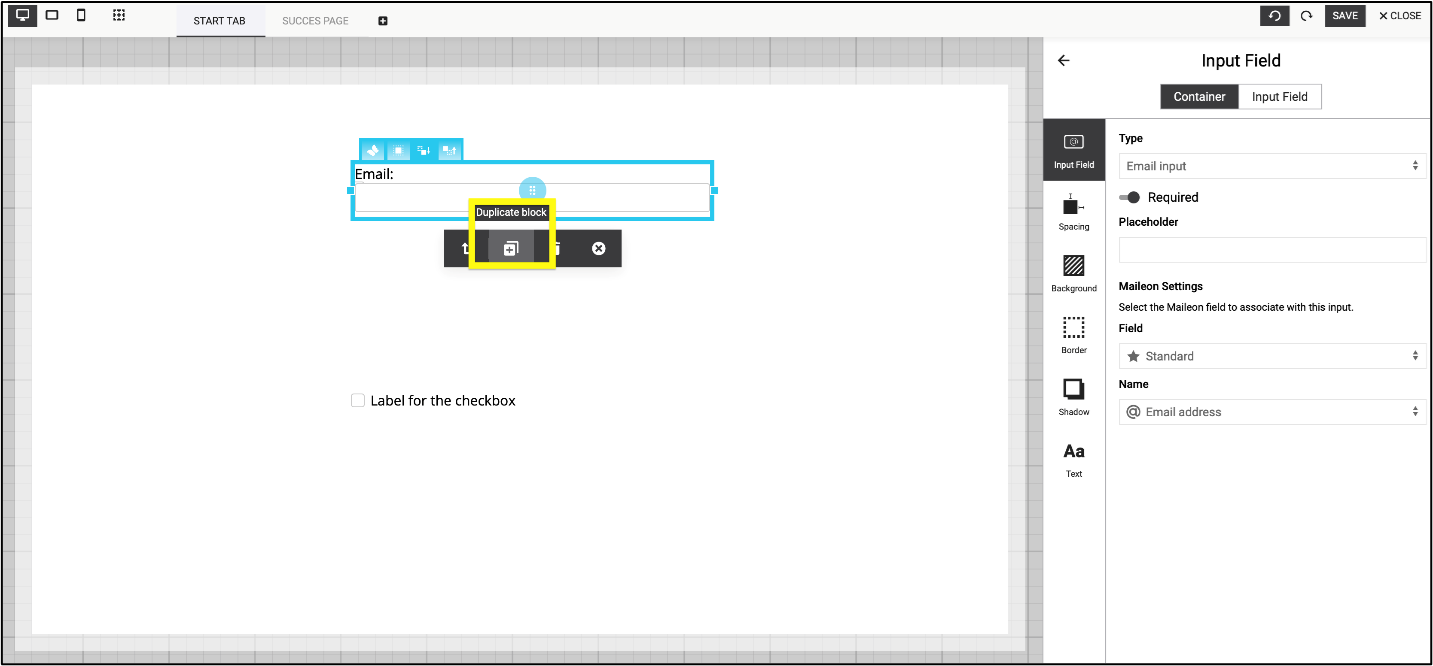
Fig. 11: Duplicate the corresponding number of elements.
The required number of elements is based on the number of properties in your contact event.
In the example, we add two items to the process. After duplication, rename the elements according to the previously specified properties by clicking in the text area (fig. 12).
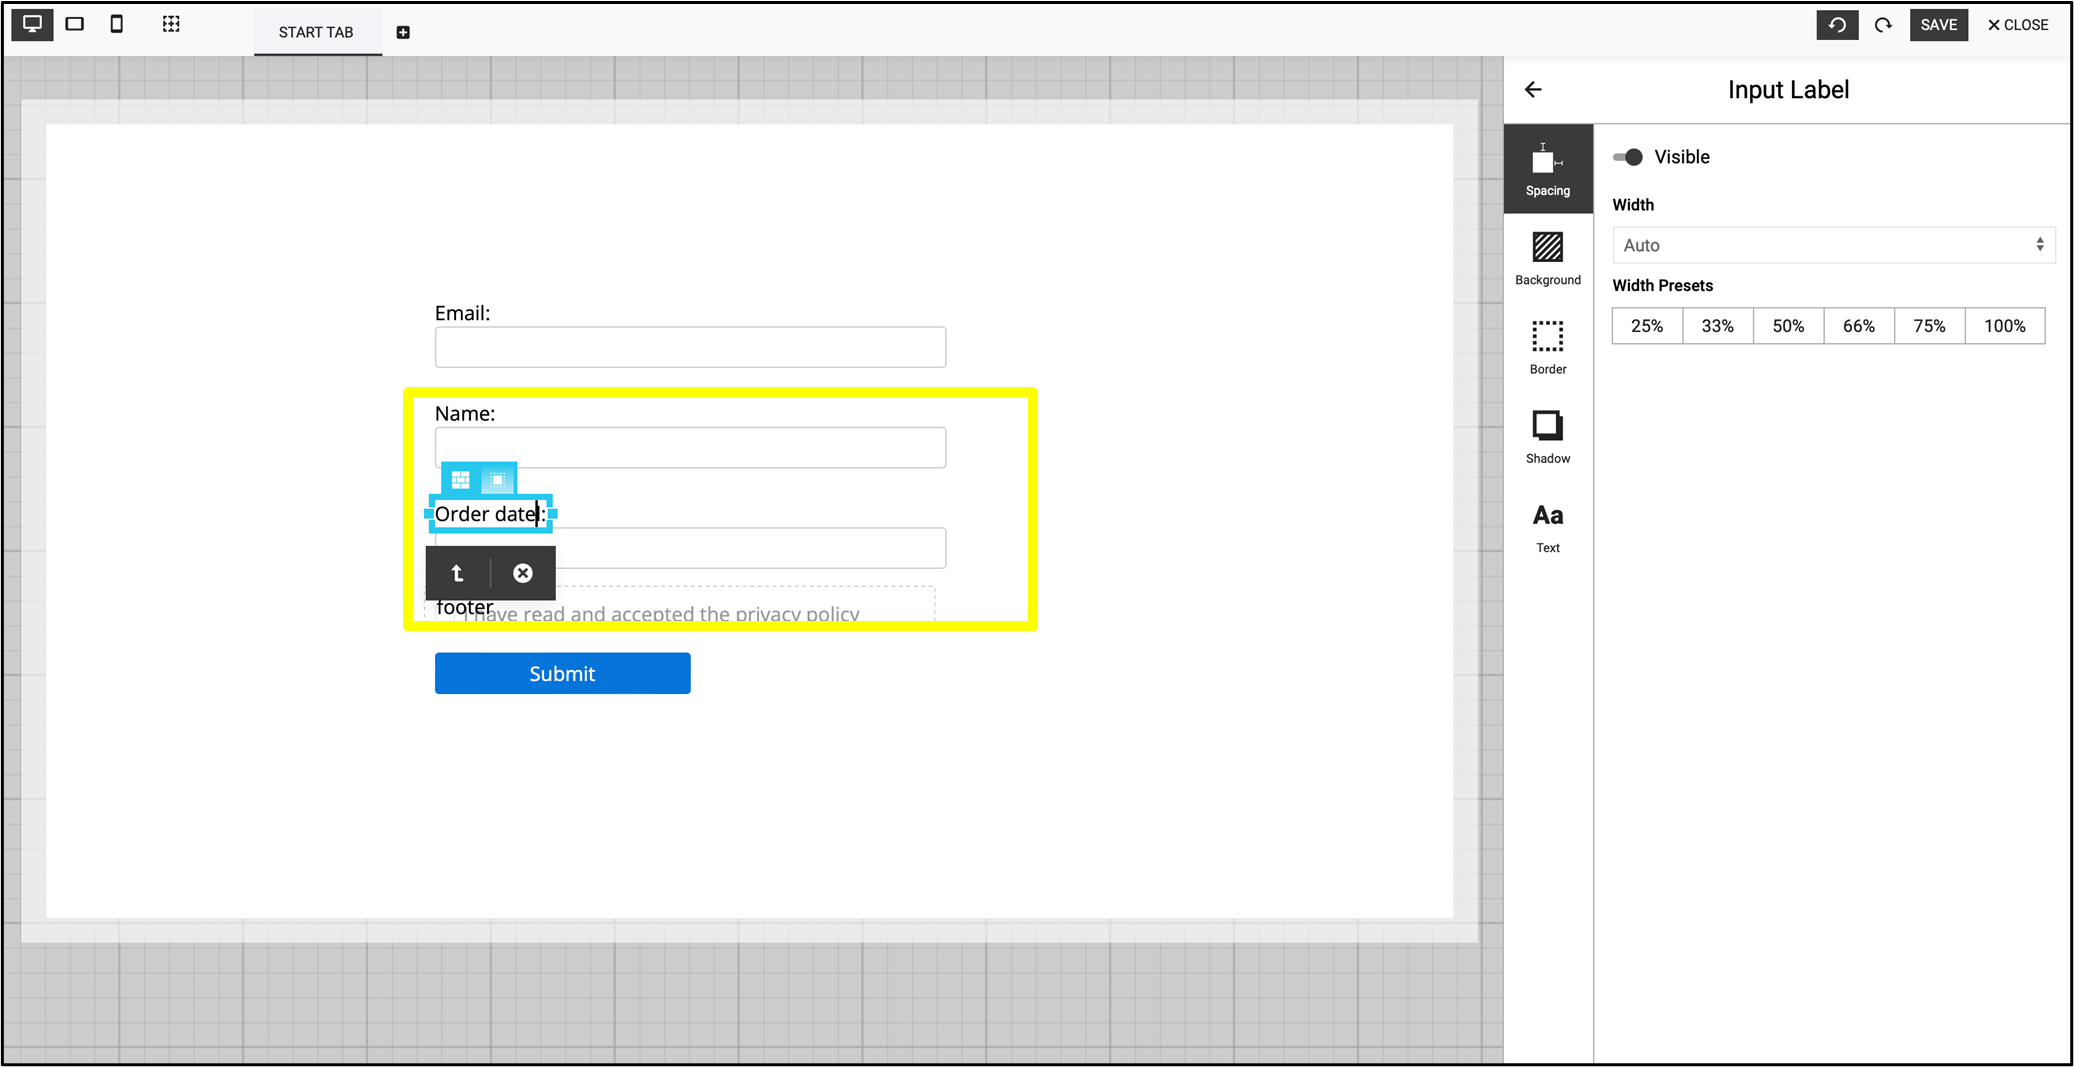
Fig. 12: Rename the elements to the previously specified properties by clicking in the text area.
After renaming the element, change its settings in the menu. Since it is now the element Name, change the type into Text input (fig. 13).
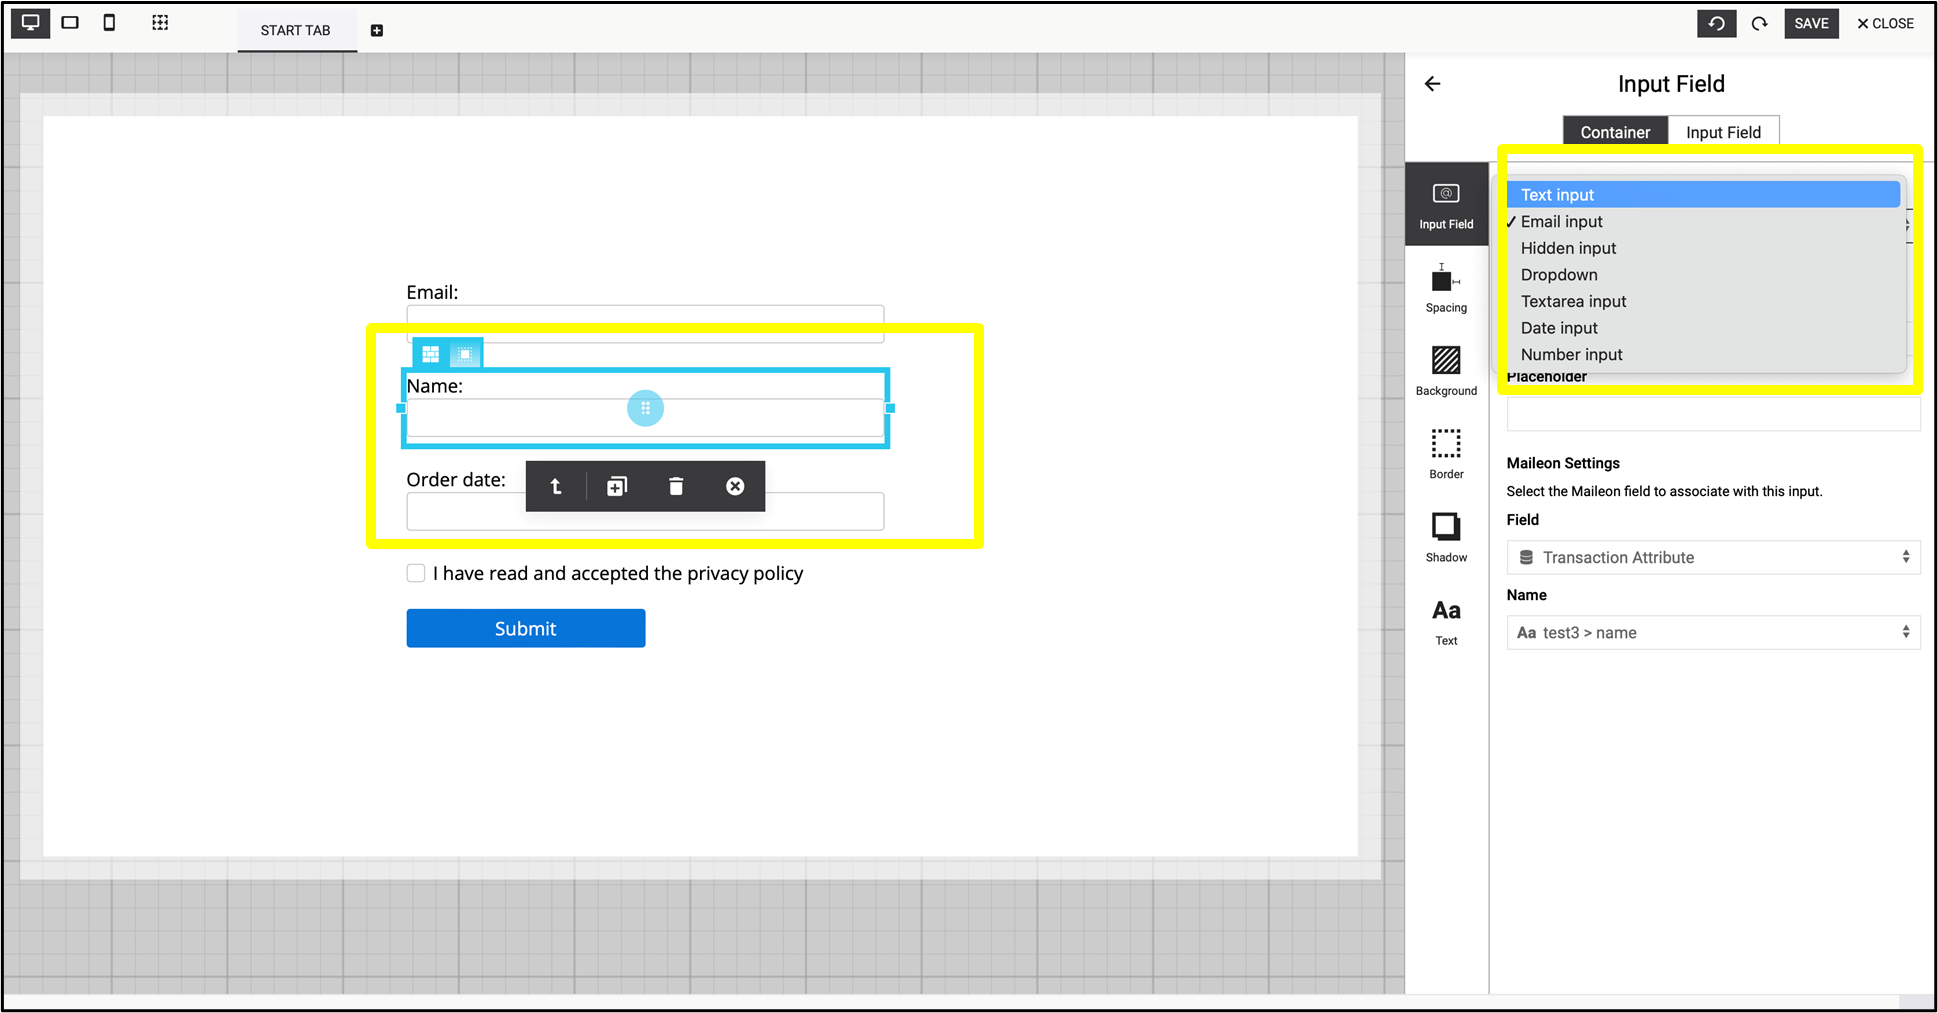
Fig. 13: Switch the type of element into ‘Text input’.
The format of the phone number should be like this: +4930901820. Otherwise, an error message will display.

Fig. 14: Selecting the phone number as an ‘Input pattern’ restricts input to that format only.
After switching the Type, switch the Field into Transaction Attribute (fig. 15).
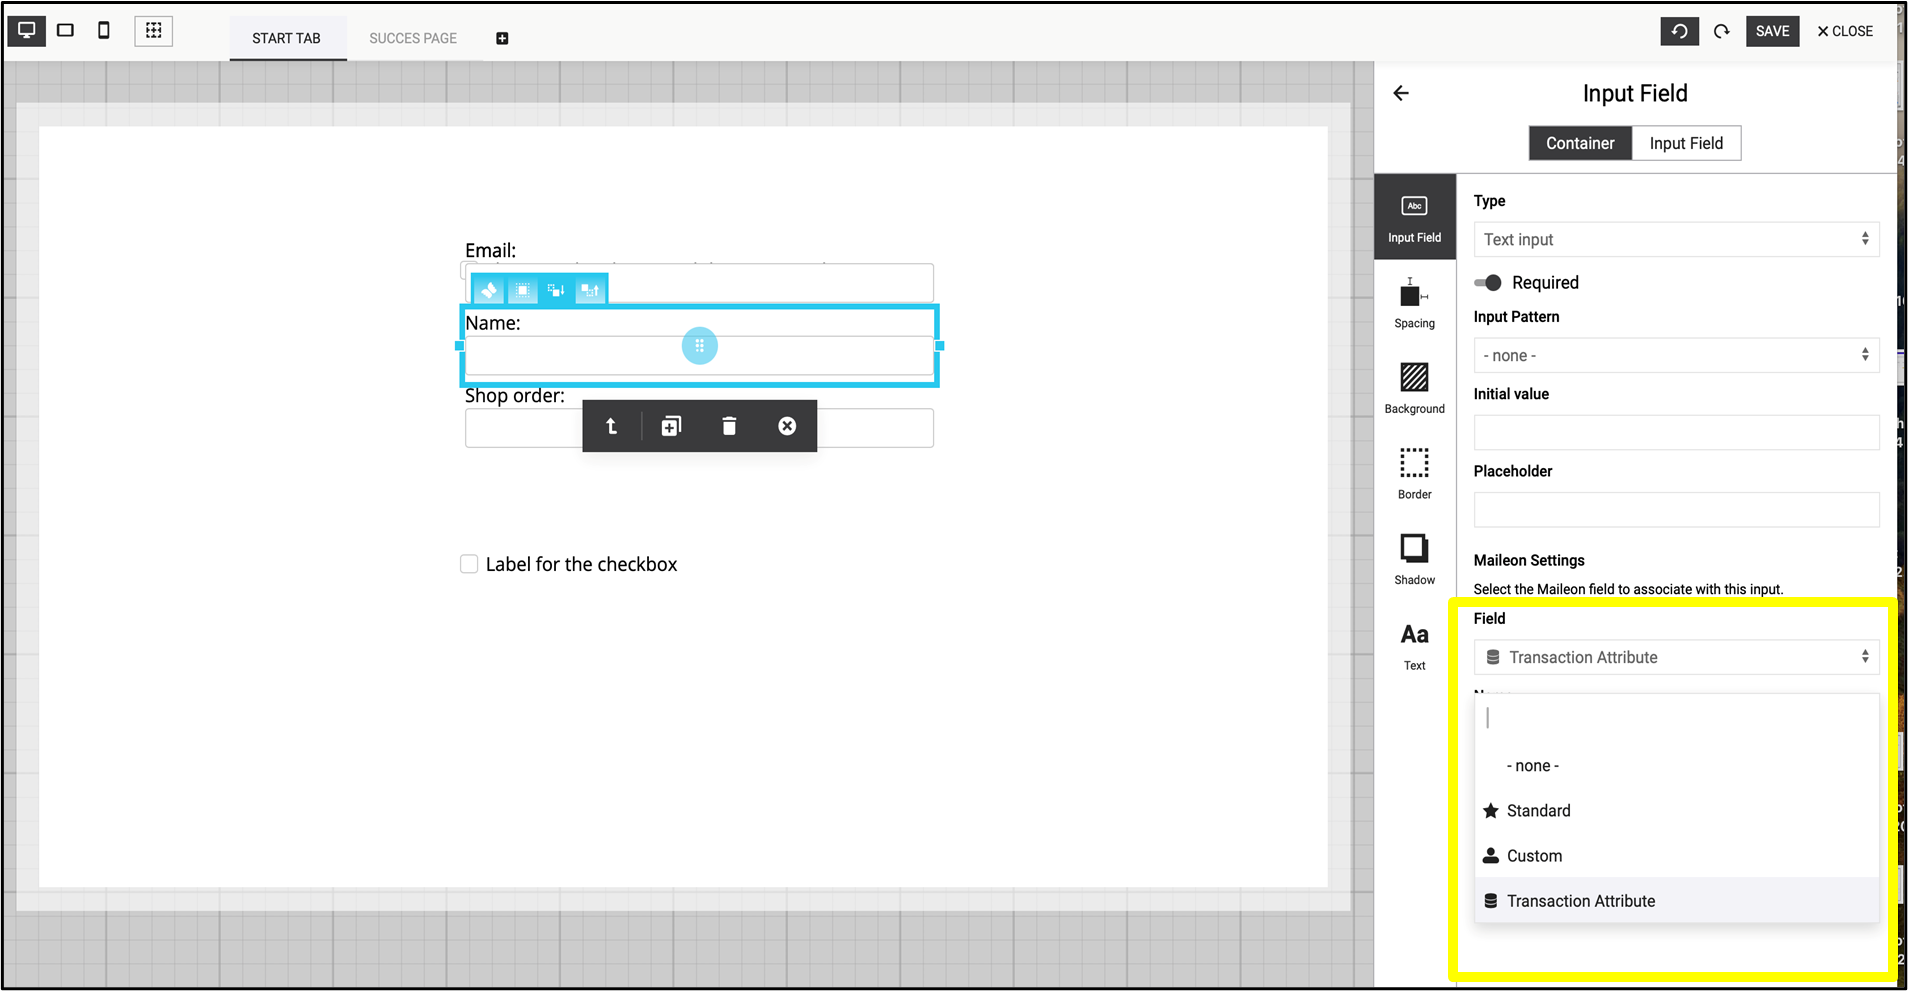
Fig. 15: Switch the ‘Field’ into ‘Transaction Attribute’.
Finally, select the property of the element to link the contact event to the element. In this case, it is the Name (fig. 16).

Fig. 16: Select the property of the element.
Now the editing of the first element is complete.
The structure of the second element (Shop order) is similar. The Type is Date input, which is the date of the order (fig. 17).
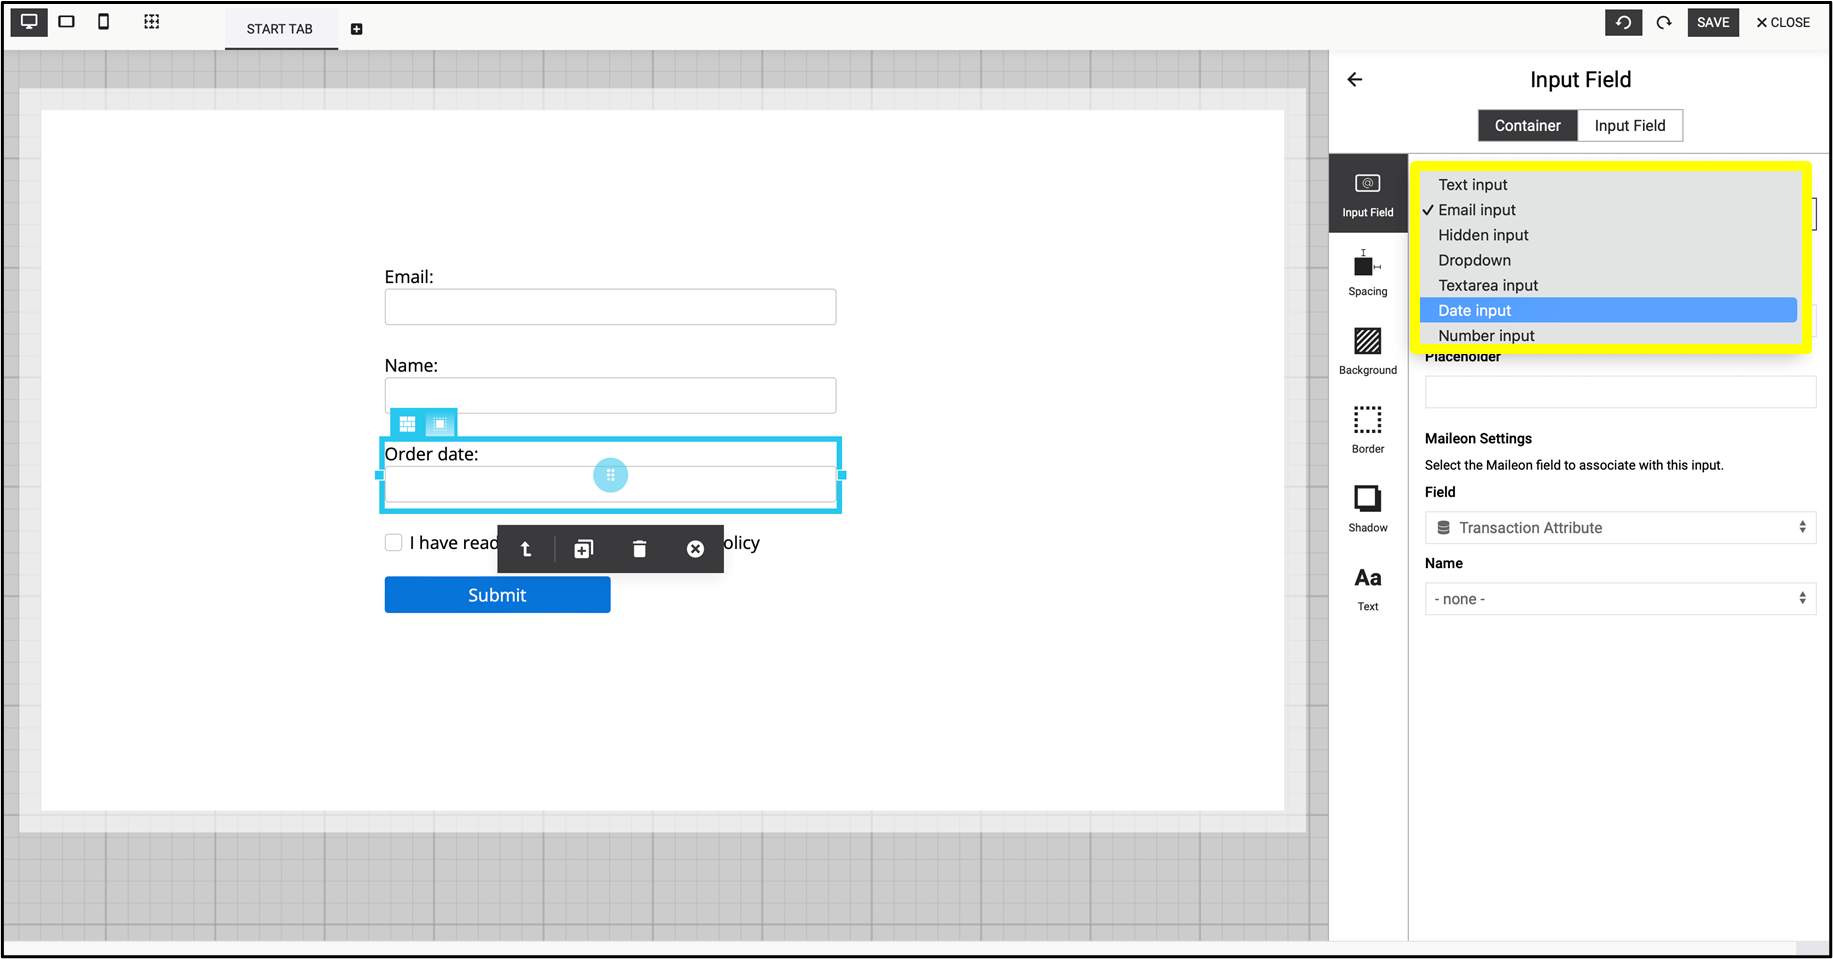
Fig. 17: Set the type of the ’Order date ’element.
Add minimum and maximum date of the order. Initial value is only required if you want to specify a fixed value (fig. 18).
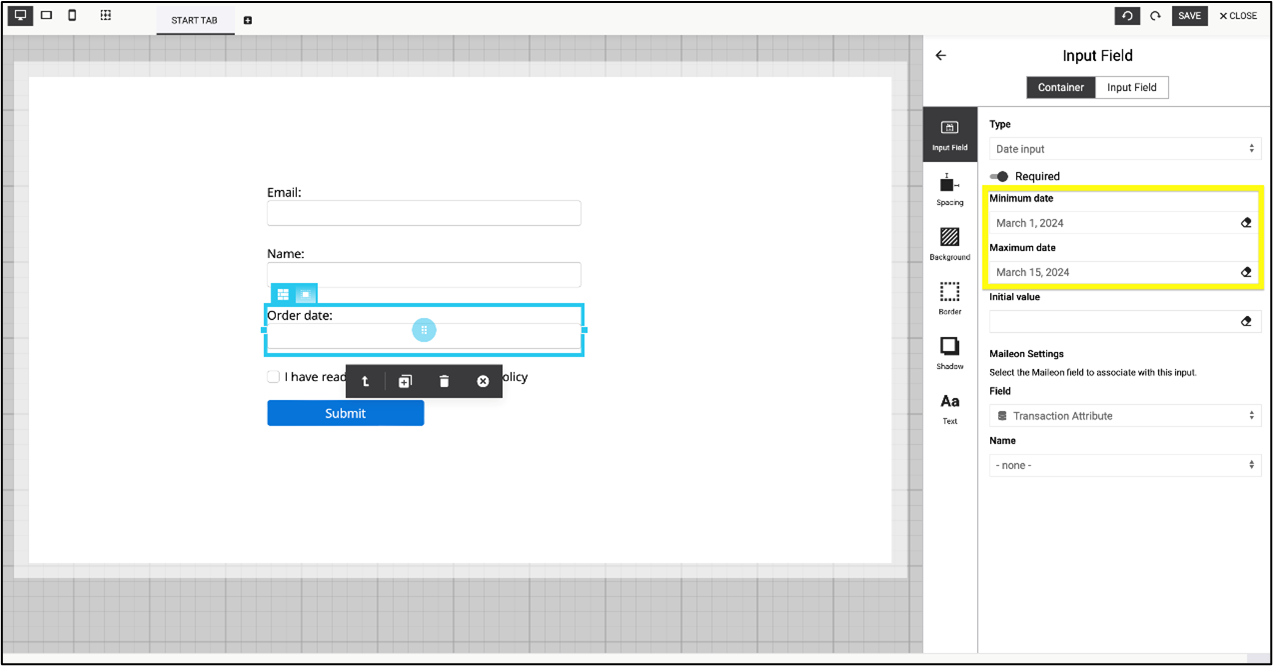
Fig. 18: Set the dates of the order.
Mark Field as Transaction Attribute like you did with the first element (fig. 19).

Fig. 19: Set the ‘Field’ as ‘Transaction Attribute’.
In this case only one option can be selected: the order.date (fig. 20).
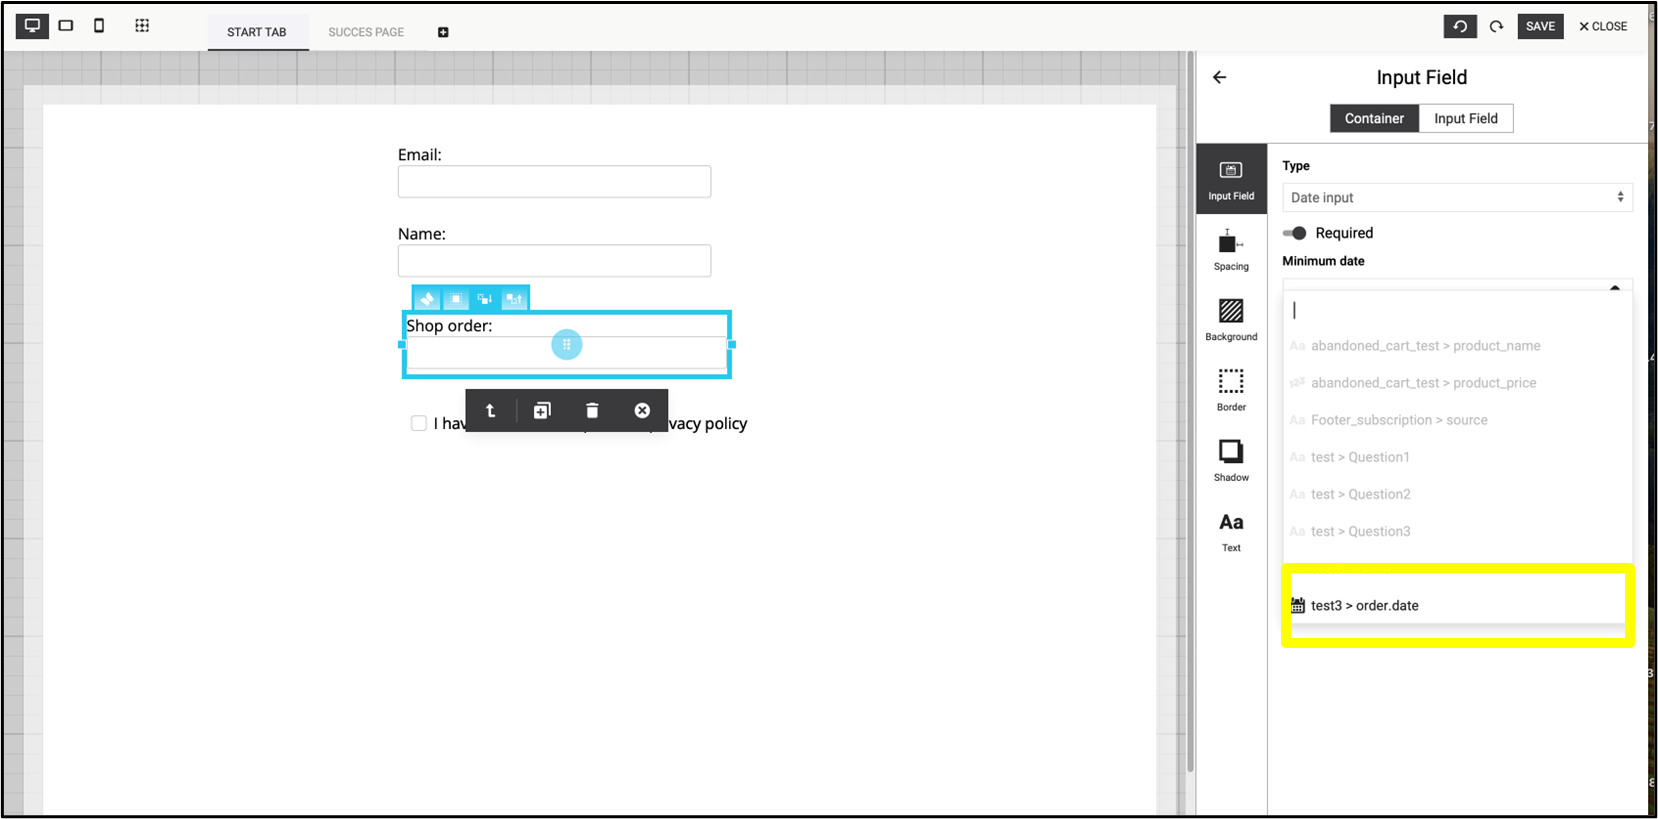
Fig. 20: The ‘order.date’ is the only option that can be selected in this section.
Once you have finished editing the elements, you have completed the basic steps of creating trigger contact events.
3. Hidden fields
You can also add hidden fields to the process. These elements are useful to run a guaranteed contact event, or to add relevant information that applies to all subscribers.
Add a Hidden field from the Form fields to the editor (fig. 21).
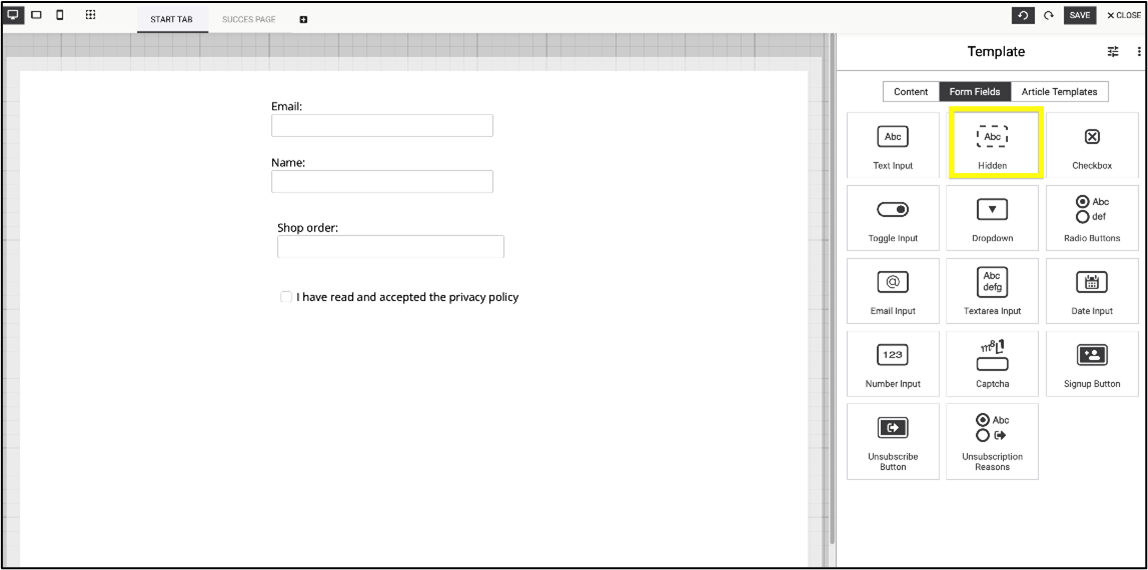
Fig. 21: Add a ‘Hidden field’ to you process.
The Type will automatically be Hidden input. Add the Initial value, which will be the source of the subscription. This can be any information that applies to all the subscribers e.g. homepage or footer (fig. 22).
The rest of the setting is similar to the previous elements.
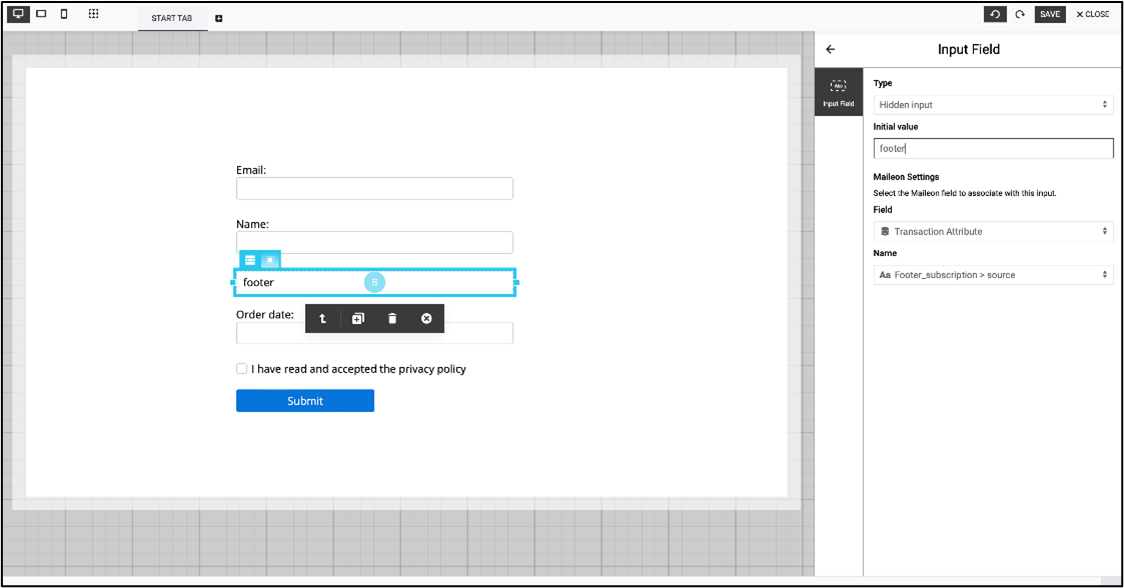
Fig. 22: Settings of a hidden field.