
Im Maileon Help-Center finden Sie umfassende Dokumentationen zu unserem System.
Beliebte Suchanfragen: Importe | Rest-API | Integrationen | SMS
3a – Editor 2.0 – App Panel Widgets
Emailing Campaign Editor – App Panel Widgets
1. Introduction
SmartContents in Maileon are dynamic elements that make it easy to personalise and automate your emailing campaigns. Rather than working with static text or media, SmartContents automatically pull in and display up-to-date data from external sources or predefined rules, ensuring your messages stay relevant and engaging.
Find these applications among the emailing editing tools (fig. 1). The most commonly used include:
- Import CSV
- RSS Feed
- Smart Bot
- YouTube
- Web Font Manager
- Themes
- Barcode 128
- QR Code
- WYSIWYGizer
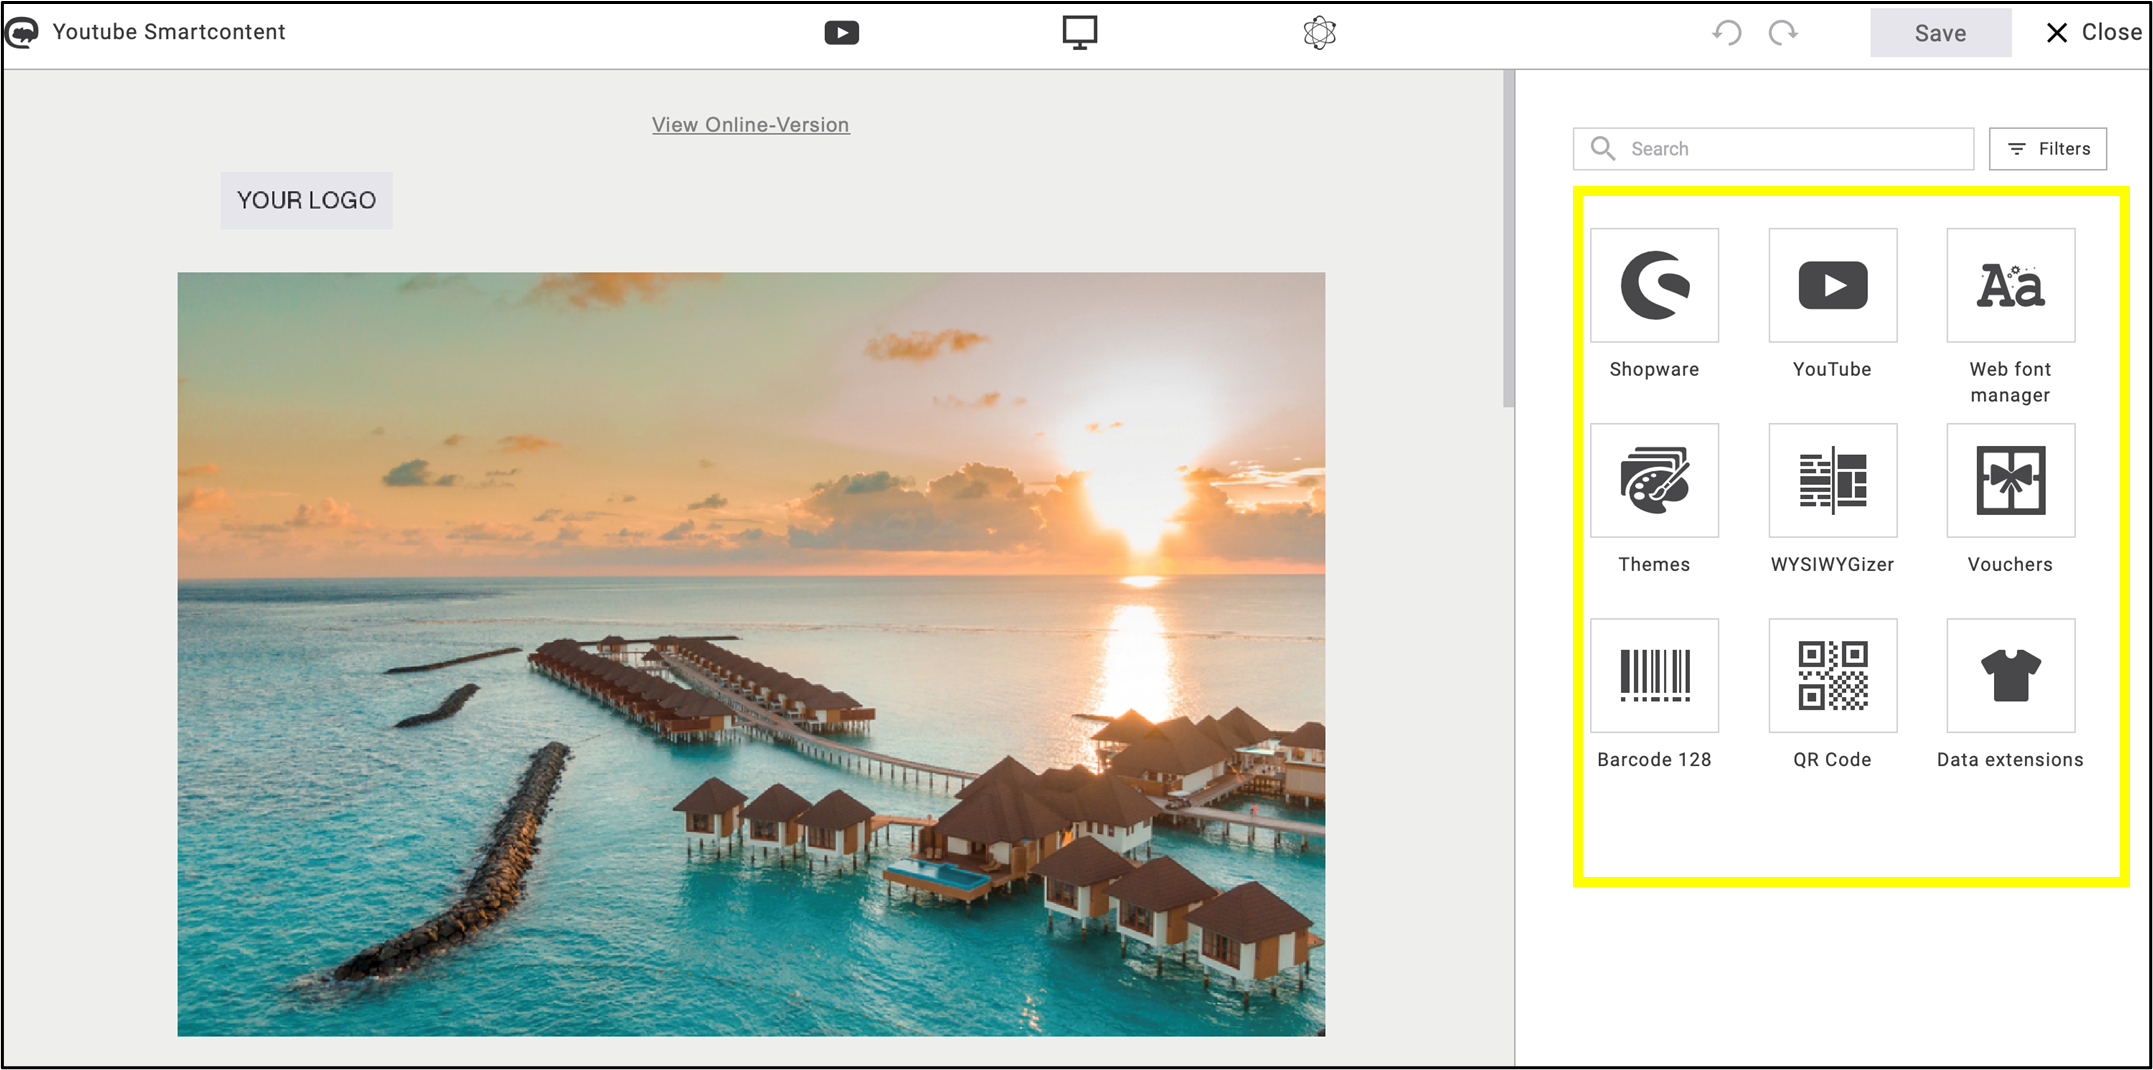
fig. 1: Find SmartContents in the email editing tools.
This documentation provides detailed descriptions of YouTube and Web Font Manager SmartContents.
2. YouTube
Embedding video files directly into an email is technically not supported due to email client restrictions. Instead of embedding, very small videos can be integrated as animated GIF.
To include video content in Maileon, you can refer to externally hosted videos on YouTube with SmartContent. This ensures full compatibility across all inbox providers and keeps the email size optimal (fig. 2).
These automatically pull in details such as the video title, thumbnail, description, or views directly from YouTube, saving you time and ensuring a smooth display.
In addition to this documentation, you can find further information about using YouTube SmartContent in the Help Center.
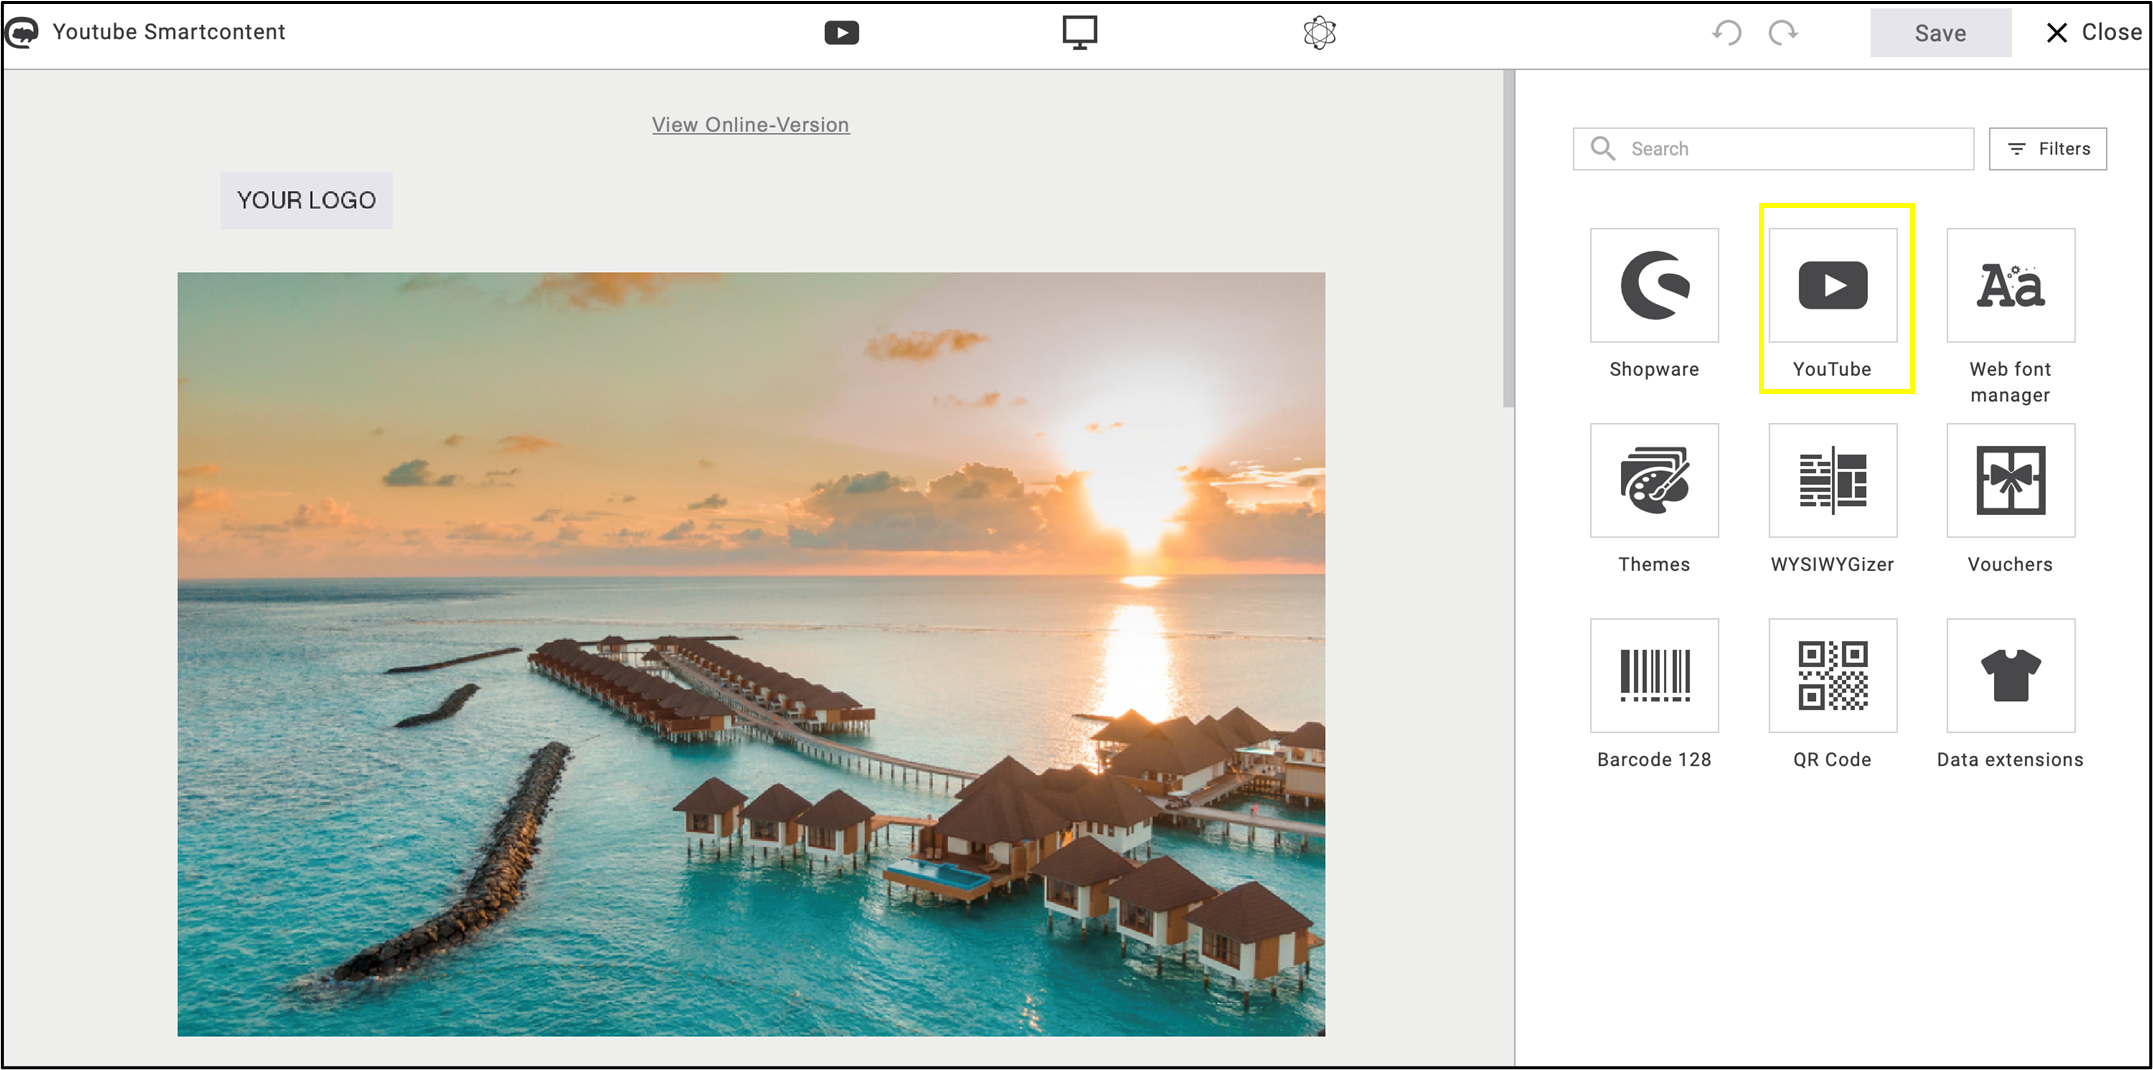
fig. 2: ’YouTube SmartContent’ placeholders keep your emailings lightweight, reliable, and dynamic.
YouTube SmartContent allows real-time video integration with customisable previews, supports dynamic personalisation using recipient data, and boosts engagement with visually rich content.
Note: The emailings displays an image linking to the YouTube video.
Use this feature to include instructional videos, product demonstrations, promotional videos, event summaries, and more.
As a first step, insert an empty text box into the emailing, which can later be parameterized (fig. 3).
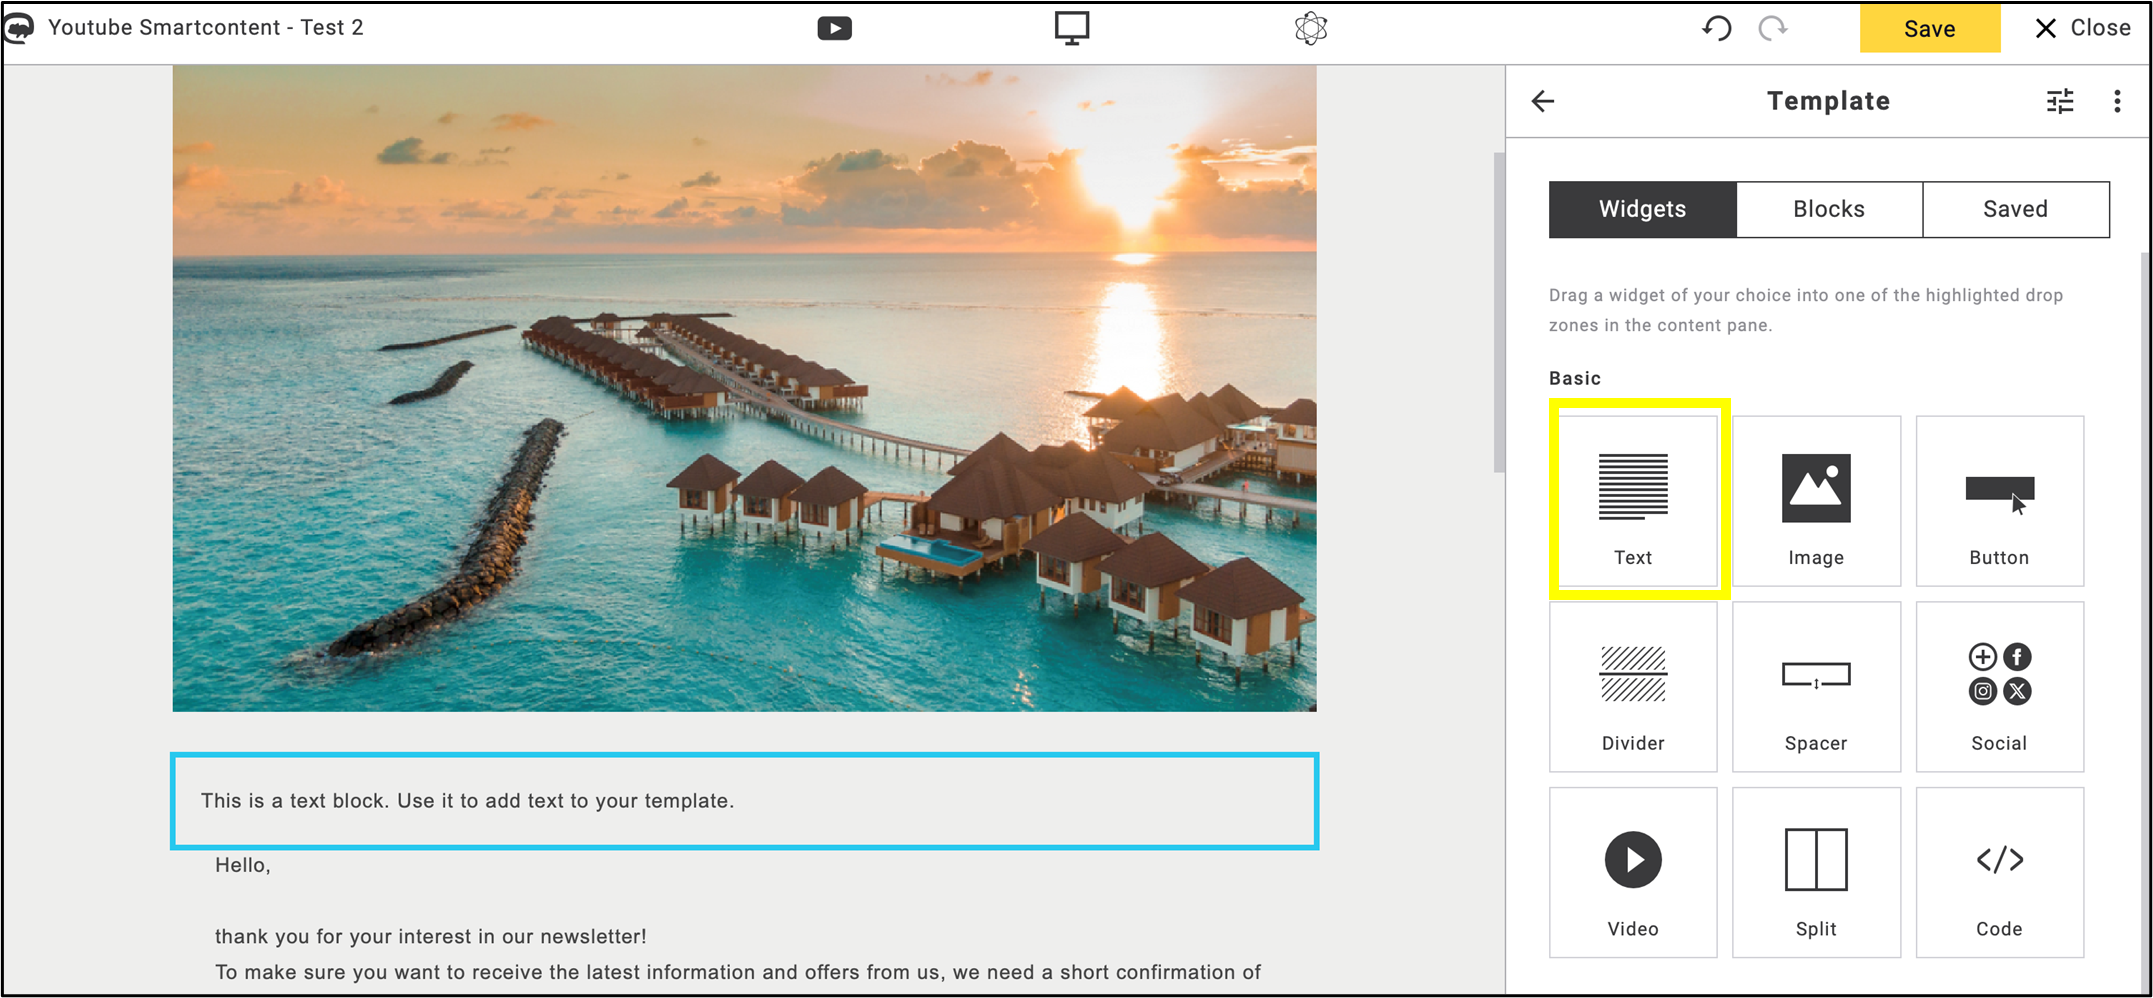
fig. 3: Insert an empty text box as the first step, ready for later customisation.
Click the Insert Placeholder icon  and select the YouTube placeholders that will contain the main video information, such as the title or description (fig. 4, fig. 5).
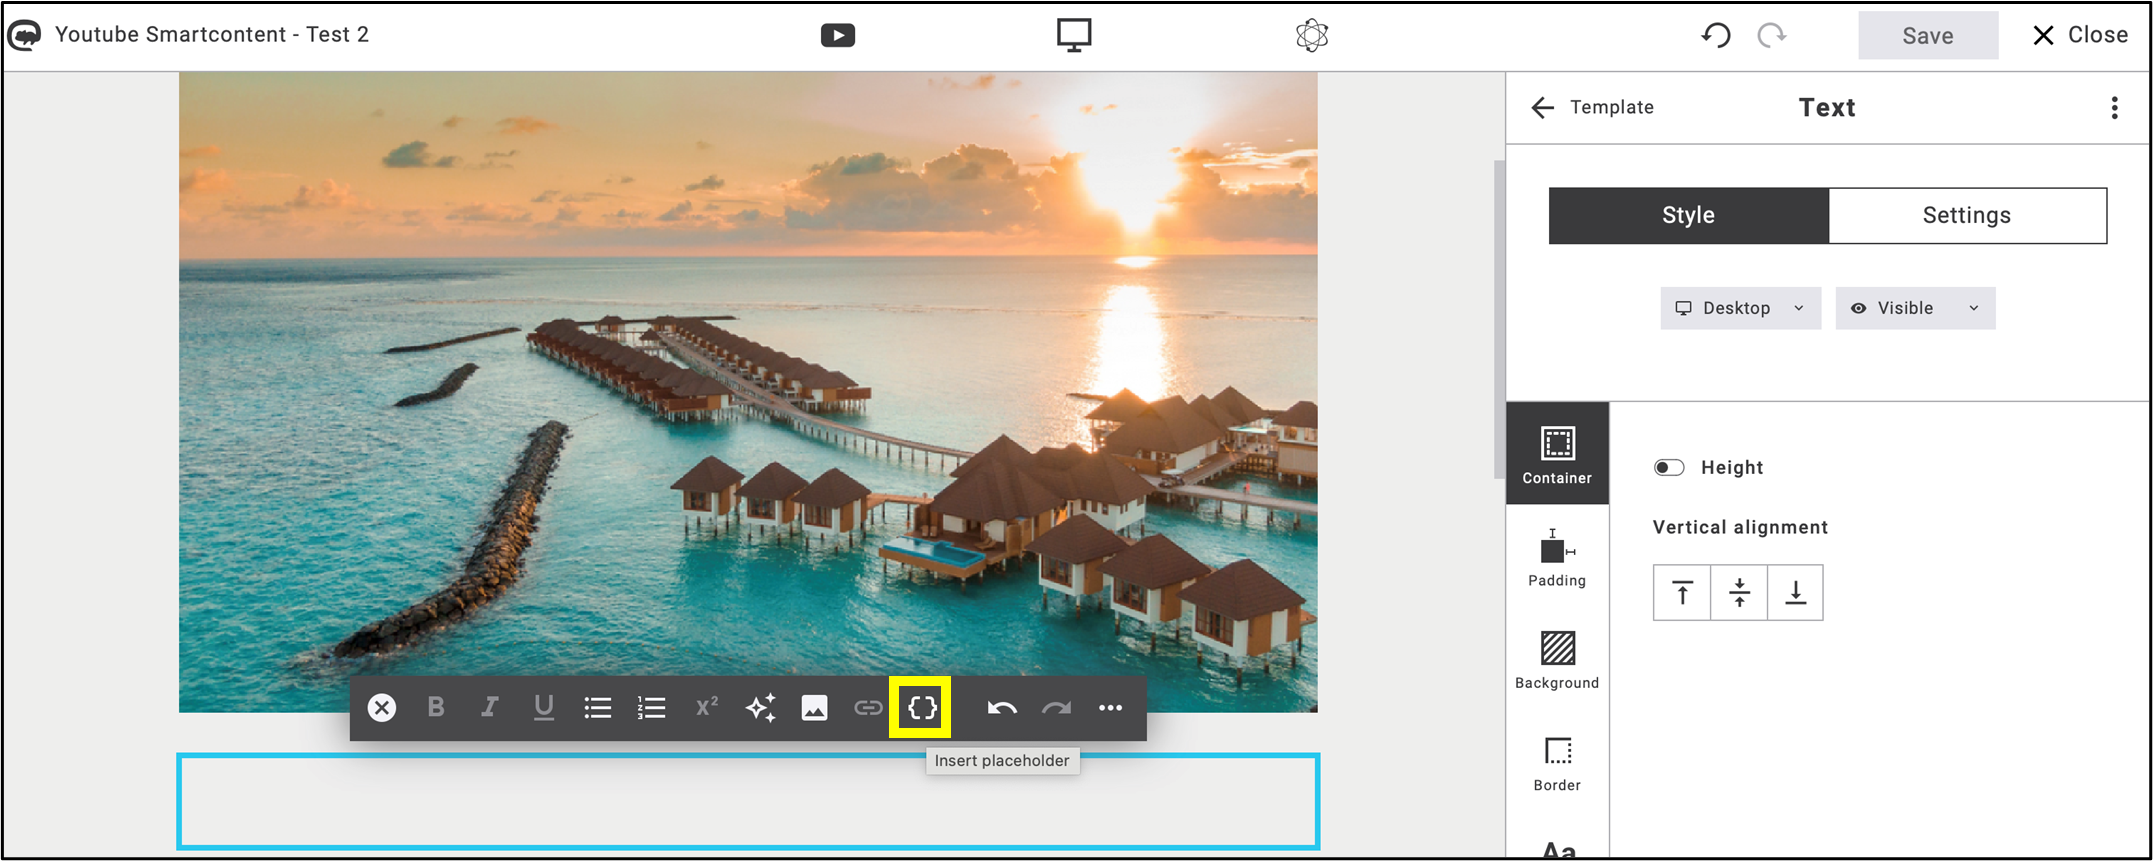
fig. 4: Click the ‘Insert Placeholder’ icon to begin setting the parameters.
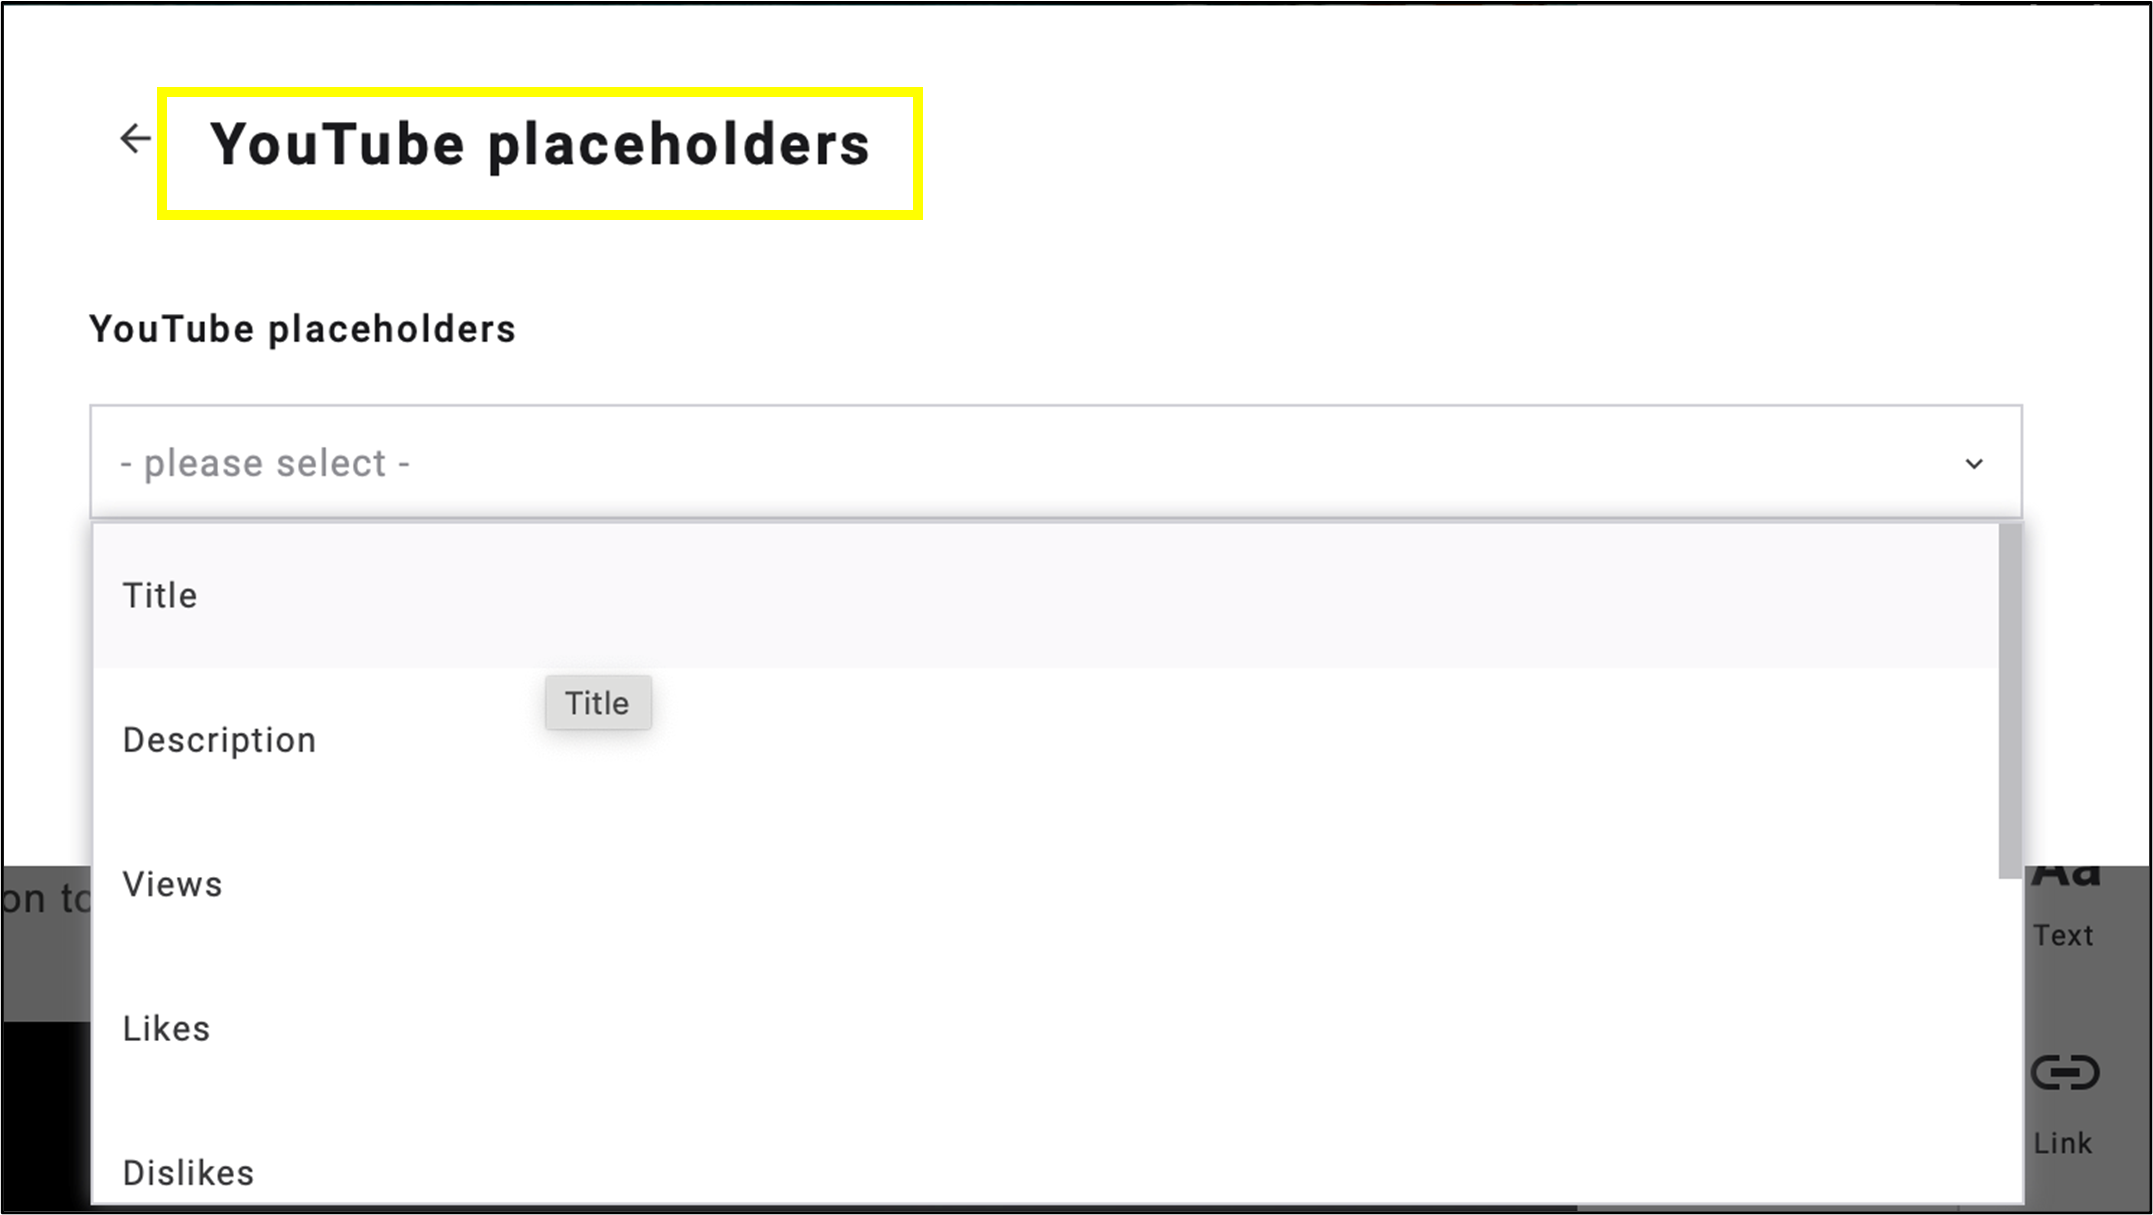
fig. 5: Select YouTube placeholders to display key video details.
The parameterised placeholders will appear in the text box. Next, click the YouTube SmartContent icon (fig. 6).
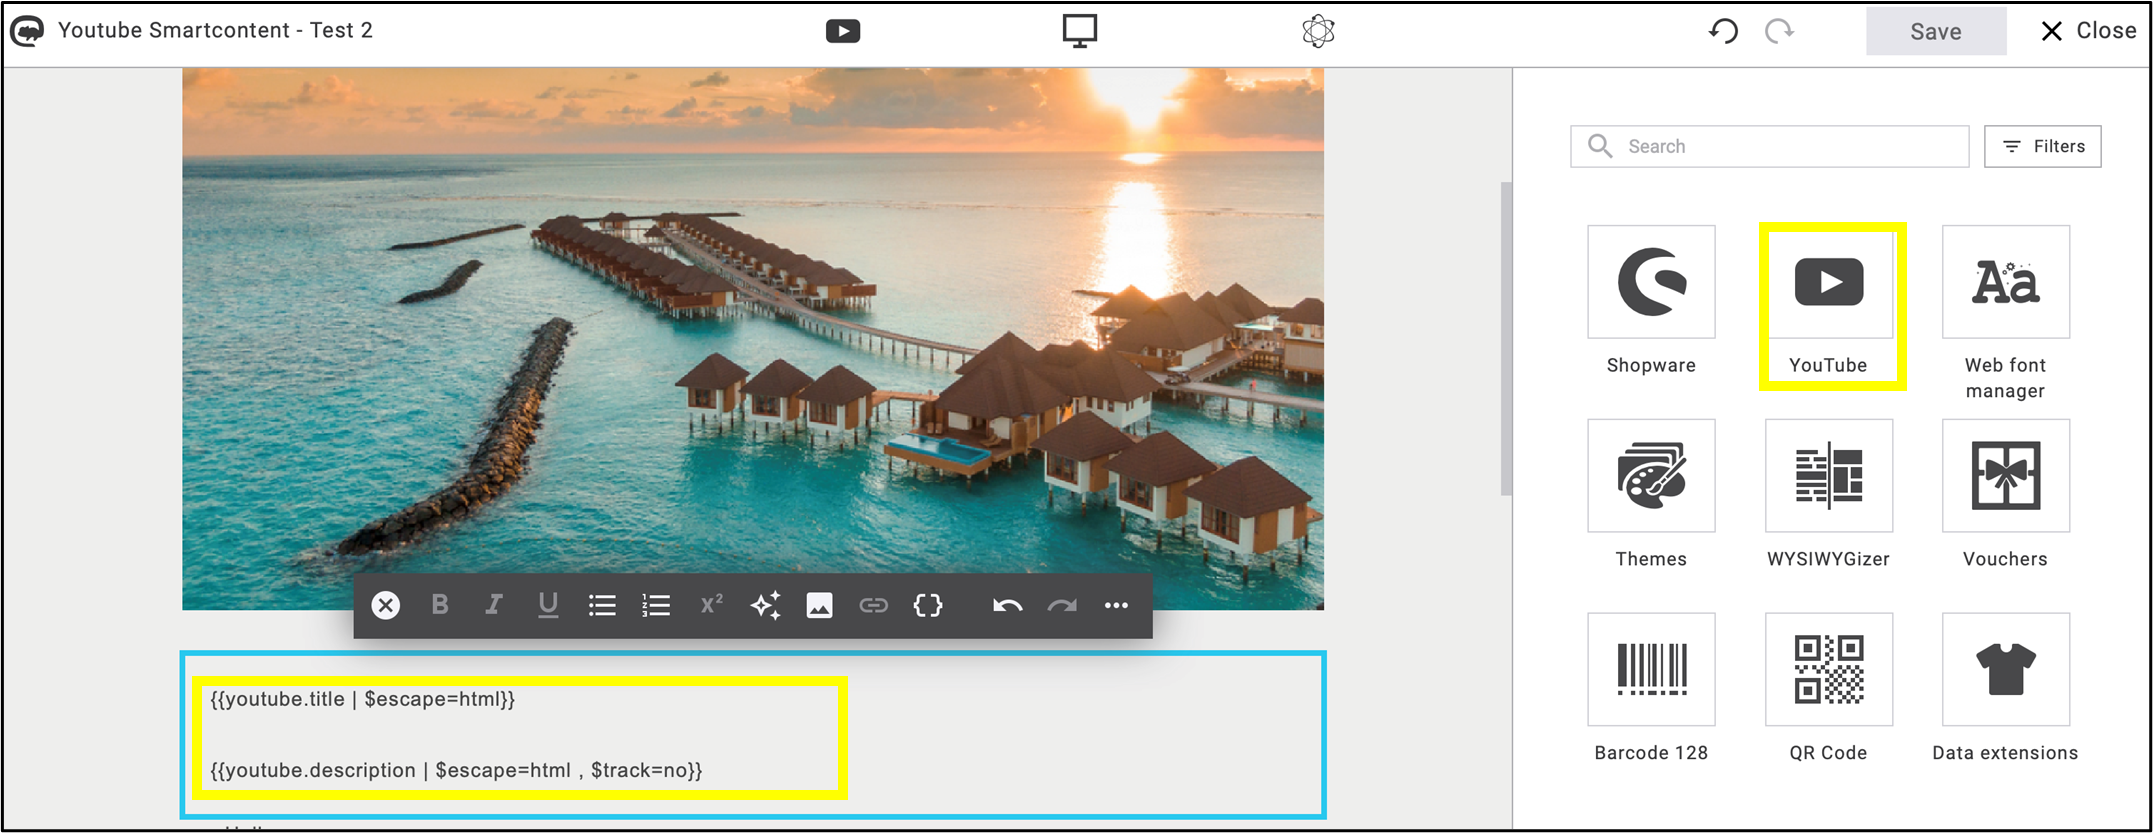
fig. 6: After parameterising the placeholders, click the YouTube icon.
An easy-to-follow, multi-step process appears, starting with a basic setup.
The content block is automatically selected. For each chosen feed item, the block is duplicated, and the placeholders are replaced with the corresponding fields from that item (fig. 7). Click Next to proceed to the next step.
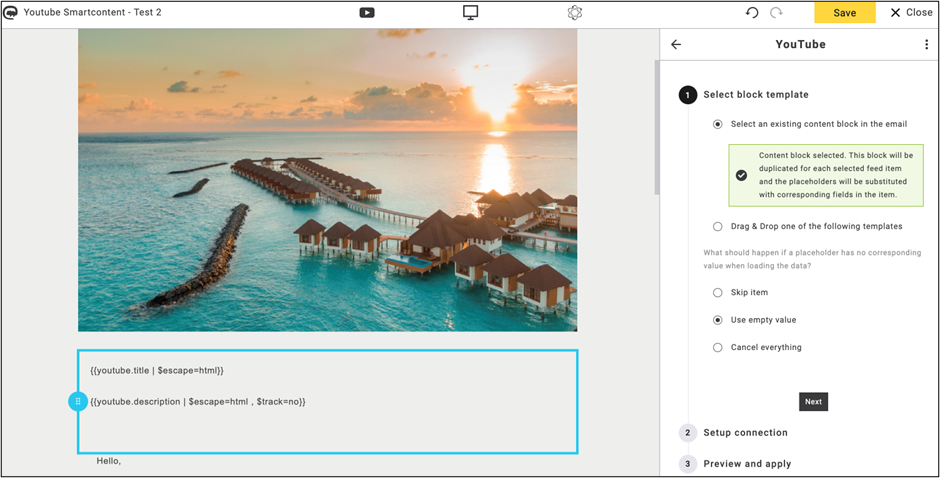
fig. 7: The content block is automatically selected in the 3-step process to begin.
In the second step, link the video and define the playback start options.
The generated link can direct recipients to the video either from the beginning or from a specified timestamp. To start the video at a scheduled time, enter the desired time interval (fig. 8).
Once step two is complete, click Next.
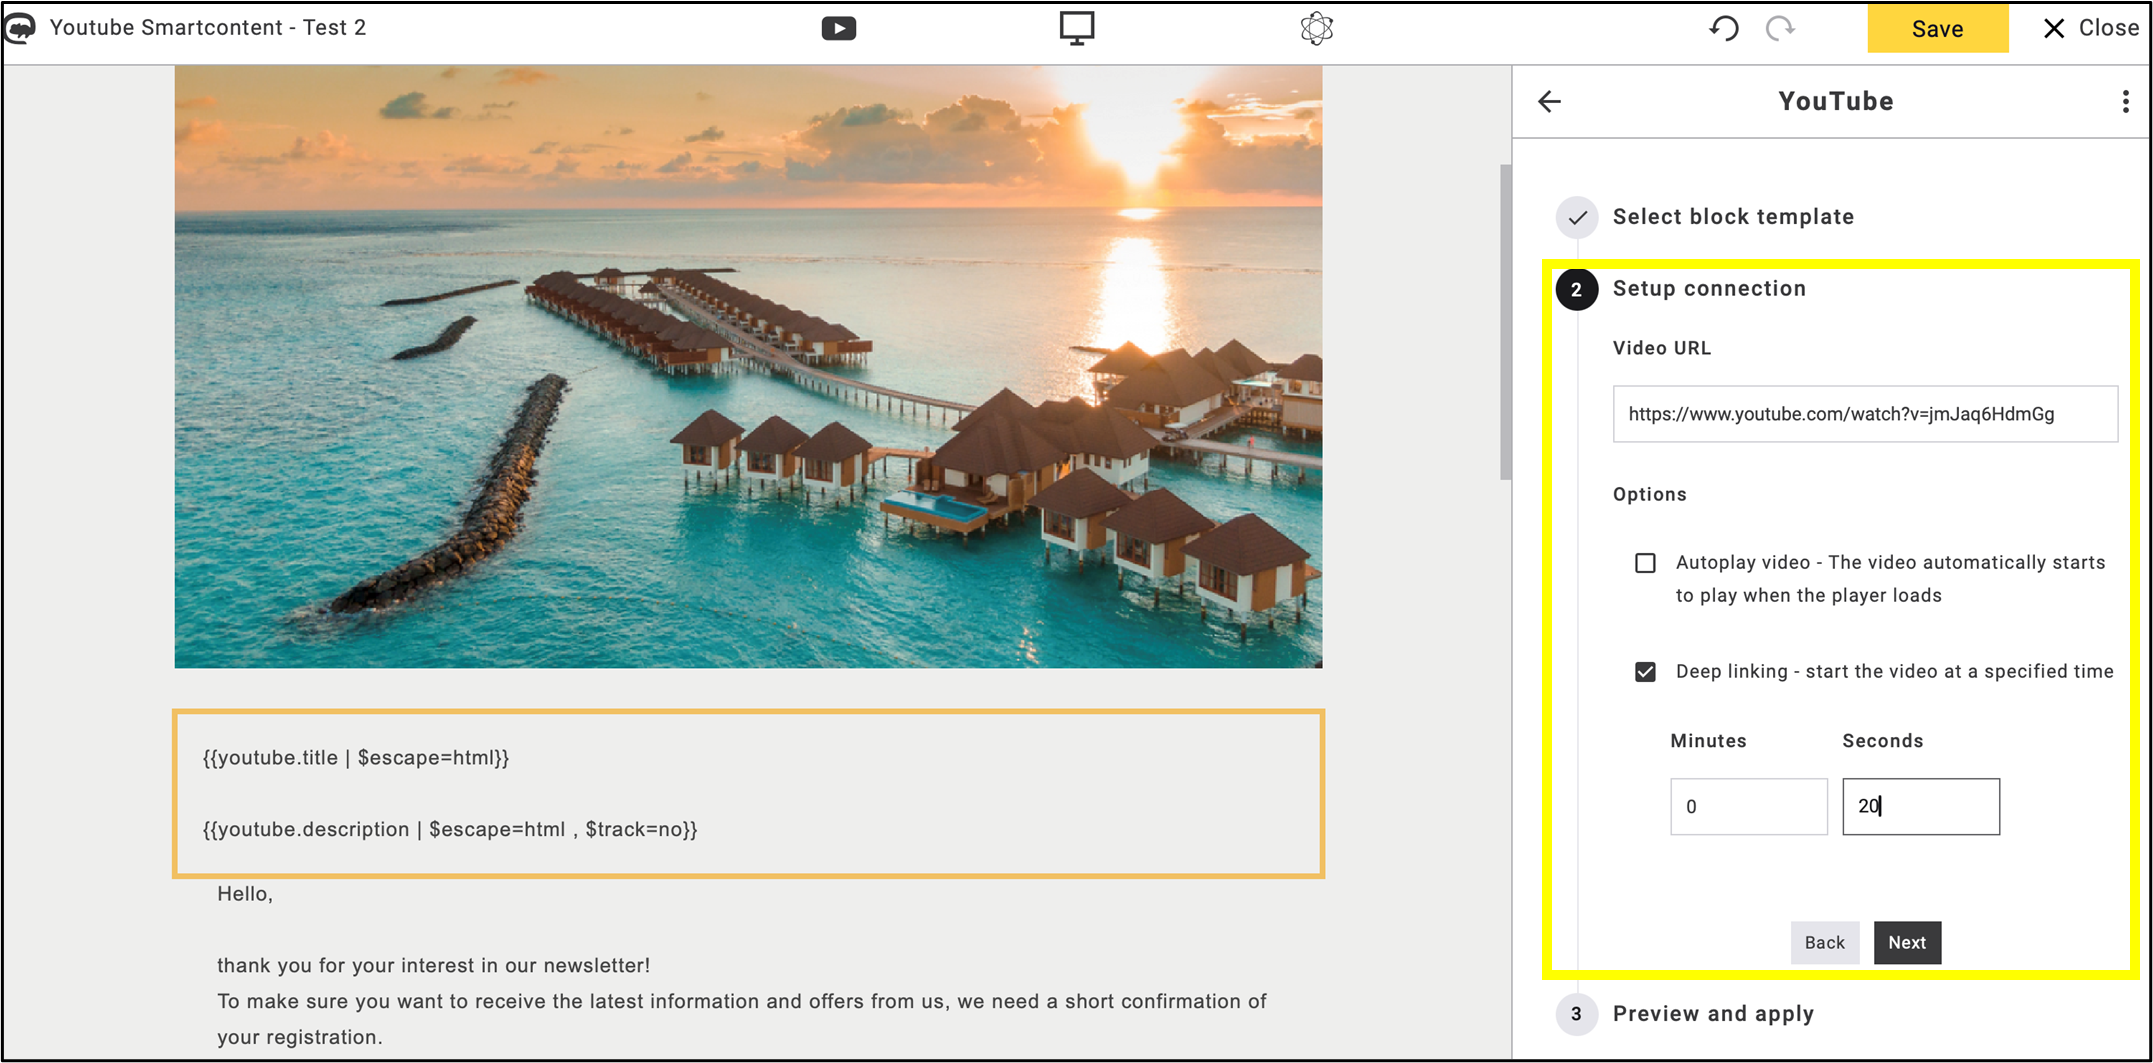
fig. 8: In the second step, link the video and configure the playback settings.
Step 3 is Preview and apply. Select the video (or videos) and click Apply (fig. 9).

fig. 9: Set ’Preview’ and click ’Apply’.
The placeholders for the video will then appear in the emailing (fig. 10). Click the YouTube icon to add the video link.
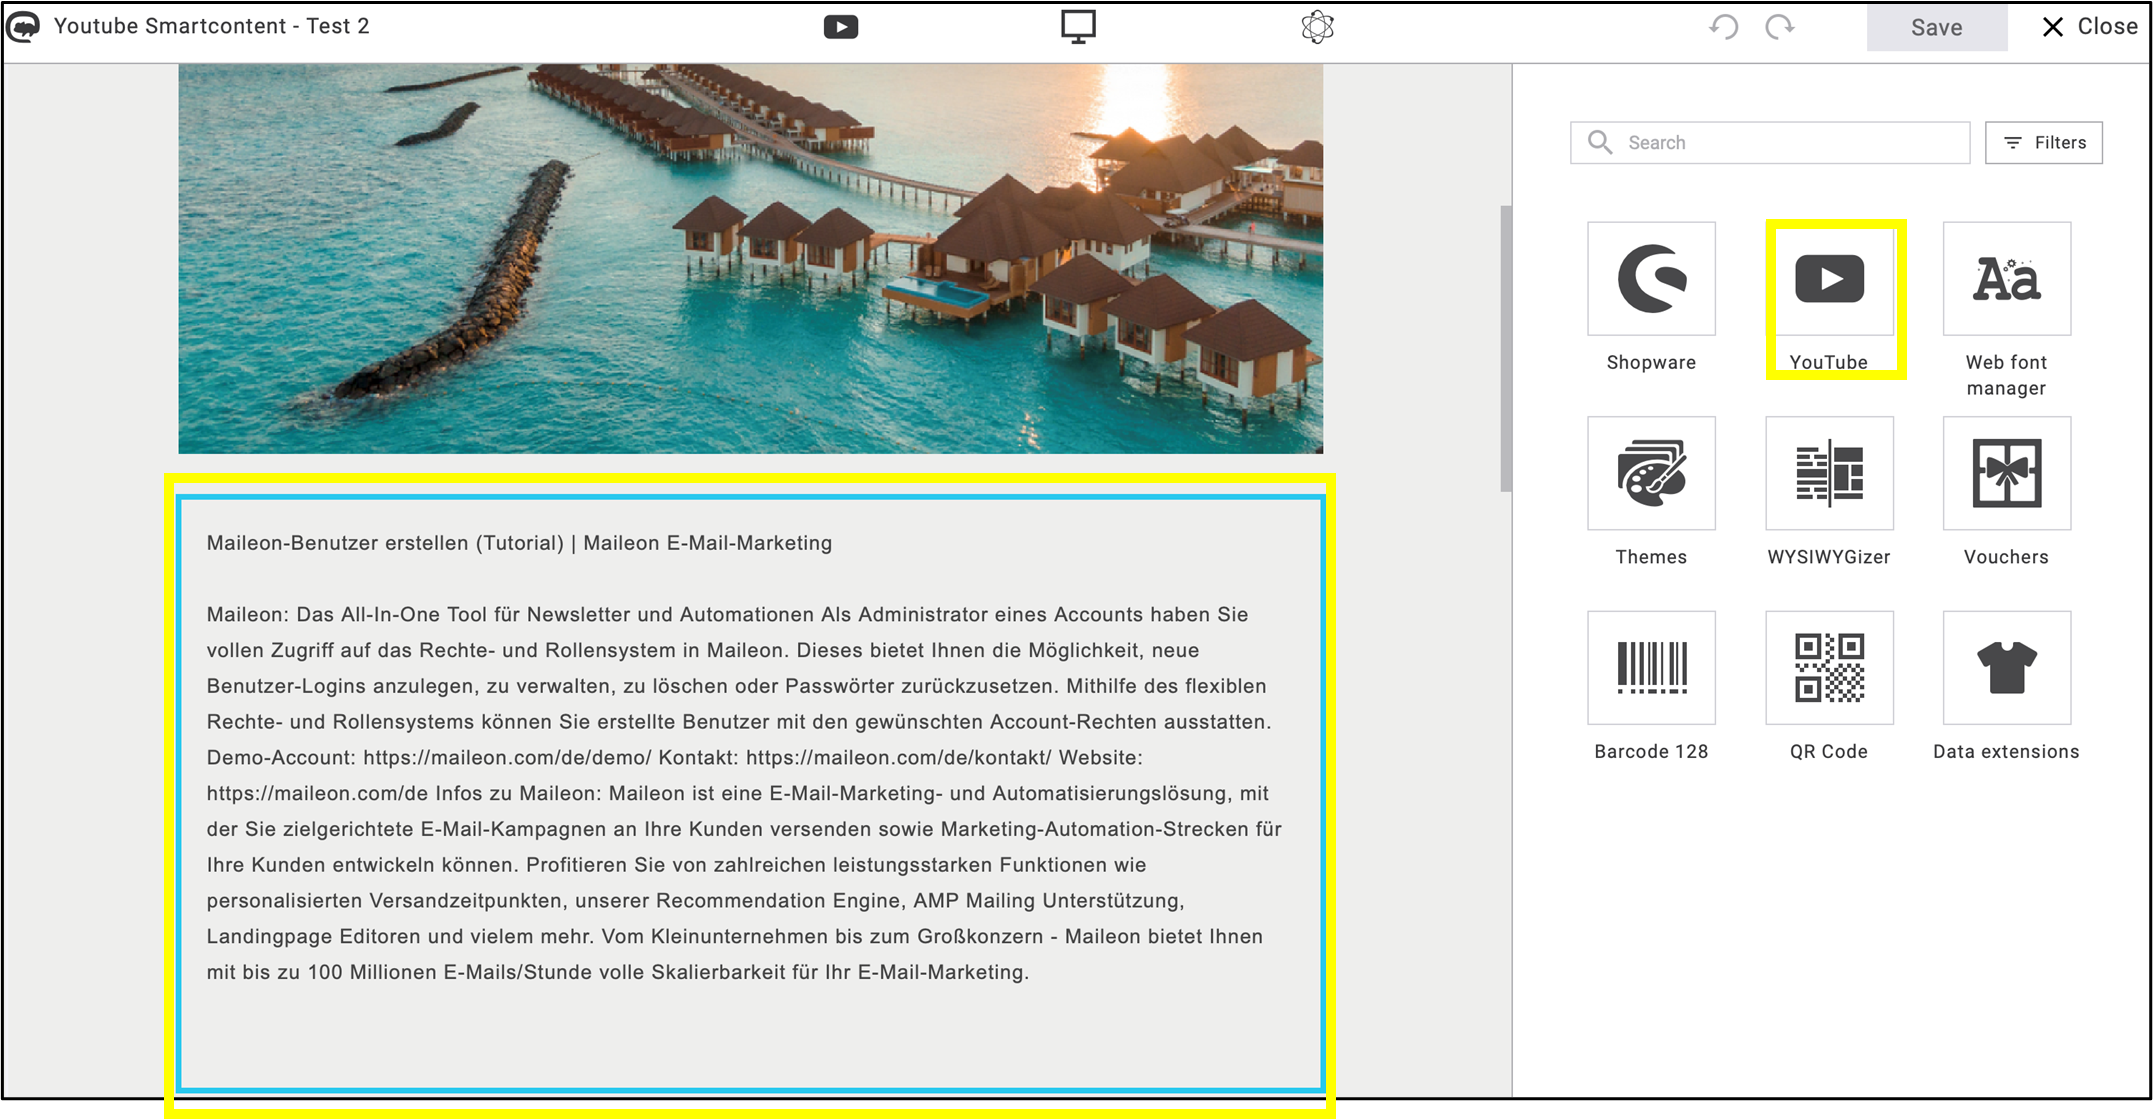
fig. 10: Video placeholders are now displayed in the email.
Click on a template from the menu and add it into the mailing in a separate box above the video placeholders (fig. 11).
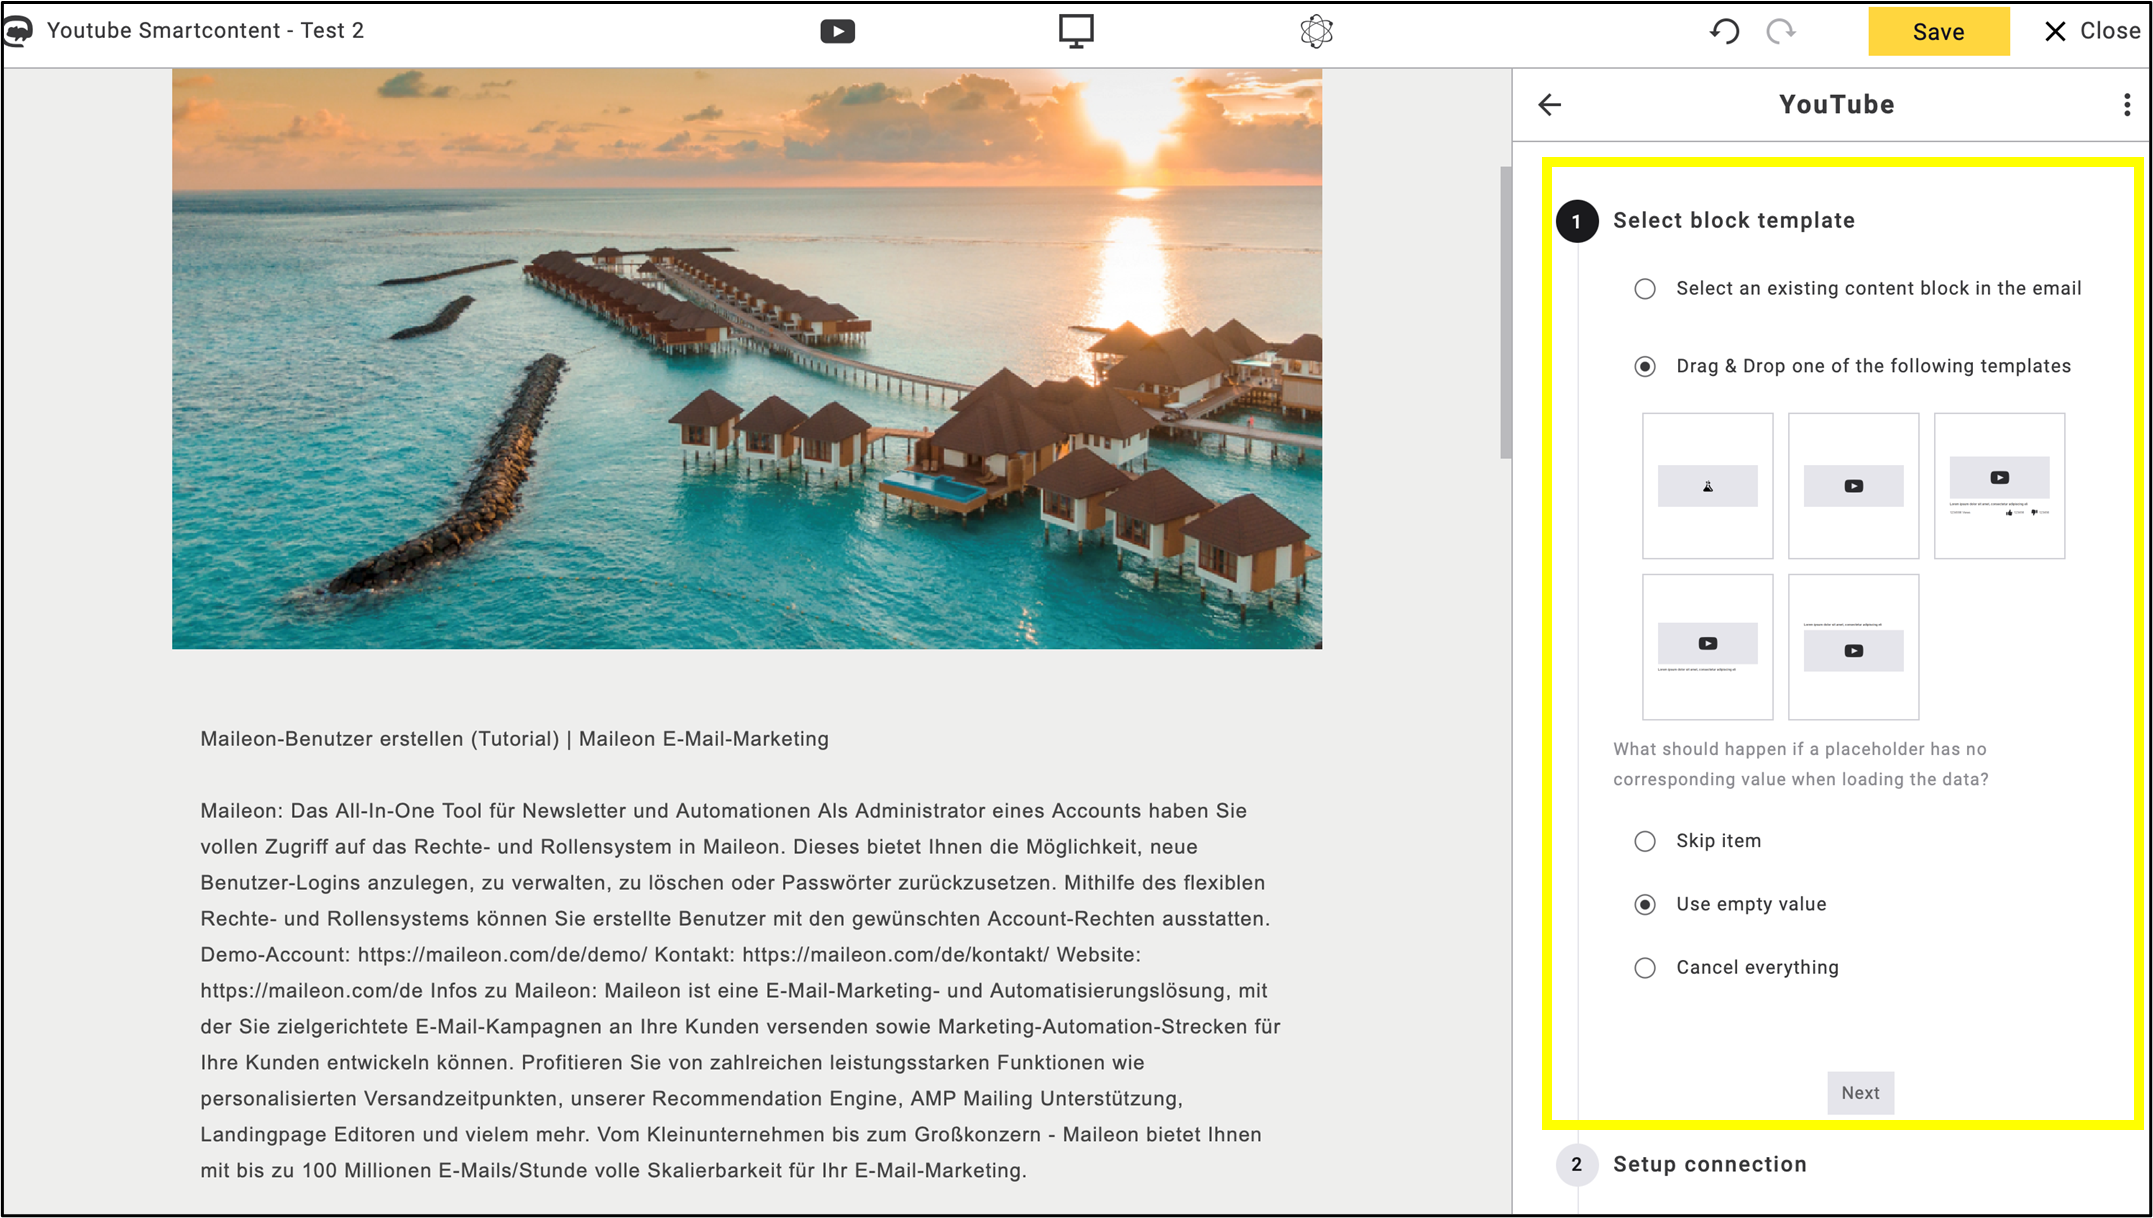
fig.11: Drag and drop a template in a separate box above the placeholders.
After placing the template, click Next (fig. 12).
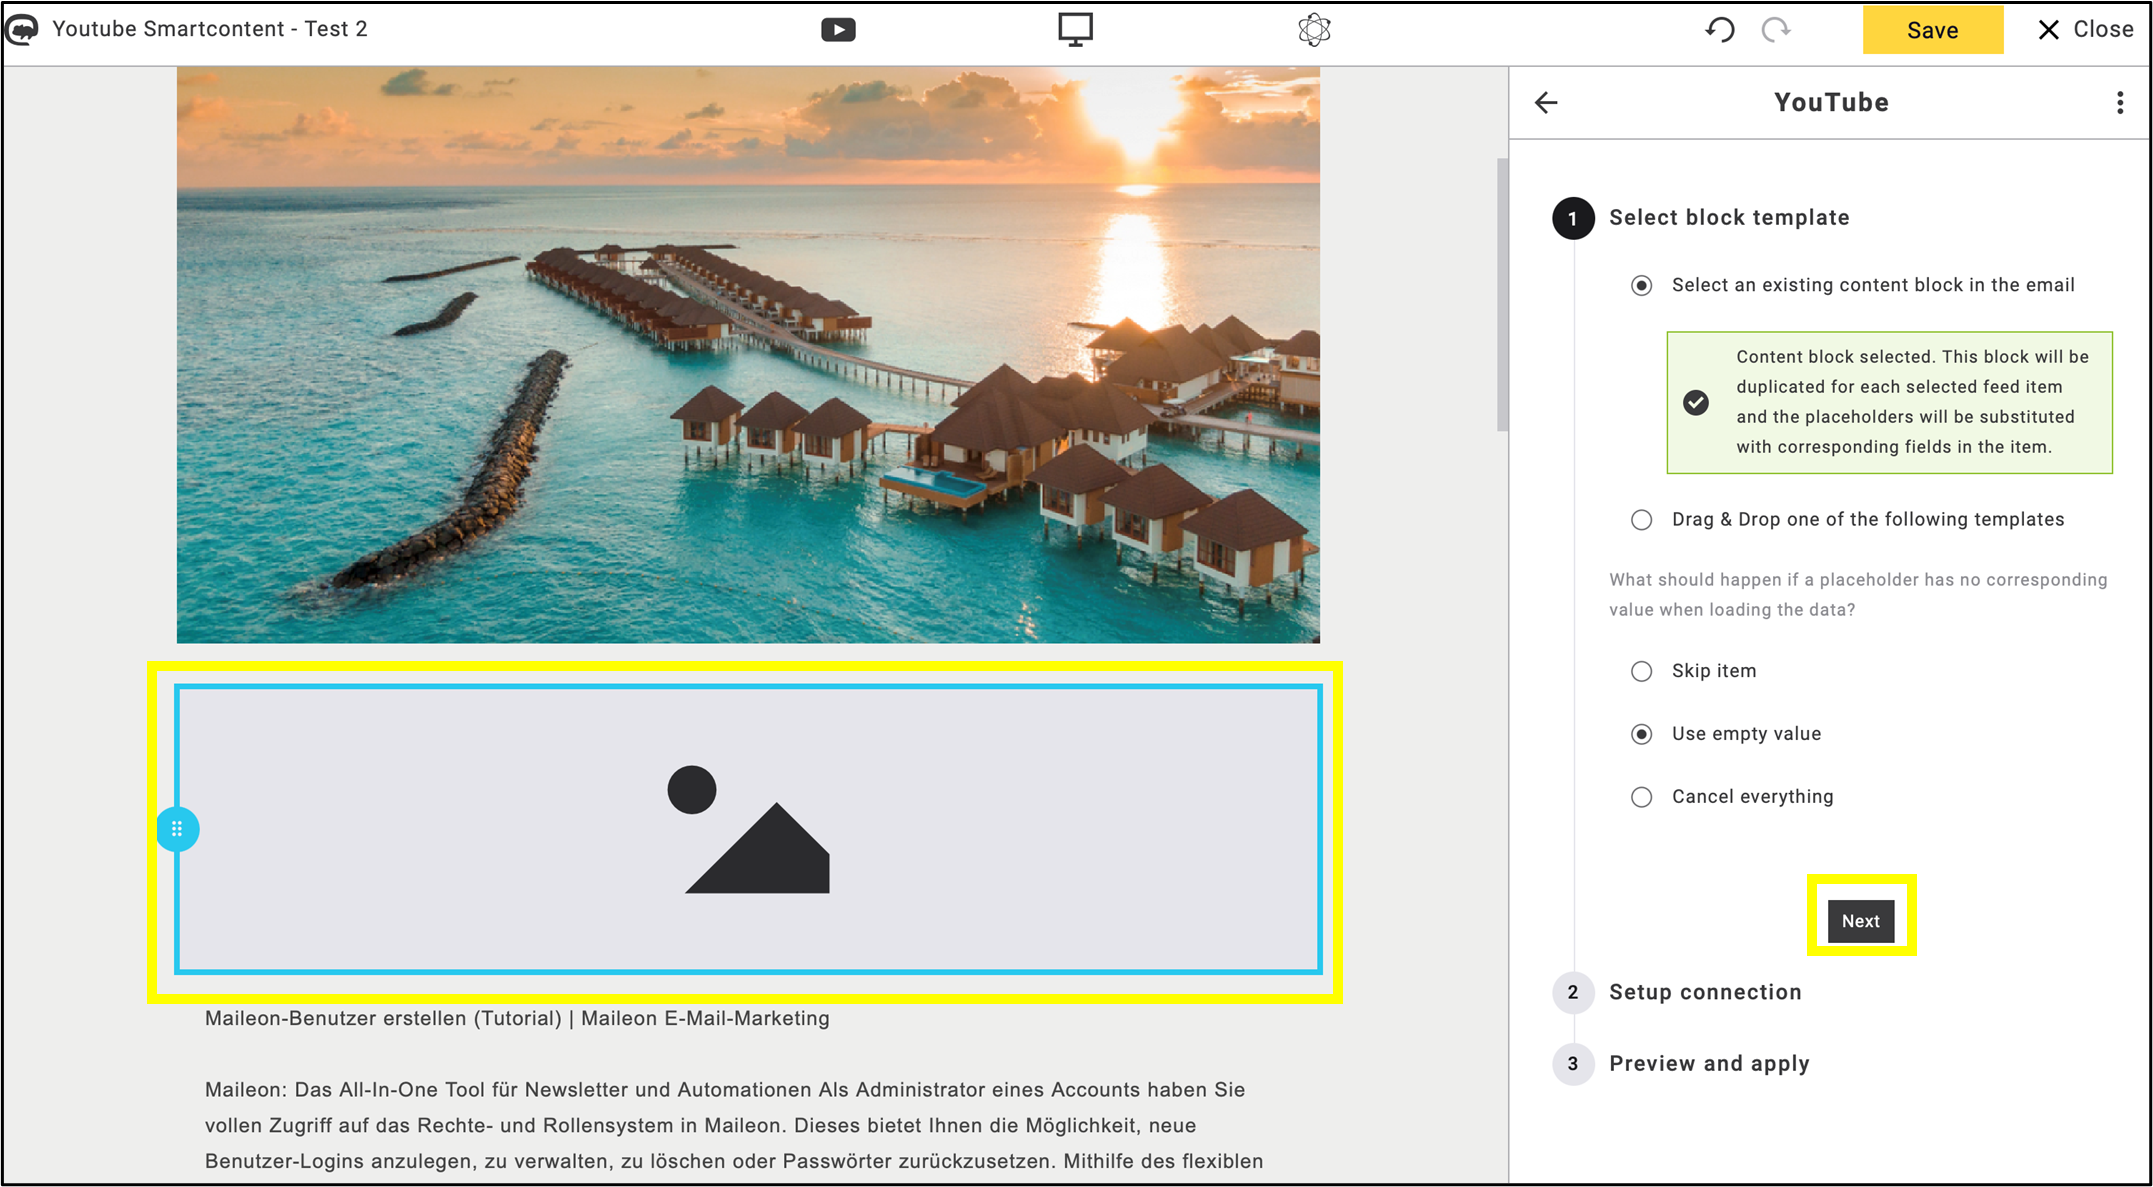
fig. 12: Place the template and click ’Next’.
Repeat the previous steps: Hypelink the video and select the option of starting (fig. 13).
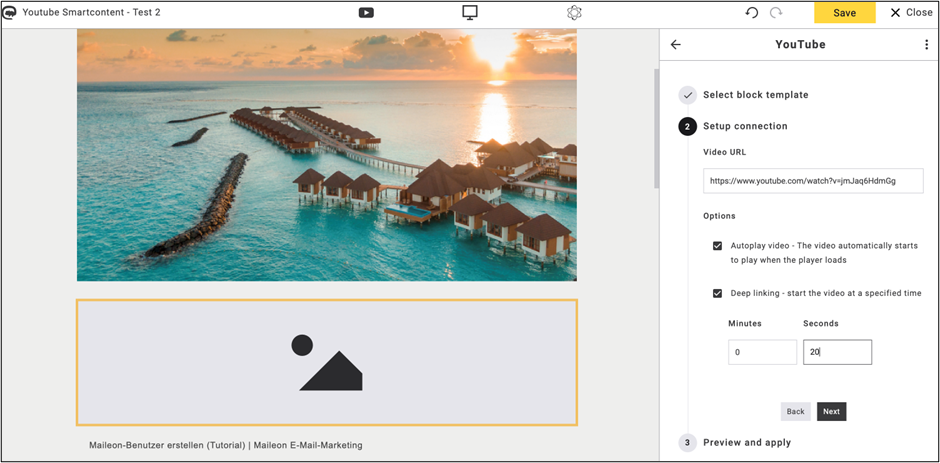
fig. 13: Repeat the steps: link the video and choose how it starts.
Finally, set the preview and click Apply (fig. 14).
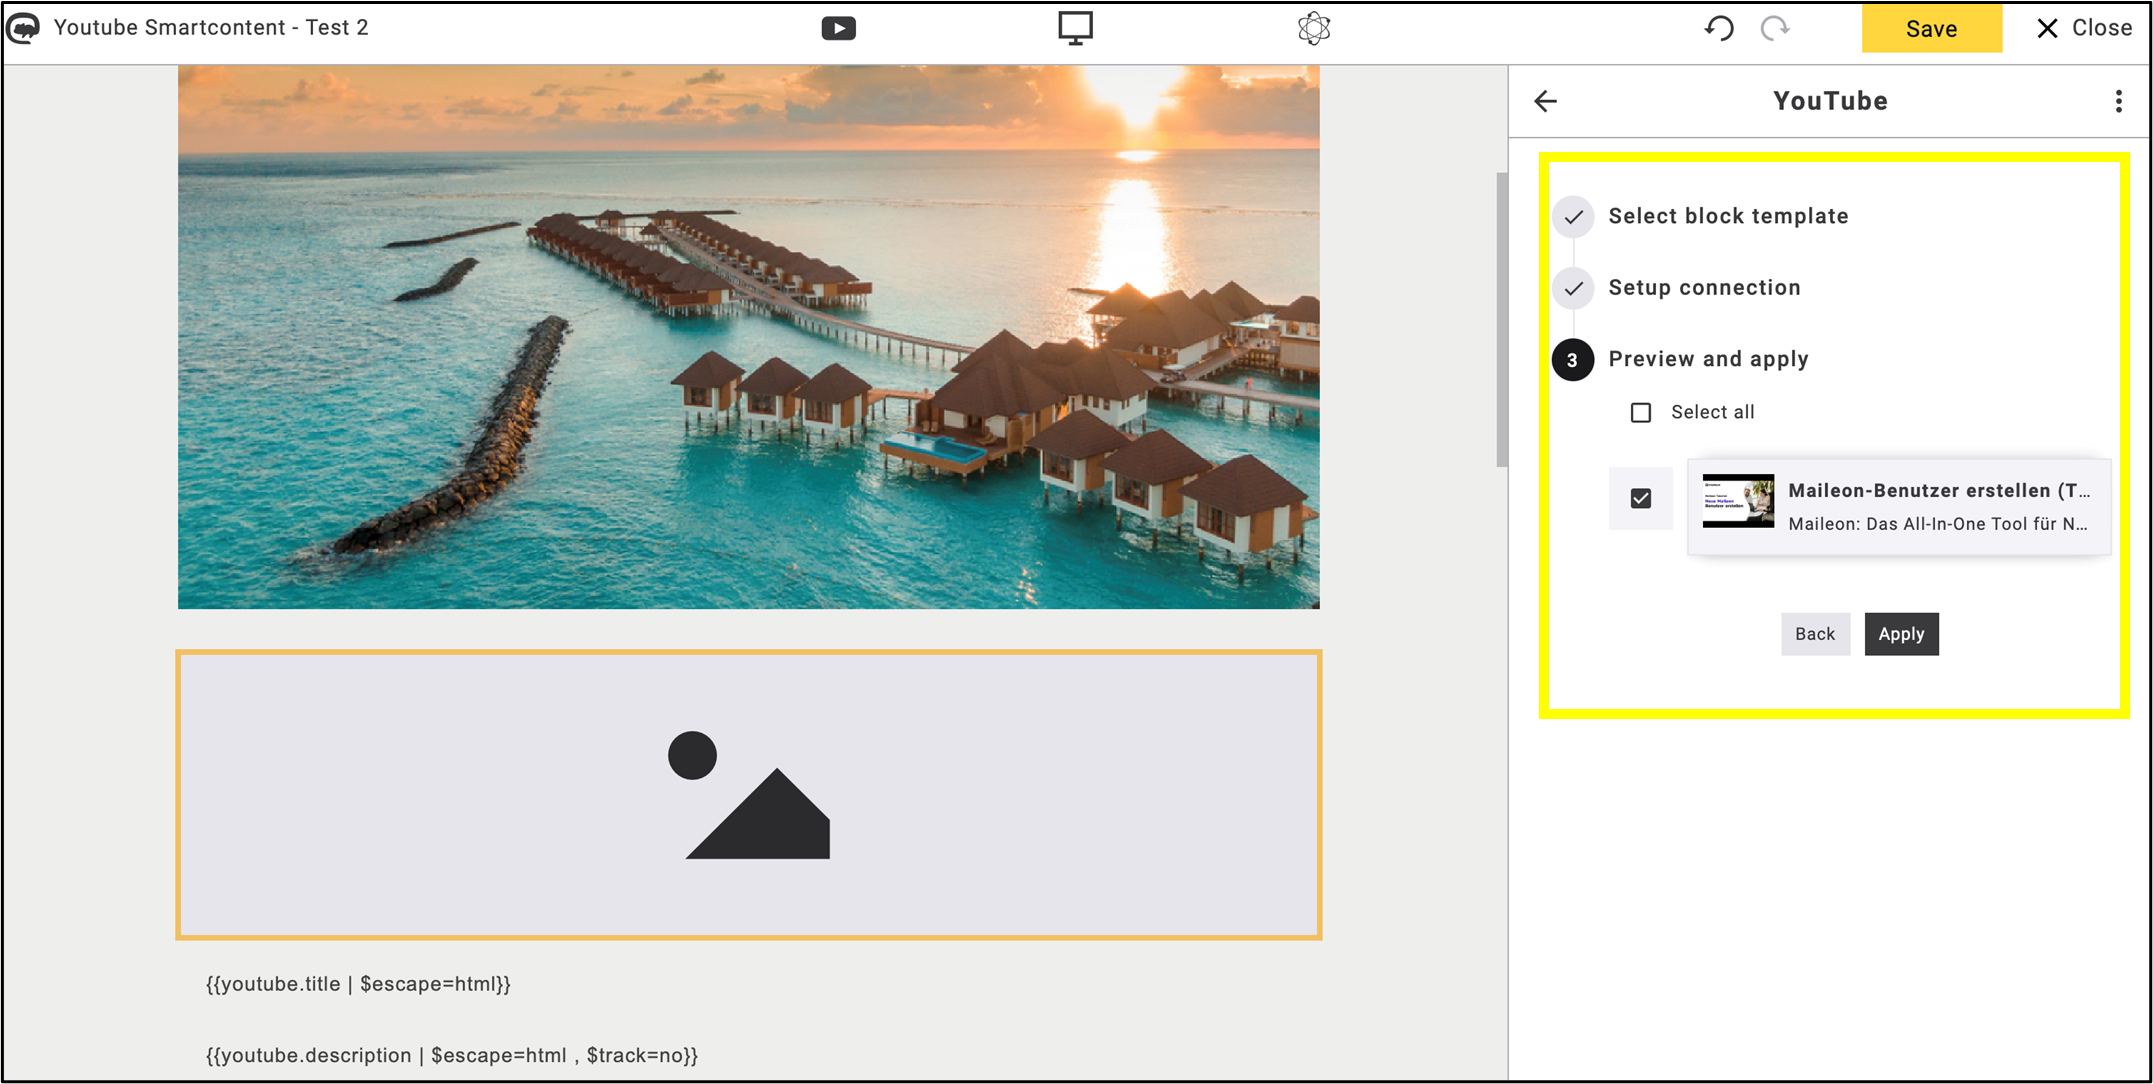
fig. 14: Set the preview and click ’Apply’.
Save your changes and review the emailing in Preview mode at the end of editing (fig. 15).
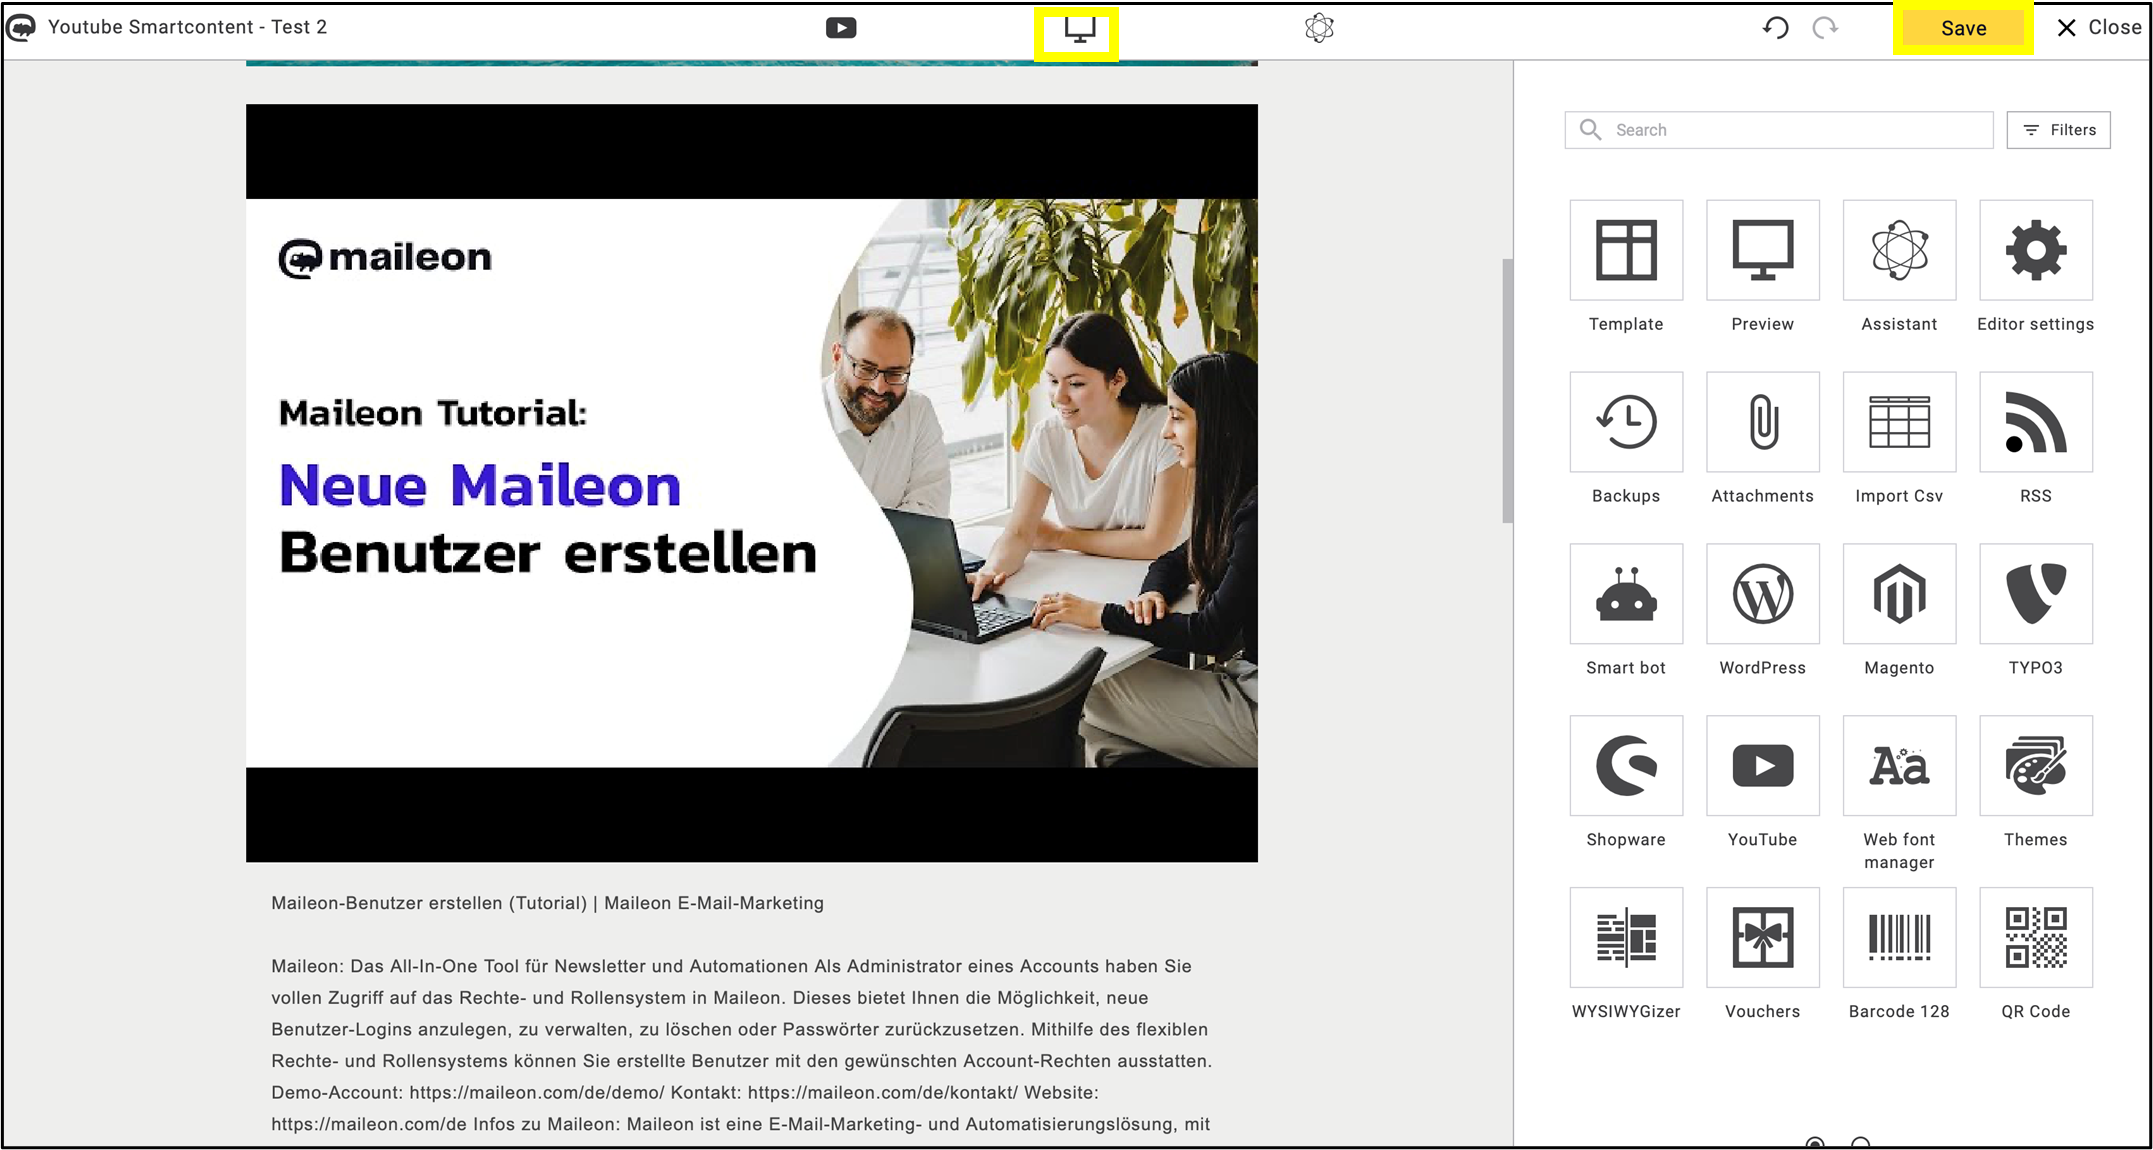
fig. 15: Save your emailing and check it in ’Preview’ mode.
The video should also appear in Preview mode (fig. 16). For proper verification, it is also recommended to send a test emailing before the actual dispatch.
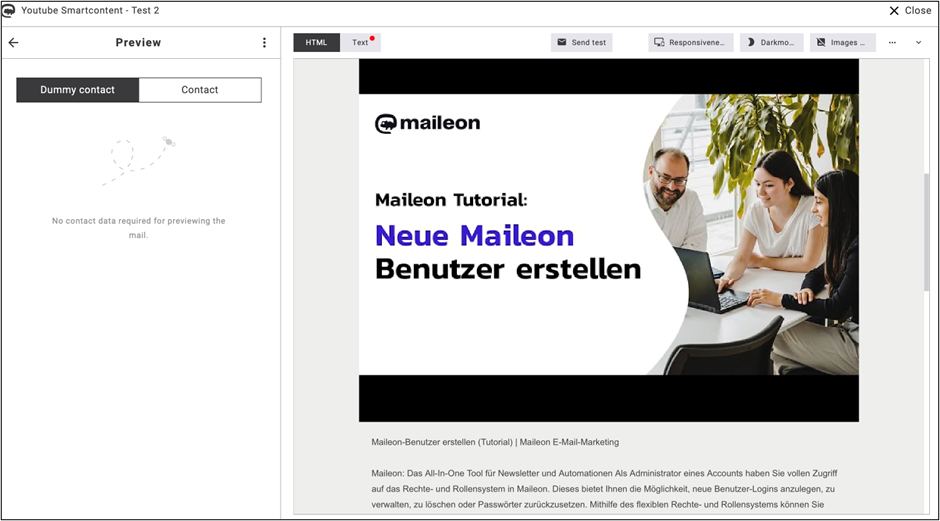
fig. 16: Check that the video appears in ’Preview’ mode.
Note 1: YouTube SmartContent should not be confused with the standard video icon in Widgets (fig. 17).
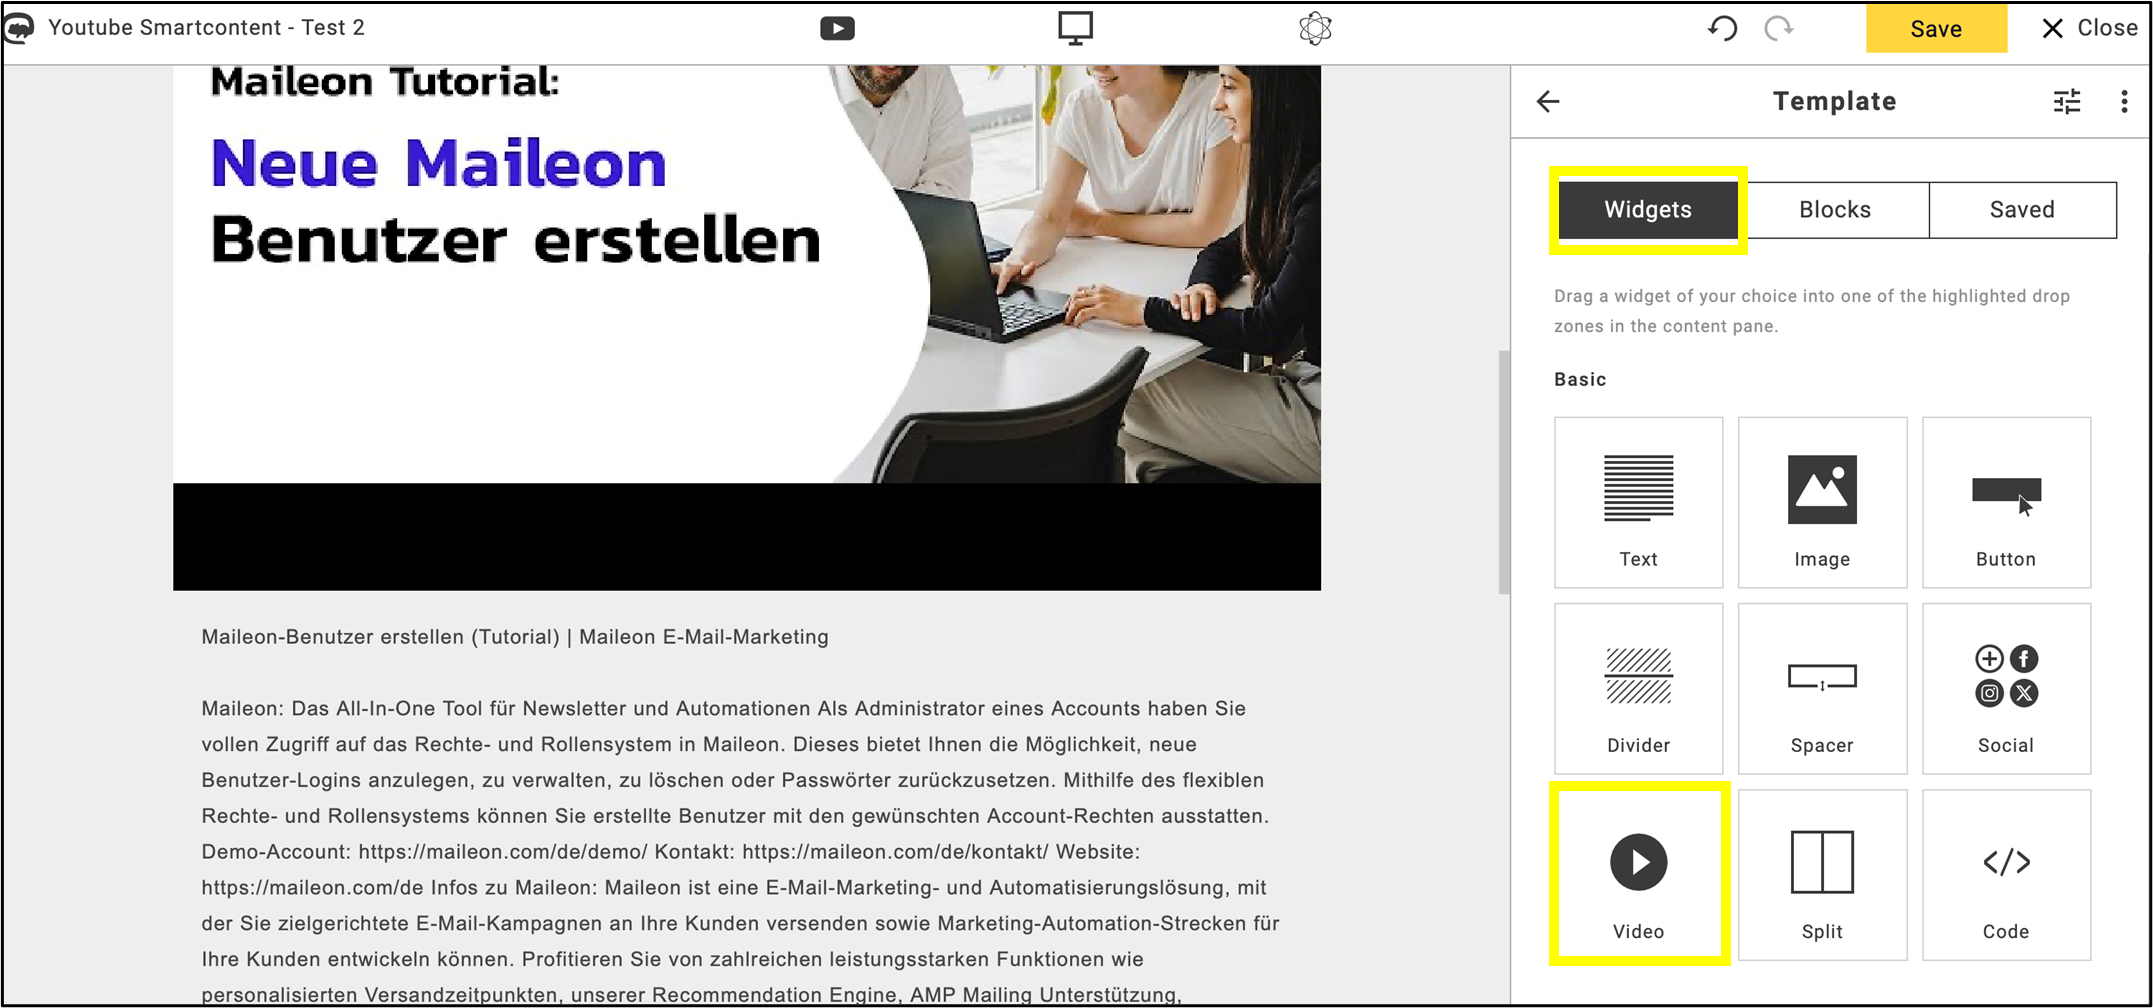
fig. 17: Avoid confusing ’YouTube SmartContent’ with the standard video icon in ’Widgets’.
Although this option also allows you to insert a link using the Insert Placeholder feature, it does not support adding an image, so the result will differ from YouTube SmartContent (fig. 18, fig. 19., fig. 20).
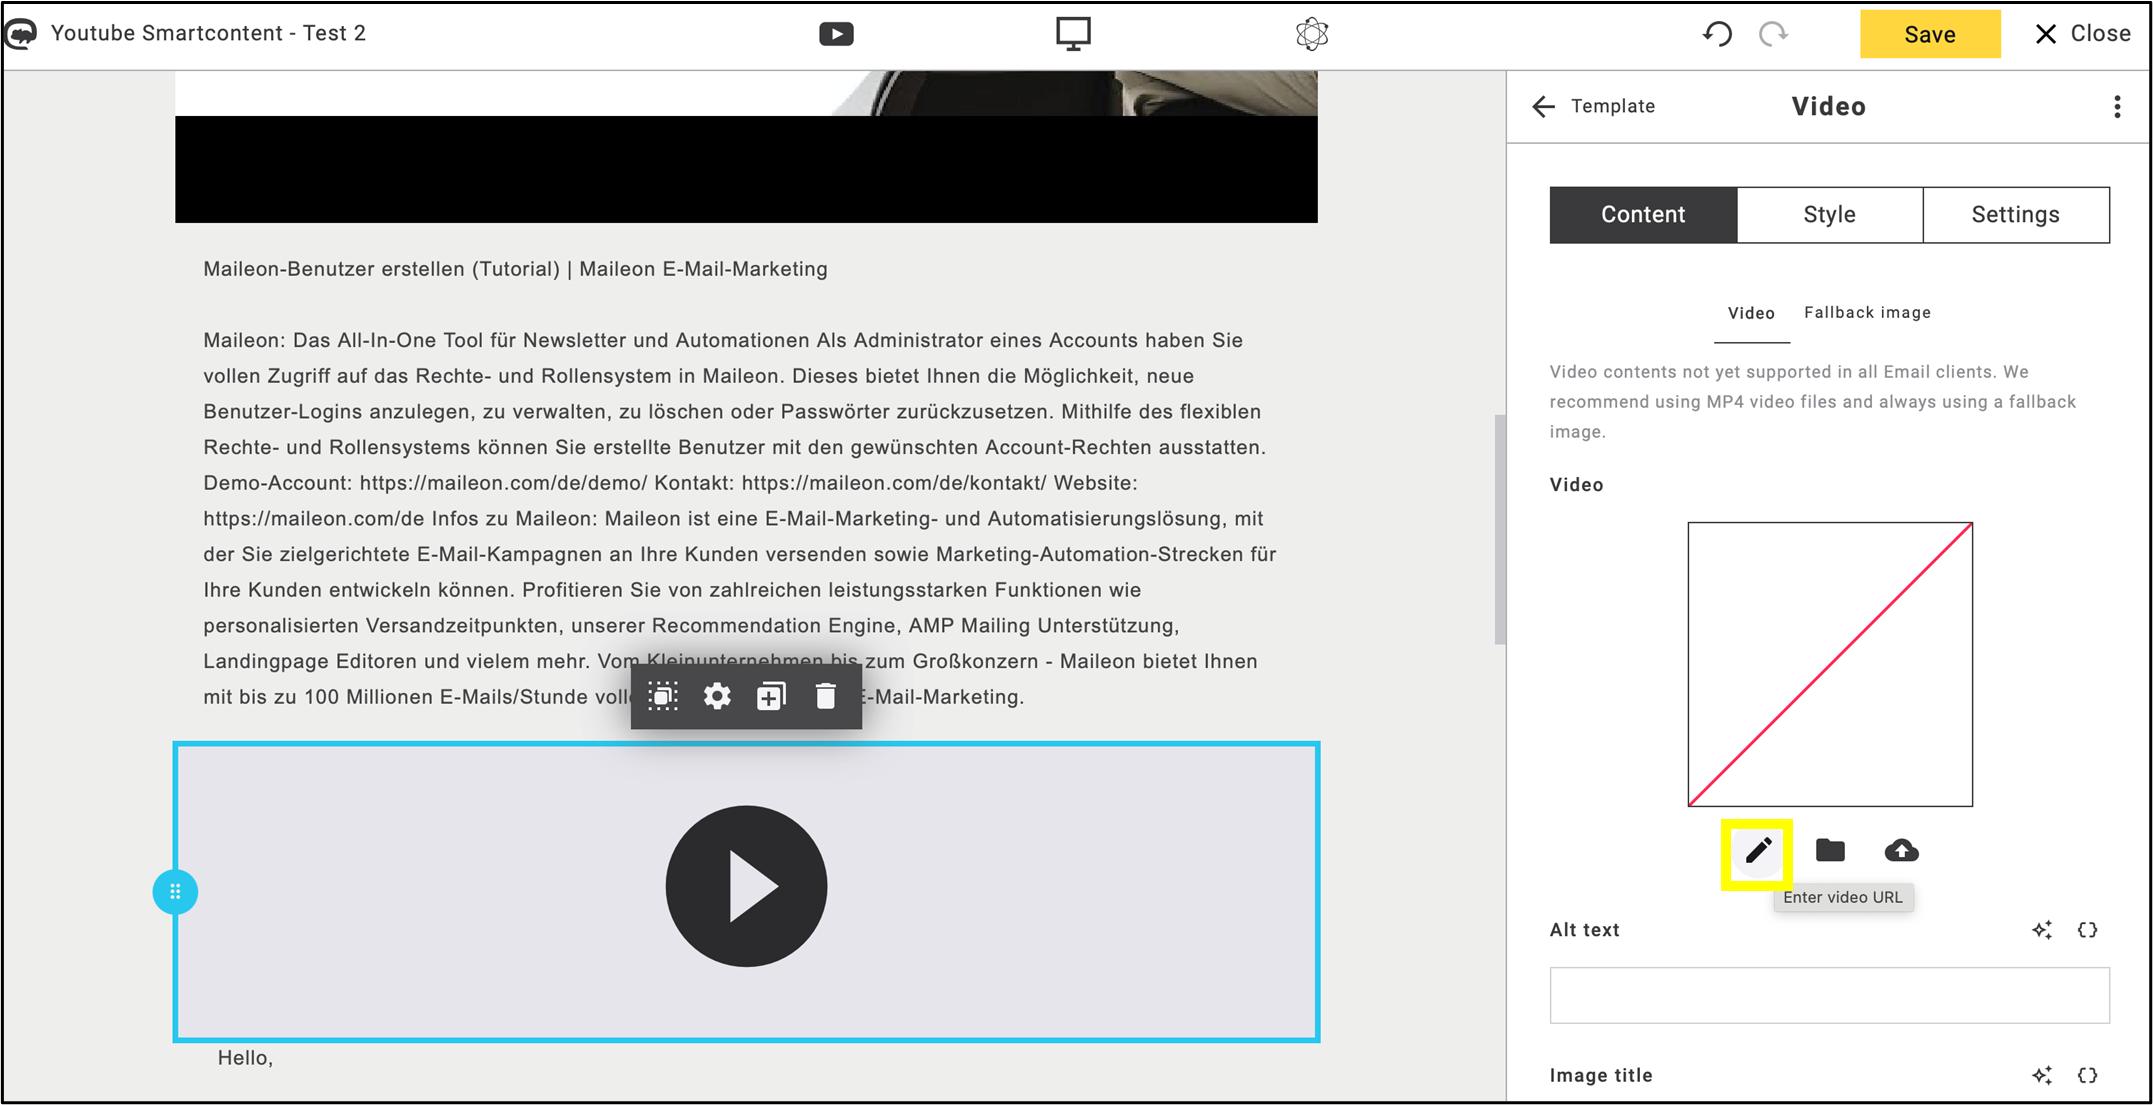
fig. 18: Clicking on the pen icon opens the insert placeholder option.
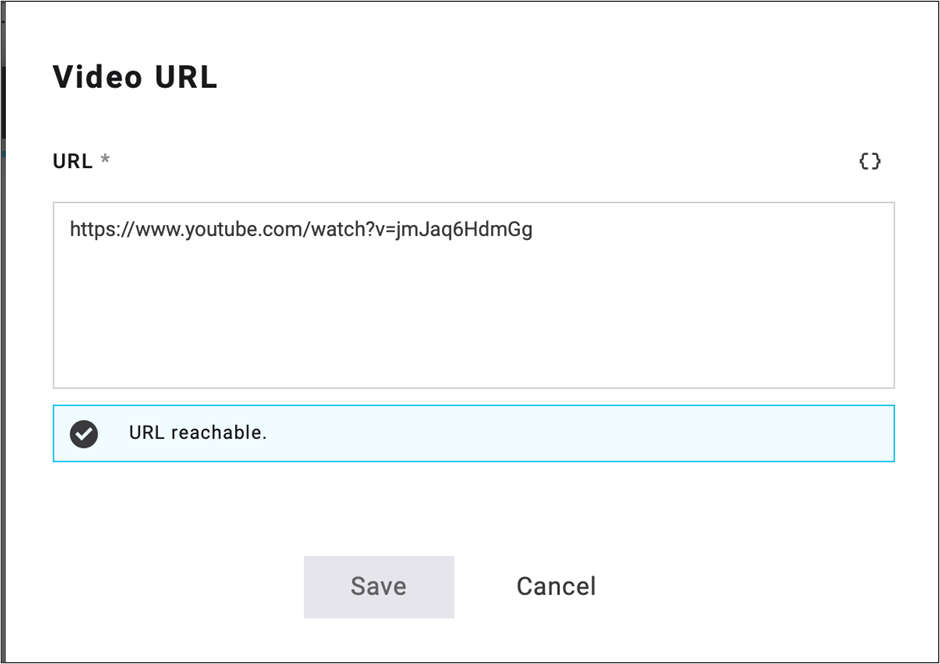
fig. 19: Insert the placeholder and YouTube link here, but the image is not supported.
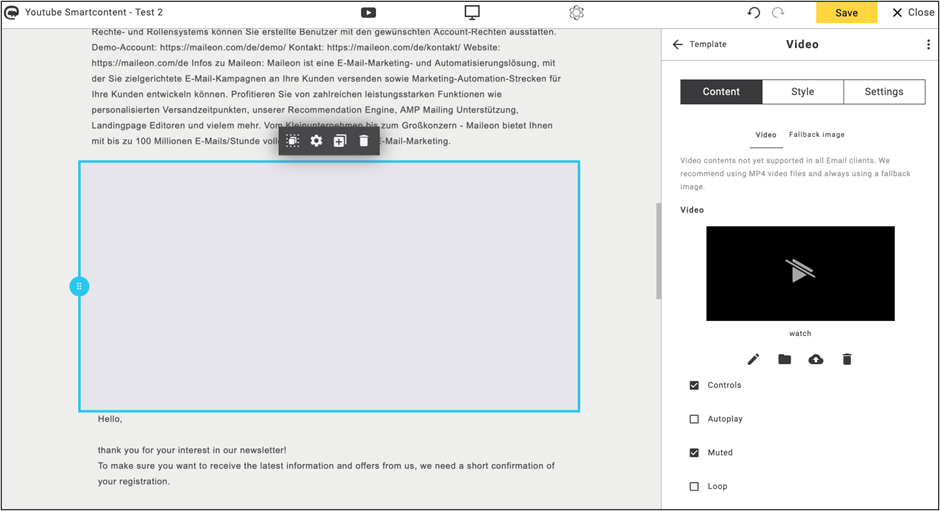
fig. 20: No image is displayed for the video.
Note 2: Converting a text box into a YouTube video block.
There is another option to create a custom YouTube content block. Insert the YouTube video title and description into the headline and text fields using insert placeholder. It is recommended to merge the headline and text blocks into a single content block (fig. 21). You can find more detailed steps for merging blocks below.
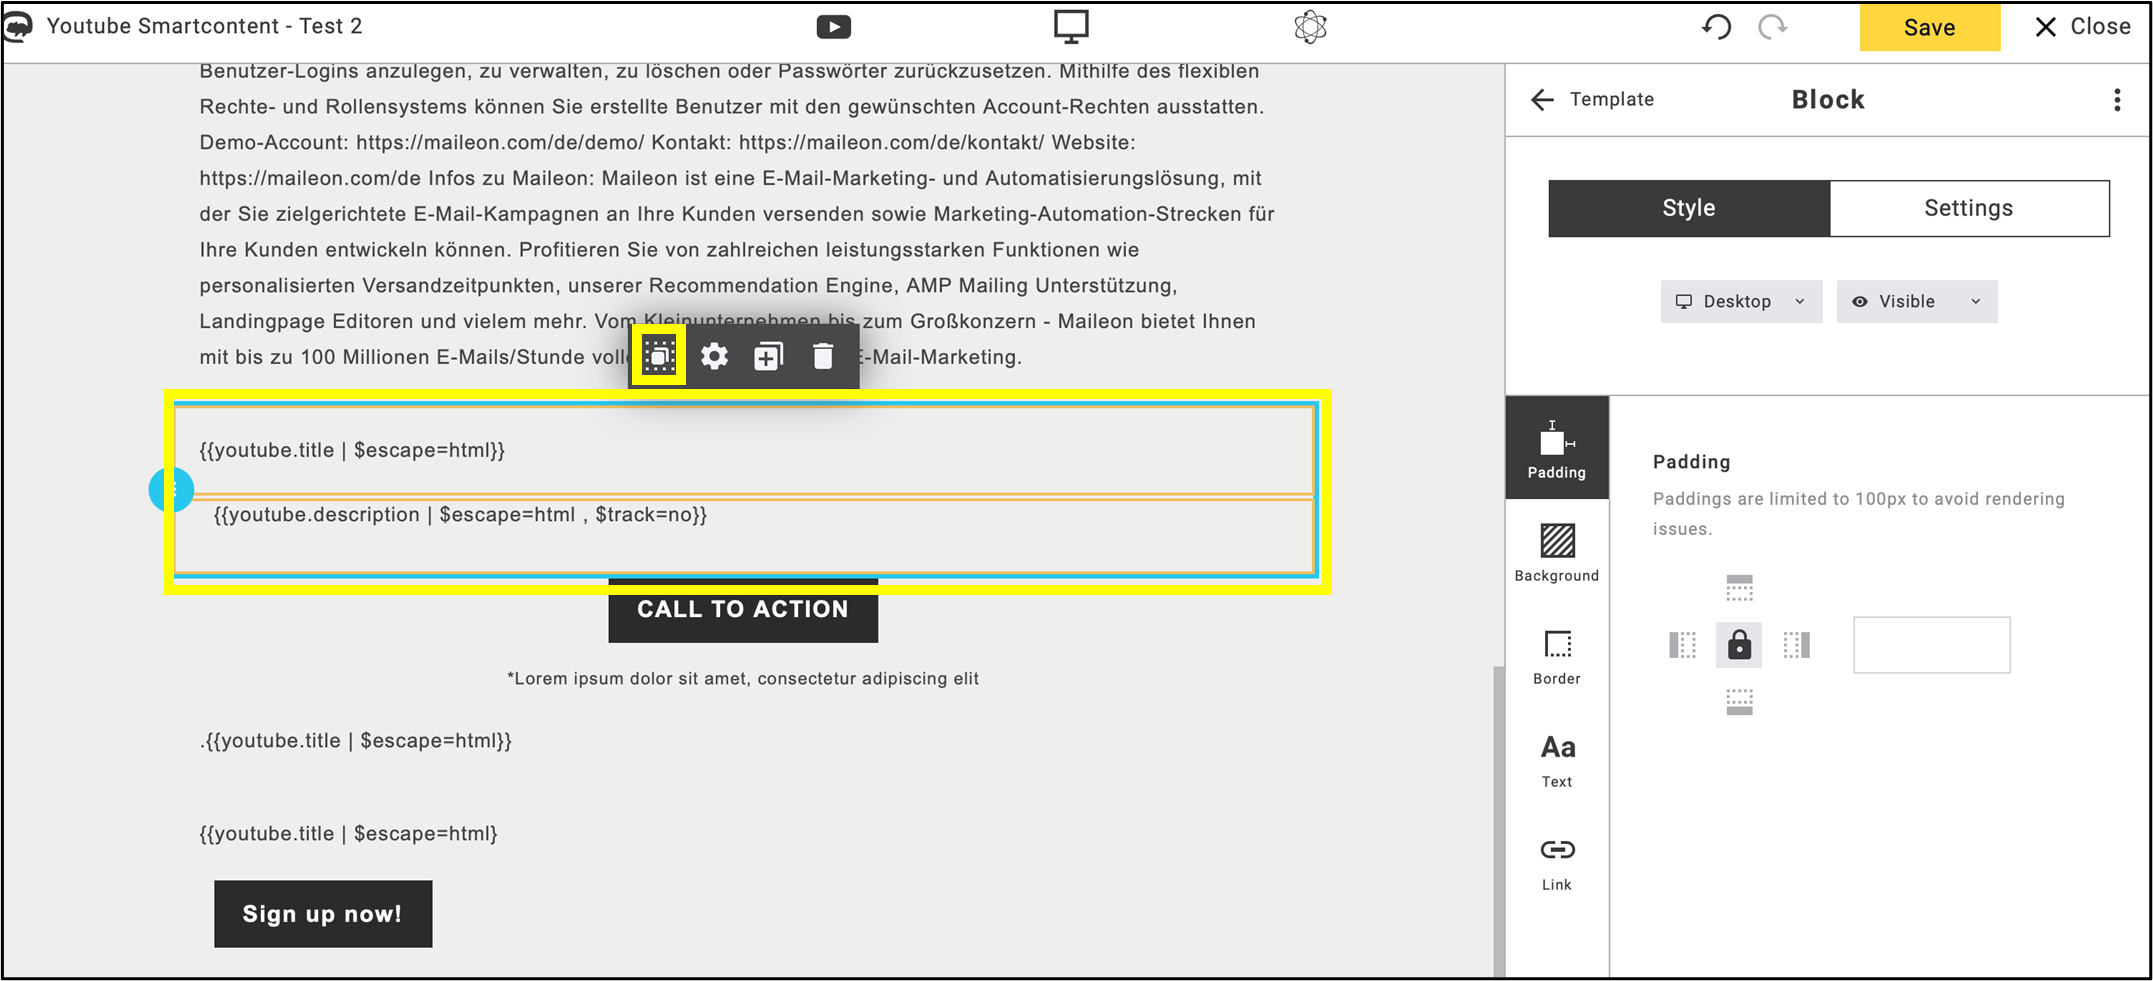
fig. 21: Insert the YouTube title and description with placeholders, then merge the blocks.
Since no image is attached to the block, drag an image block above the text box and click on +Define link in the side menu to insert a YouTube link to it (fig. 22).
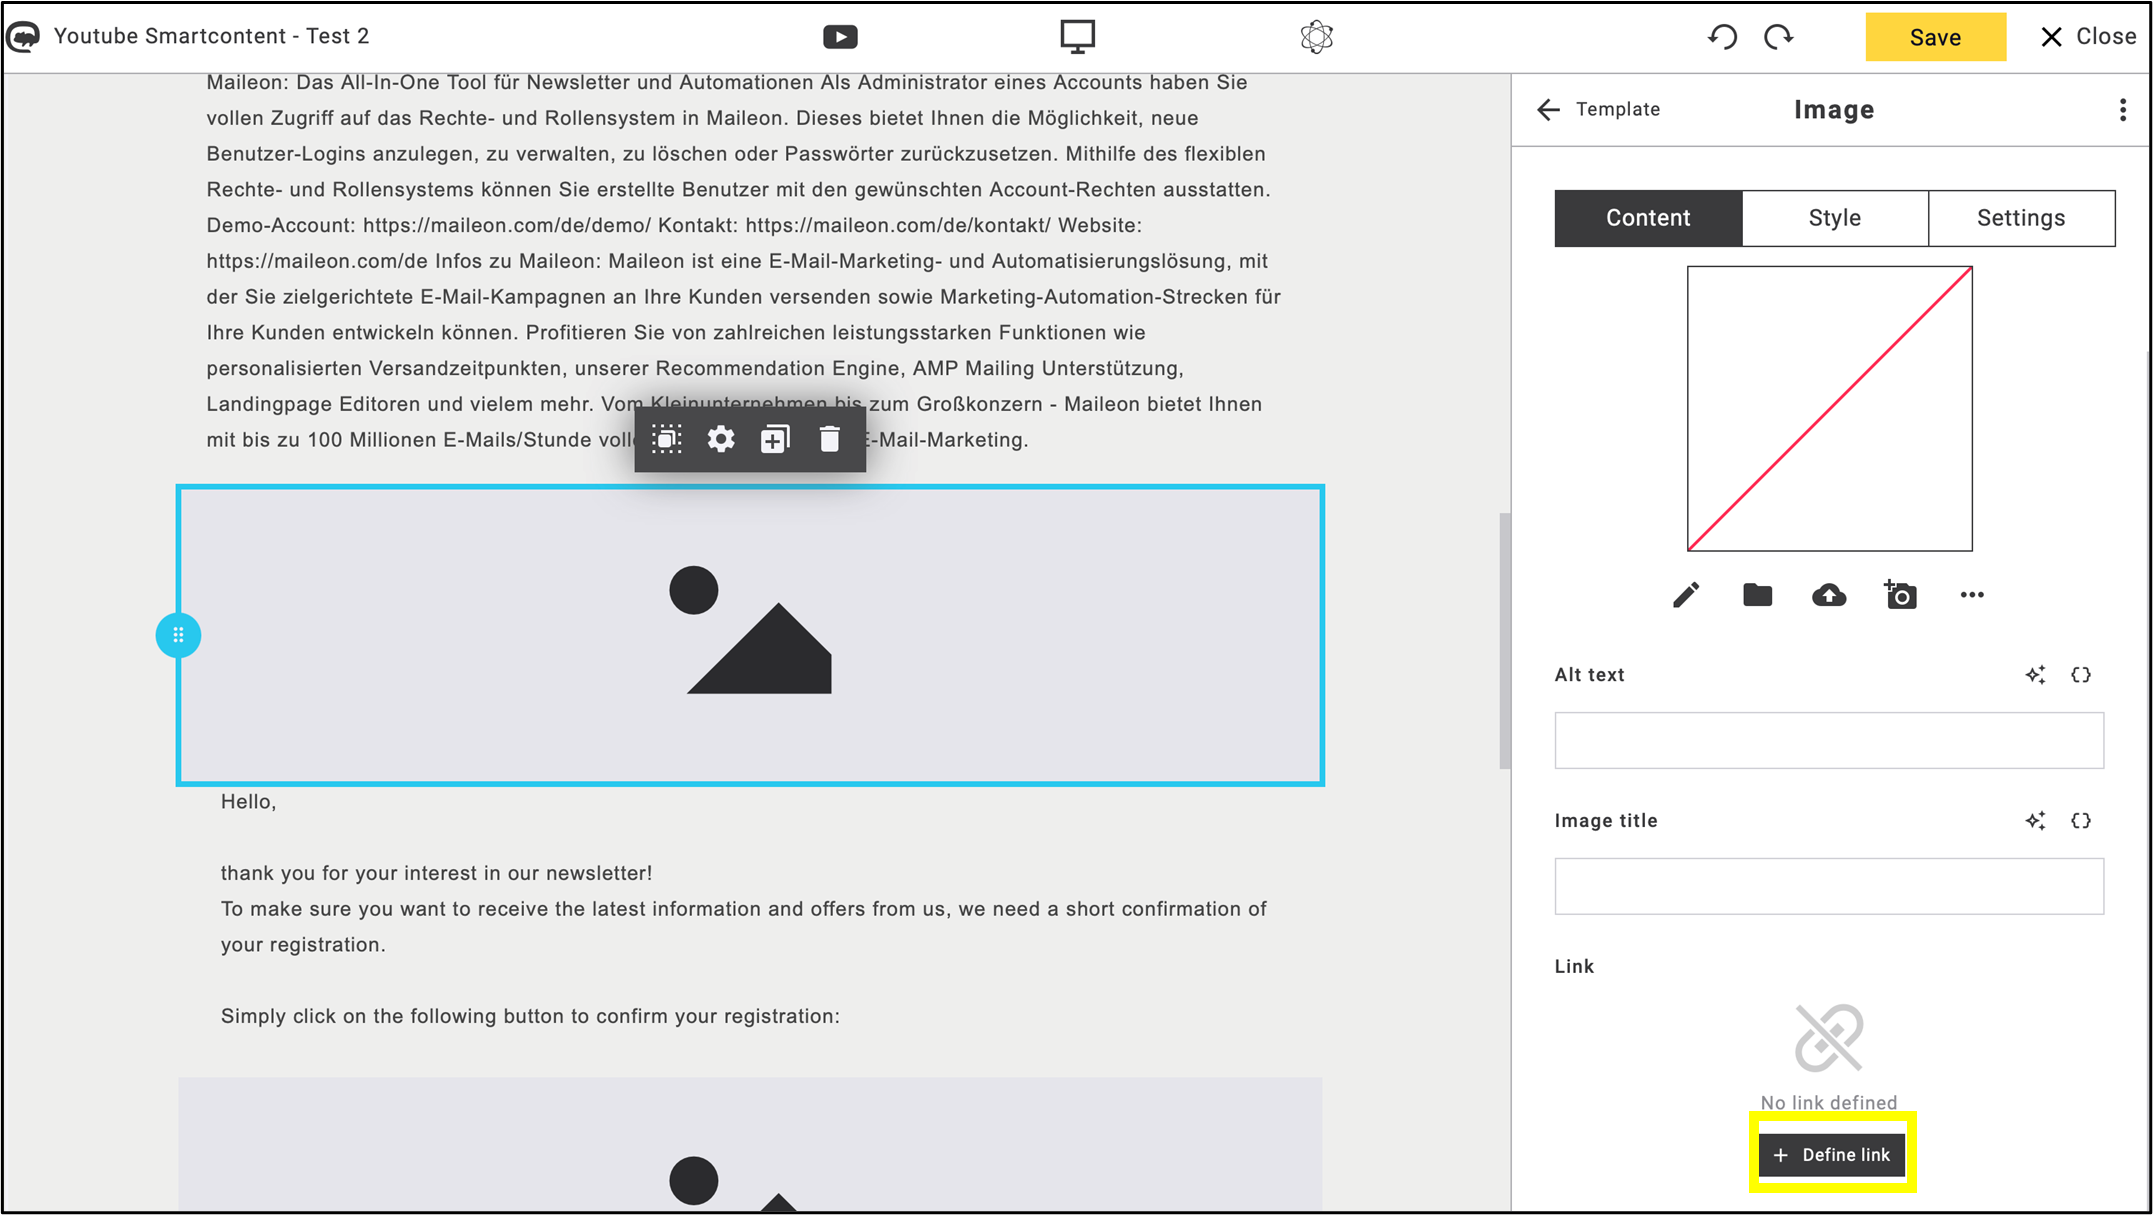
fig. 22: Add an image block above the text box and click ’+Define link’ to insert a URL.
In the Insert link menu select YouTube links and click Save (fig. 23).
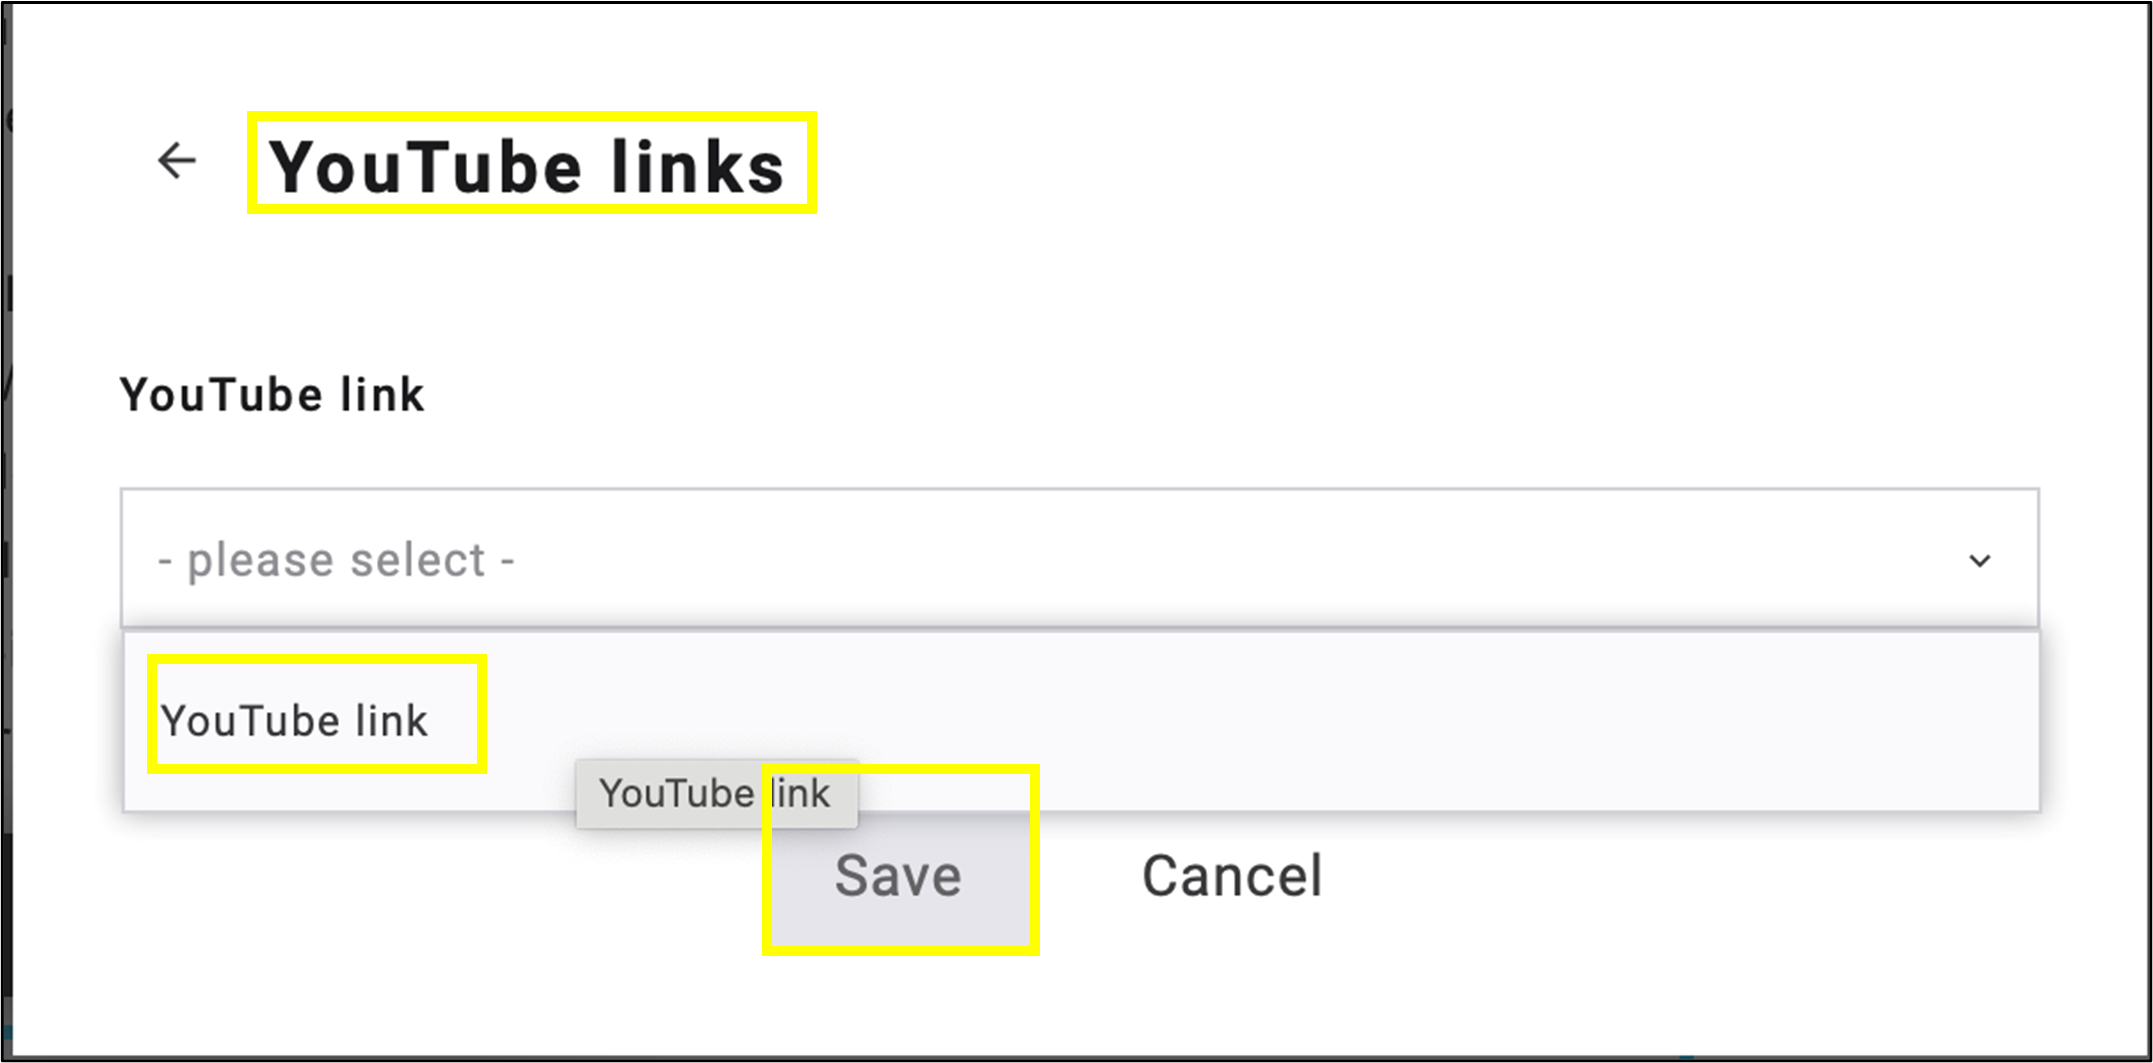
fig. 23: Select ’YouTube links‘ in the ’Insert Link’ menu and click ’Save’.
Then click the pencil icon in the side menu to add a URL (fig. 24).
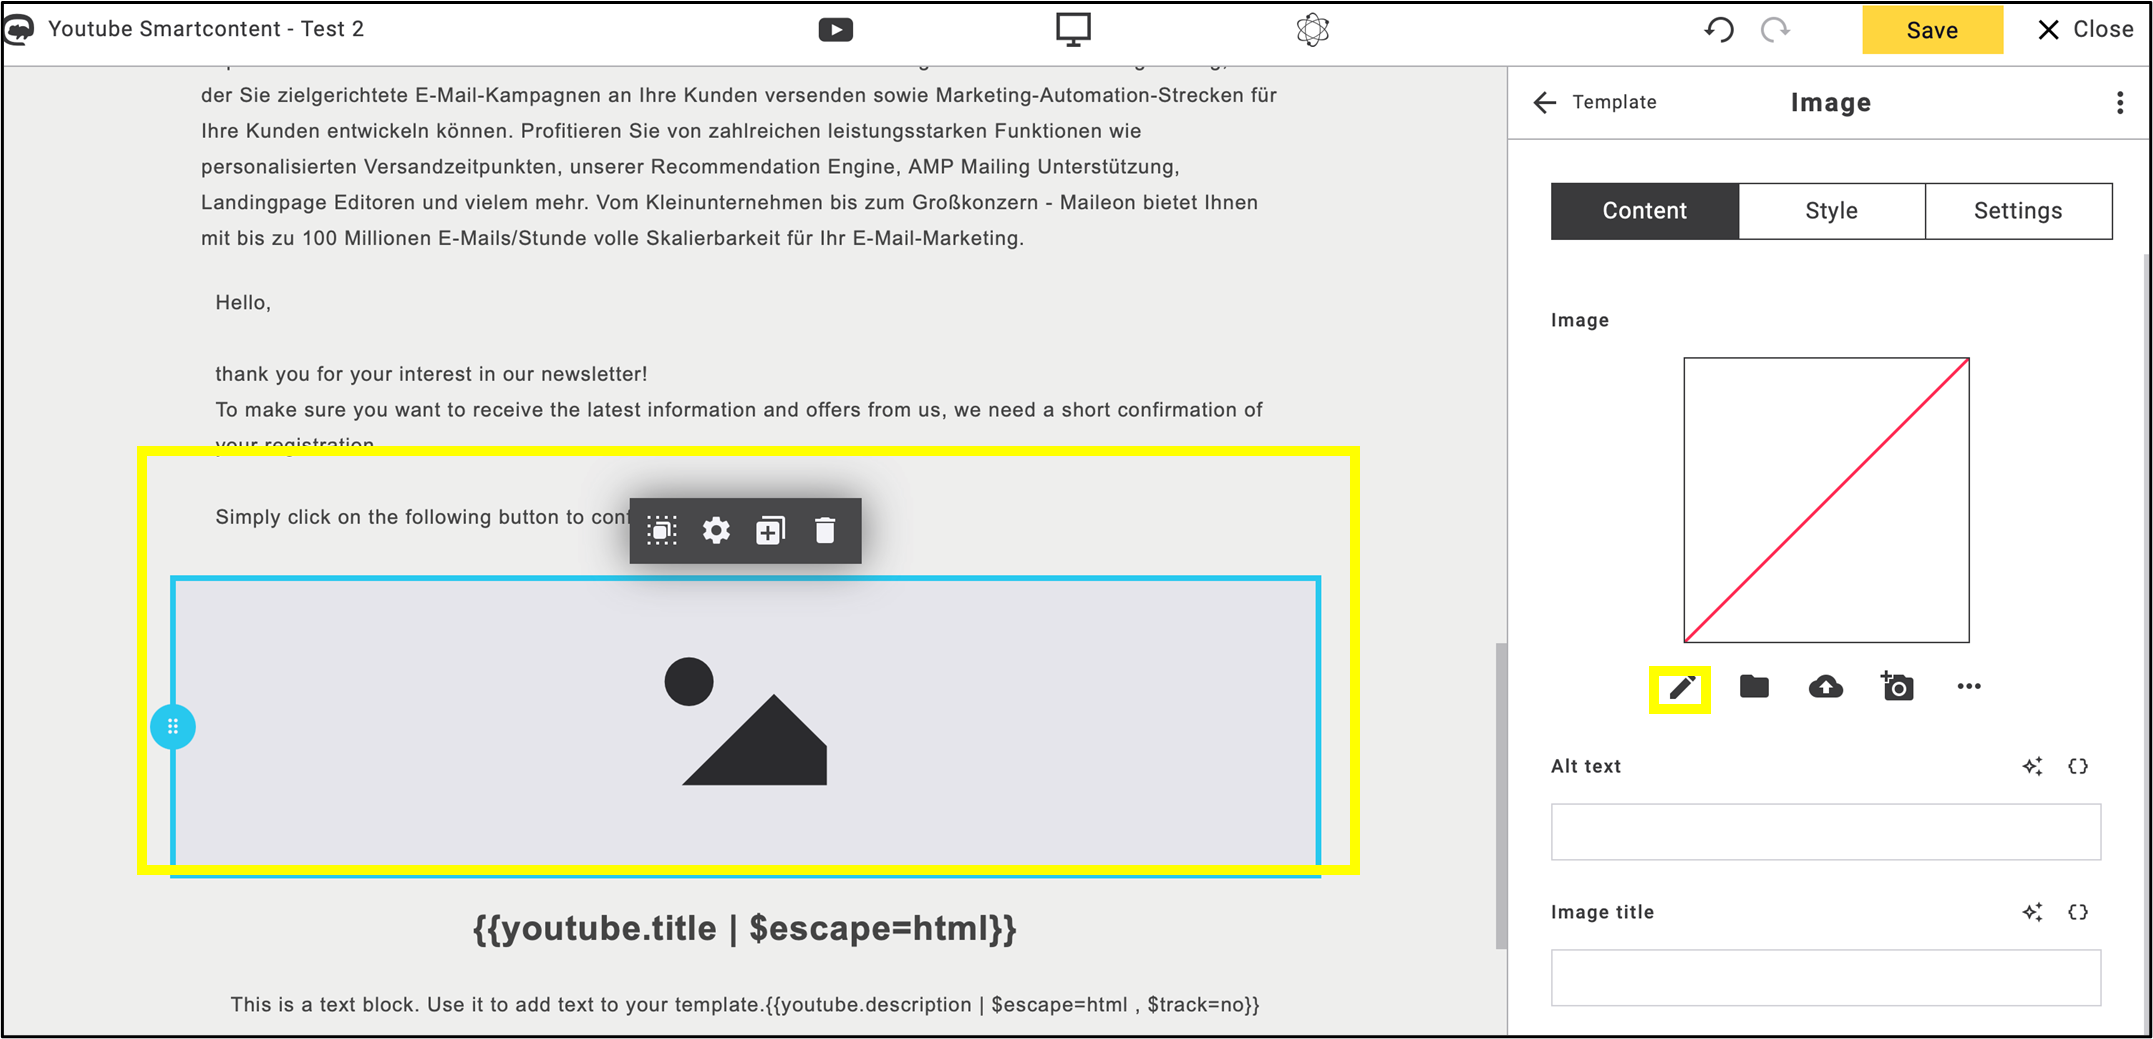
fig. 24: Click on pencil icon to edit the image block.
Click on the insert placeholder icon, where you can choose between the link and thumbnail options (fig. 25).
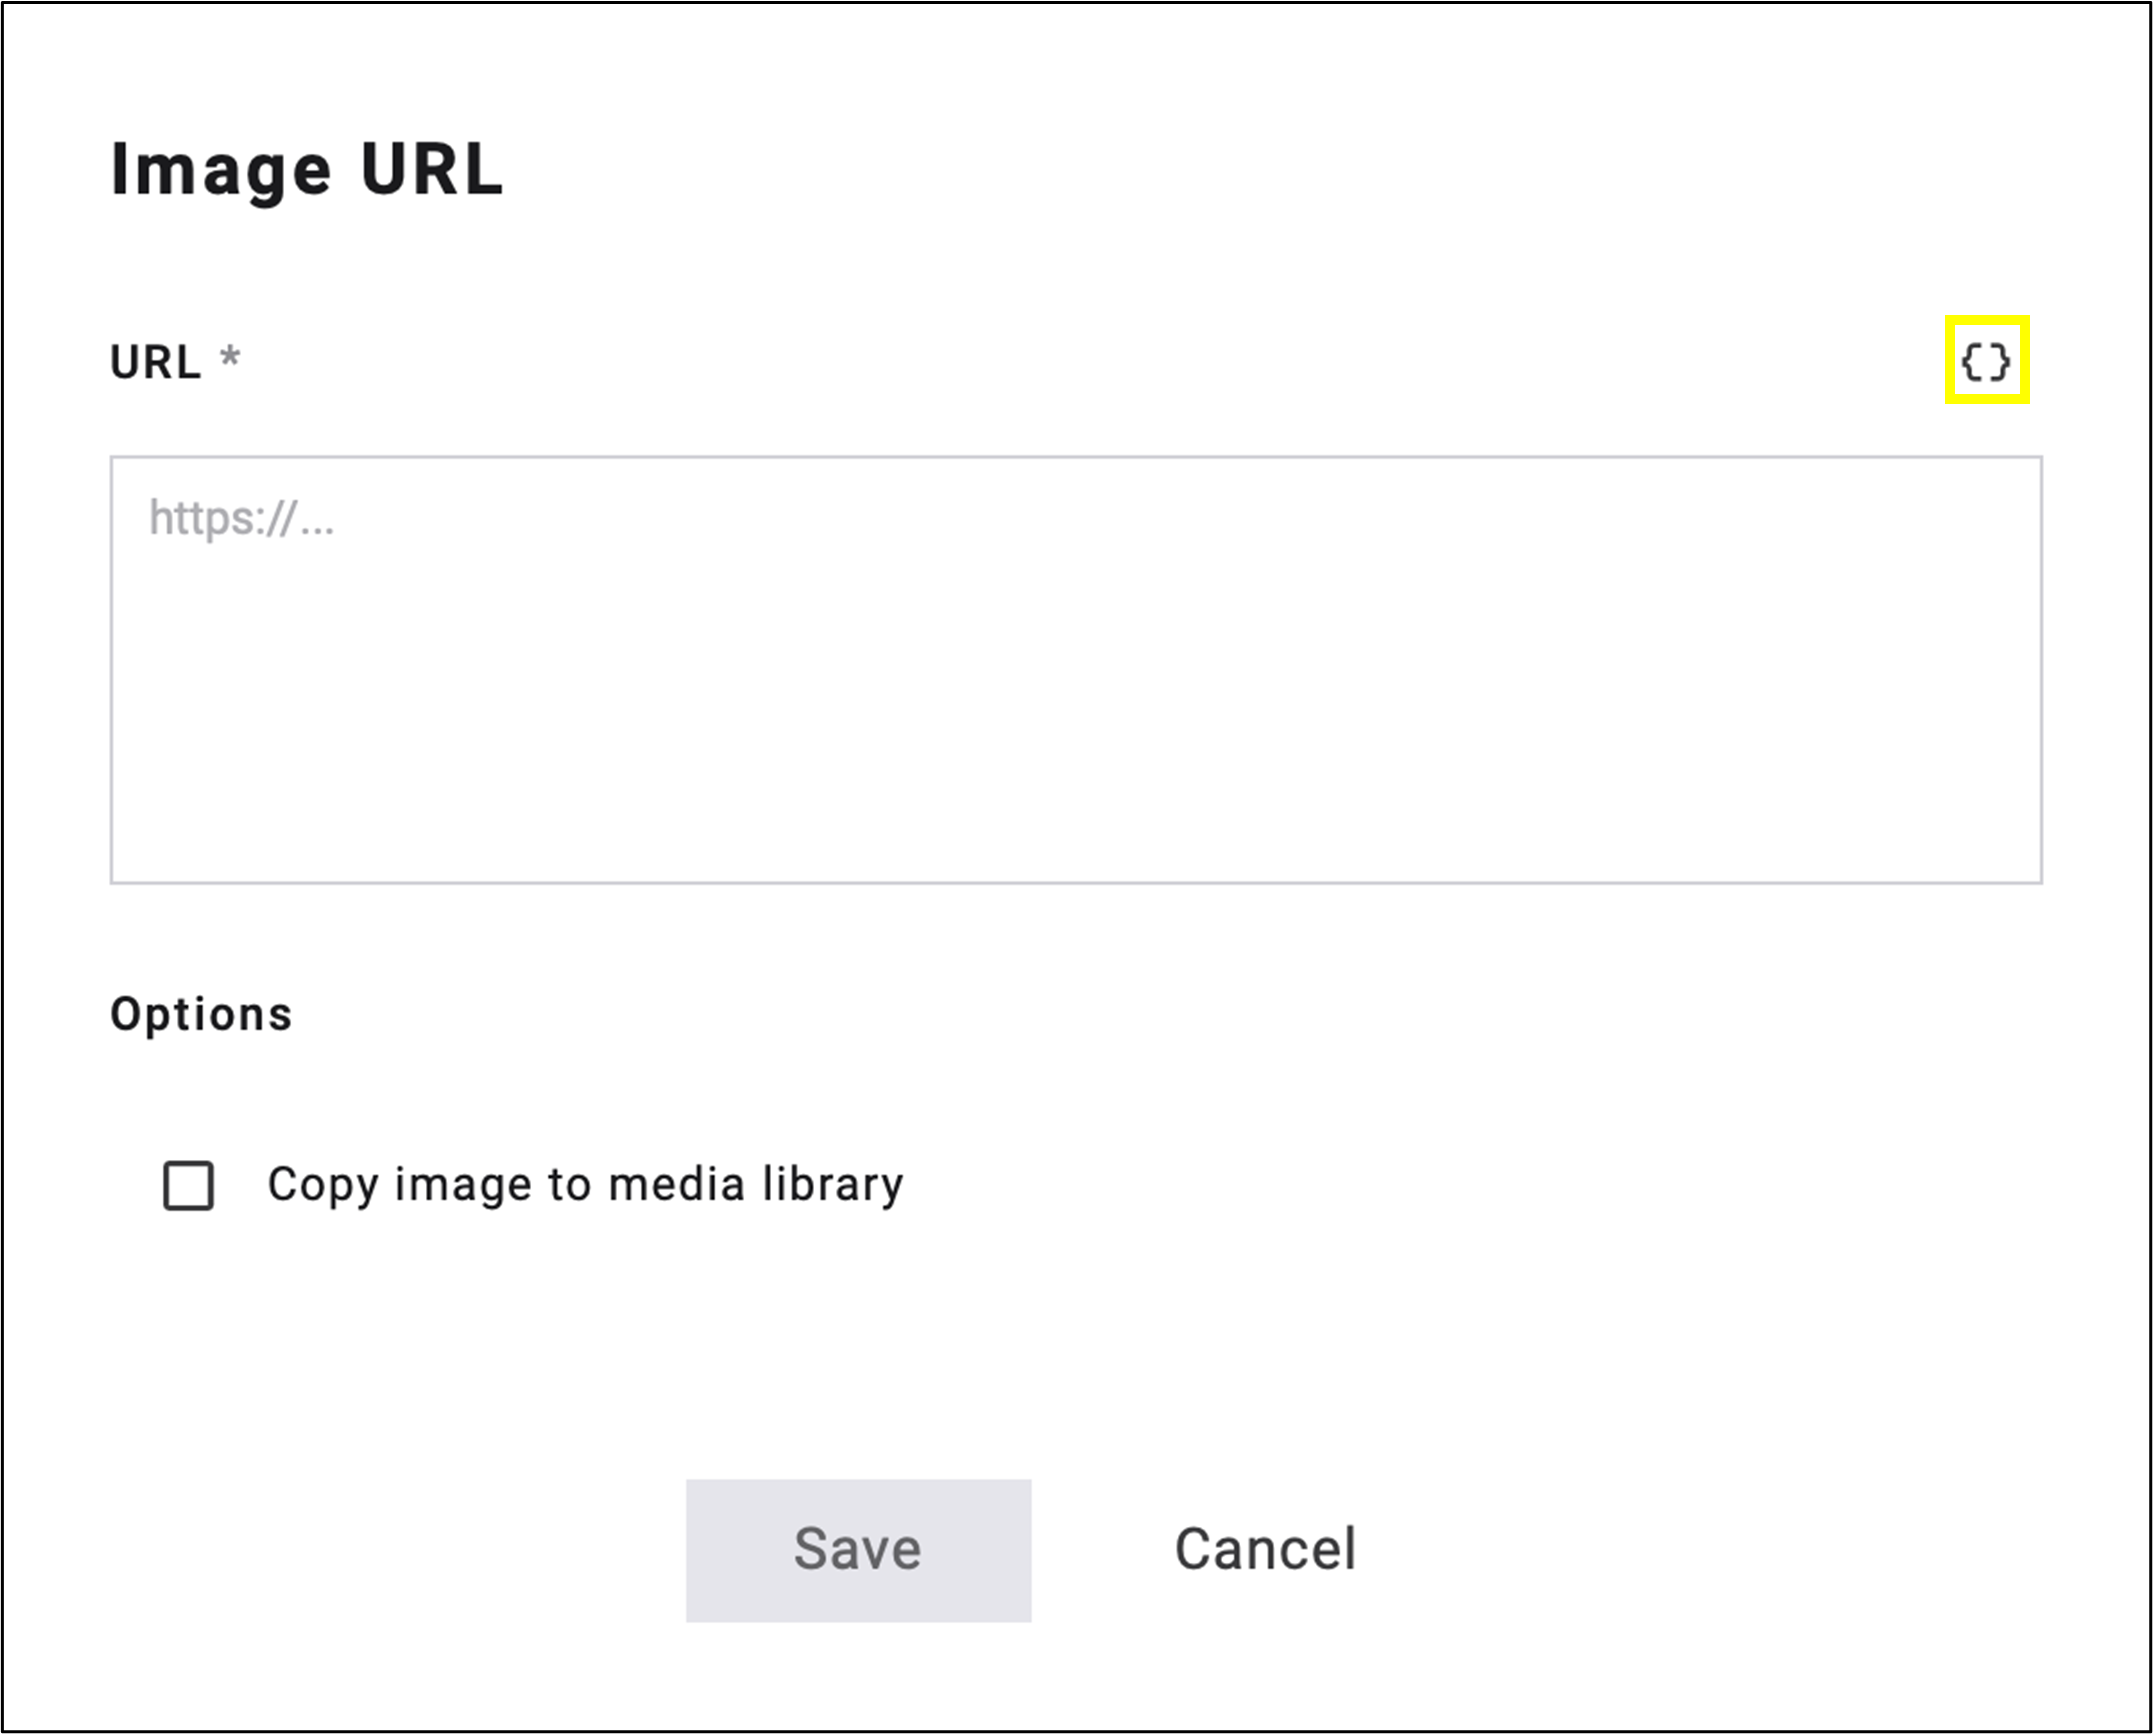
fig. 25: Click the insert placeholder icon to choose between the link and thumbnail.
Using YouTube placeholders, select either the Link or Thumbnail option, then click Insert Placeholder (fig. 26).
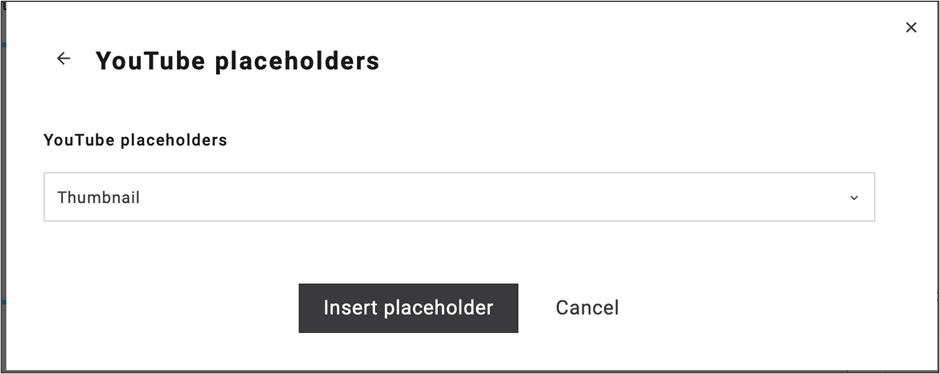
fig. 26: Select ’Link’/’Thumbnail‘, then click ’Insert placeholder’.
The pop-up window will contain the selected parameter (fig. 27). Click Save.
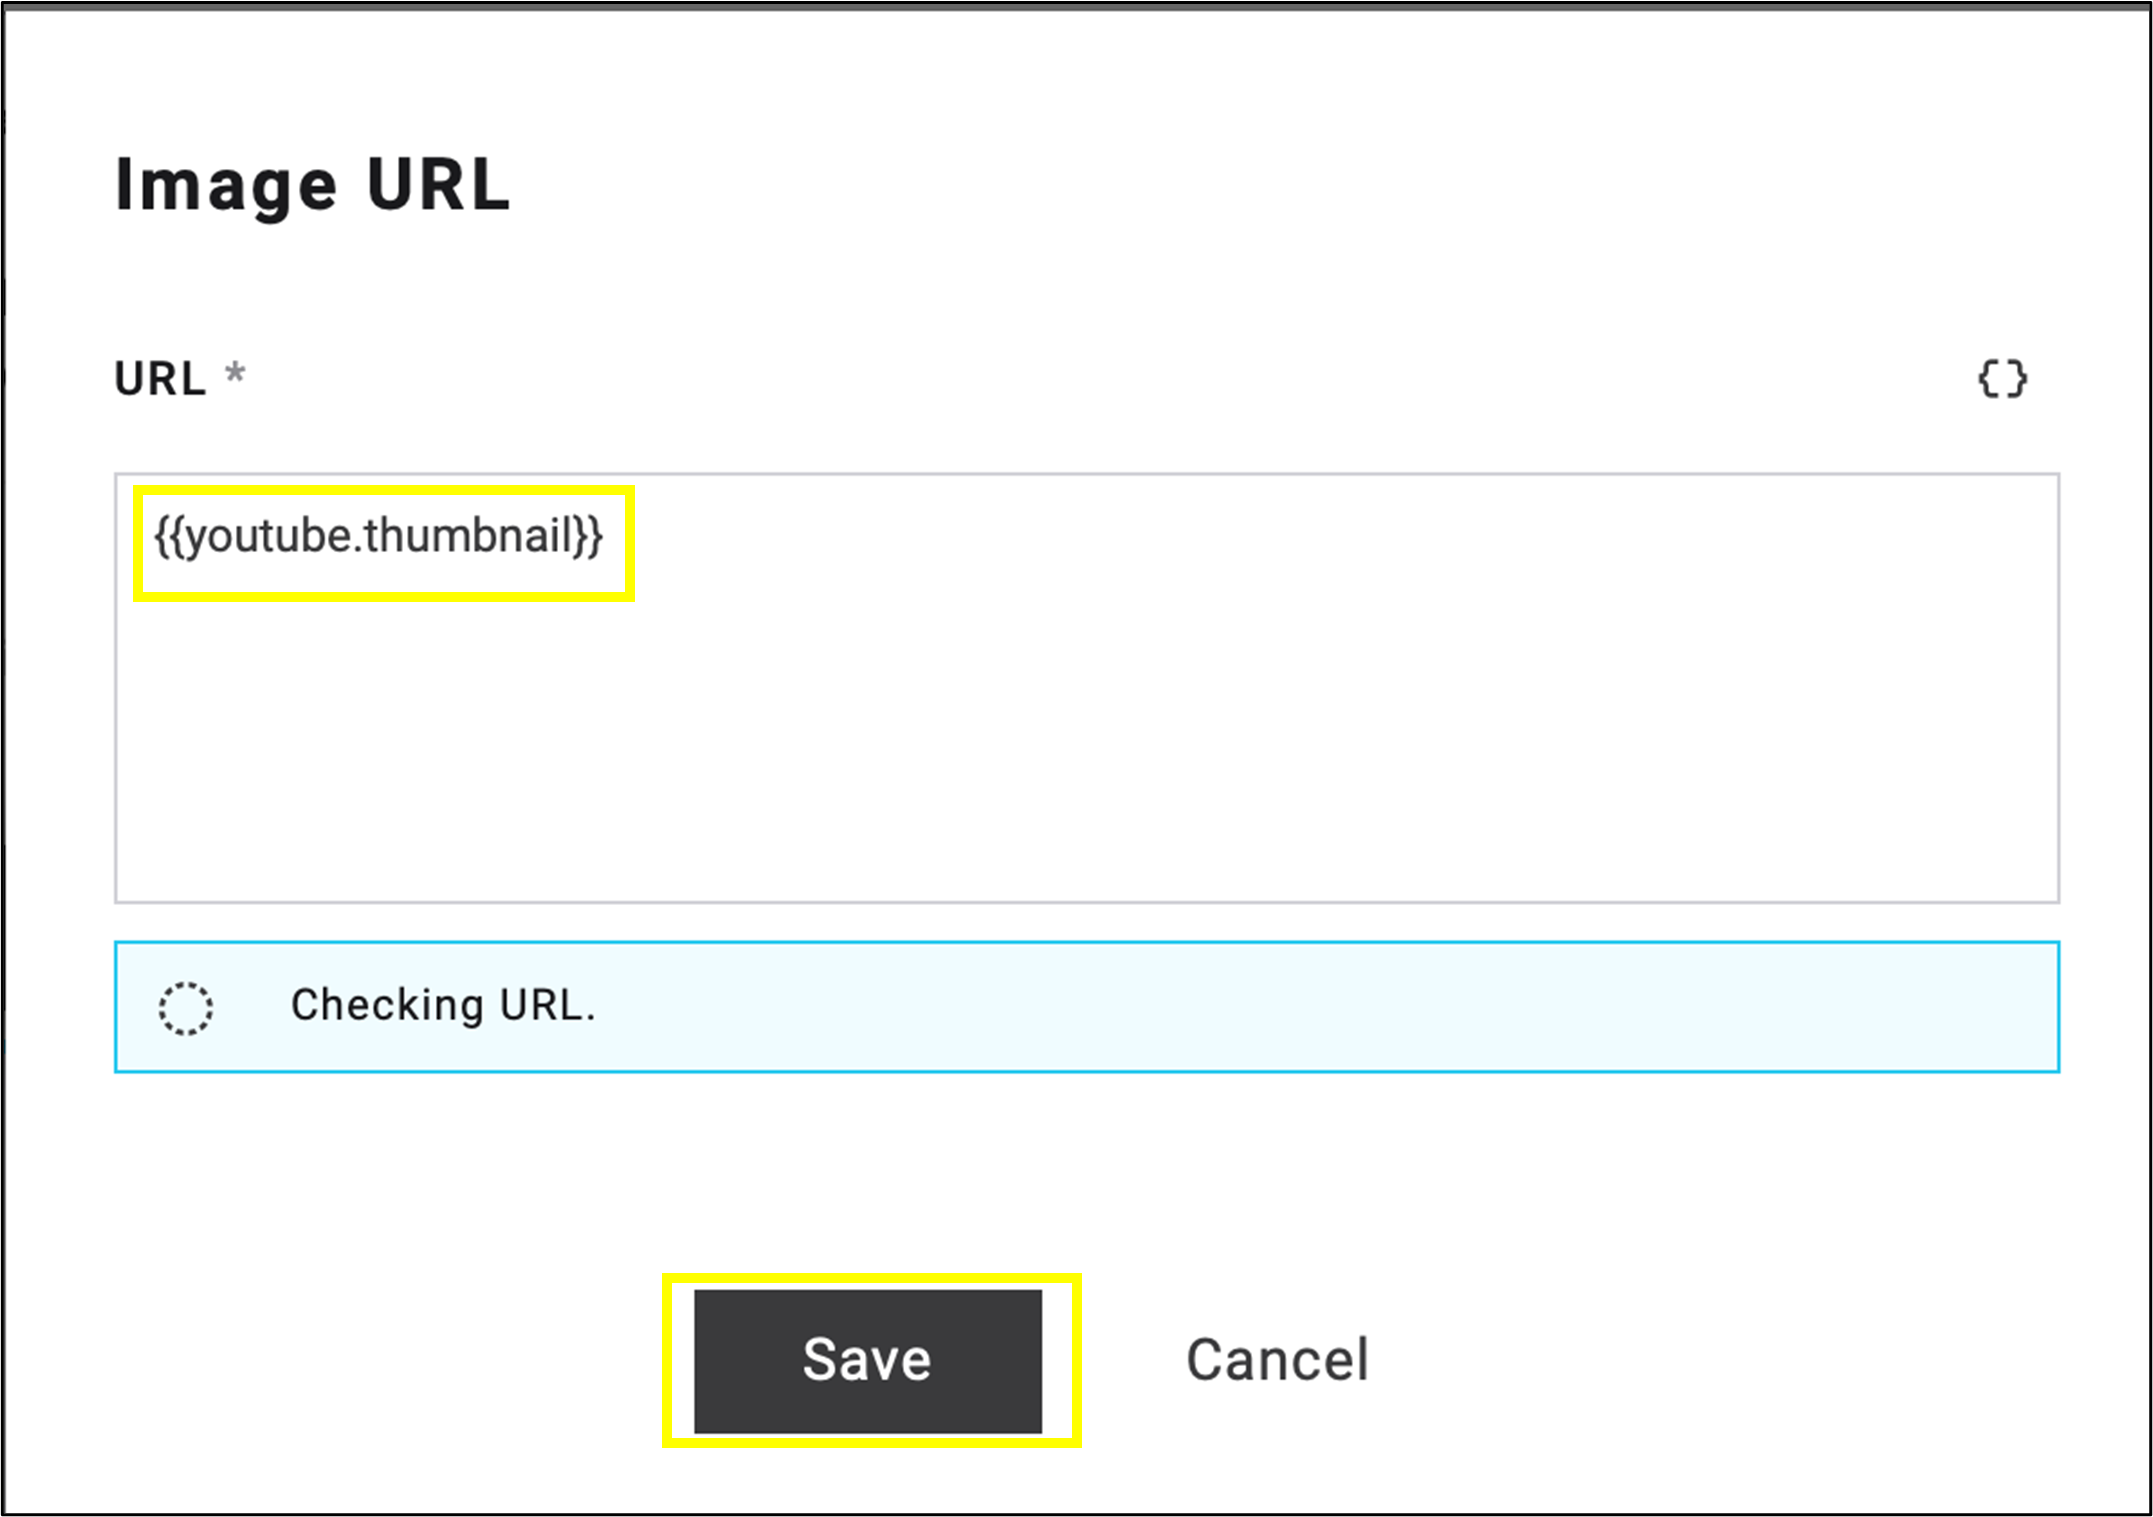
fig. 27: Confirm the parameter in the popup by clicking ’Save’.
Select the image block and the text block and group them together by clicking the Select adjacent elements icon (fig. 28).
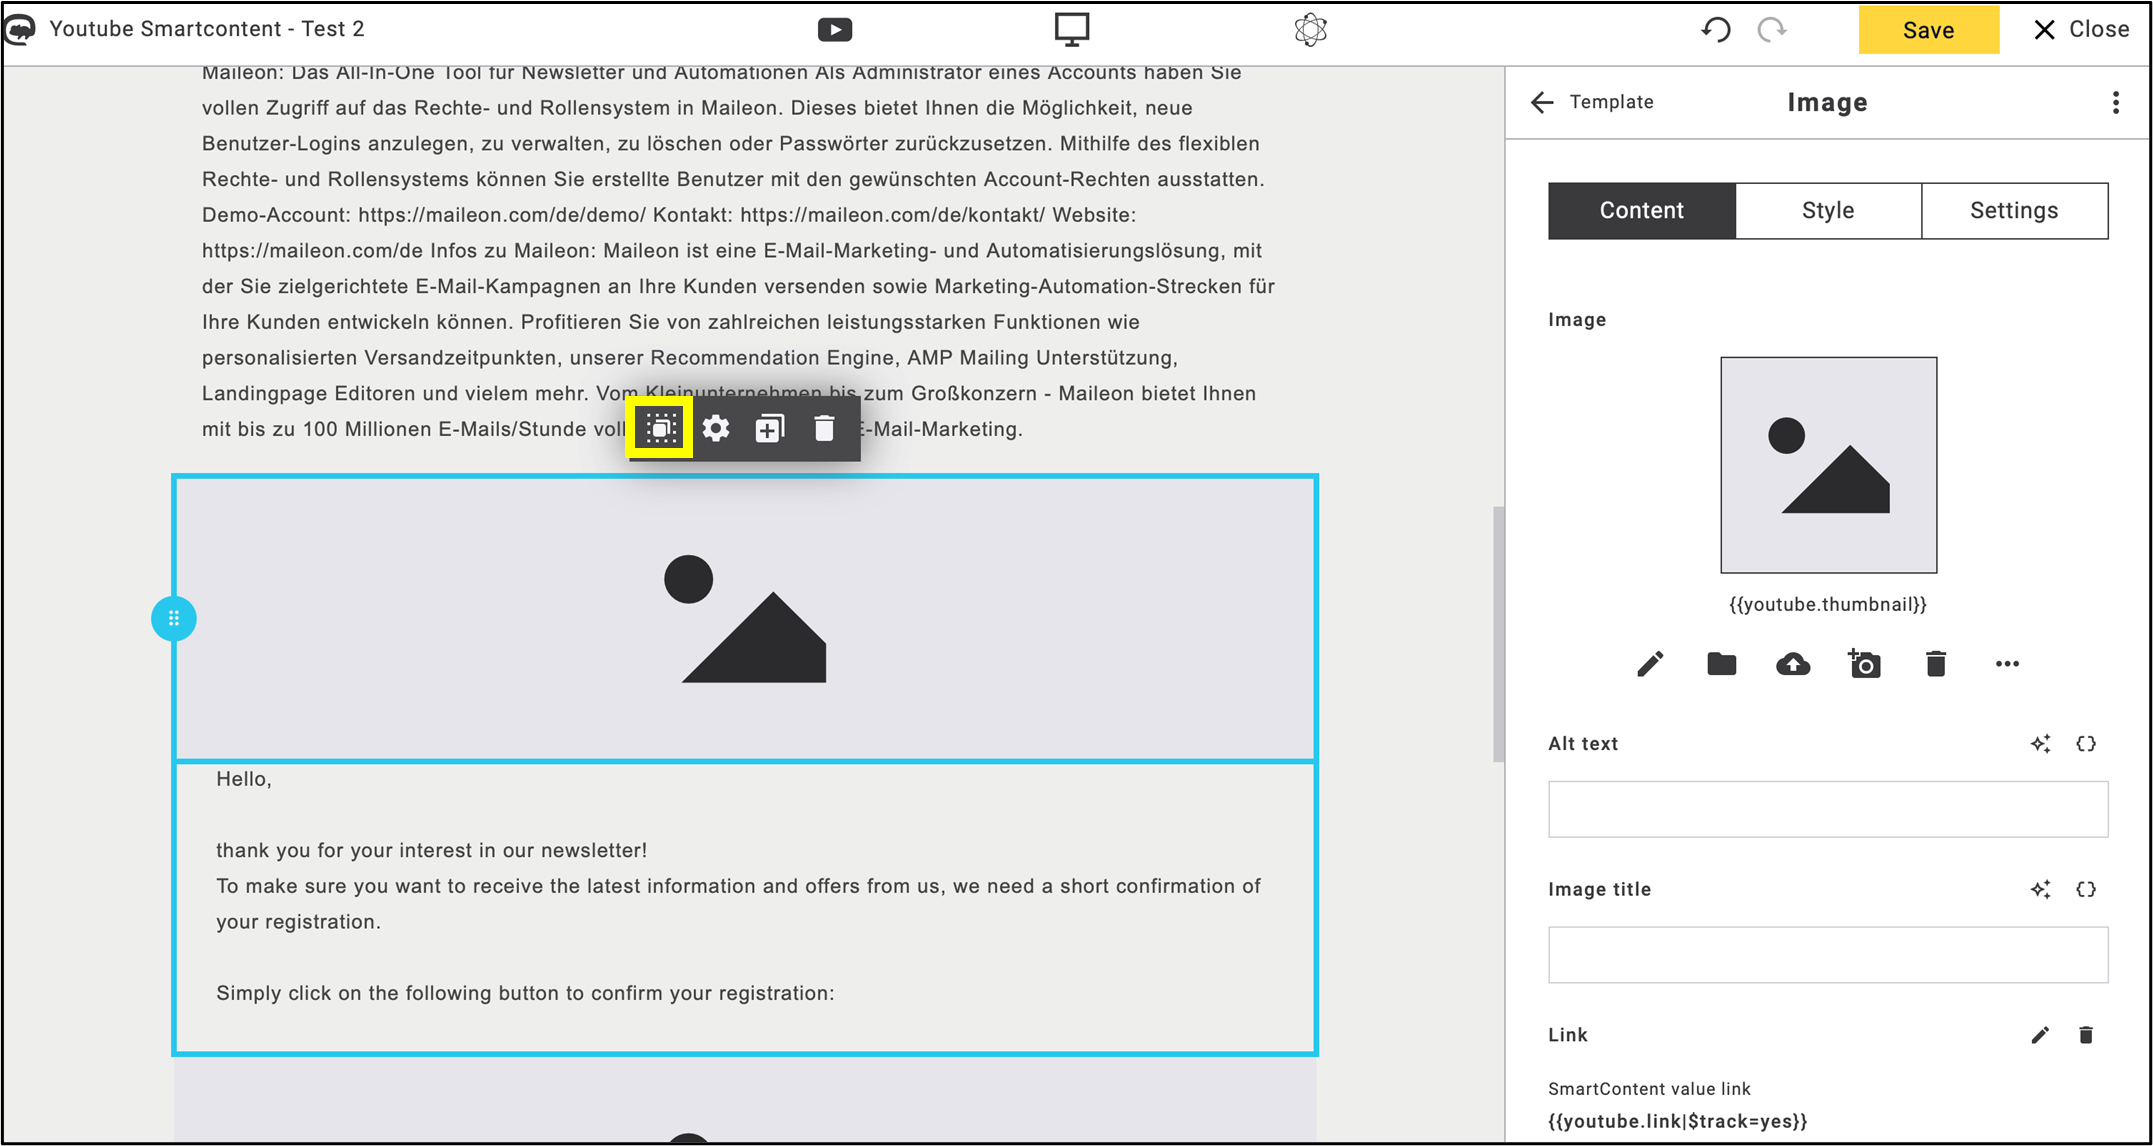
fig. 28: Click ’Select adjacent elements’ to select the image and the text block.
To group the items into a single block, first select both the image and text blocks. Then,
click Group items to combine them (fig. 29).
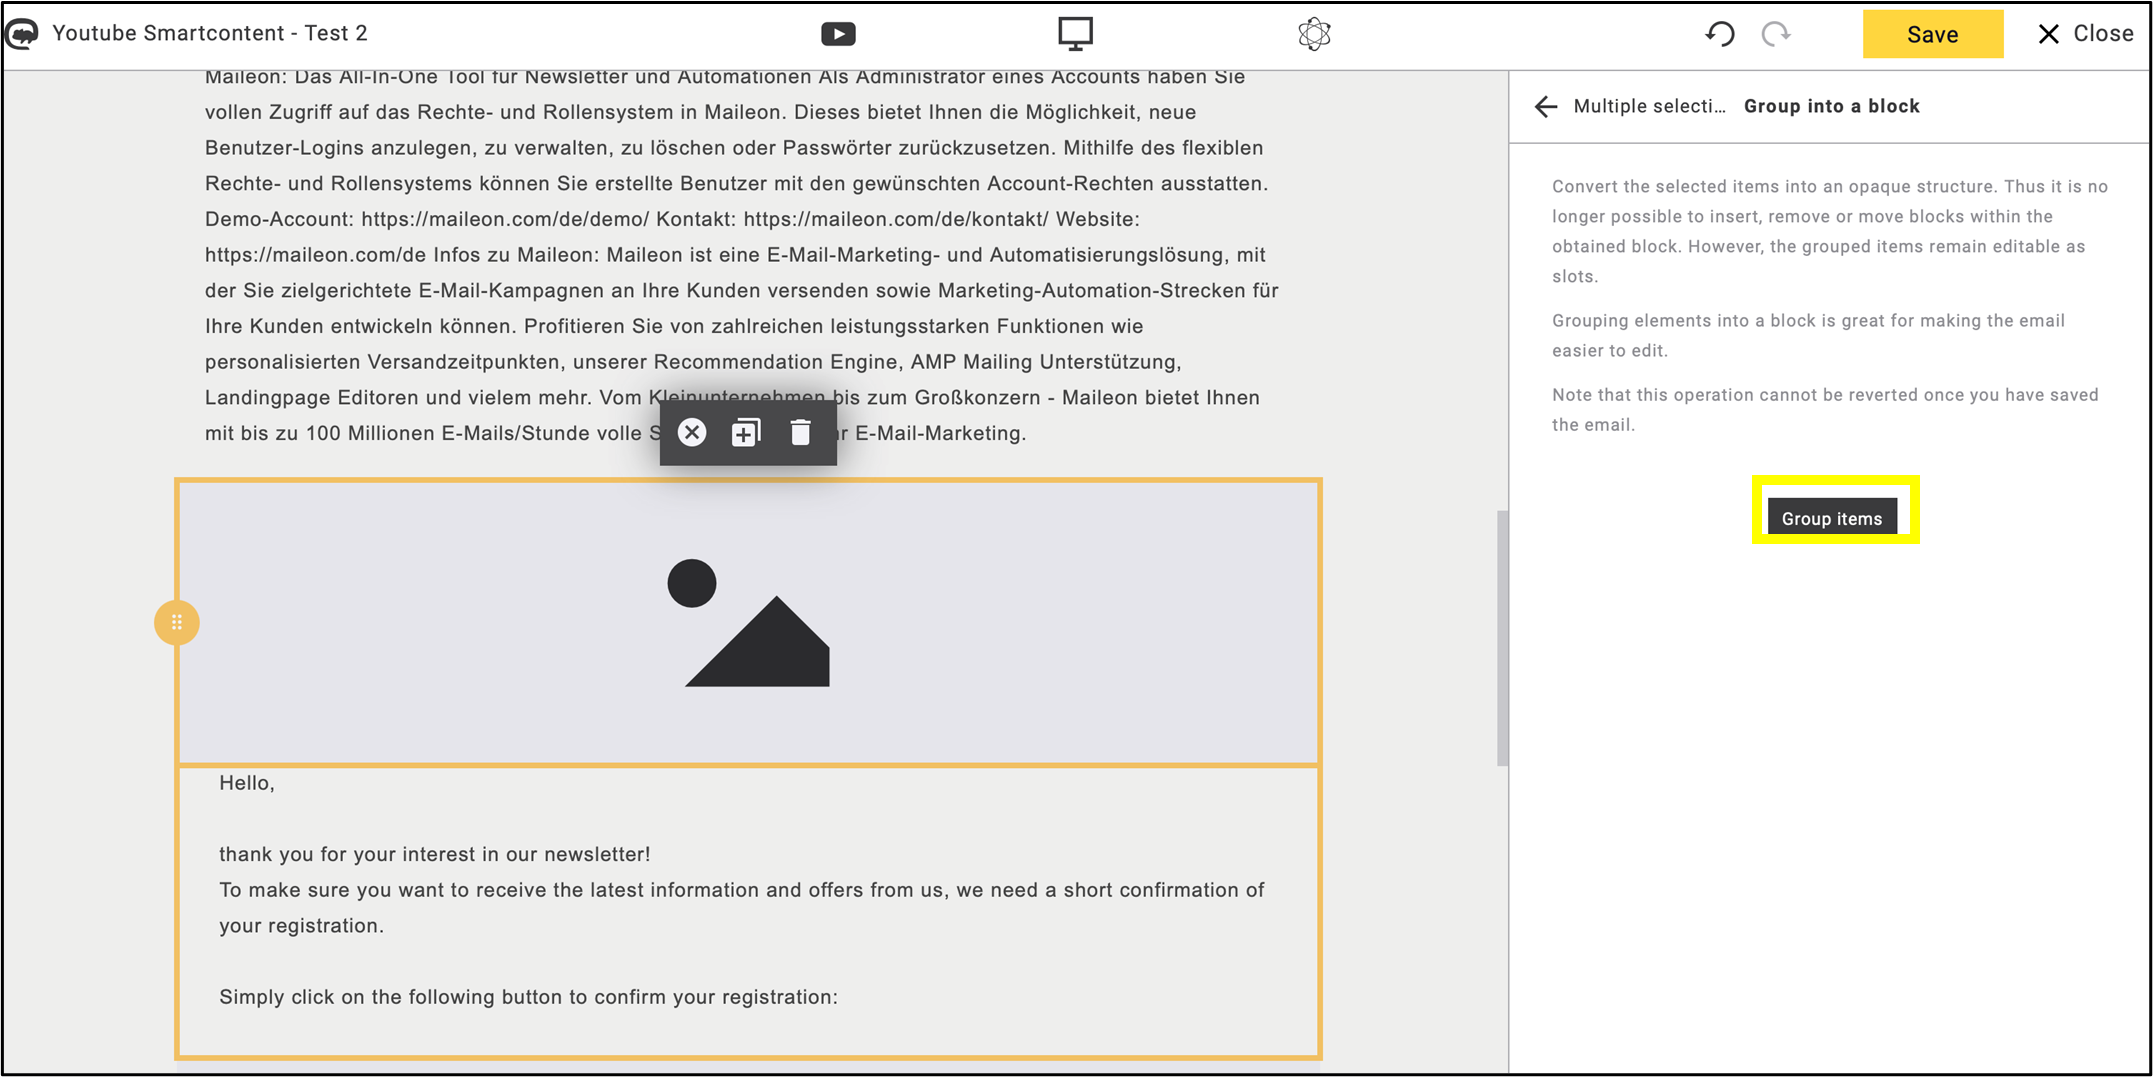
fig. 29: Merge the elements into one block.
Embed the YouTube video into the parameterised block by following the steps described at the beginning of this documentation (fig. 30).
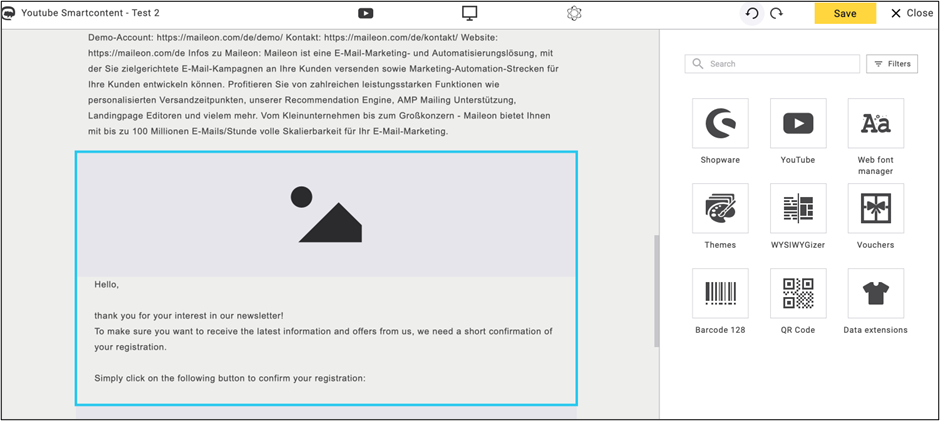
fig. 30: Embed the YouTube video into the block as outlined above.
Note 3:
Use the Insert Placeholder option to bring a variety of information from the YouTube video into the emailing — not only the title or description but also keywords and more (fig. 31).
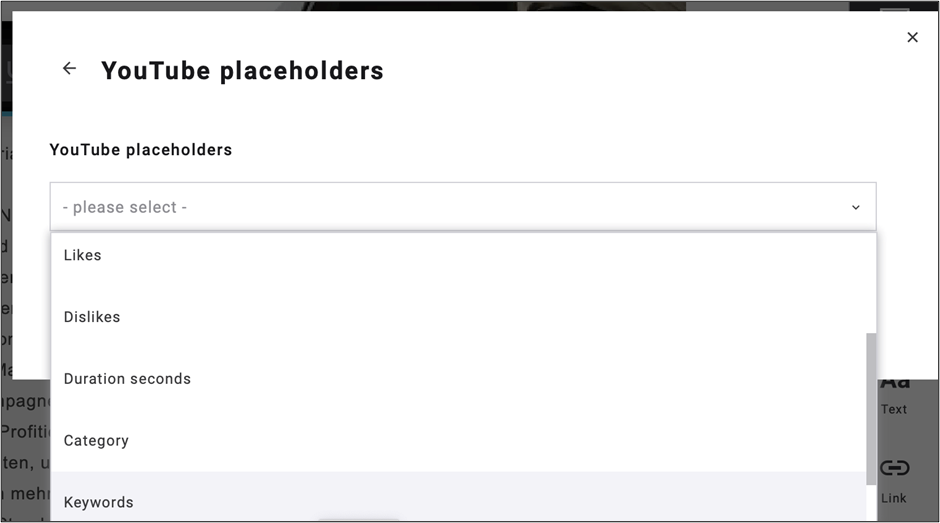
fig. 31: Insert YouTube placeholders to add titles, descriptions, keywords, and more.
3. Web Font Manager
To maintain consistency in the design of emailing, it is recommended to specify fallback fonts that are safe to use in web environments and that are as similar as possible to the chosen web font.
Web fonts are designed specifically for online use and are not usually pre-installed on devices or operating systems. Many emailing clients fall back to a default system font, for example Helvetica in Apple Mail.
In CSS, the font-family property is used to reference web fonts and fallback fonts. With Web Font Manager, you can easily register your web fonts, set fallback options, and create font-family expressions. These will then be available in the editor when you want to format your text.
Find Web Font Manager among the apps within the emailing editing tools (fig. 32).
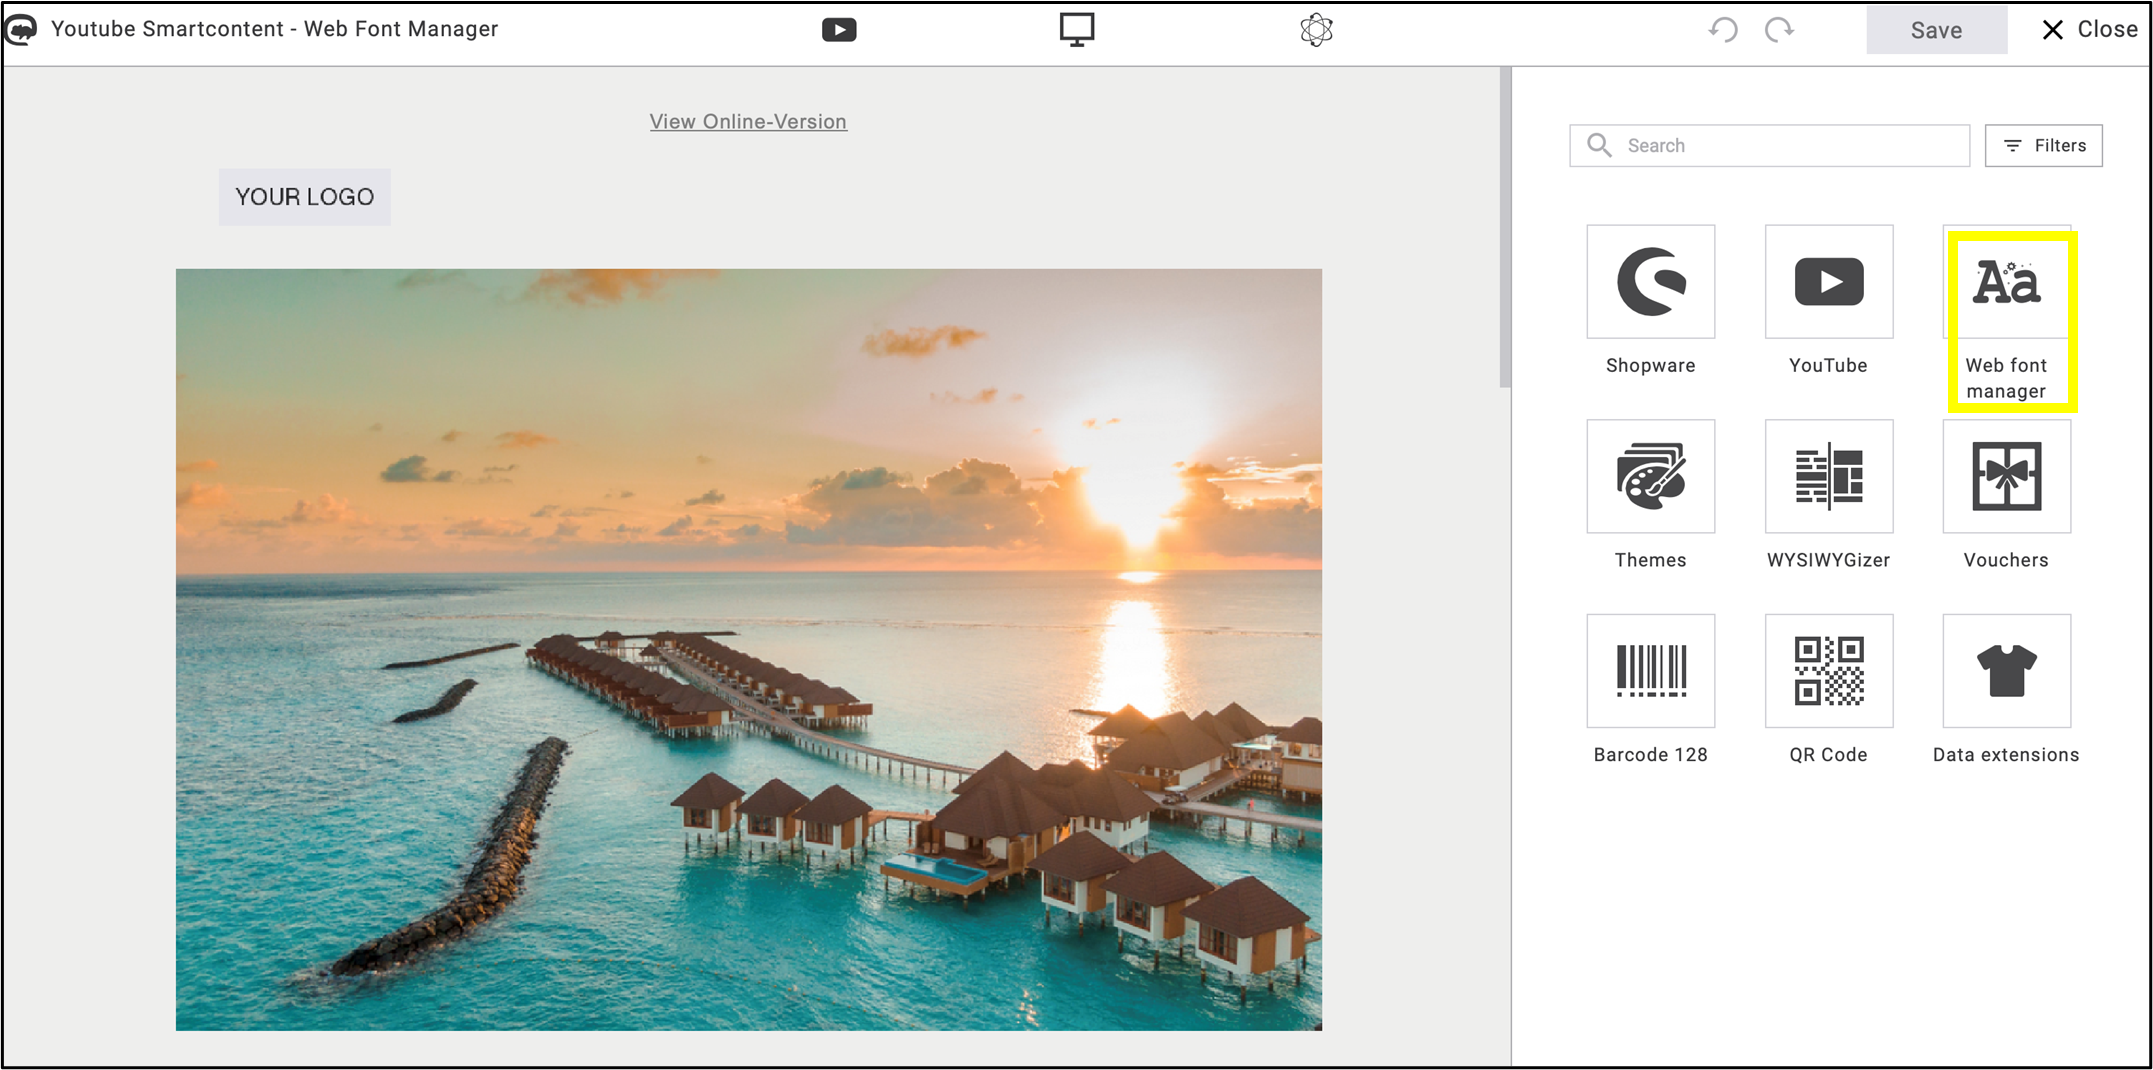
Fig. 32: Locate ’Web Font Manager“ in the emailing editing tools.
As the first step, drag and drop a text box in the emailing (fig. 33).
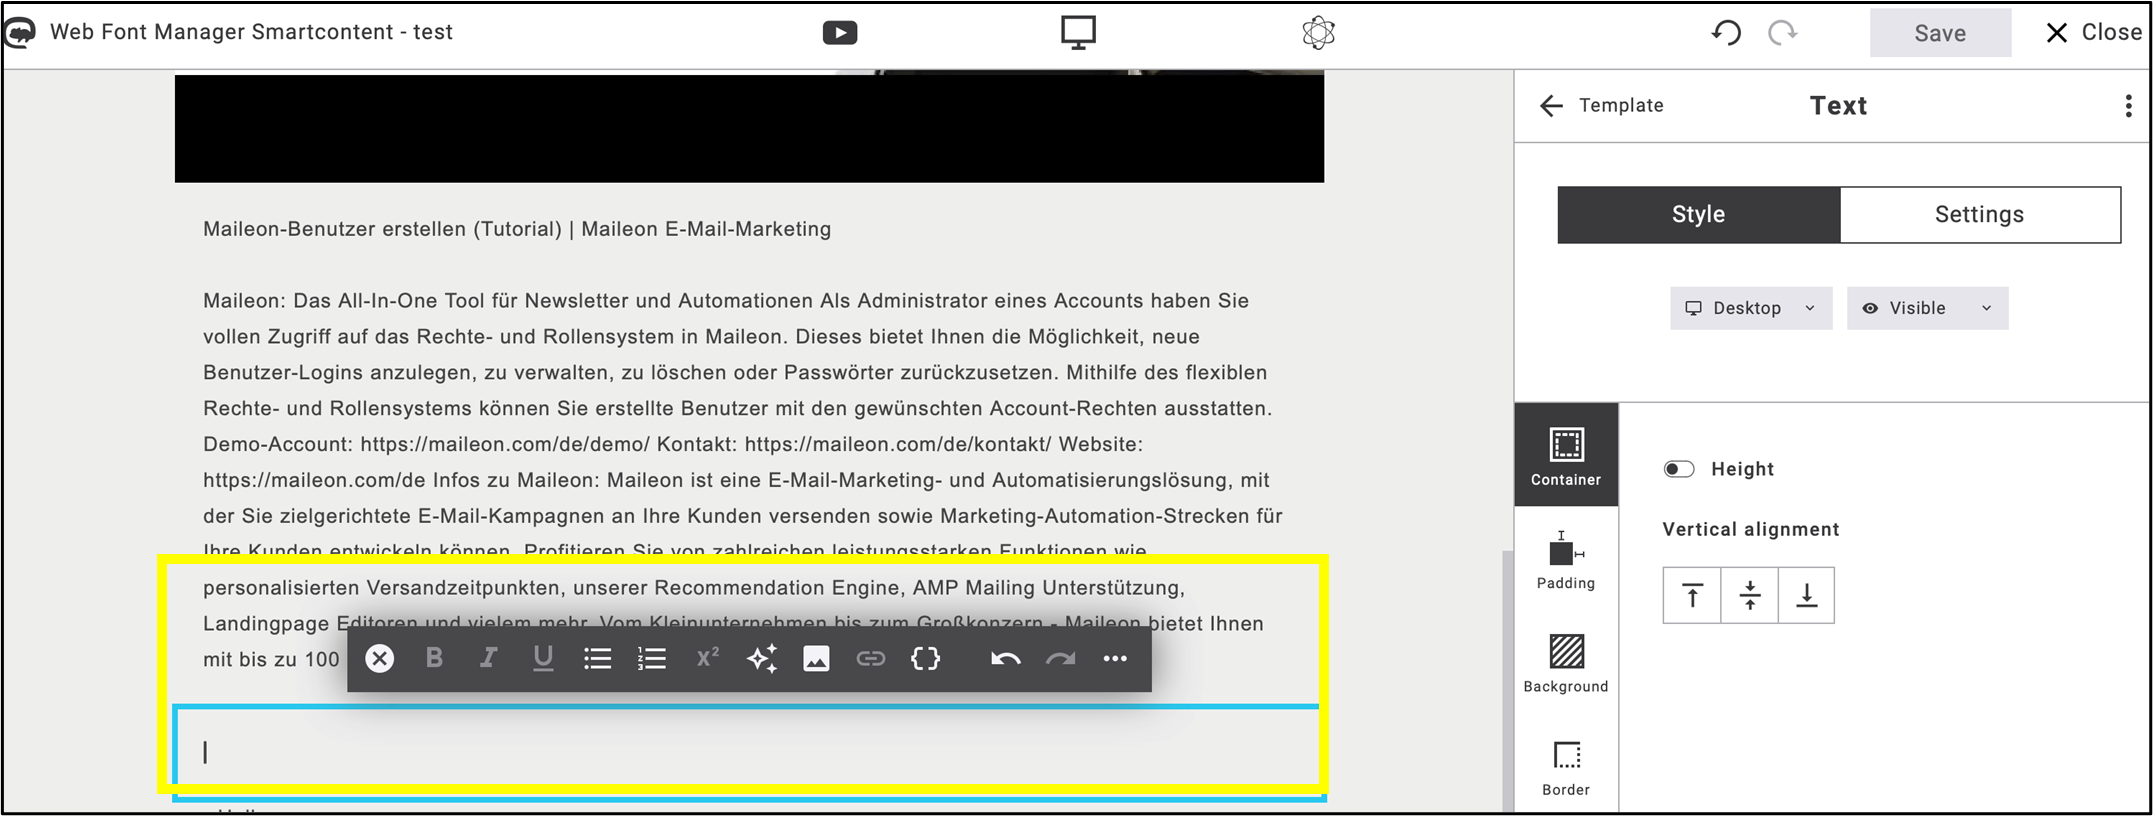
fig. 33: Drag and drop a text box into the emailing as the first step.
To use the tool, you need to select the font you want to use, for example from Google Fonts. After selecting one, click Get font (fig. 34).
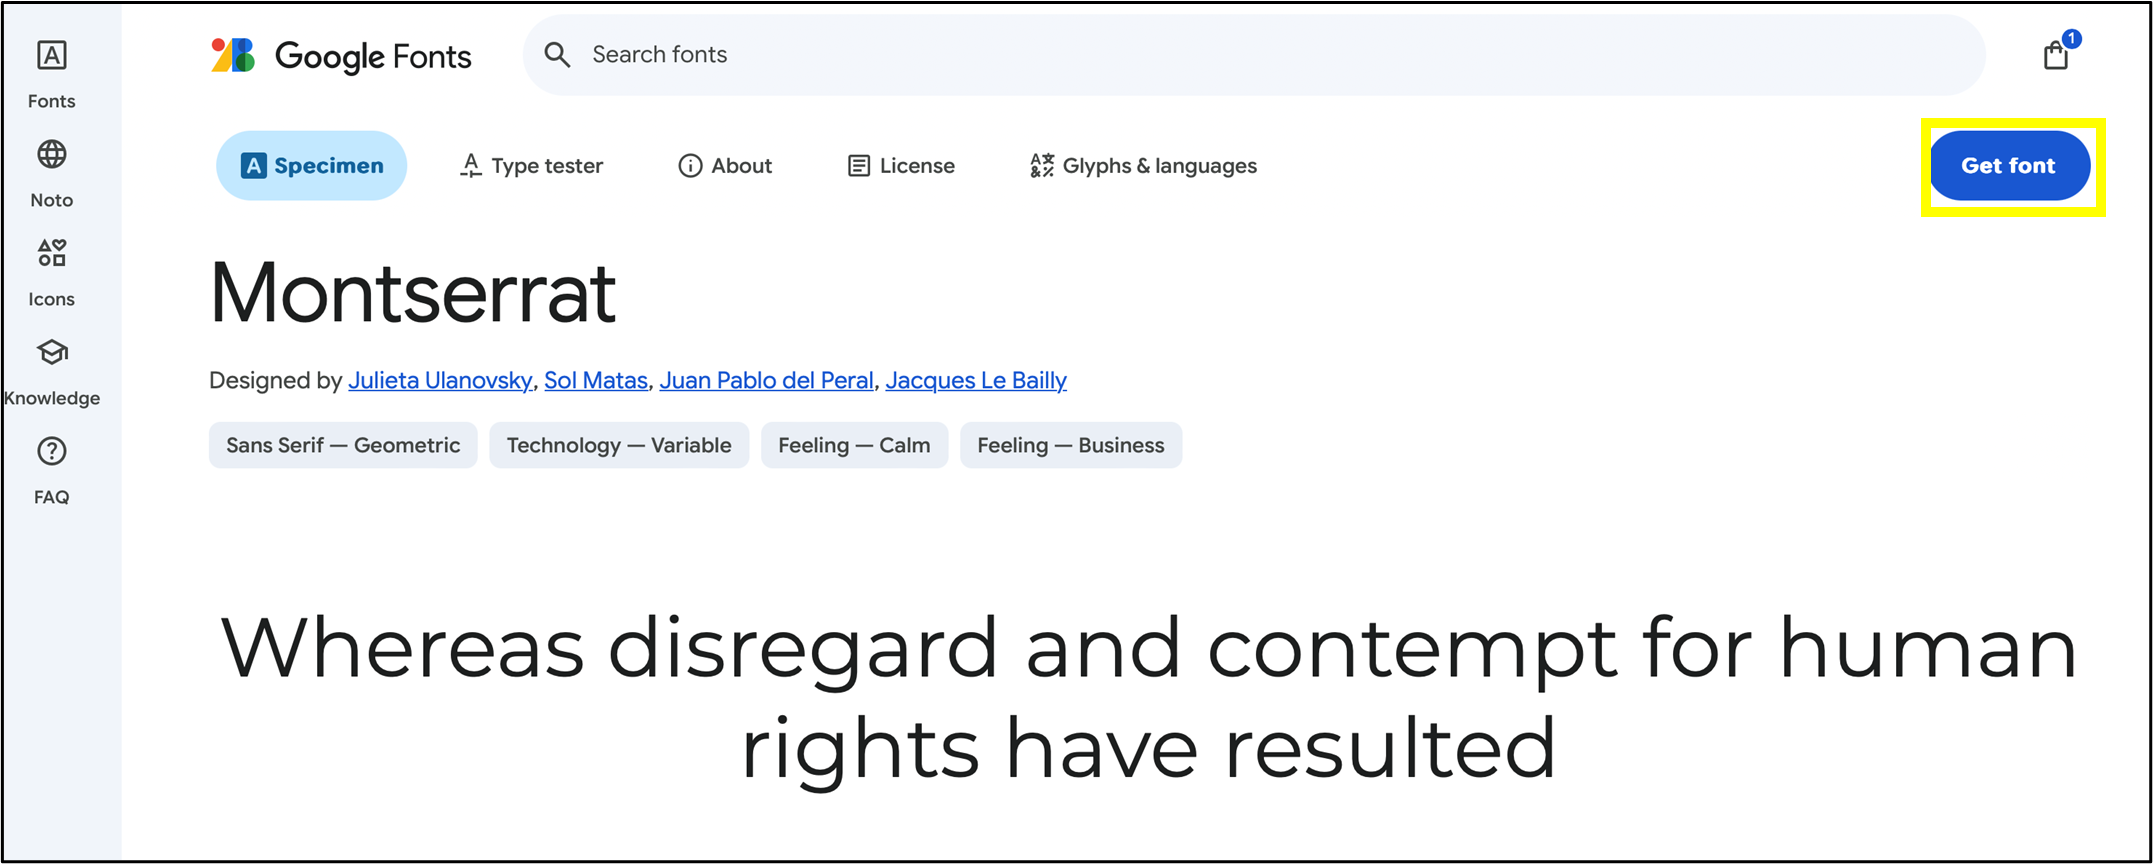
fig 34: Select your desired font from Google Fonts and click ’Get Font’ to use it.
Once you have chosen a font, click Get embed code (fig. 35).
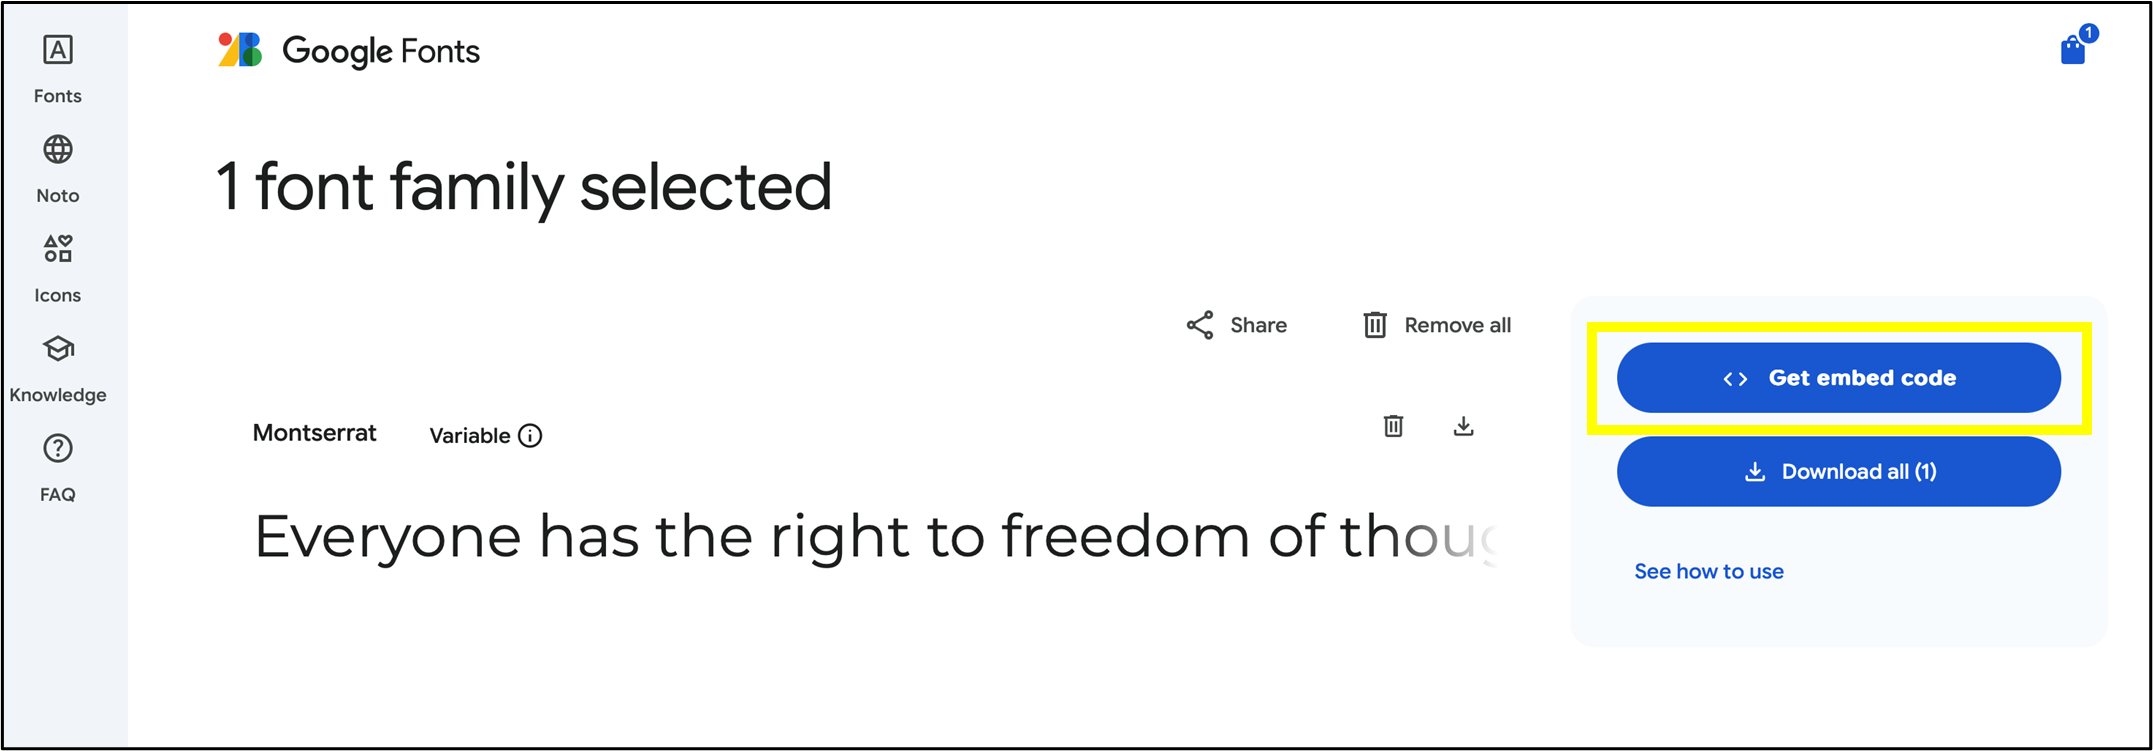
fig. 35: After selecting the font, click ’Get Embed Code’.
Click @import and copy the link in the quotation marks (fig. 36).
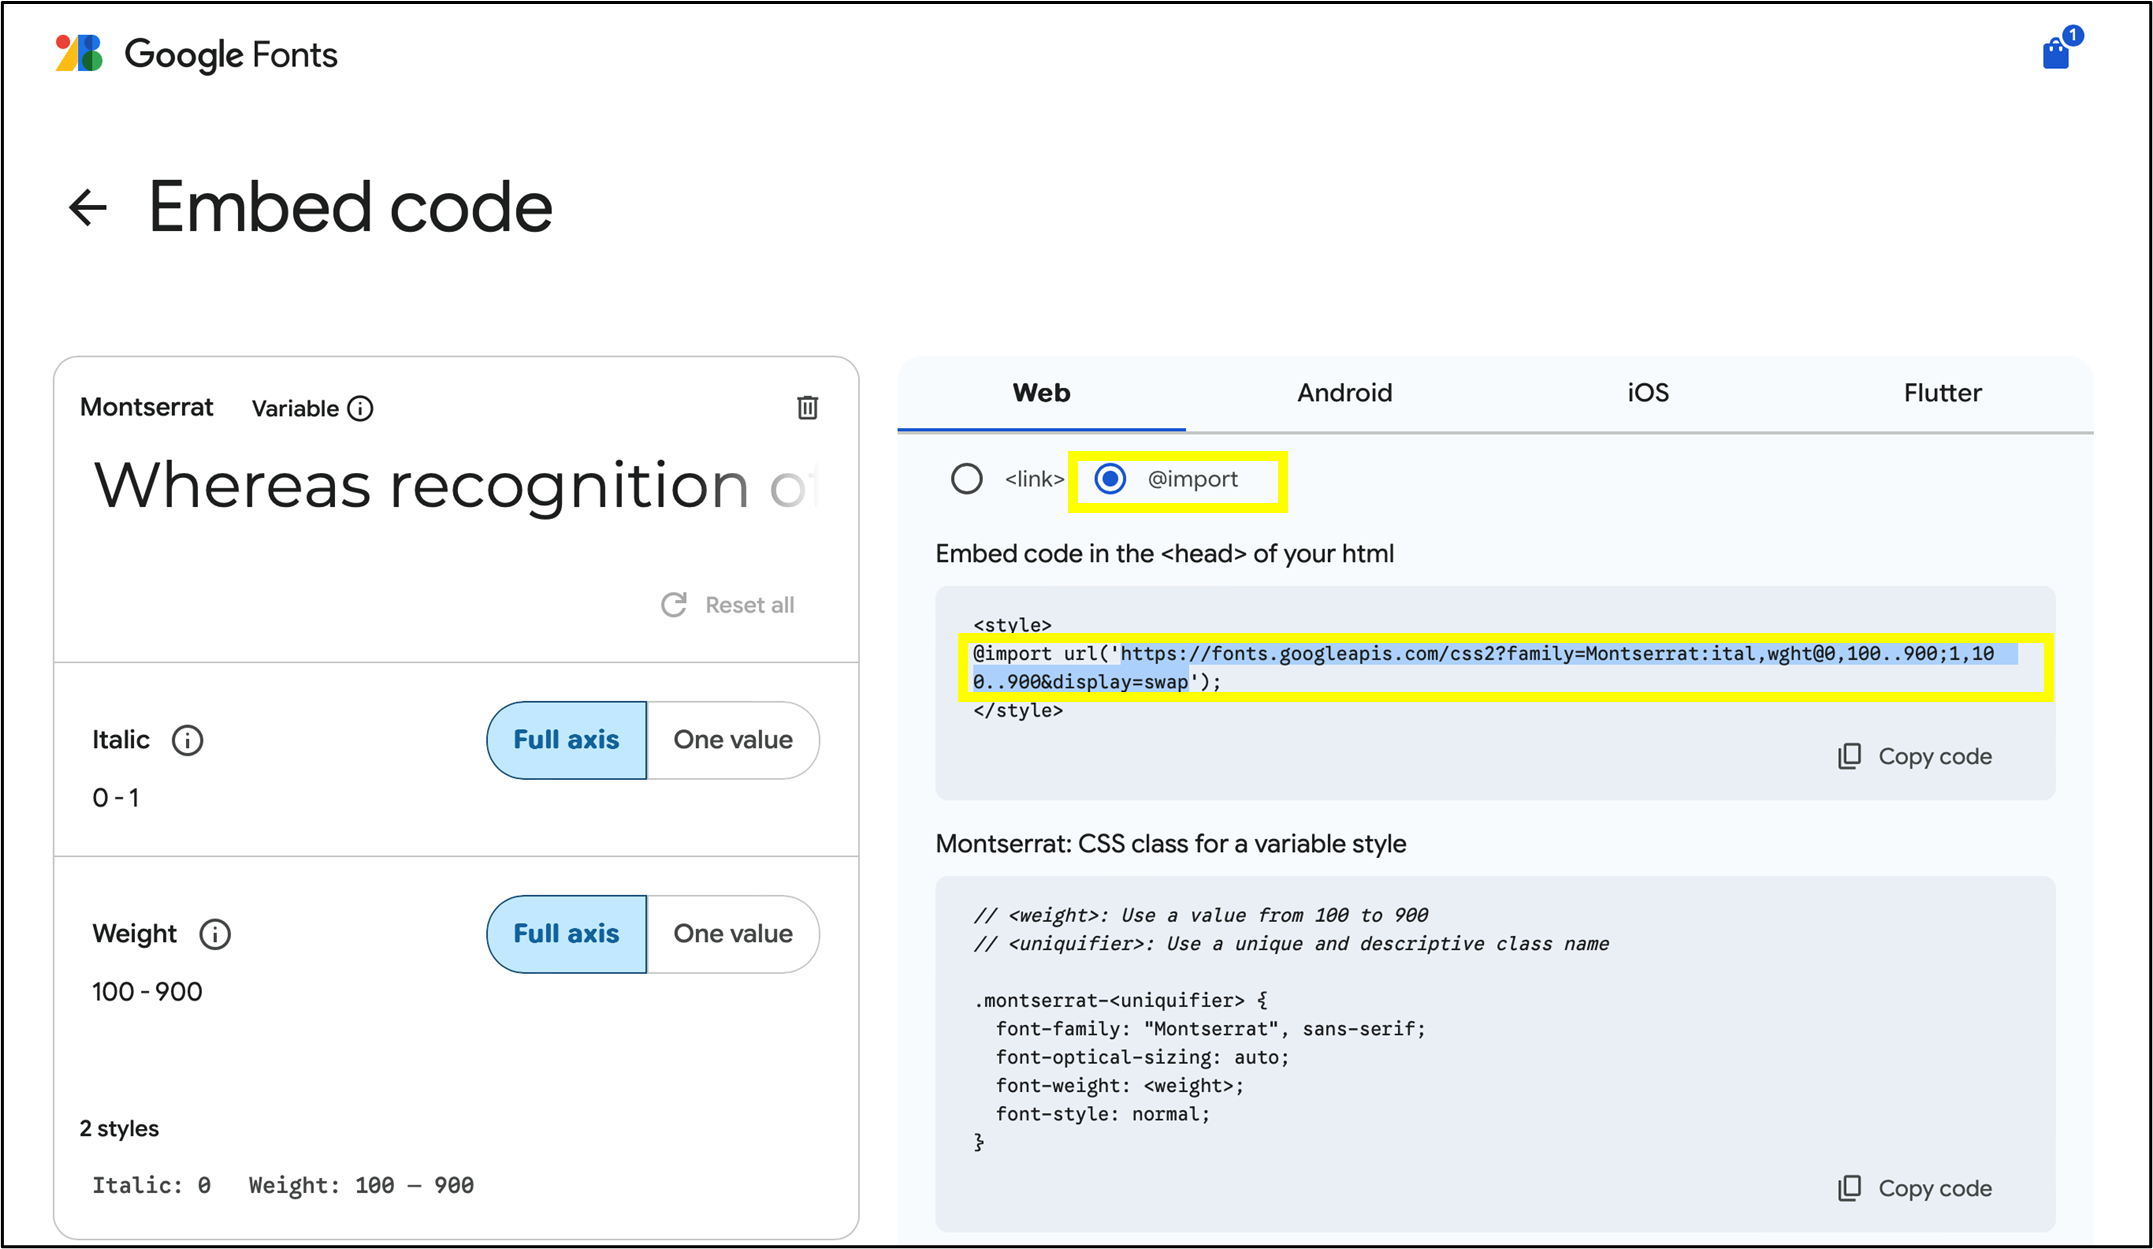
fig. 36: Click @import and copy the link in quotes.
Select Web Font Manager from the applications in the Maileon emailing editor and click Add web font (fig. 37).
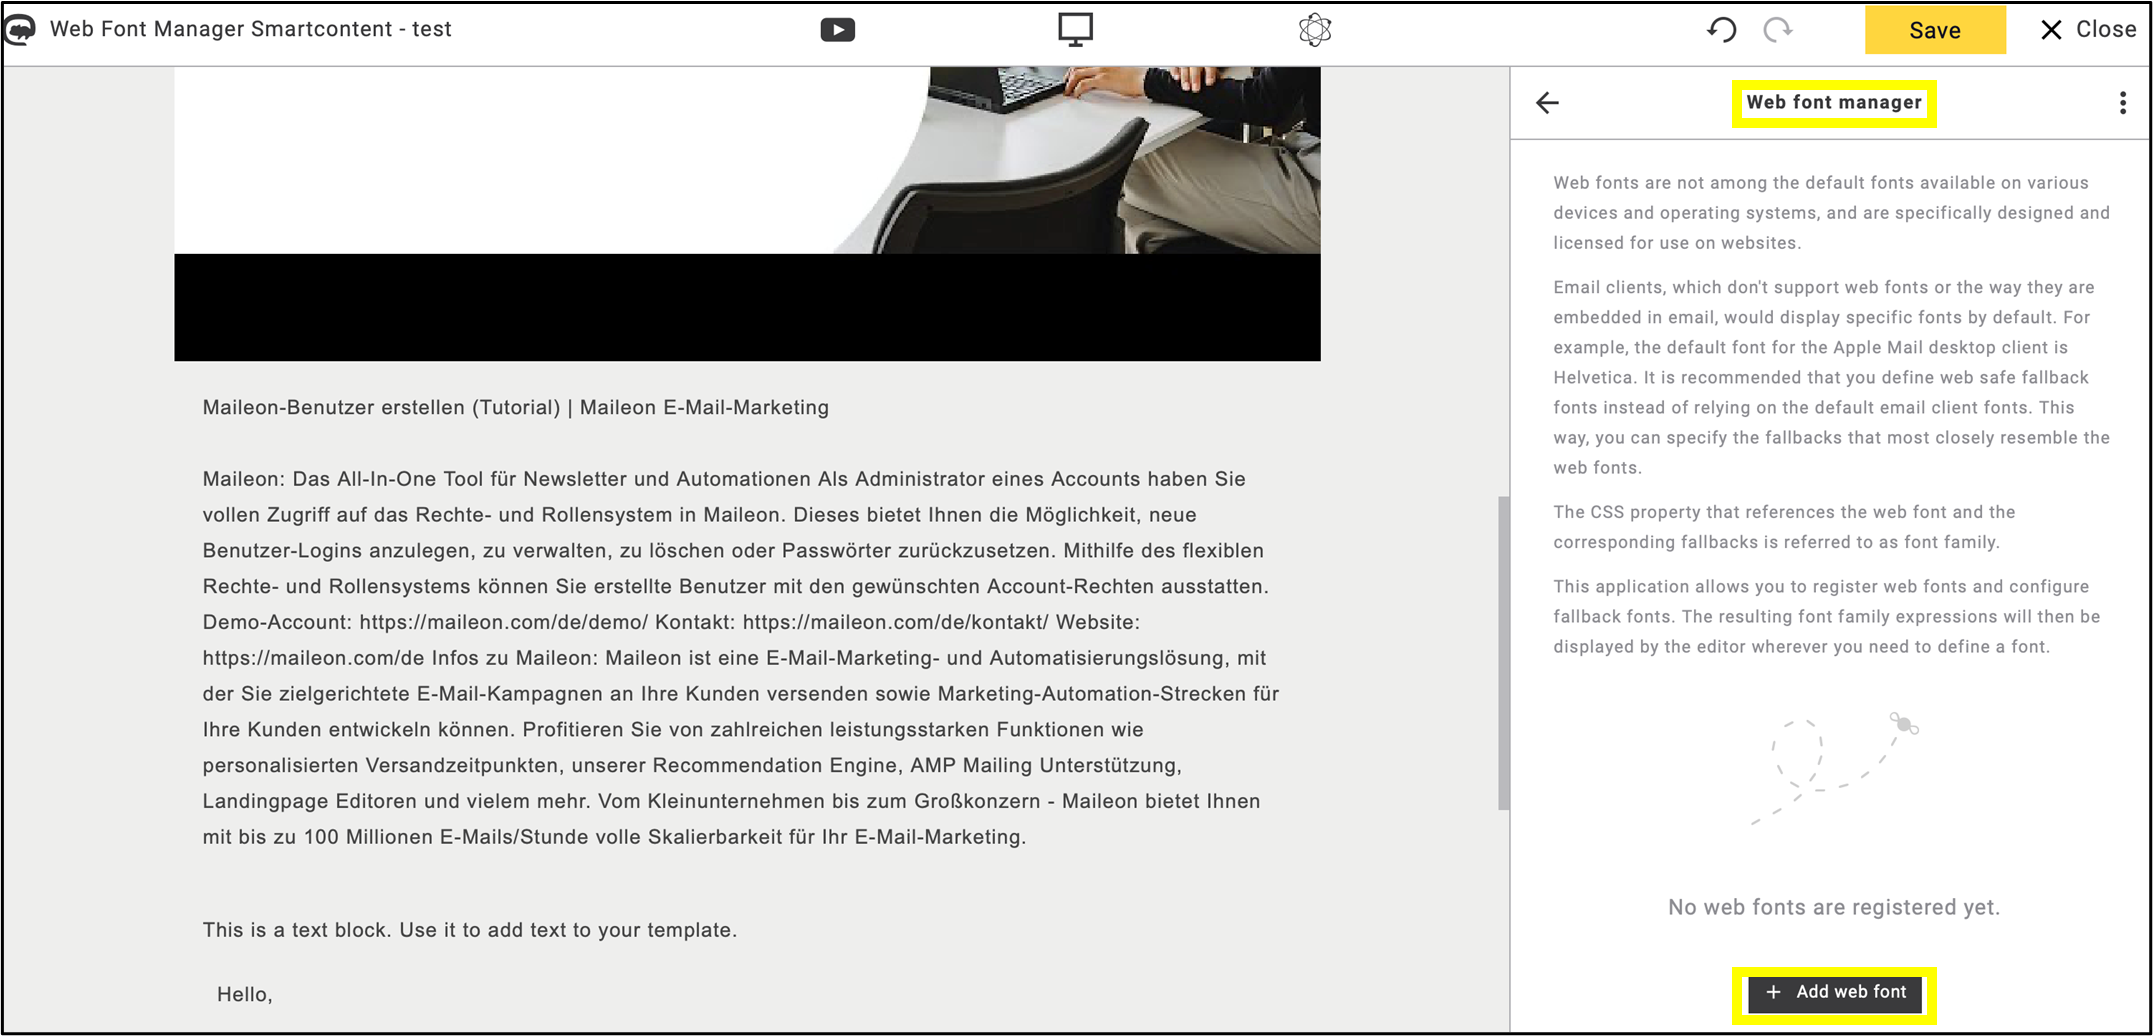
fig. 37: Open ’Web Font Manager‘ in the editor and click ’Add Web Font’.
Add a name and reference link of the font you want to use (fig. 38).
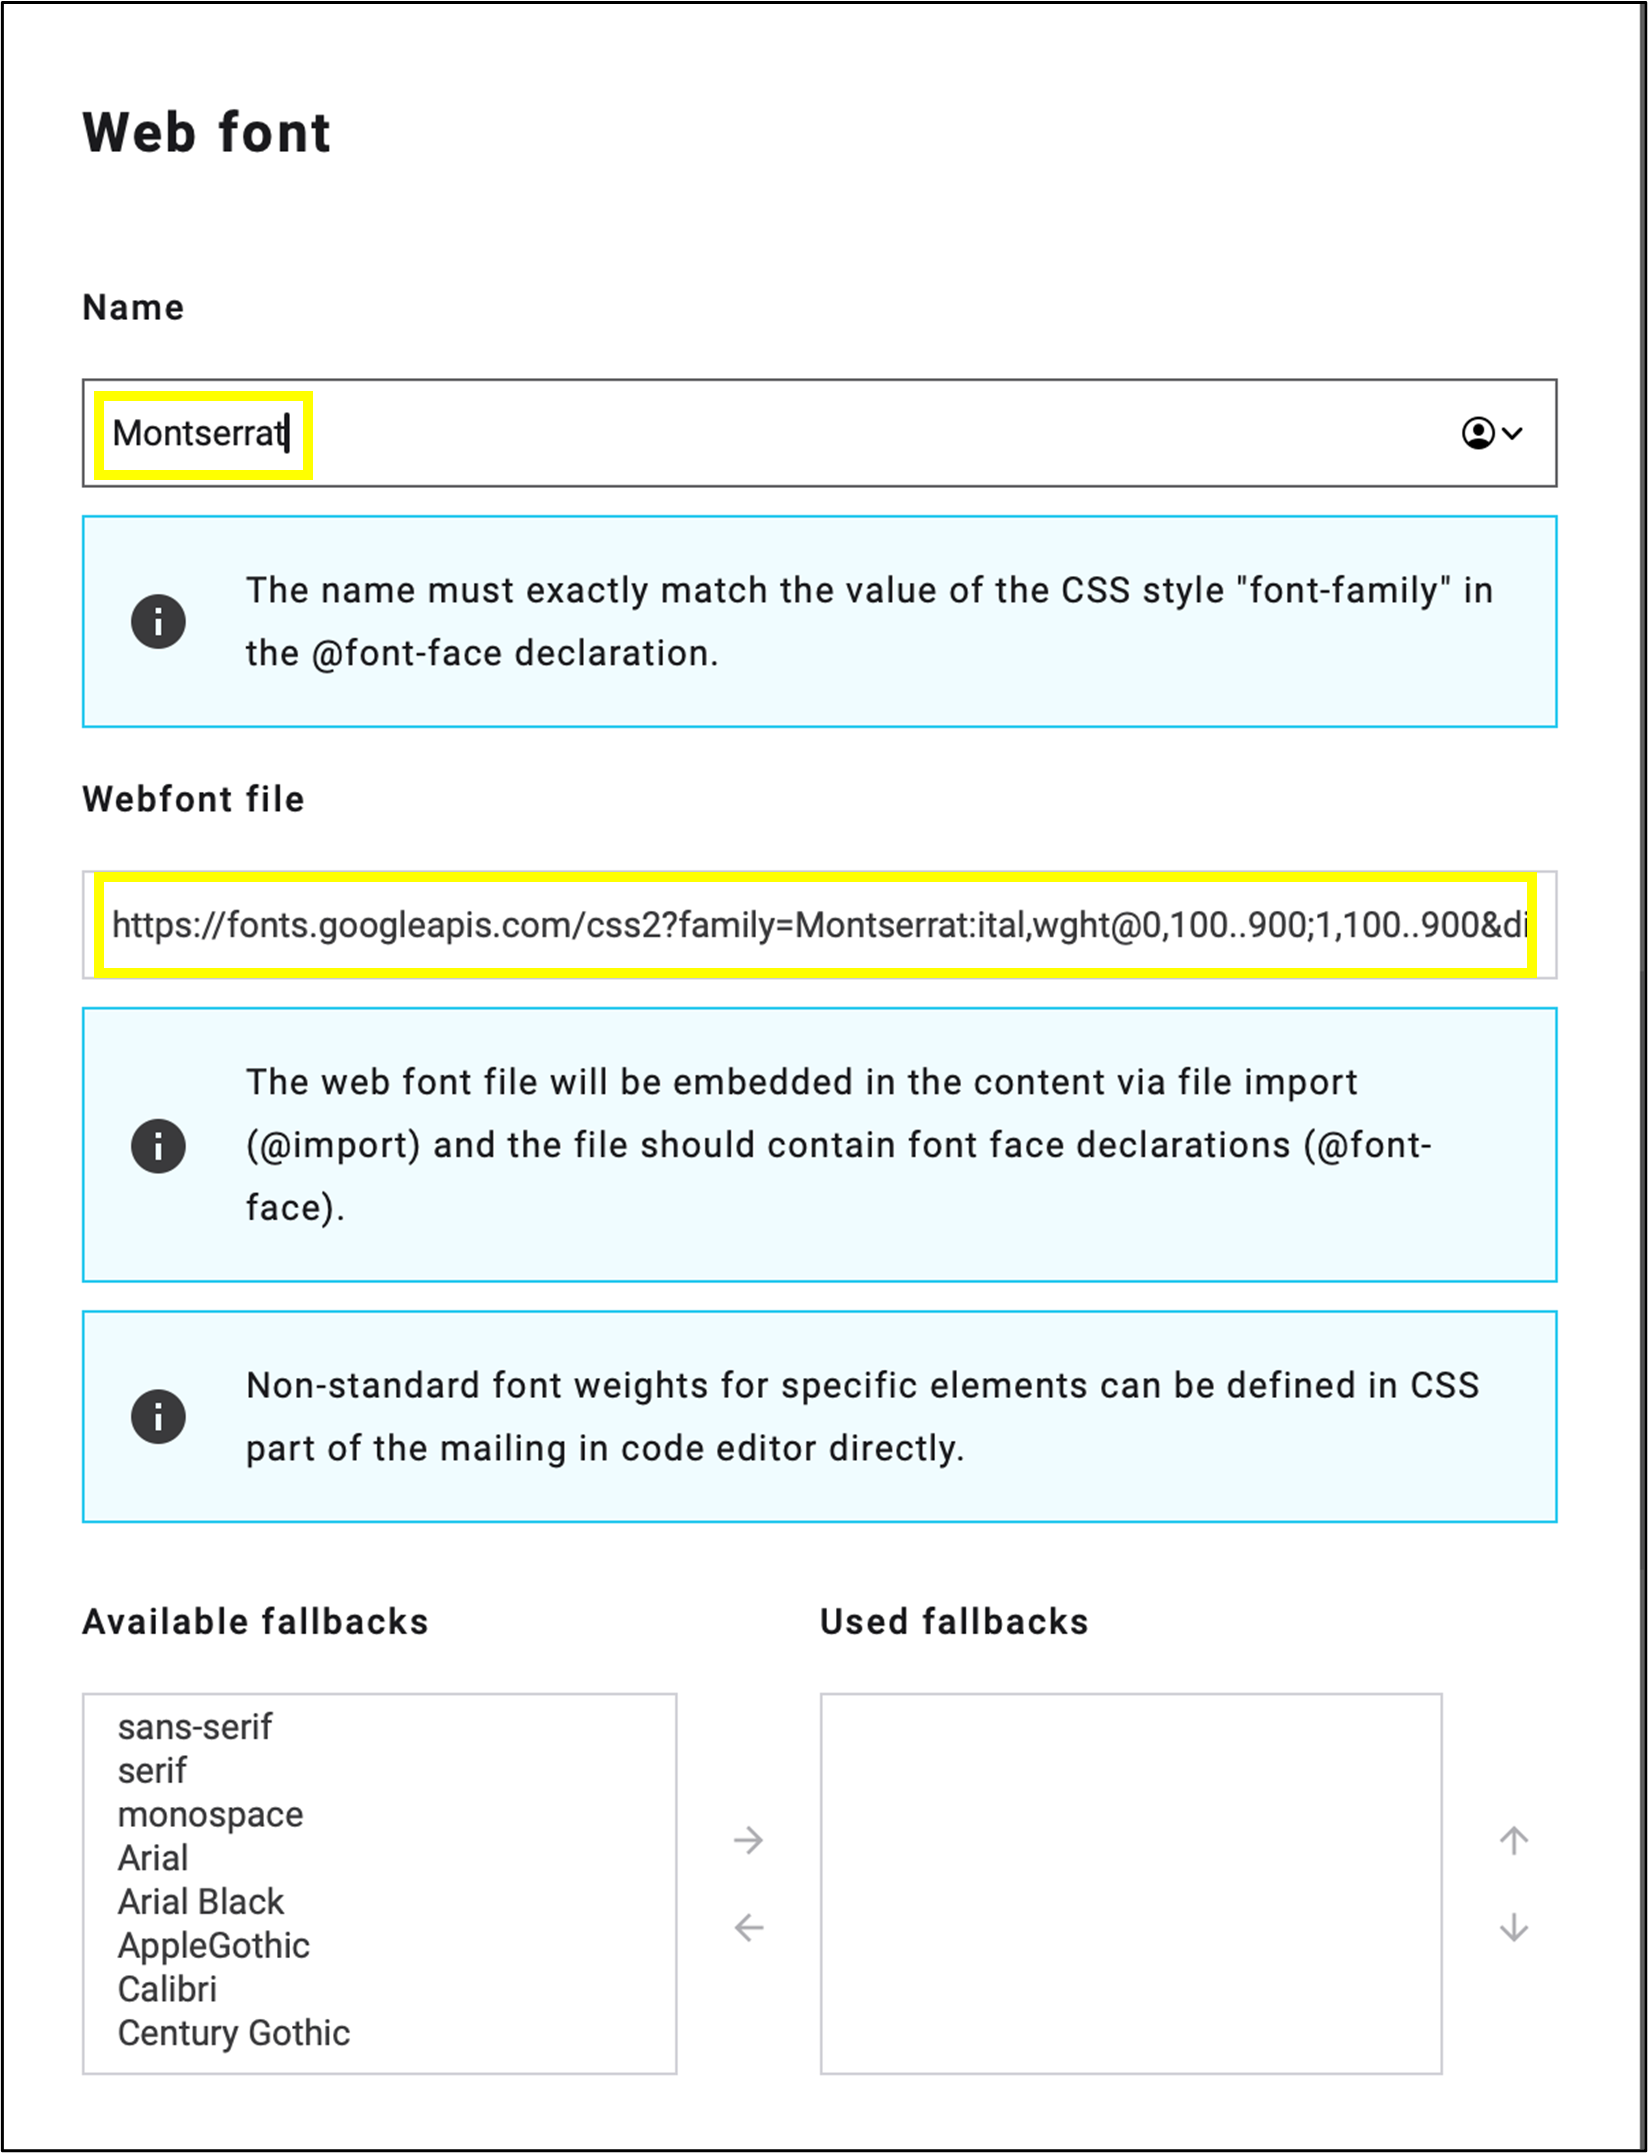
fig. 38: Add the font name and reference link.
Set the fallback by adding one or more fonts that resemble the chosen web font (e.g., Arial, Helvetica, sans-serif).
Maileon generates a font-family expression (e.g., Open Sans, Montserrat sans-serif), which will be available in the editor when formatting text.
After selecting the fallback font, click the arrow, then complete the process by clicking Save (fig. 39).
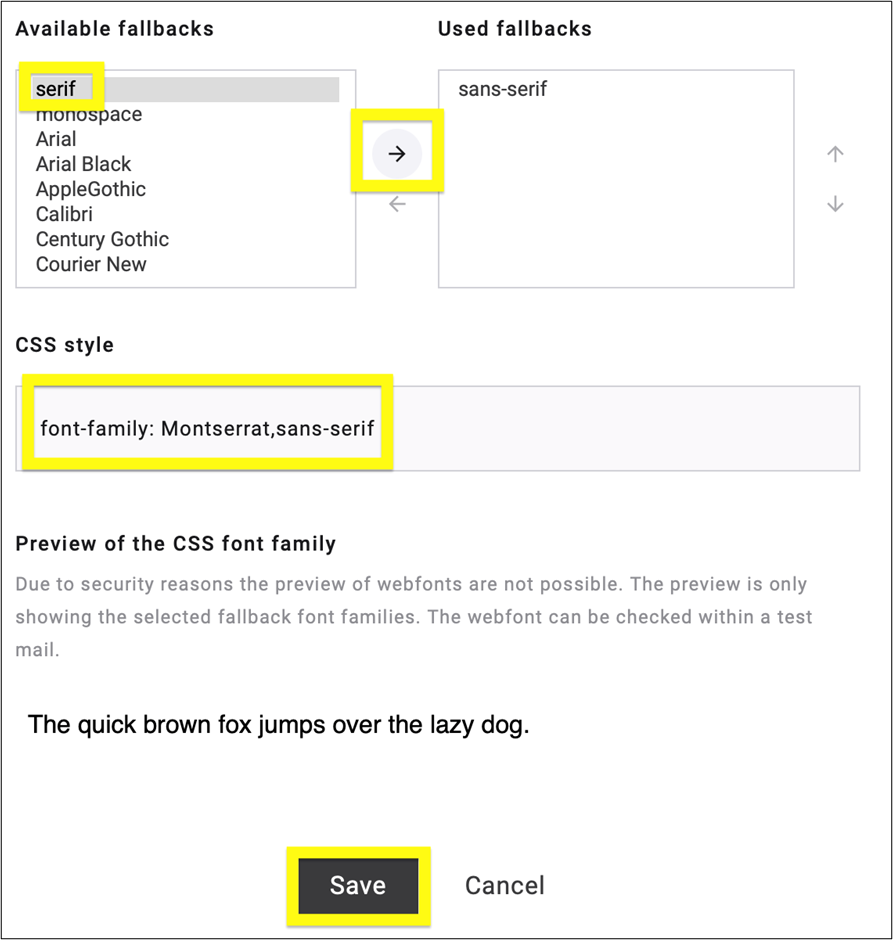
fig. 39: Select the fallback font, click the arrow, and save it.
The added web font appears in the side menu (fig. 40).
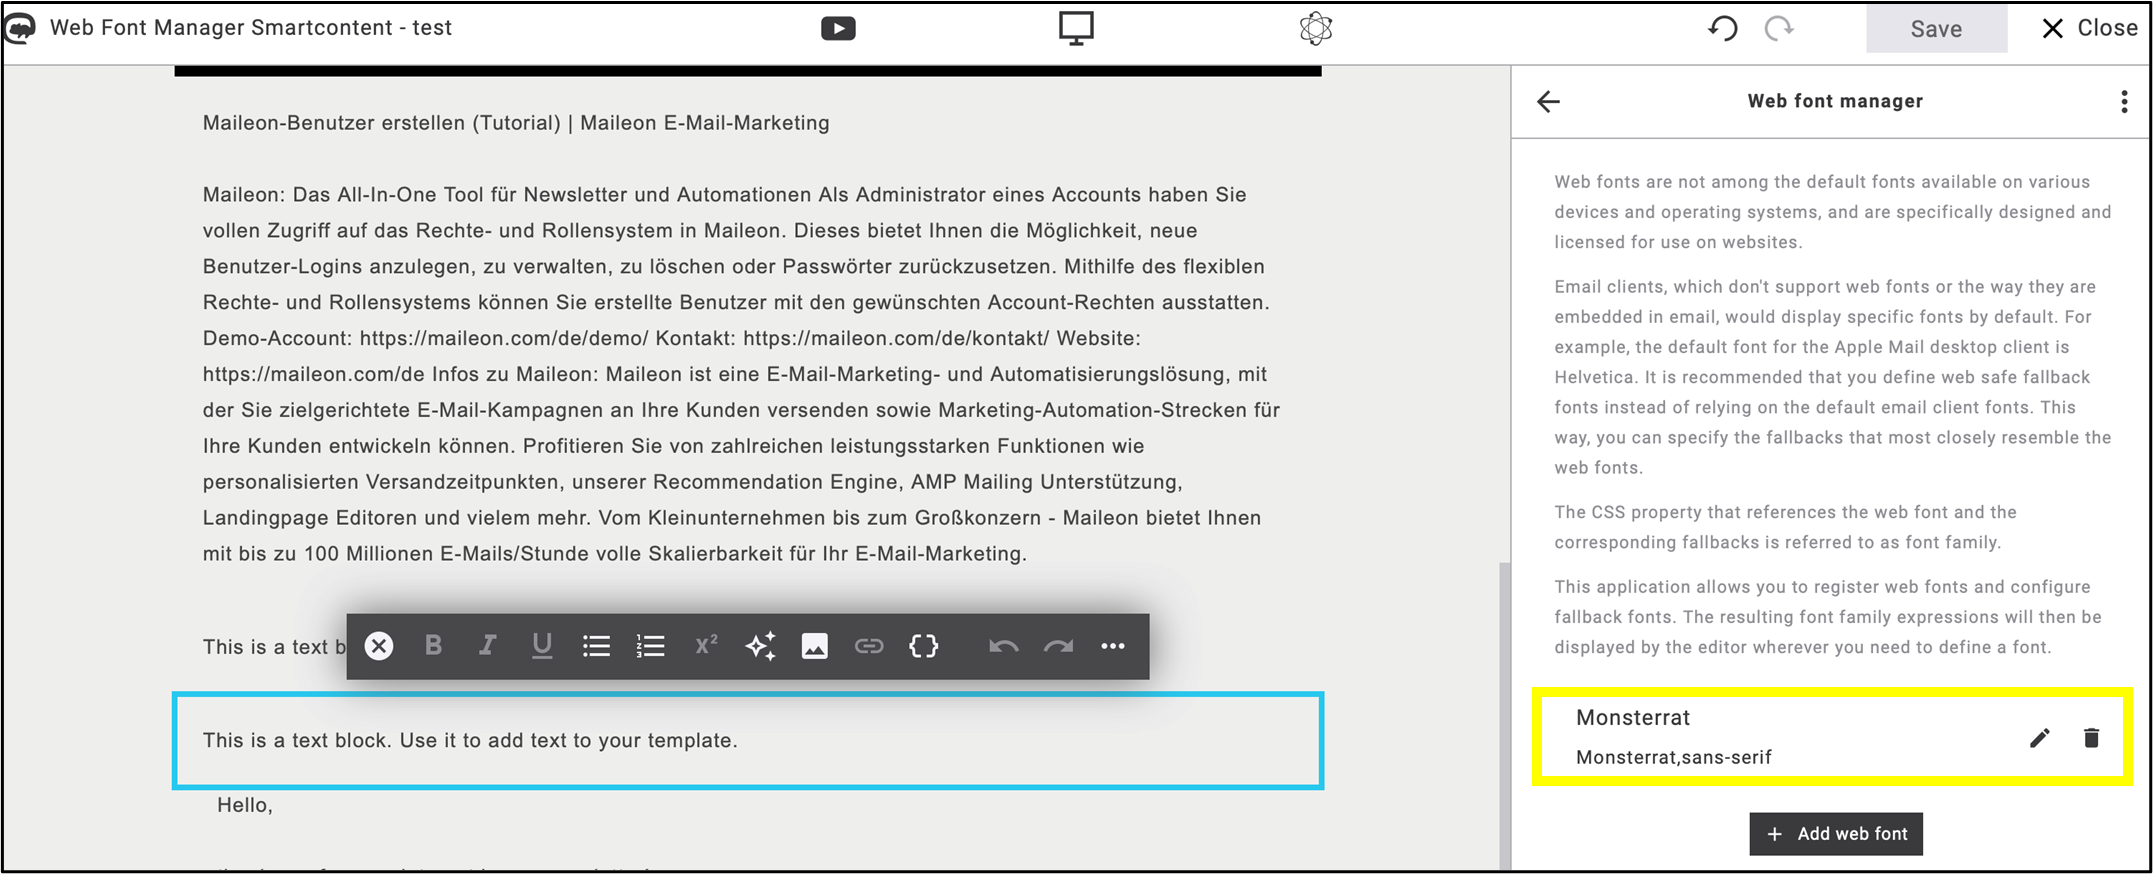
fig. 40: The added web font appears in the side menu.
To select a web font, click on the text box and choose the registered font family from the Font menu in the Style section when formatting the text (fig. 41).
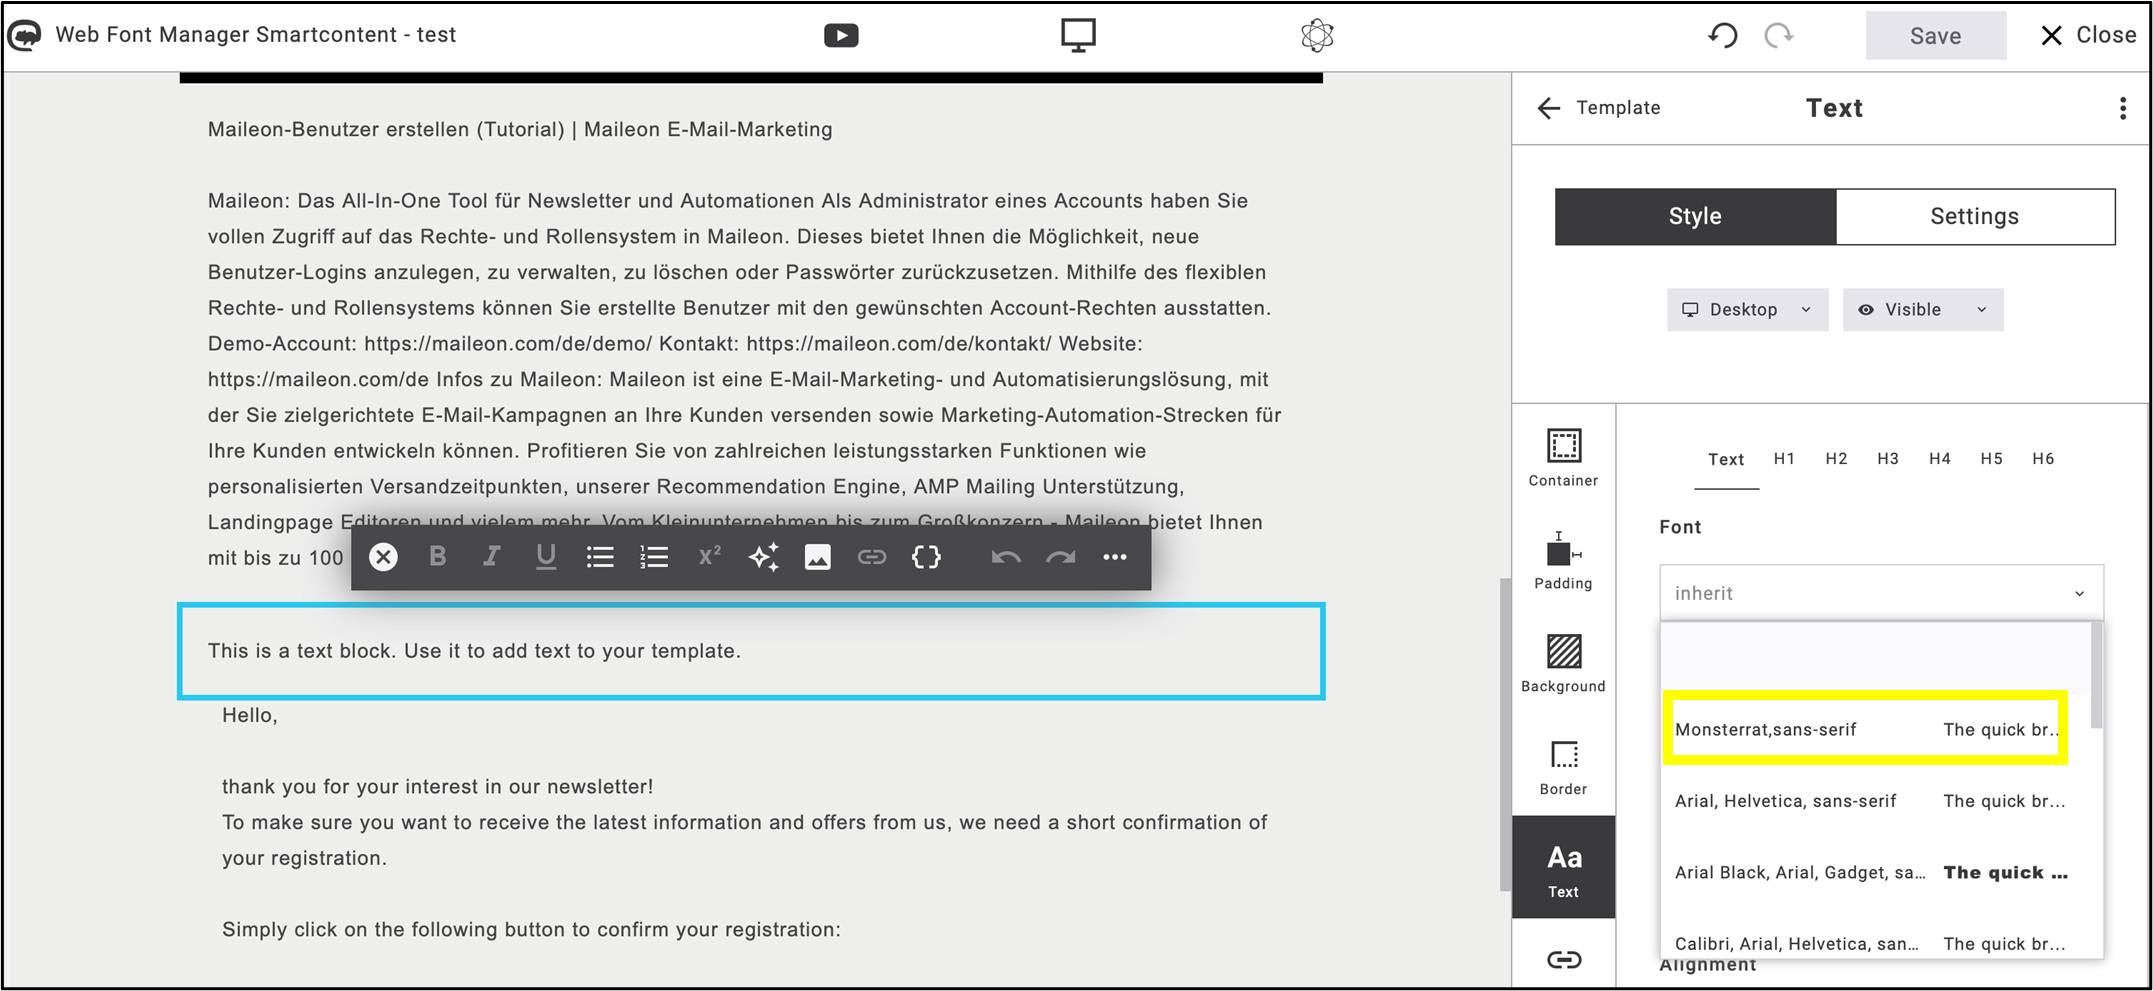
fig. 41: Select the text box and choose the registered web font from the ’Style’ menu.
Save the process and review the emailing in Preview mode at the end of editing (fig. 42).
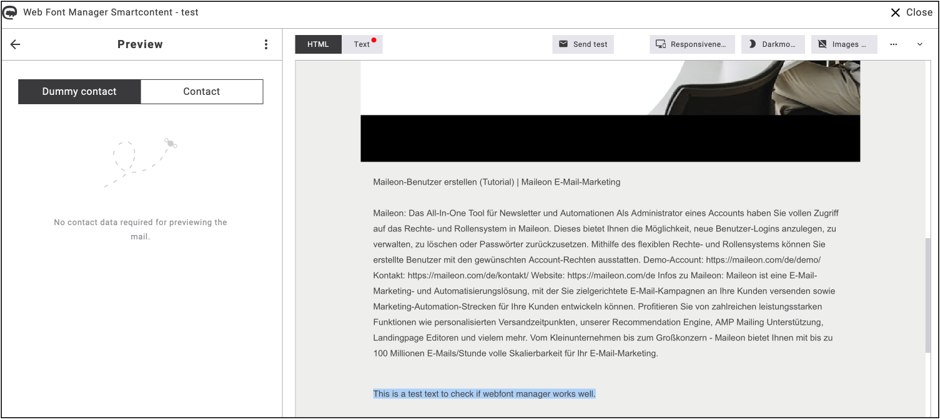
Note: Always test your email across multiple clients.
4. Themes
Themes are collections of design elements—such as fonts, text styles, and colors—that can be used when creating emailings and quickly applied to any template (fig. 43).
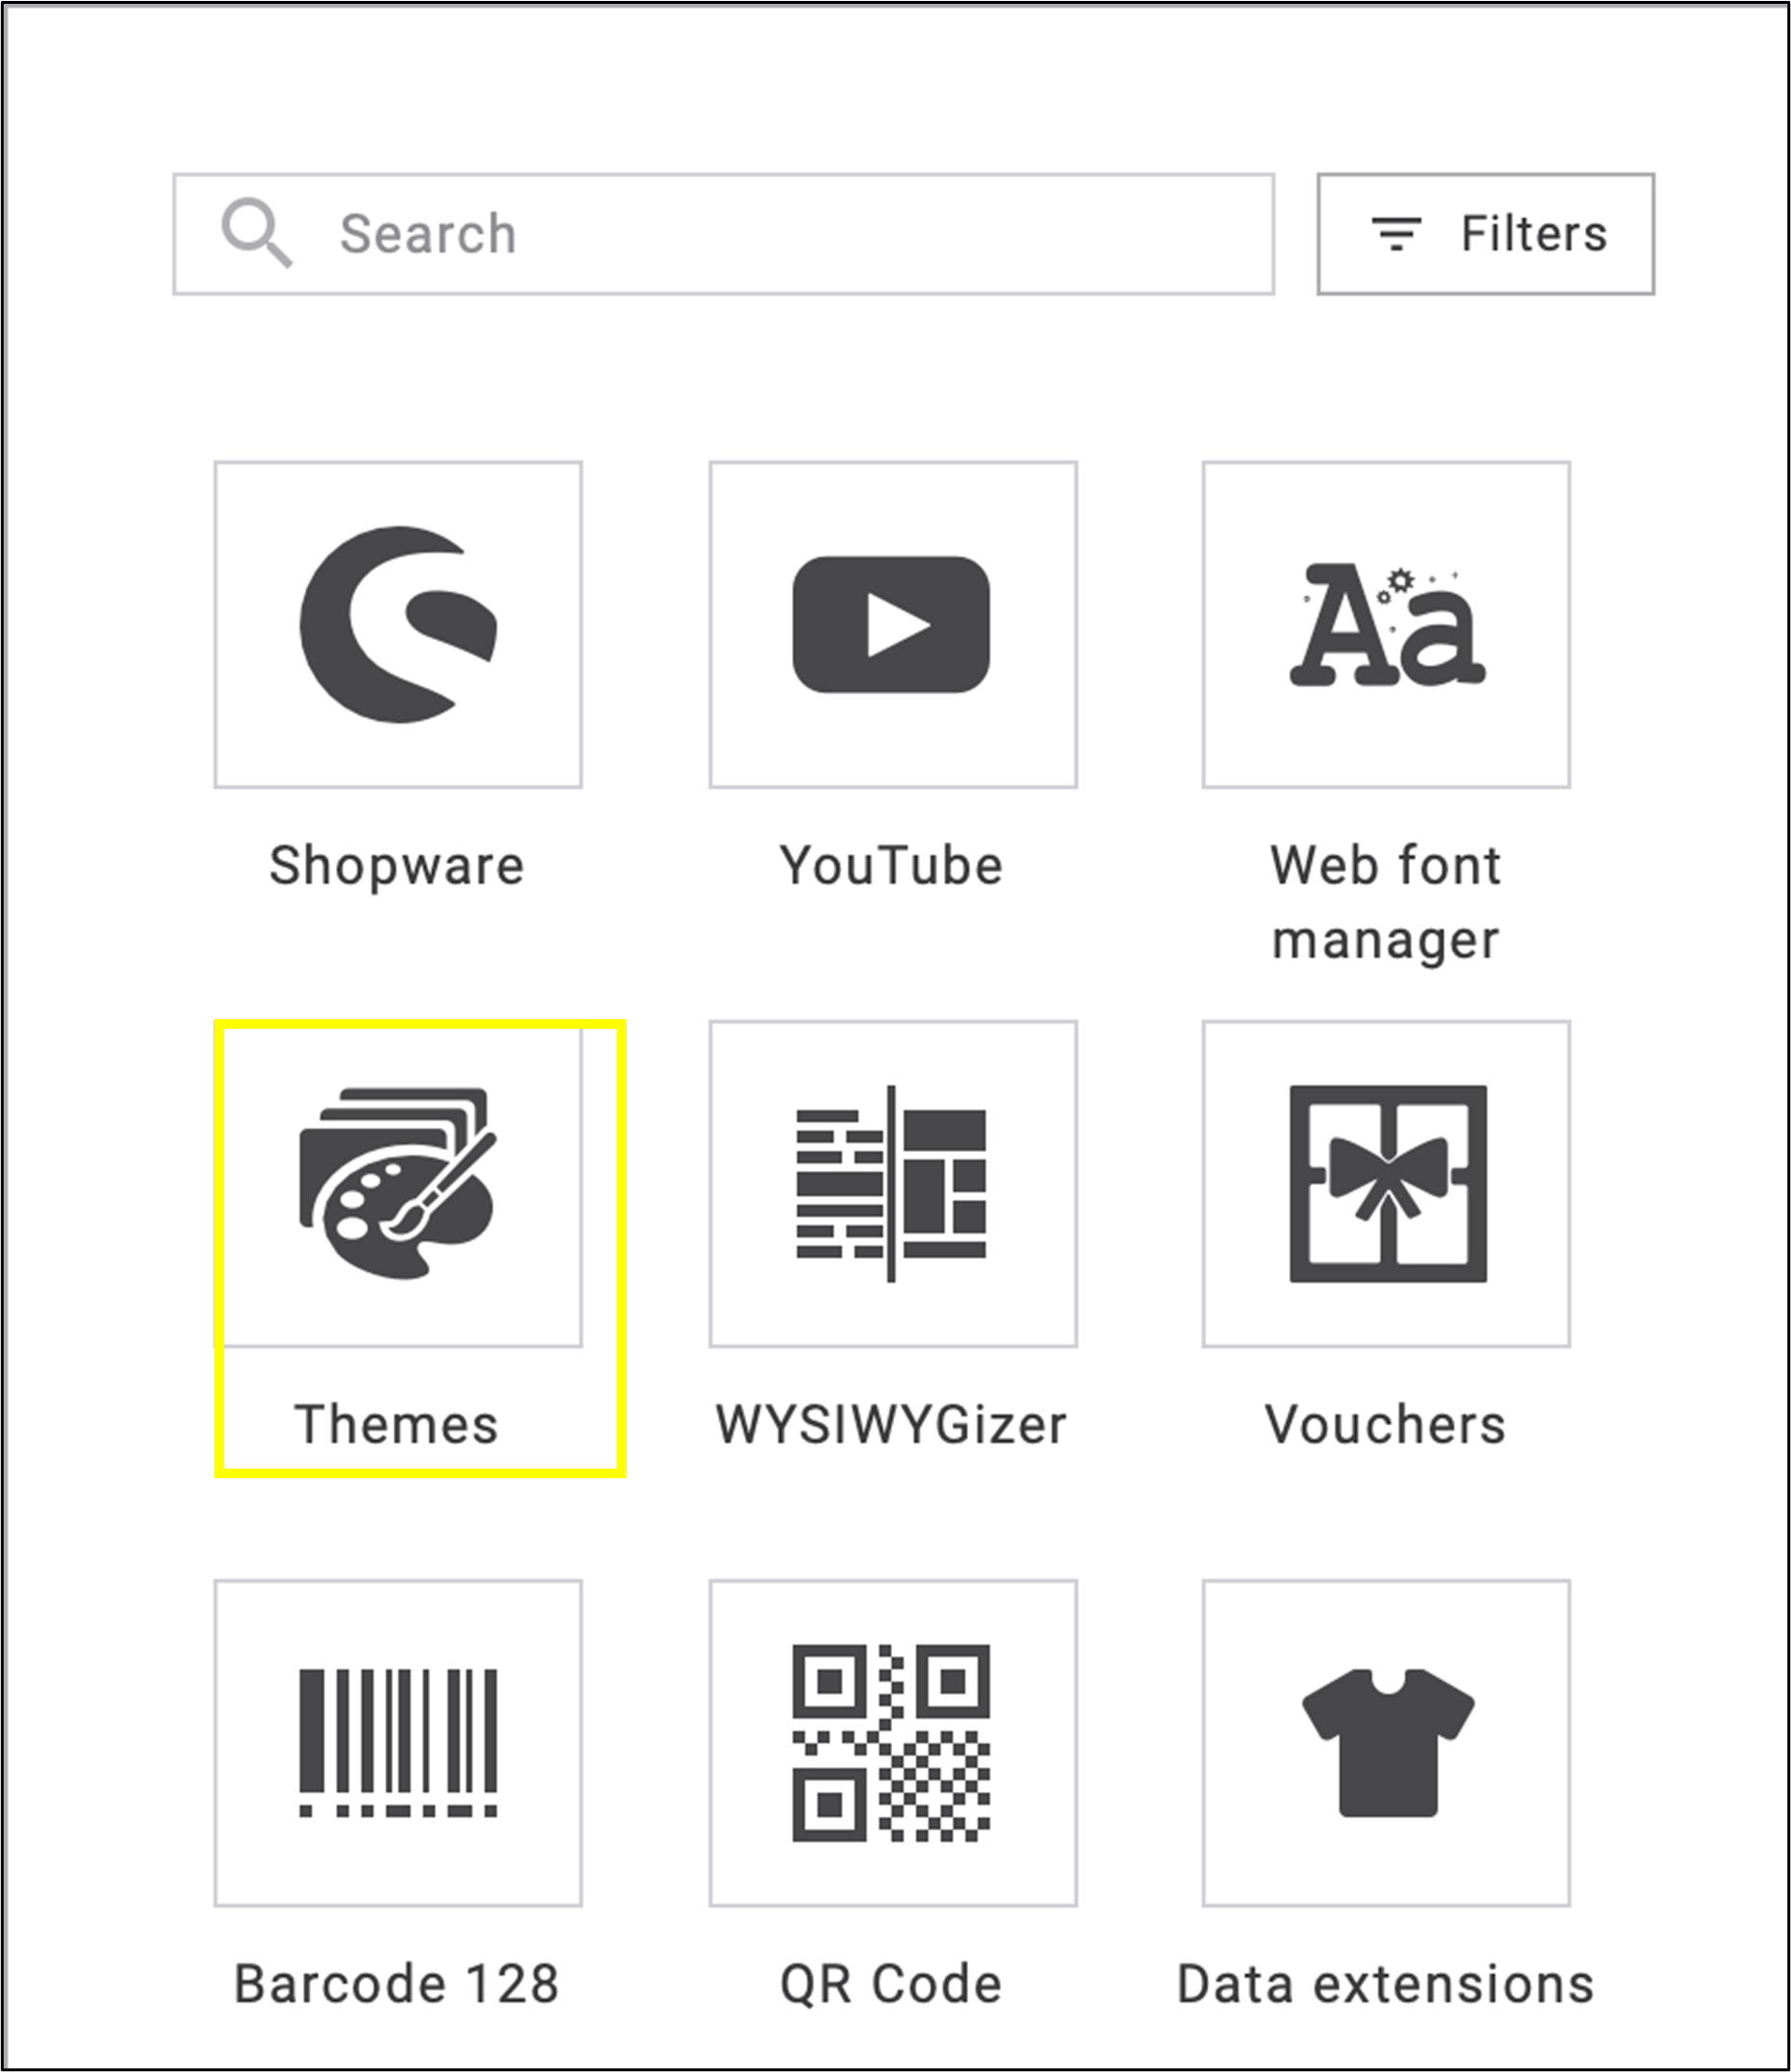
fig. 43: Apply ‘Themes’ to any template and create consistent emailing designs in just a few clicks.
Click the Themes widget and choose how you want to create the theme. You have the option to favor this app by clicking on the three vertical dots (fig. 44).
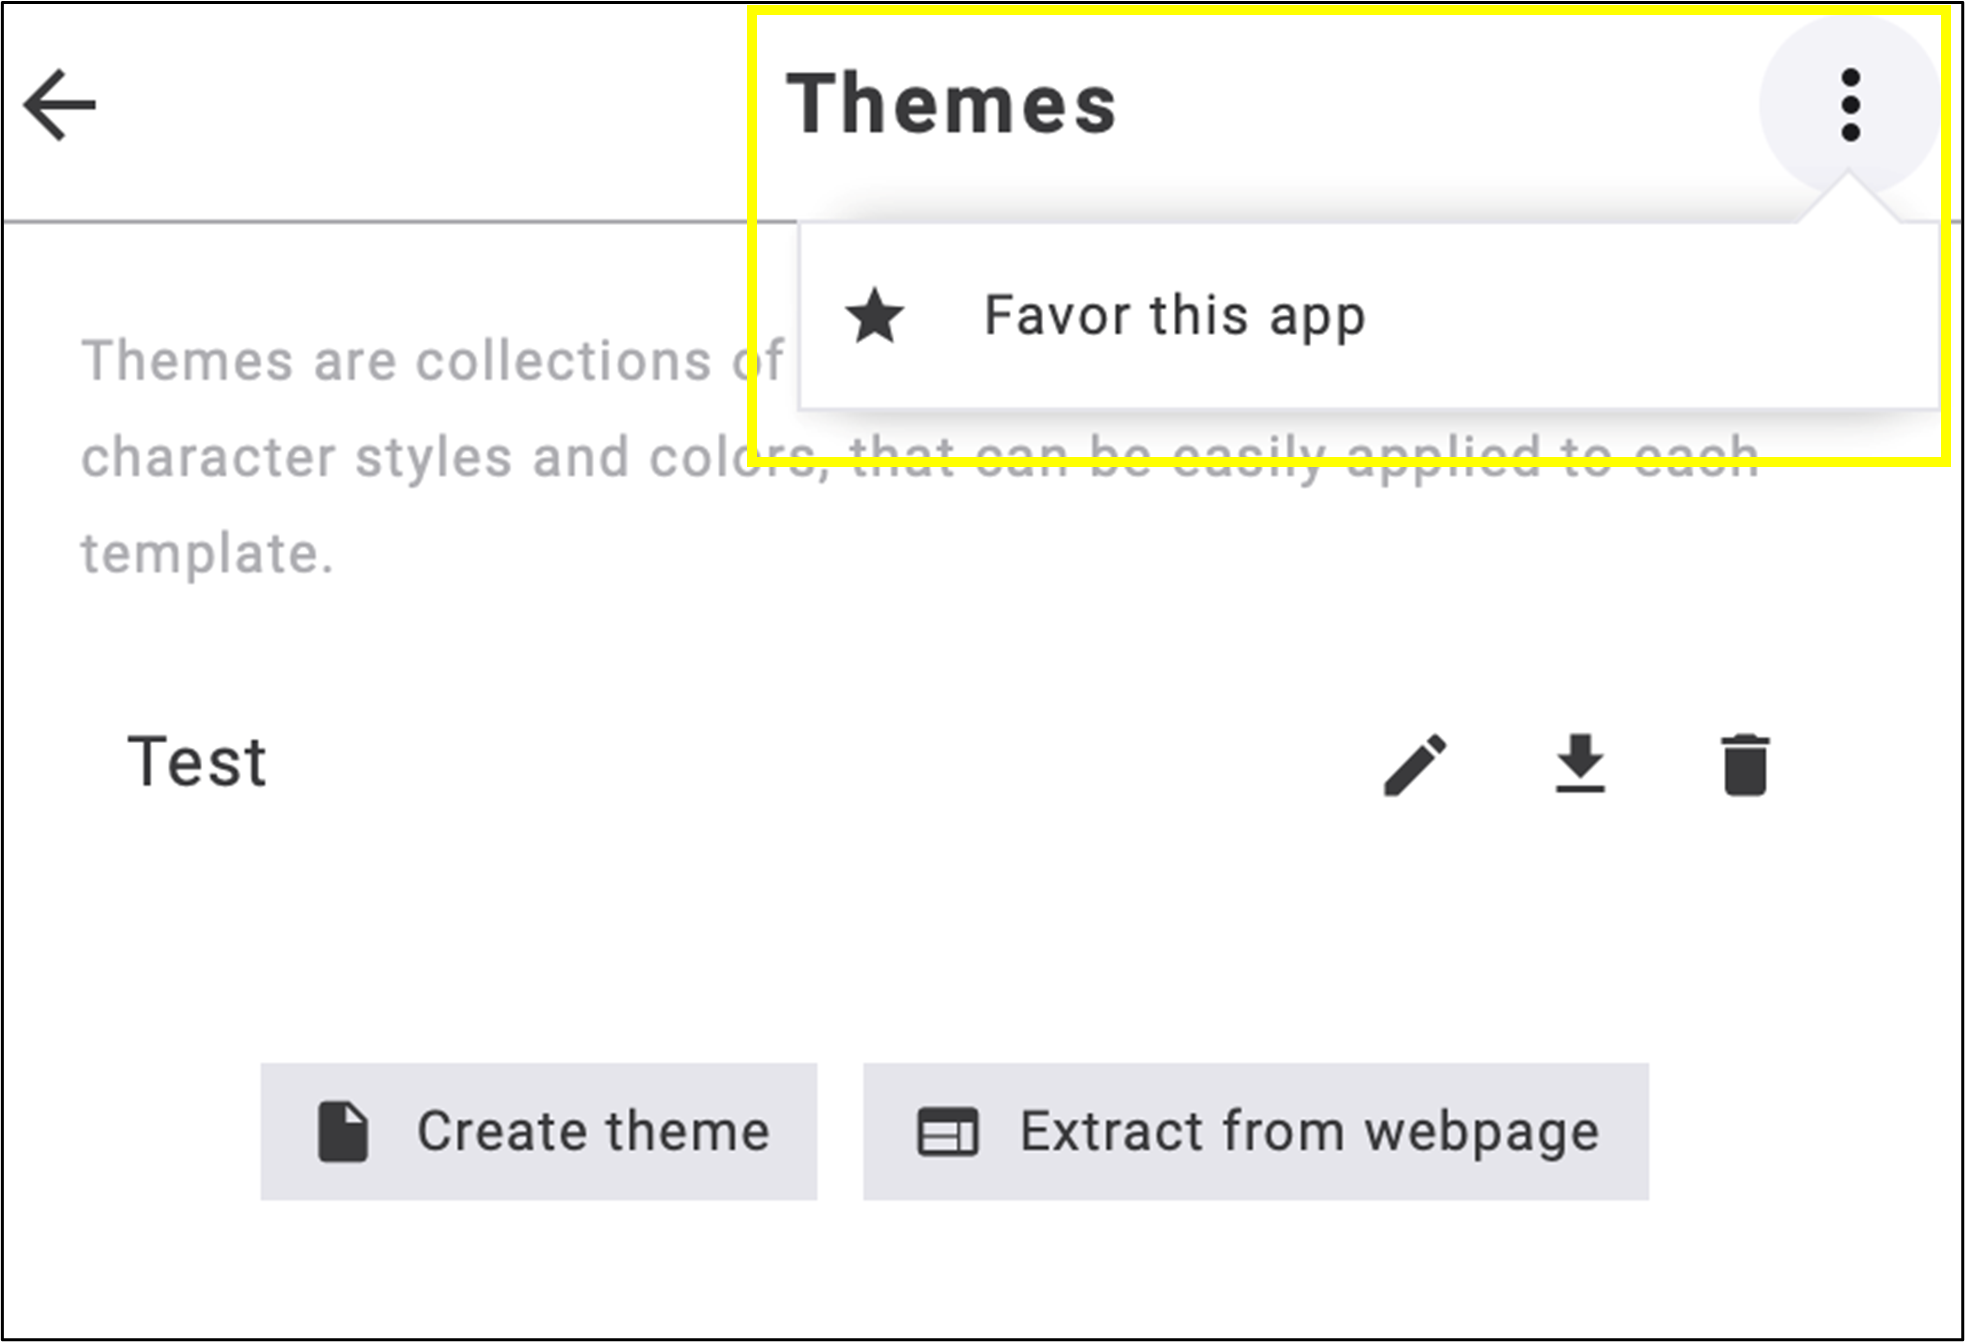
fig. 44: Mark the app as a favorite by clicking the three vertical dots.
There are two options: create a theme from scratch using Create theme or generate one using Extract from webpage (fig. 45).
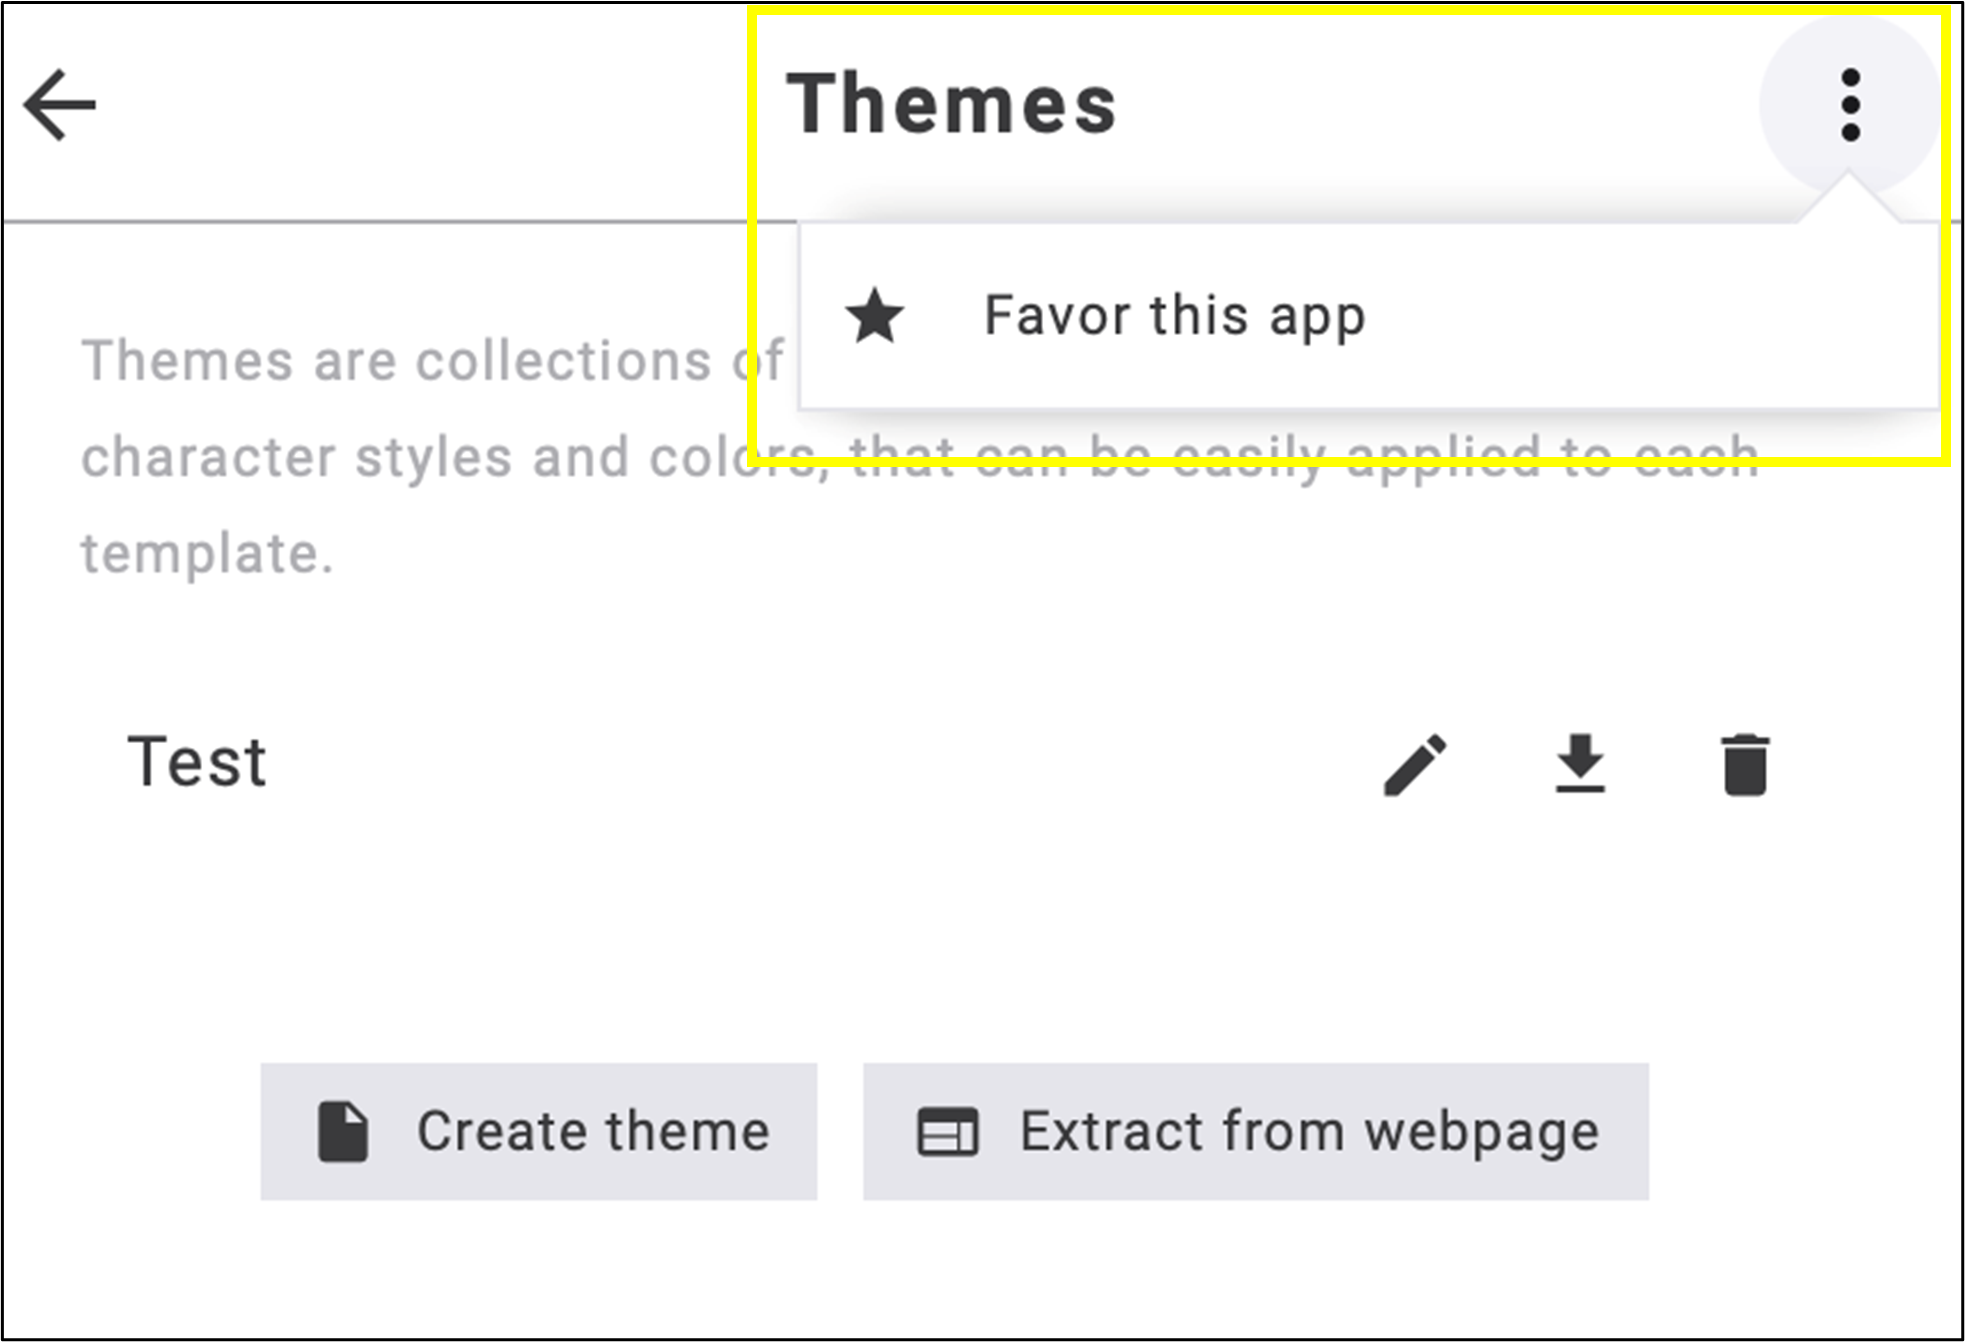
fig. 45: Create a theme from scratch or generate one directly from a webpage.
1. Create theme: Click Create theme, name it and Save it (fig. 46).
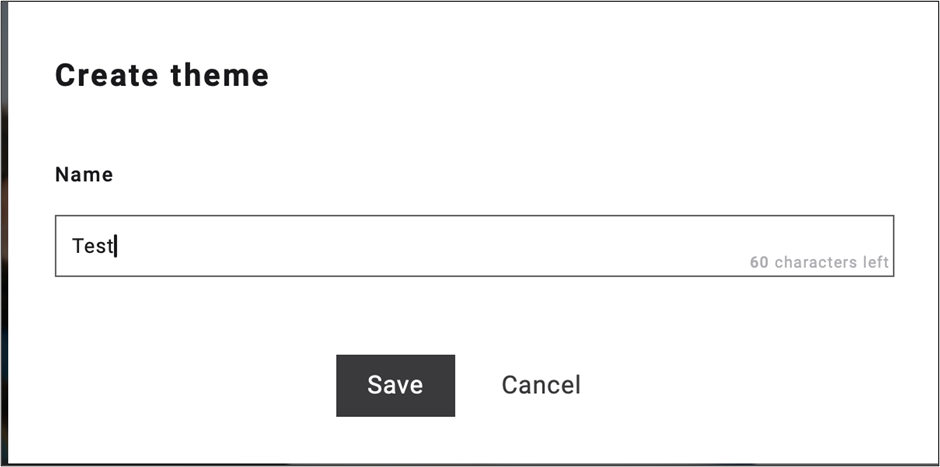
fig. 46: Click ‘Create theme’, enter a name, and save it.
2. Extract from webpage: Click Extract from webpage, name it and enter the URL of the desired website (https://…). Click Extract (fig. 47).
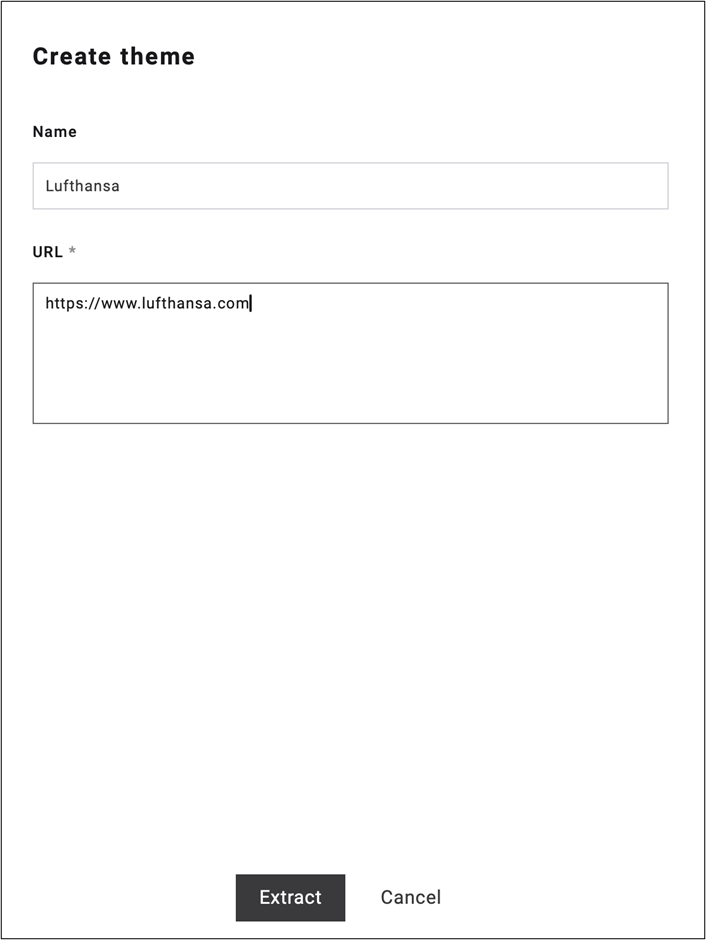
fig. 47: Click ‘Extract from webpage’, enter a name and website URL, then click ‘Extract’.
Note: This method does not work with every website because some websites have security restrictions configured by their administrators. In such cases, external tools or services are not allowed to crawl or access the website’s theme data.
Select from the assets extracted from the webpage, edit as you desire, and click Save changes to edit further details (fig. 48).
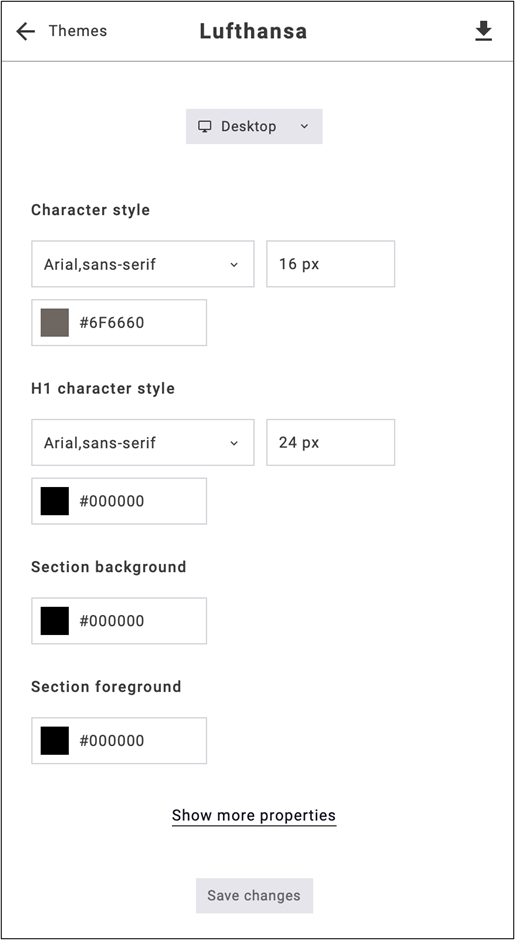
fig. 48: Edit the extracted assets and click ‘Save changes’ to continue editing the theme.
Editing of the Themes (fig. 49):
- Pencil icon: edit the theme name.
- Downward-pointing arrow: apply the theme to the emailing. Here, you can optionally decide which parts of the emailing text should adopt the selected theme. You can also modify the style of existing buttons and update the default button style if button styling is included as part of the theme.
- Trash can icon: delete the theme.
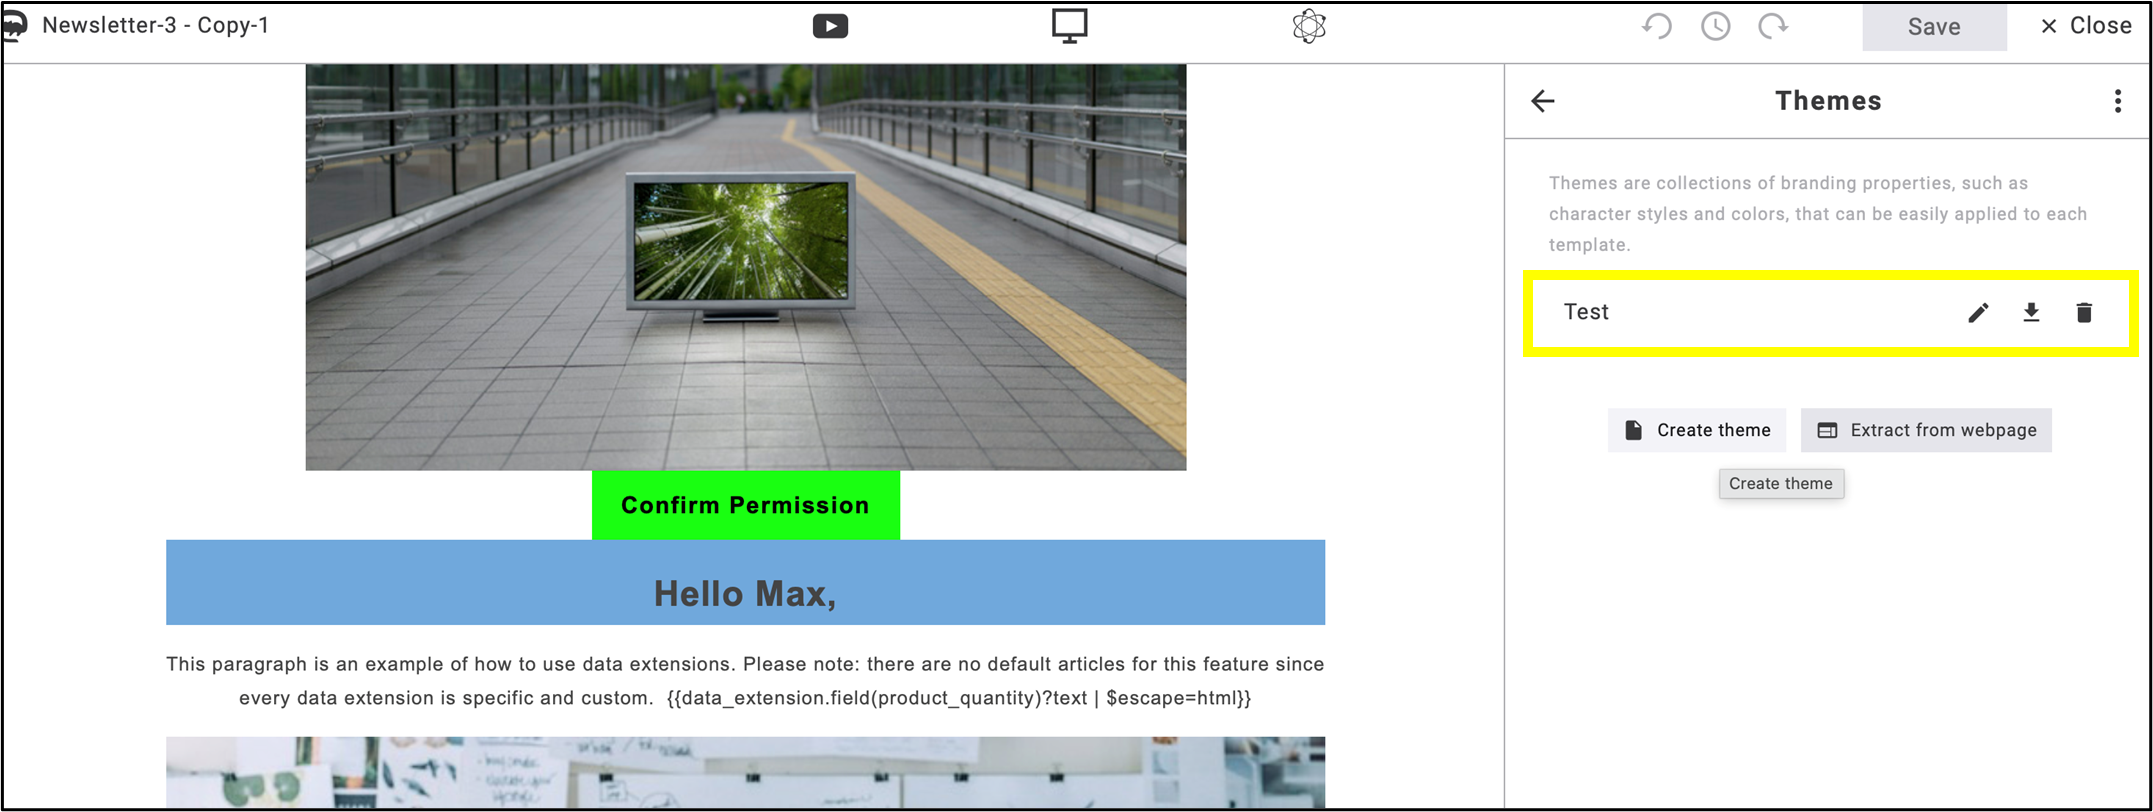
fig. 49: Use the pencil, down arrow, and trash can icons to edit the name of the theme, apply, or delete the theme.
To edit a theme style, click on the name of the theme (fig. 50). Detailed configuration options are available here.
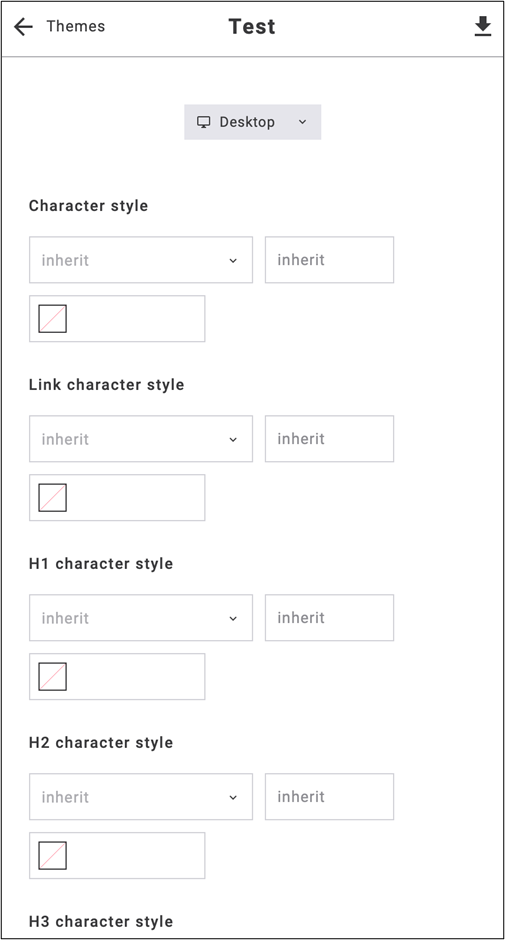
fig. 50: Click the theme name to edit its style and access detailed configuration options.
Click Desktop to open a drop-down menu with preview options for mobile, tablet, small devices, large screens, and dark mode (fig. 51).
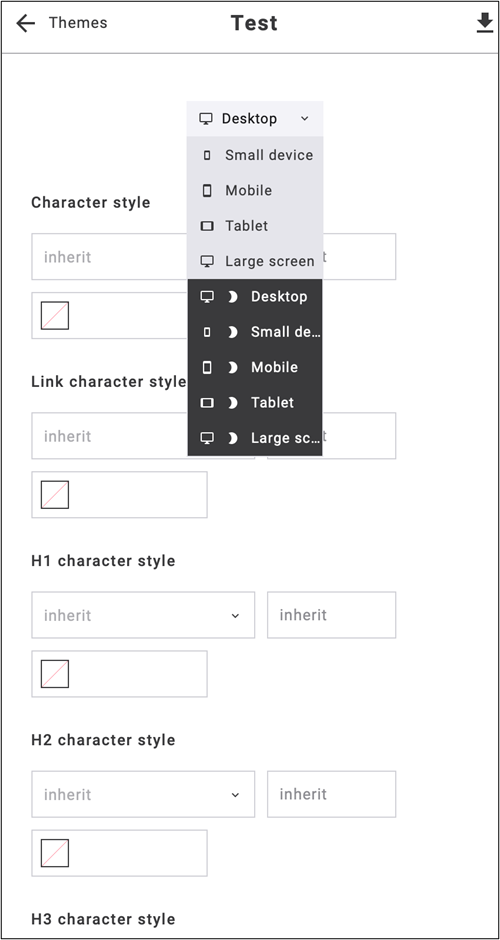
fig. 51: Click ‘Desktop’ to open preview options for mobile, tablet, small devices, large screens, and dark mode.
Note: Saved themes are available for every emailing.
5. Barcode 128
The Barcode 128 widget is a tool that allows you to automatically generate and insert barcodes for your emailings or landing pages (fig. 52). It can be used for coupons, customer identification, and other scannable use cases.
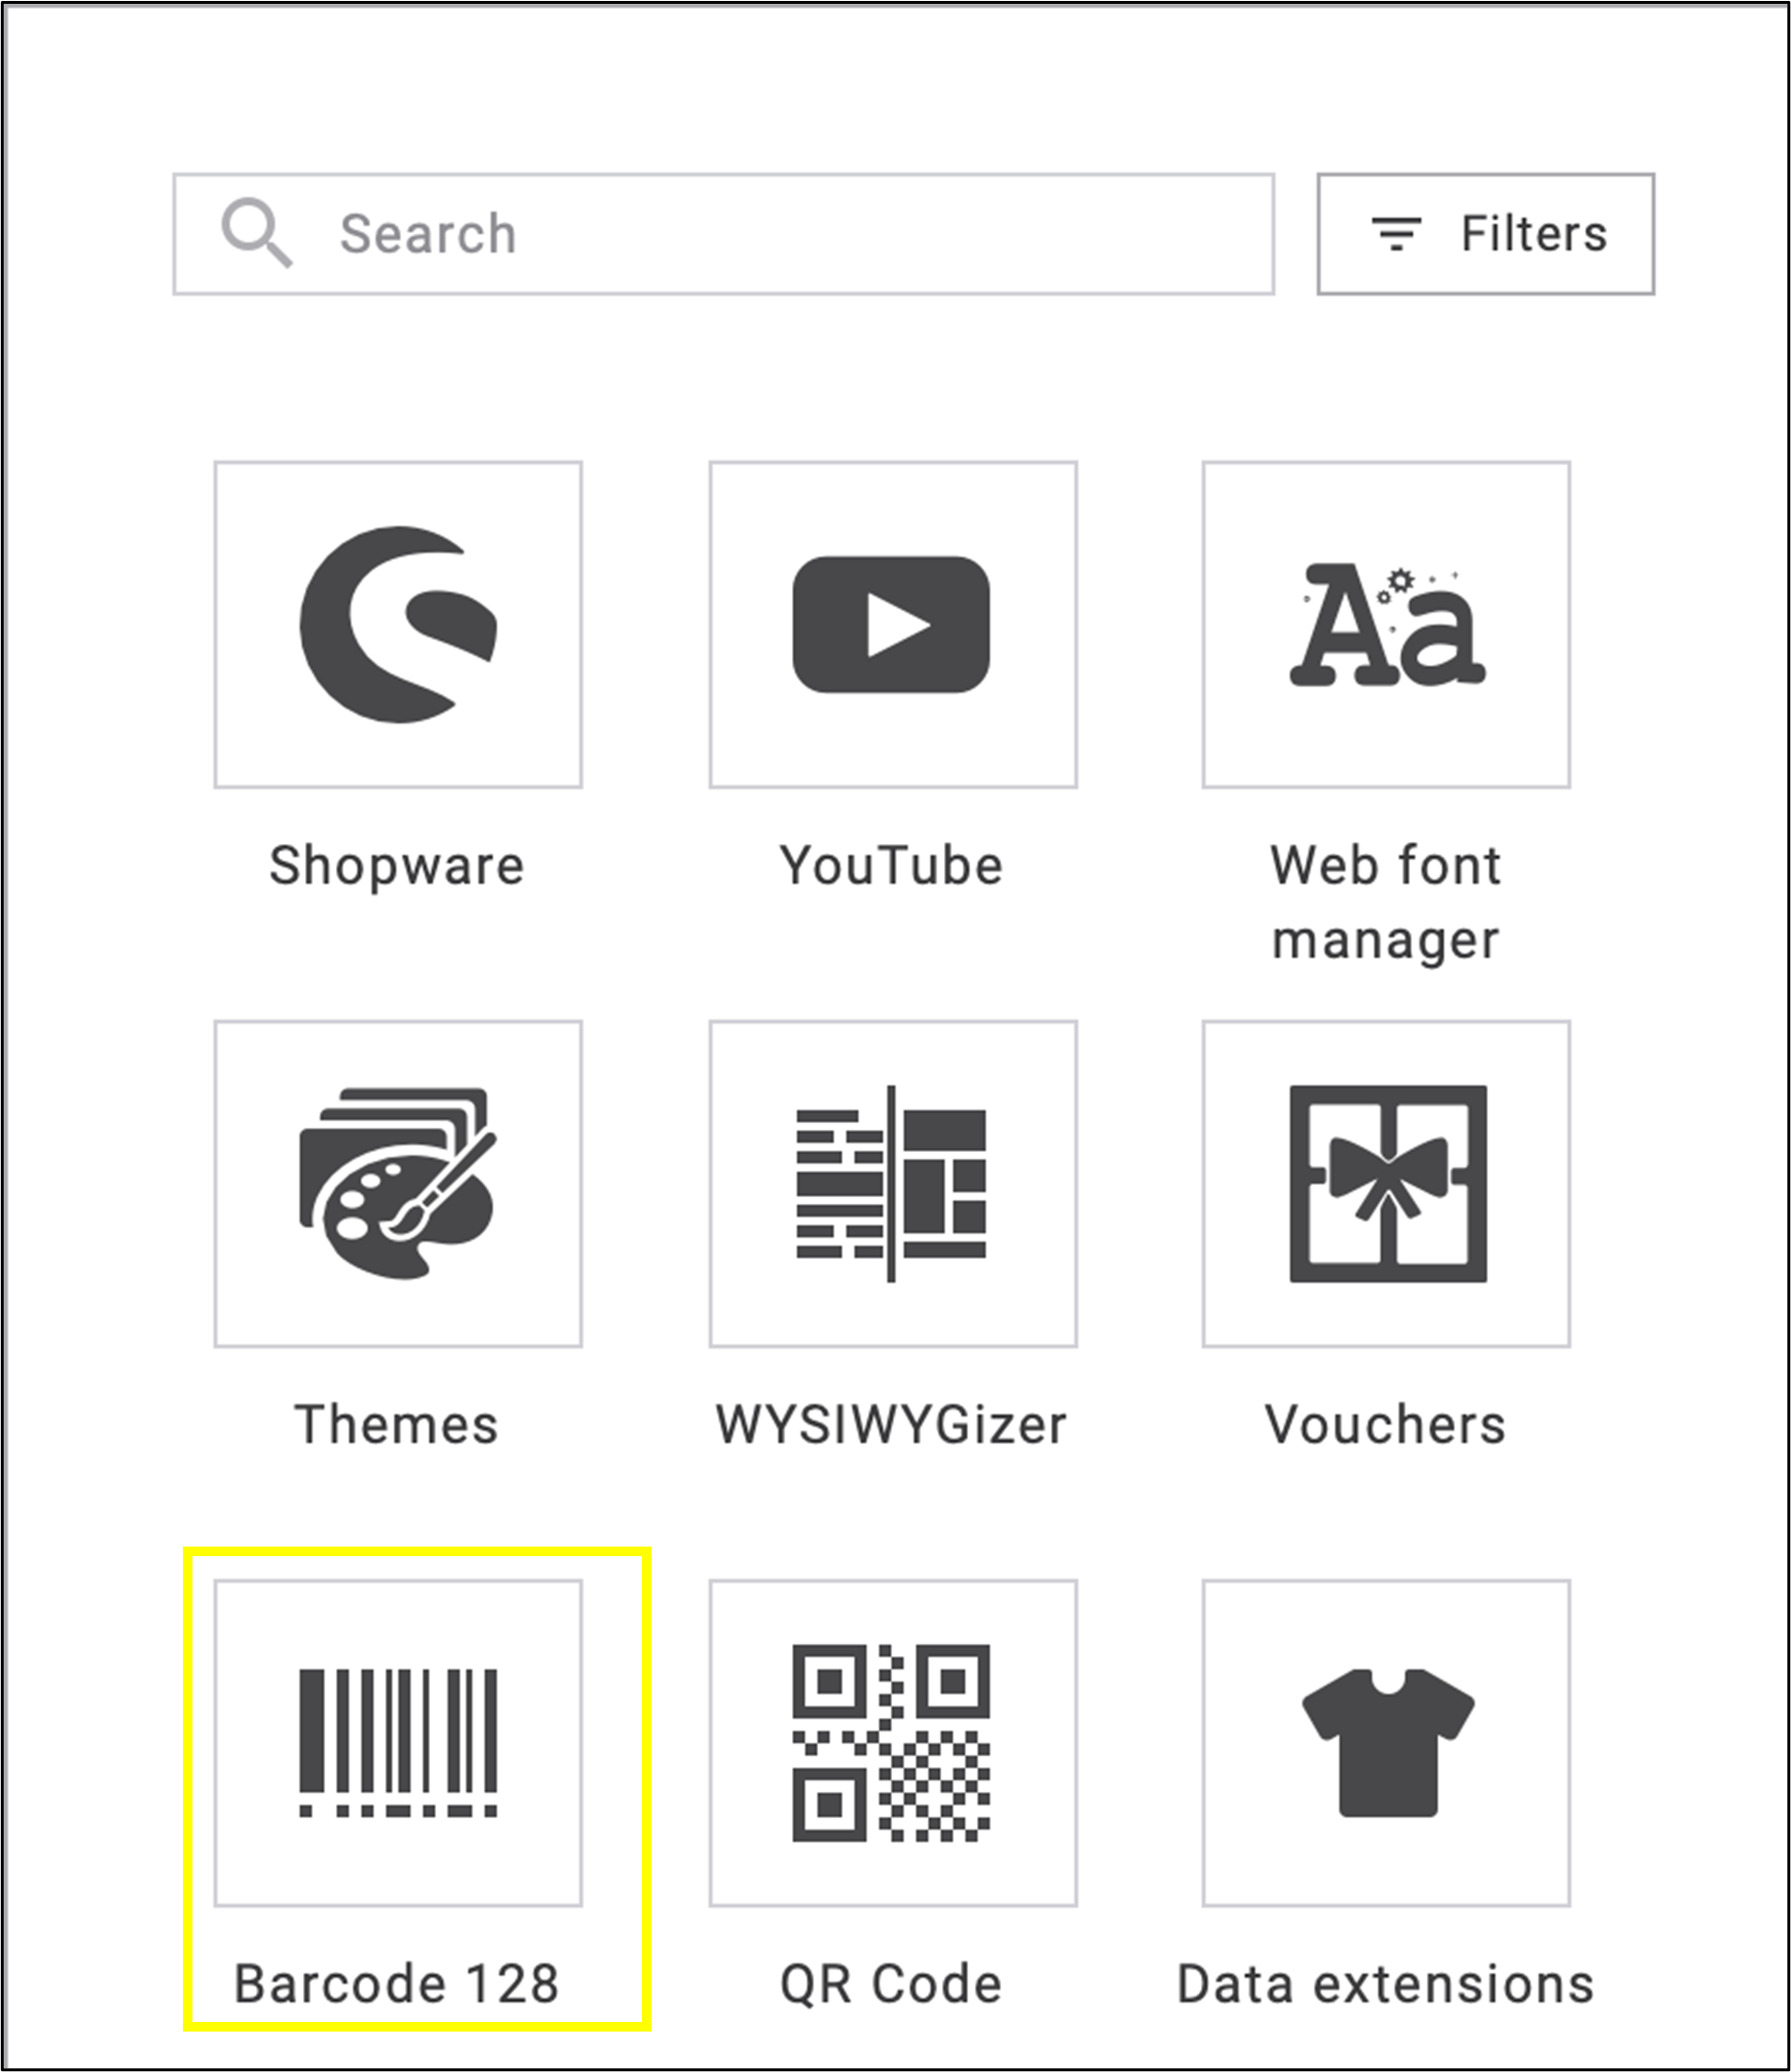
fig. 52: Use ‘Barcode 128’ widget to generate and insert barcodes into your emailings or landing pages.
Open the widget and click the placeholder icon to start the process (fig. 53).
Note: The personalization of barcodes consumes server resources, since caching does not help much here by definition. For this reason, this app does not allow barcodes that do not contain personalization. In this case, it is recommended to create the barcode manually and insert it as a normal image.
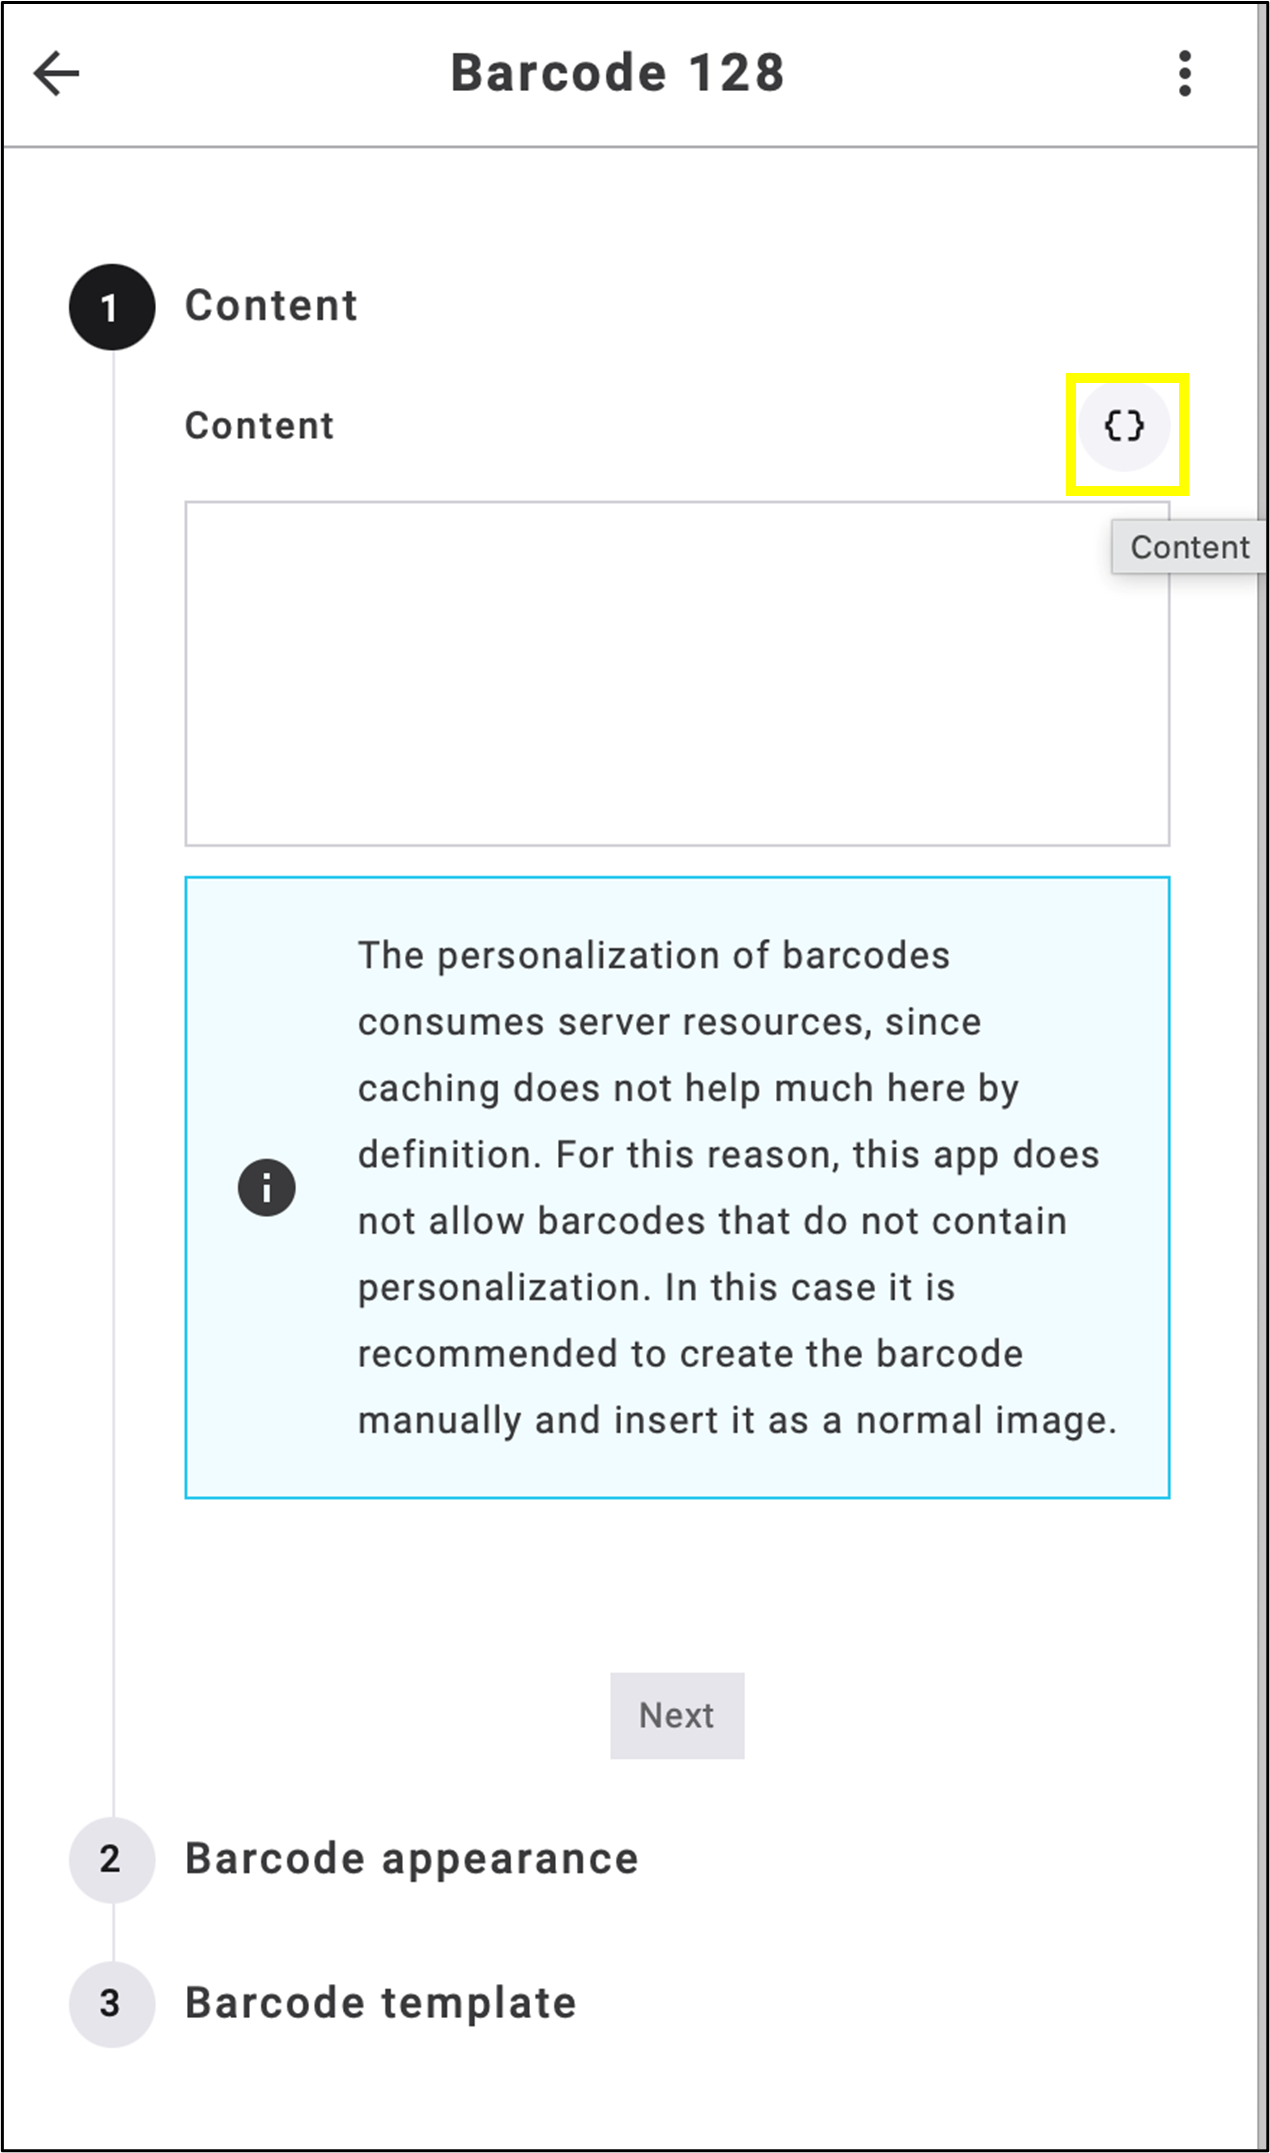
fig. 53: After opening the widget, click the placeholder icon to start the process.
After clicking on the placeholder icon, choose the type of placeholder you want to insert. The list of placeholders are:
- RSS placeholders: Placeholders for RSS feed properties such as the title of a feed item.
- Contact fields: Contact properties such as first and last name.
- Email properties: Email properties such as the send date and the subject line.
- YouTube placeholders: Placeholders for YouTube videos such as the title of a video.
- Data extension placeholders: Placeholders for adding data extension record information.
- Conditional contents: Rule-based output, e. g. Salutation depending on gender.
- Voucher codes: Assign vouchers from the account’s voucher pools.
- Account placeholder: Integration of placeholders managed on account level.
- Magento placeholders: Placeholders for Magento products such as the title of a product.
- Shopware placeholders: Placeholders for Shopware products such as the title of a product.
- Smartbot placeholders: Placeholders for Smartbot such as the name of a product.
- TYPO3 placeholders: Placeholders for TYPO3 page properties such as the title of a page.
- WordPress placeholders: Placeholders for WordPress pages or posts such as the title of a post.
- CSV placeholders: Placeholders for import of CSV file.
In this example, we demonstrate the use of Barcode 128 through a contact field placeholder. Select Voucher Codes option within the Contact fields placeholder and click Insert placeholder (fig. 54).
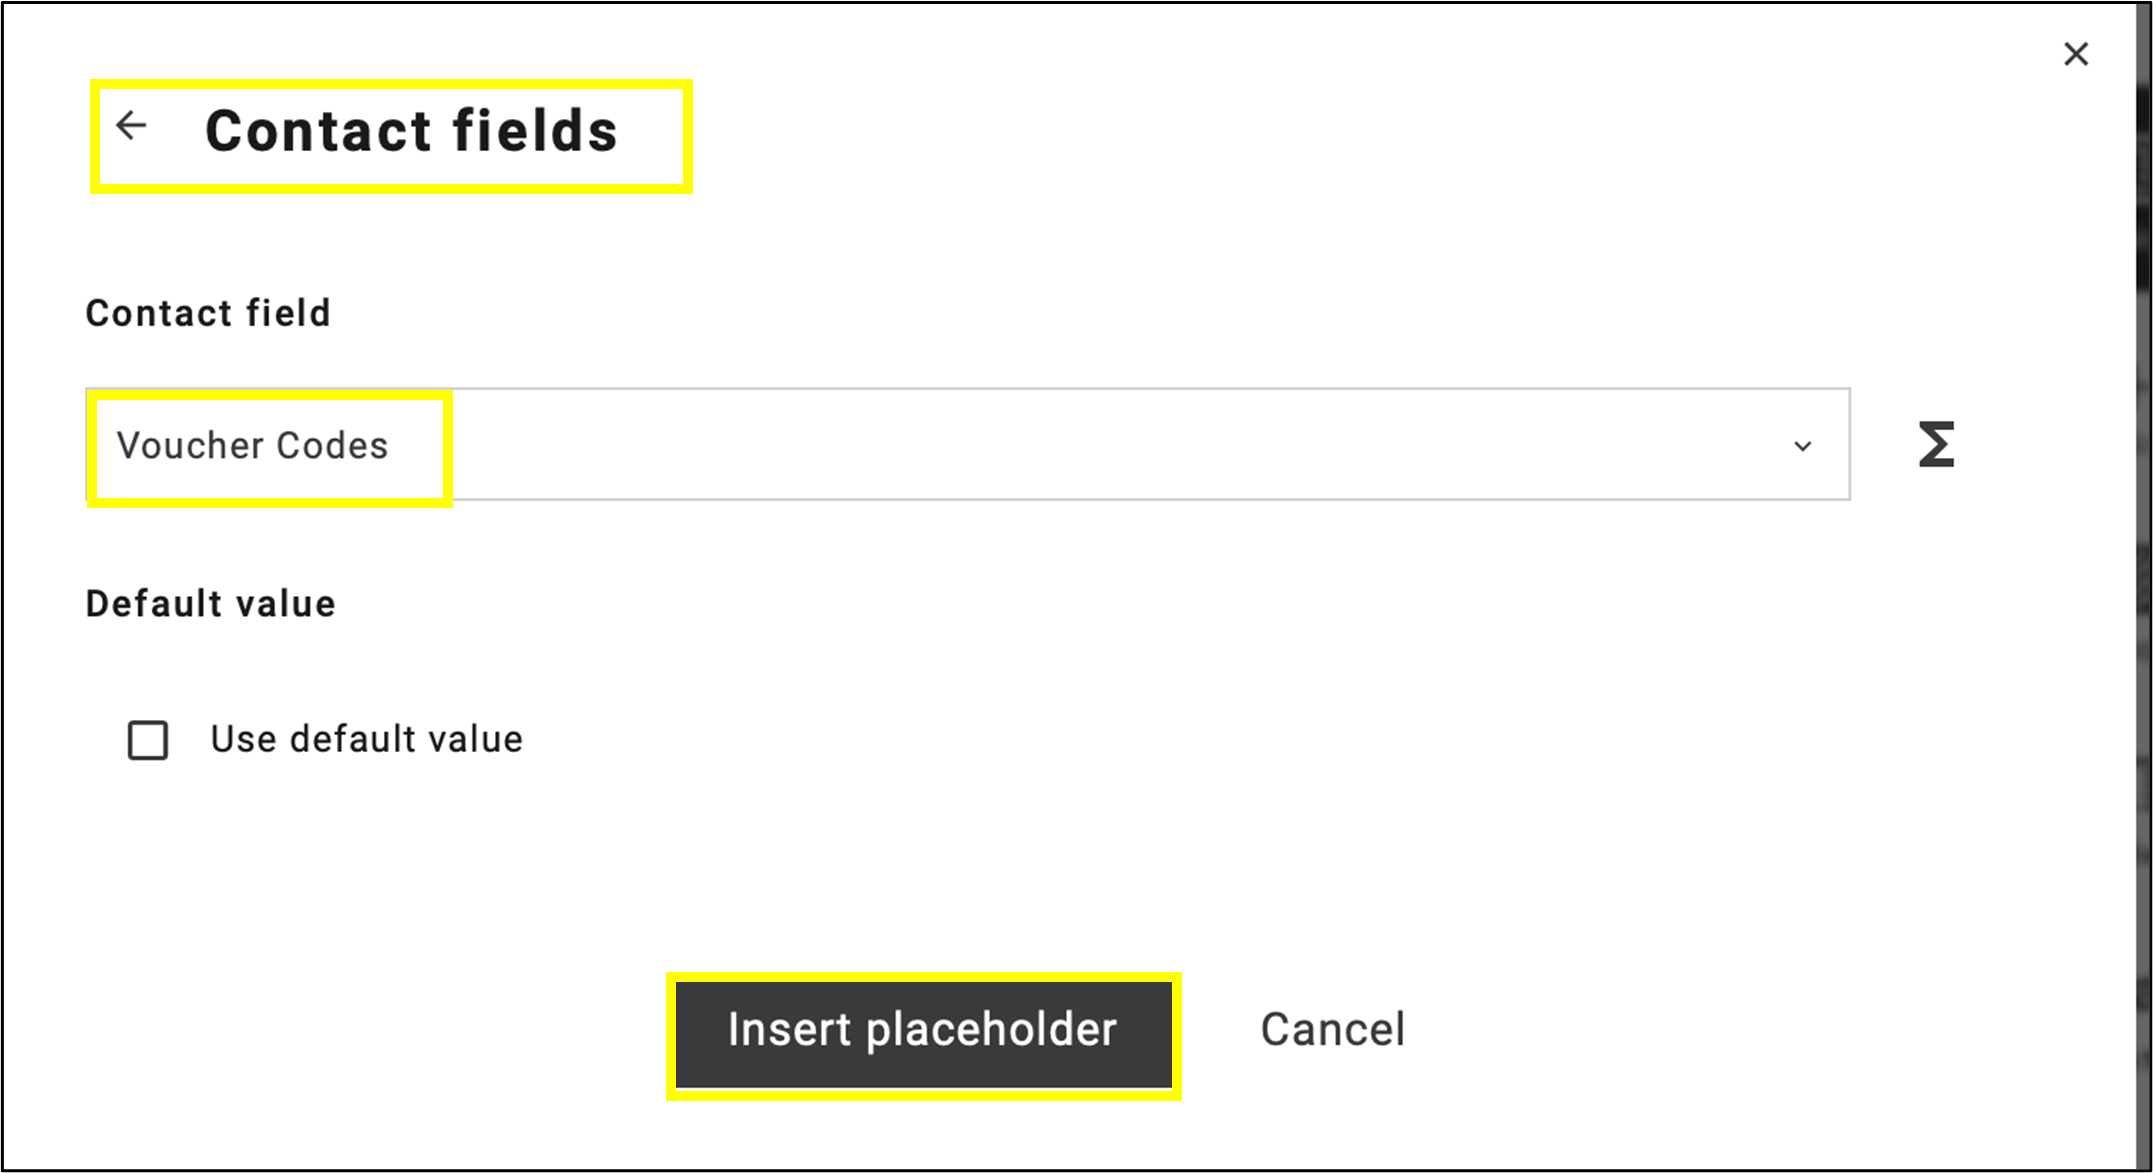
fig. 54: In the contact field, select Voucher Codes, then click ’Insert placeholder’.
The merge tag is now displayed in the Content area and embedded directly into the emailing (fig. 55). Click Next to continue.
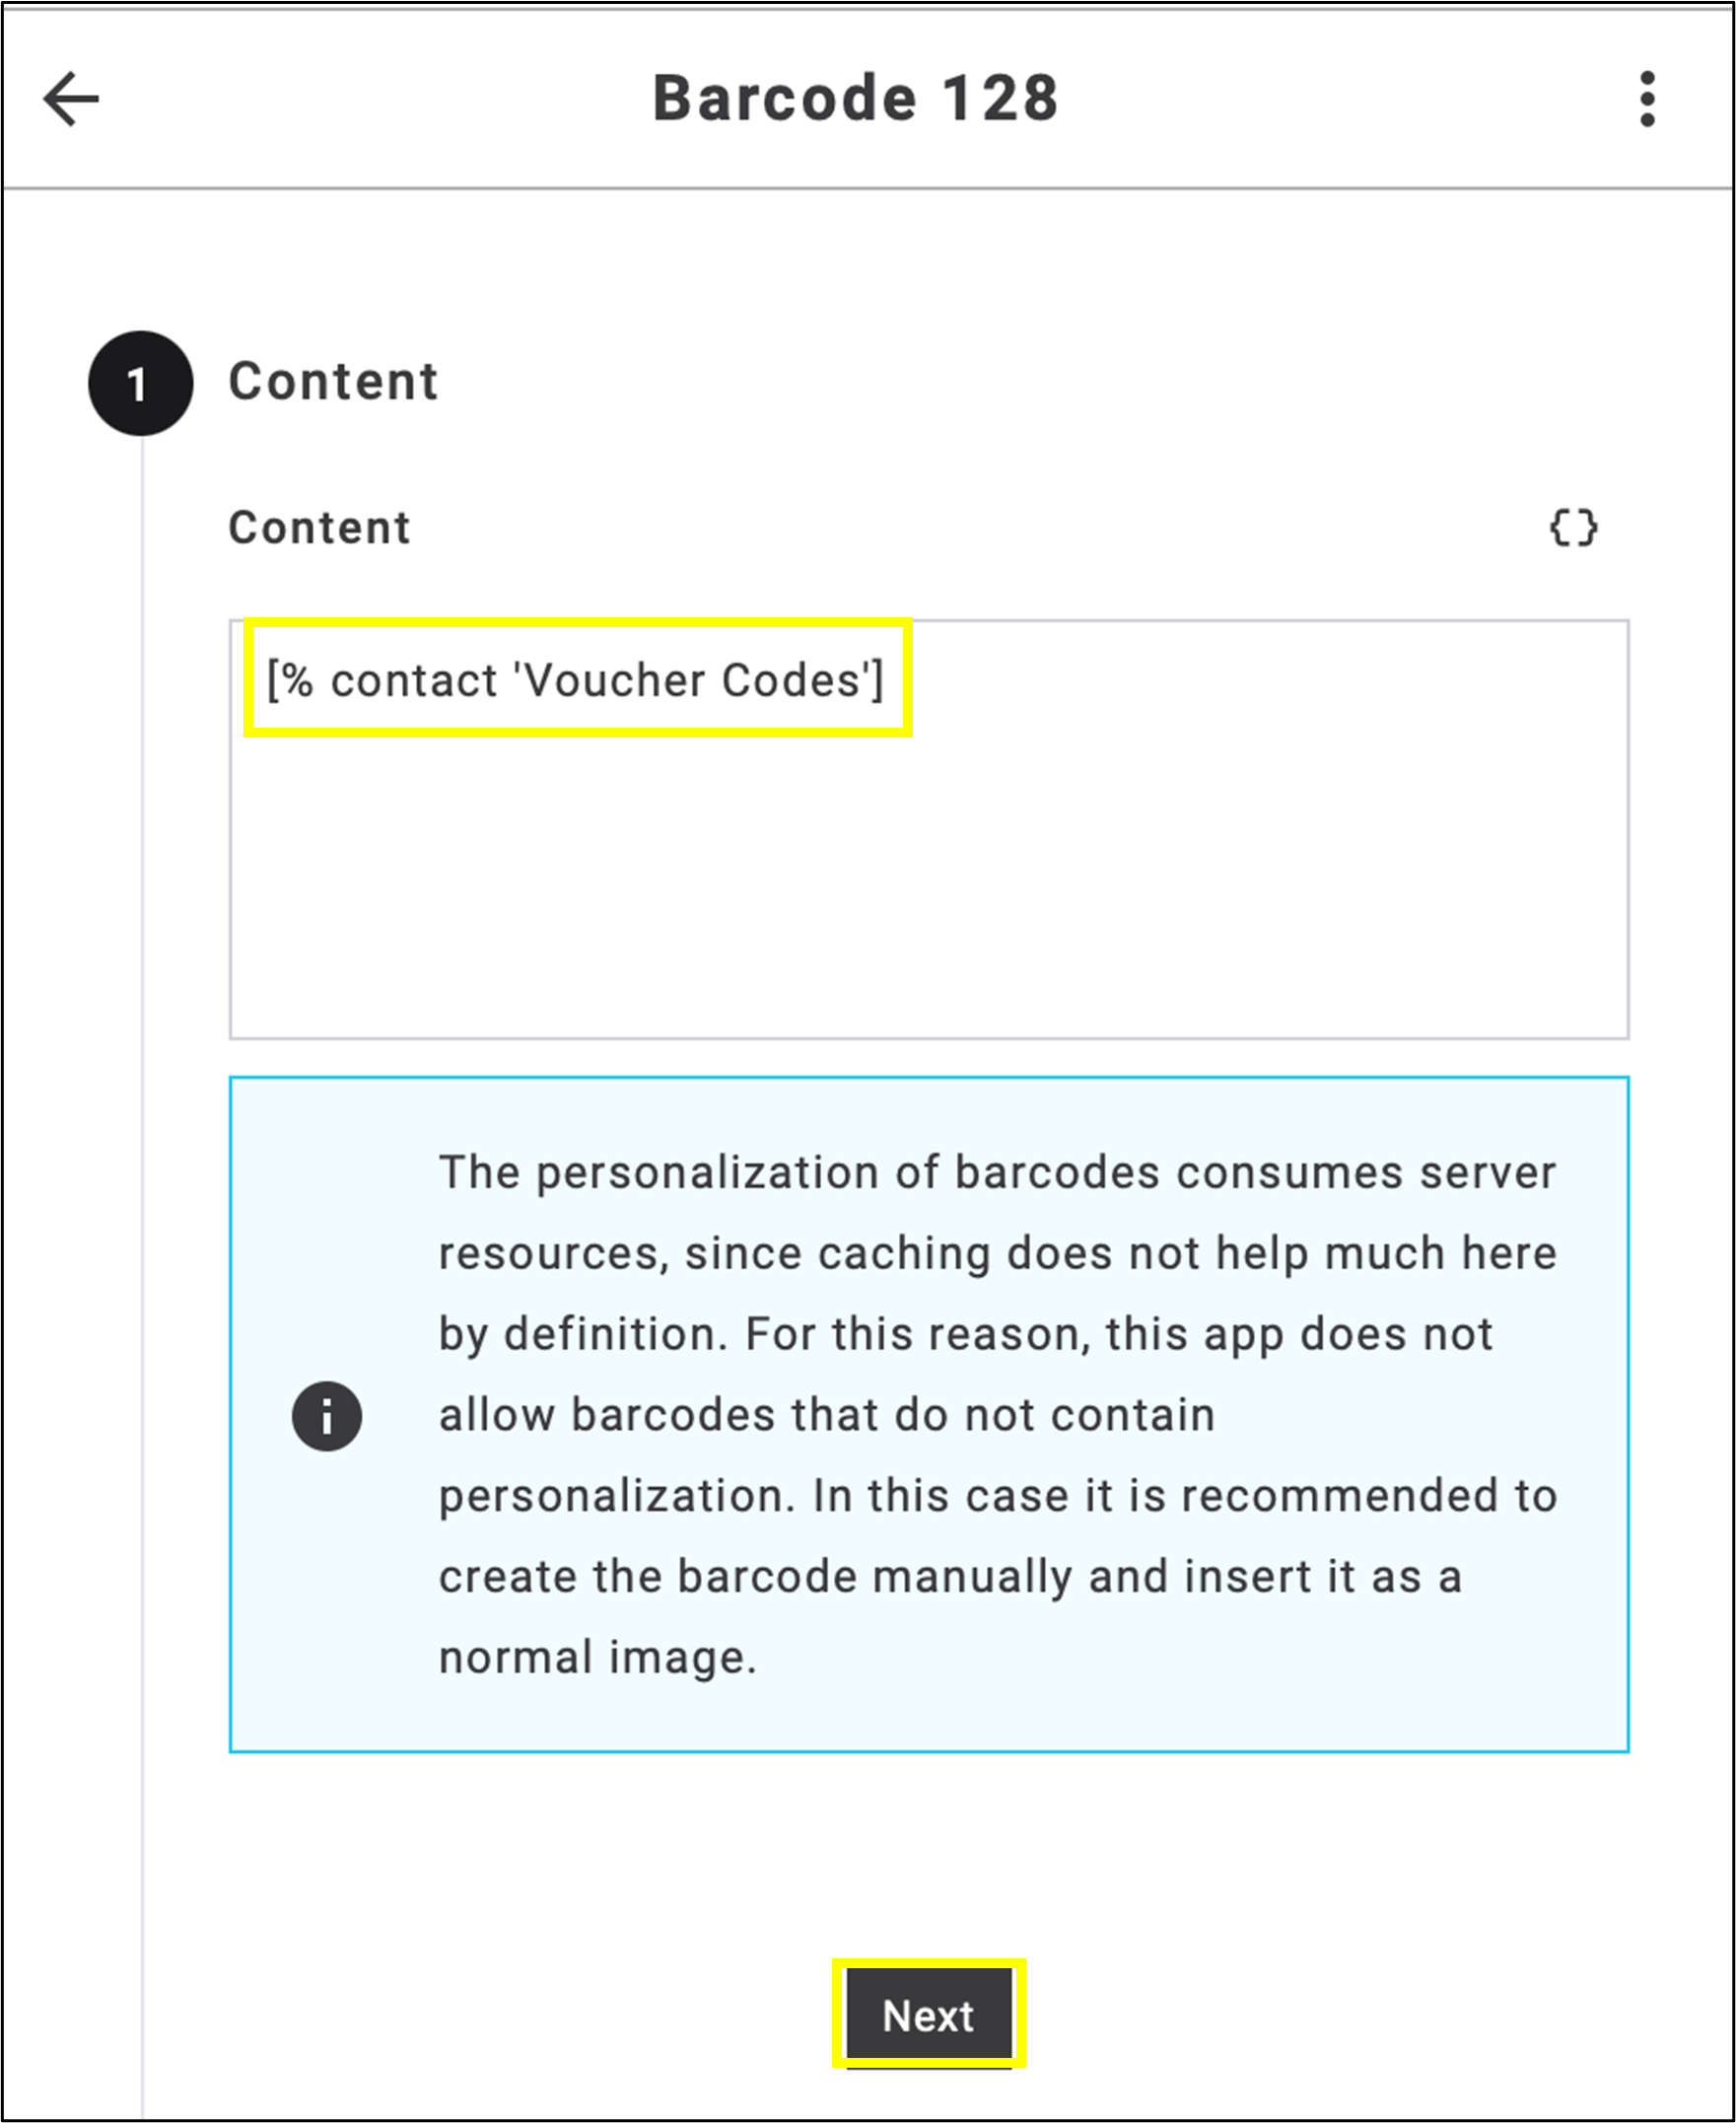
fig. 55: The placeholder is now added to the content area and integrated directly into the emailing.
Here, you can configure the background and foreground colors of the barcode (fig. 56).
Note: Use high-contrast colors to ensure the barcode can be scanned properly by mobile devices. Very light colors are not recommended because they can reduce readability.
After completing the settings, click Next to continue.
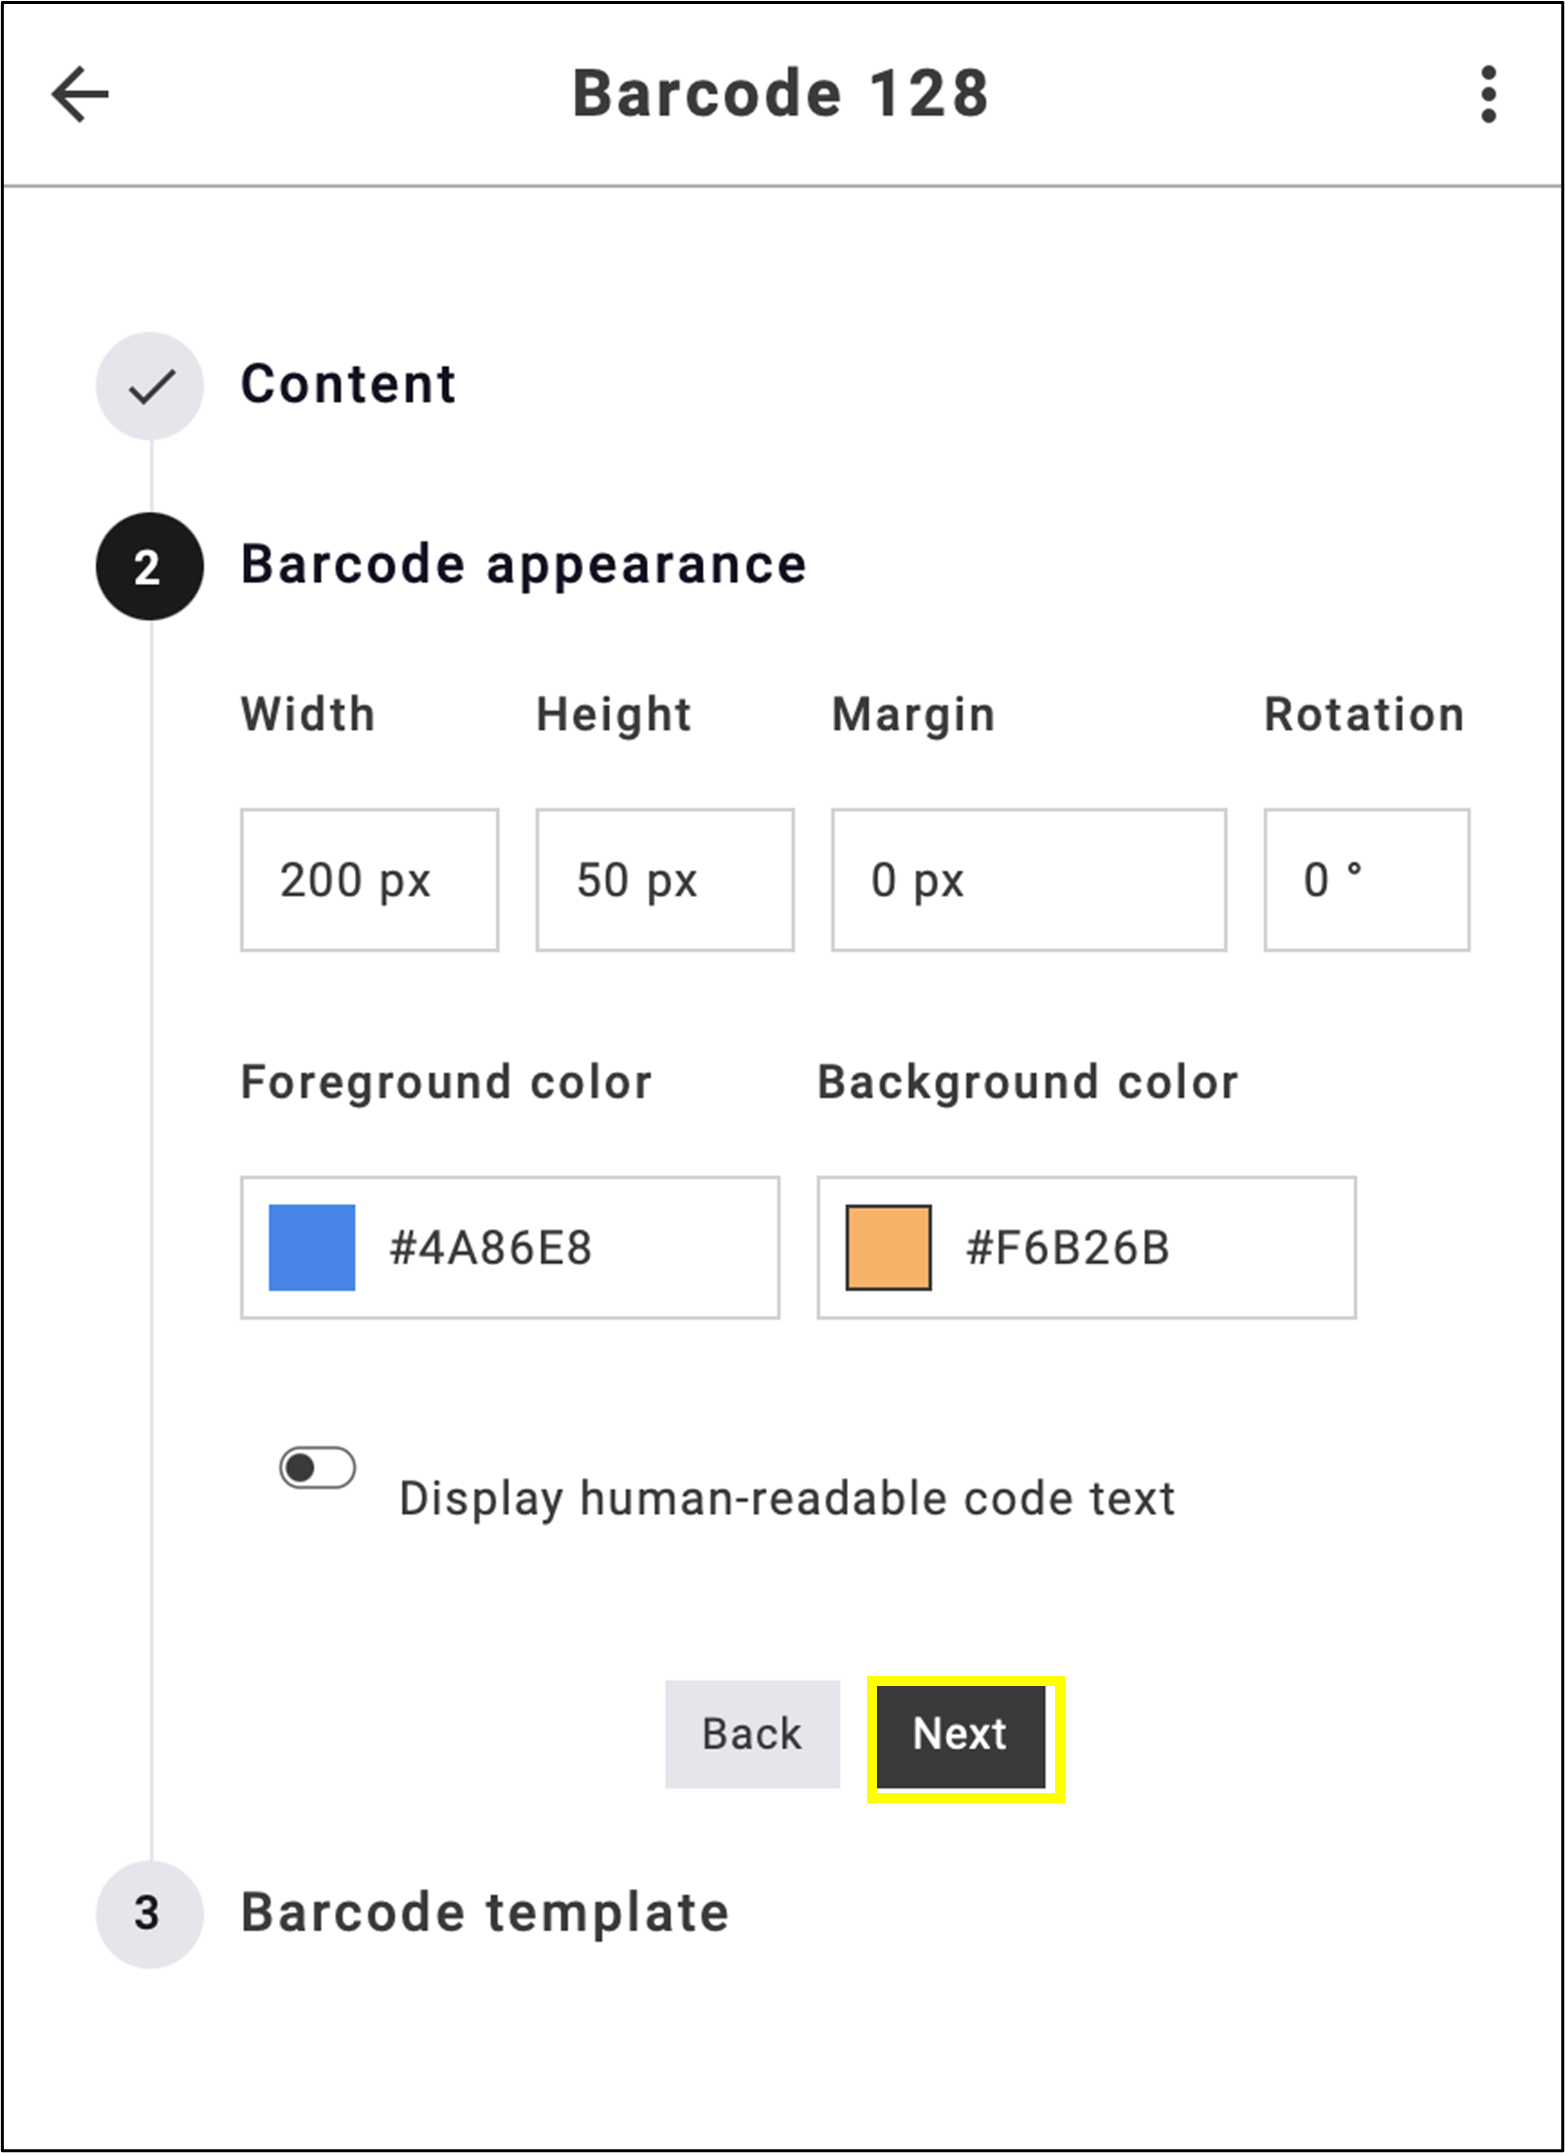 fig. 56: Customize the barcode colors, use high-contrast settings for optimal mobile scanning.The barcode is generated based on the selected settings. To insert the generated barcode into the message, click on the code and drag it into the message body.
Note: Drag and drop it directly from the barcode icon (fig. 57).
After completing the process, click Done.
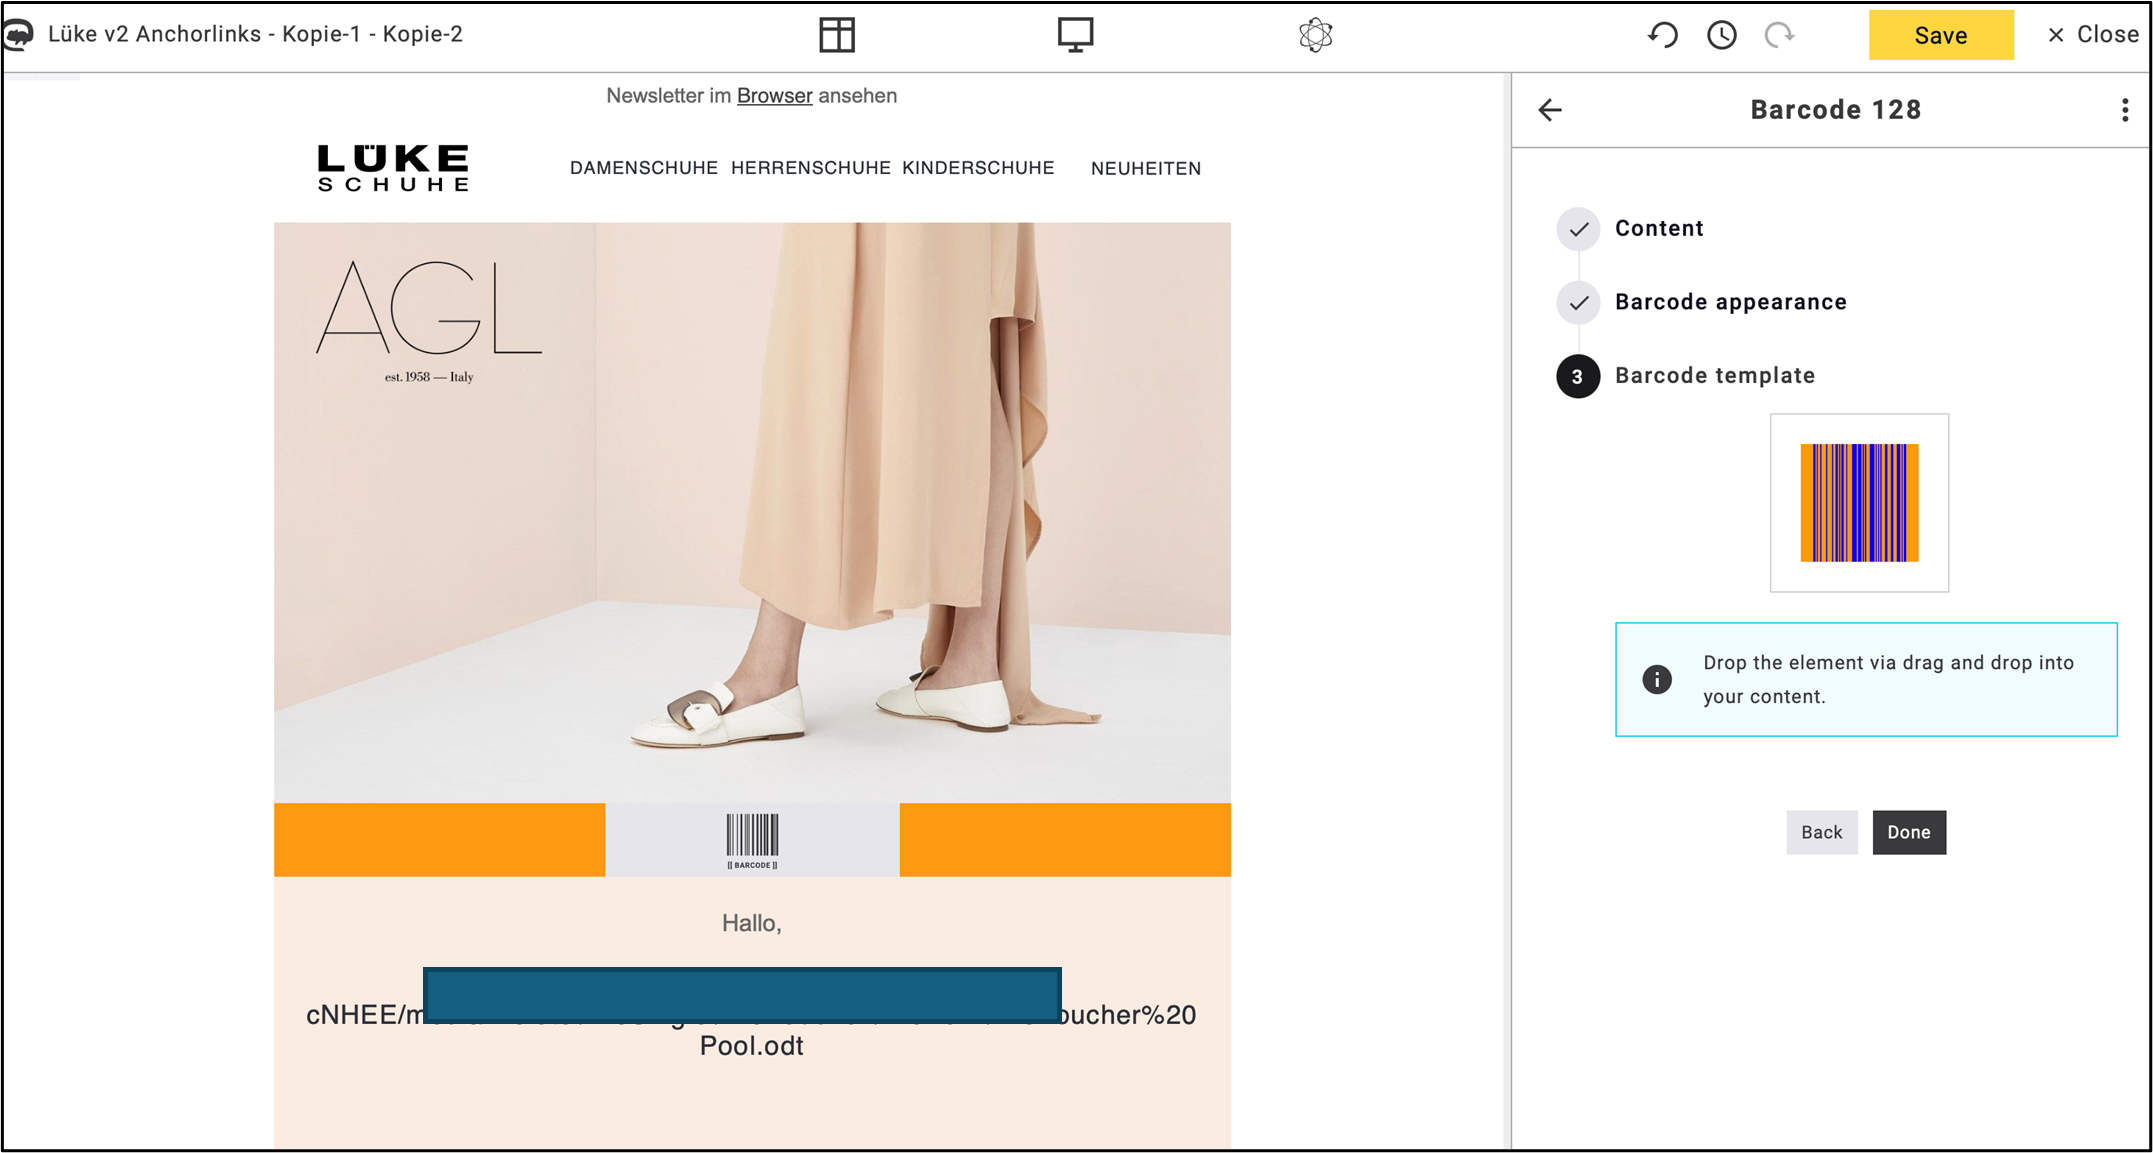
fig. 57: Drag and drop the generated barcode directly into the message body.
The inserted code may not appear the same in the emailing body. To verify it, view the emailing in Preview mode (fig. 58).
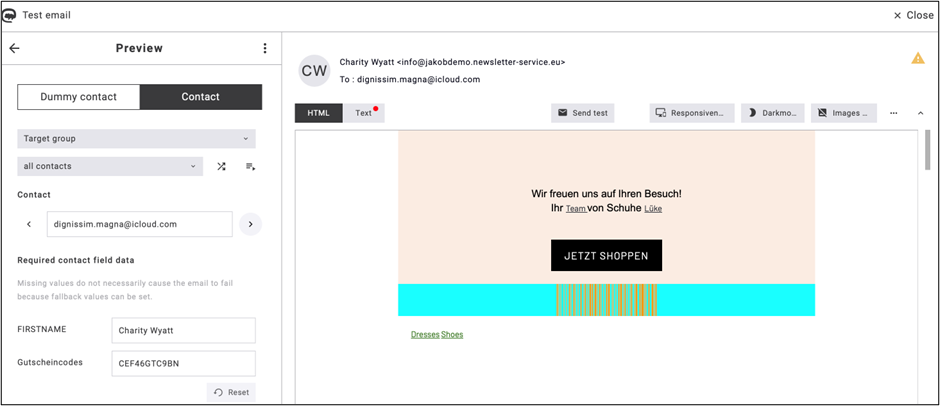
fig. 58: Preview the emailing to verify the inserted code appearance.
6. QR code
The QR Code widget in Maileon allows you to generate and insert customizable QR codes into emailings and landing pages. It can be used to link recipients directly to websites, campaigns, registrations, or other digital content through quick mobile scanning (fig. 59).
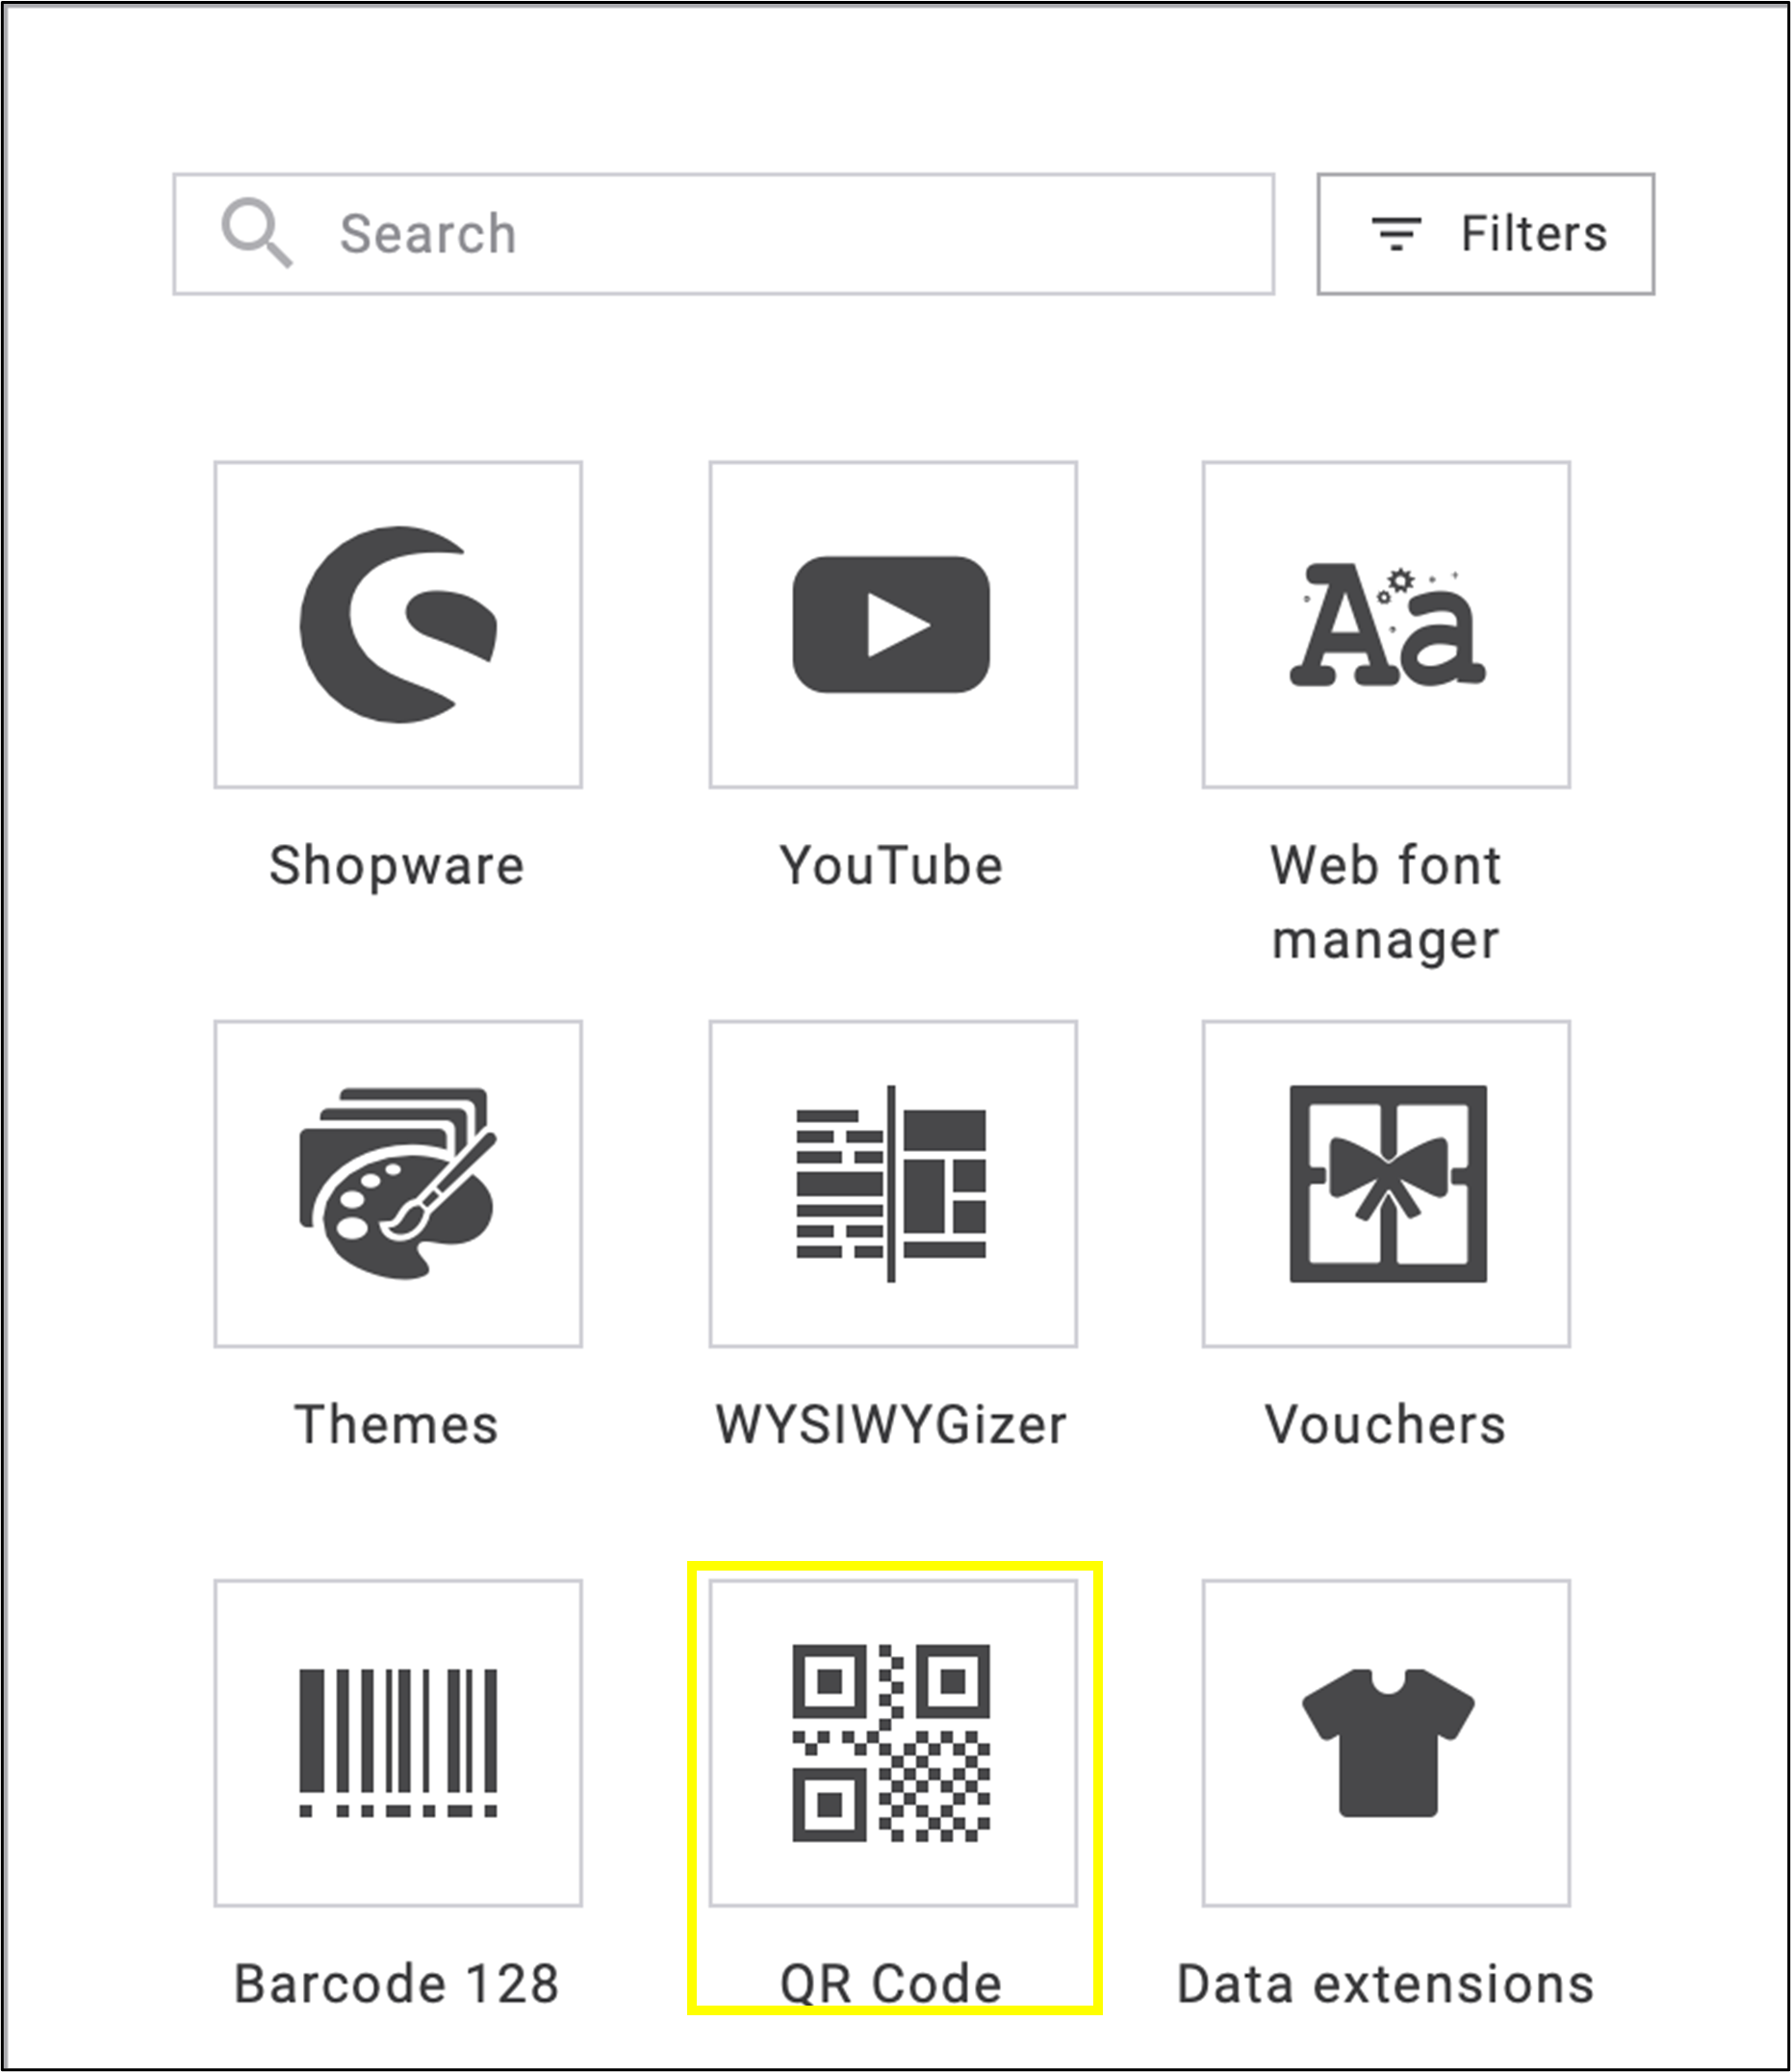
fig. 59: Generate and add customizable QR codes to your emailings and landing pages with the Maileon QR Code widget.
Open the widget and click the placeholder icon to start the process (fig. 60).
Note: The personalization of QR codes consumes server resources, since caching does not help much here by definition. For this reason, this app does not allow QR codes that do not contain personalization. In this case, it is recommended to create the QR codes manually and insert it as a normal image.
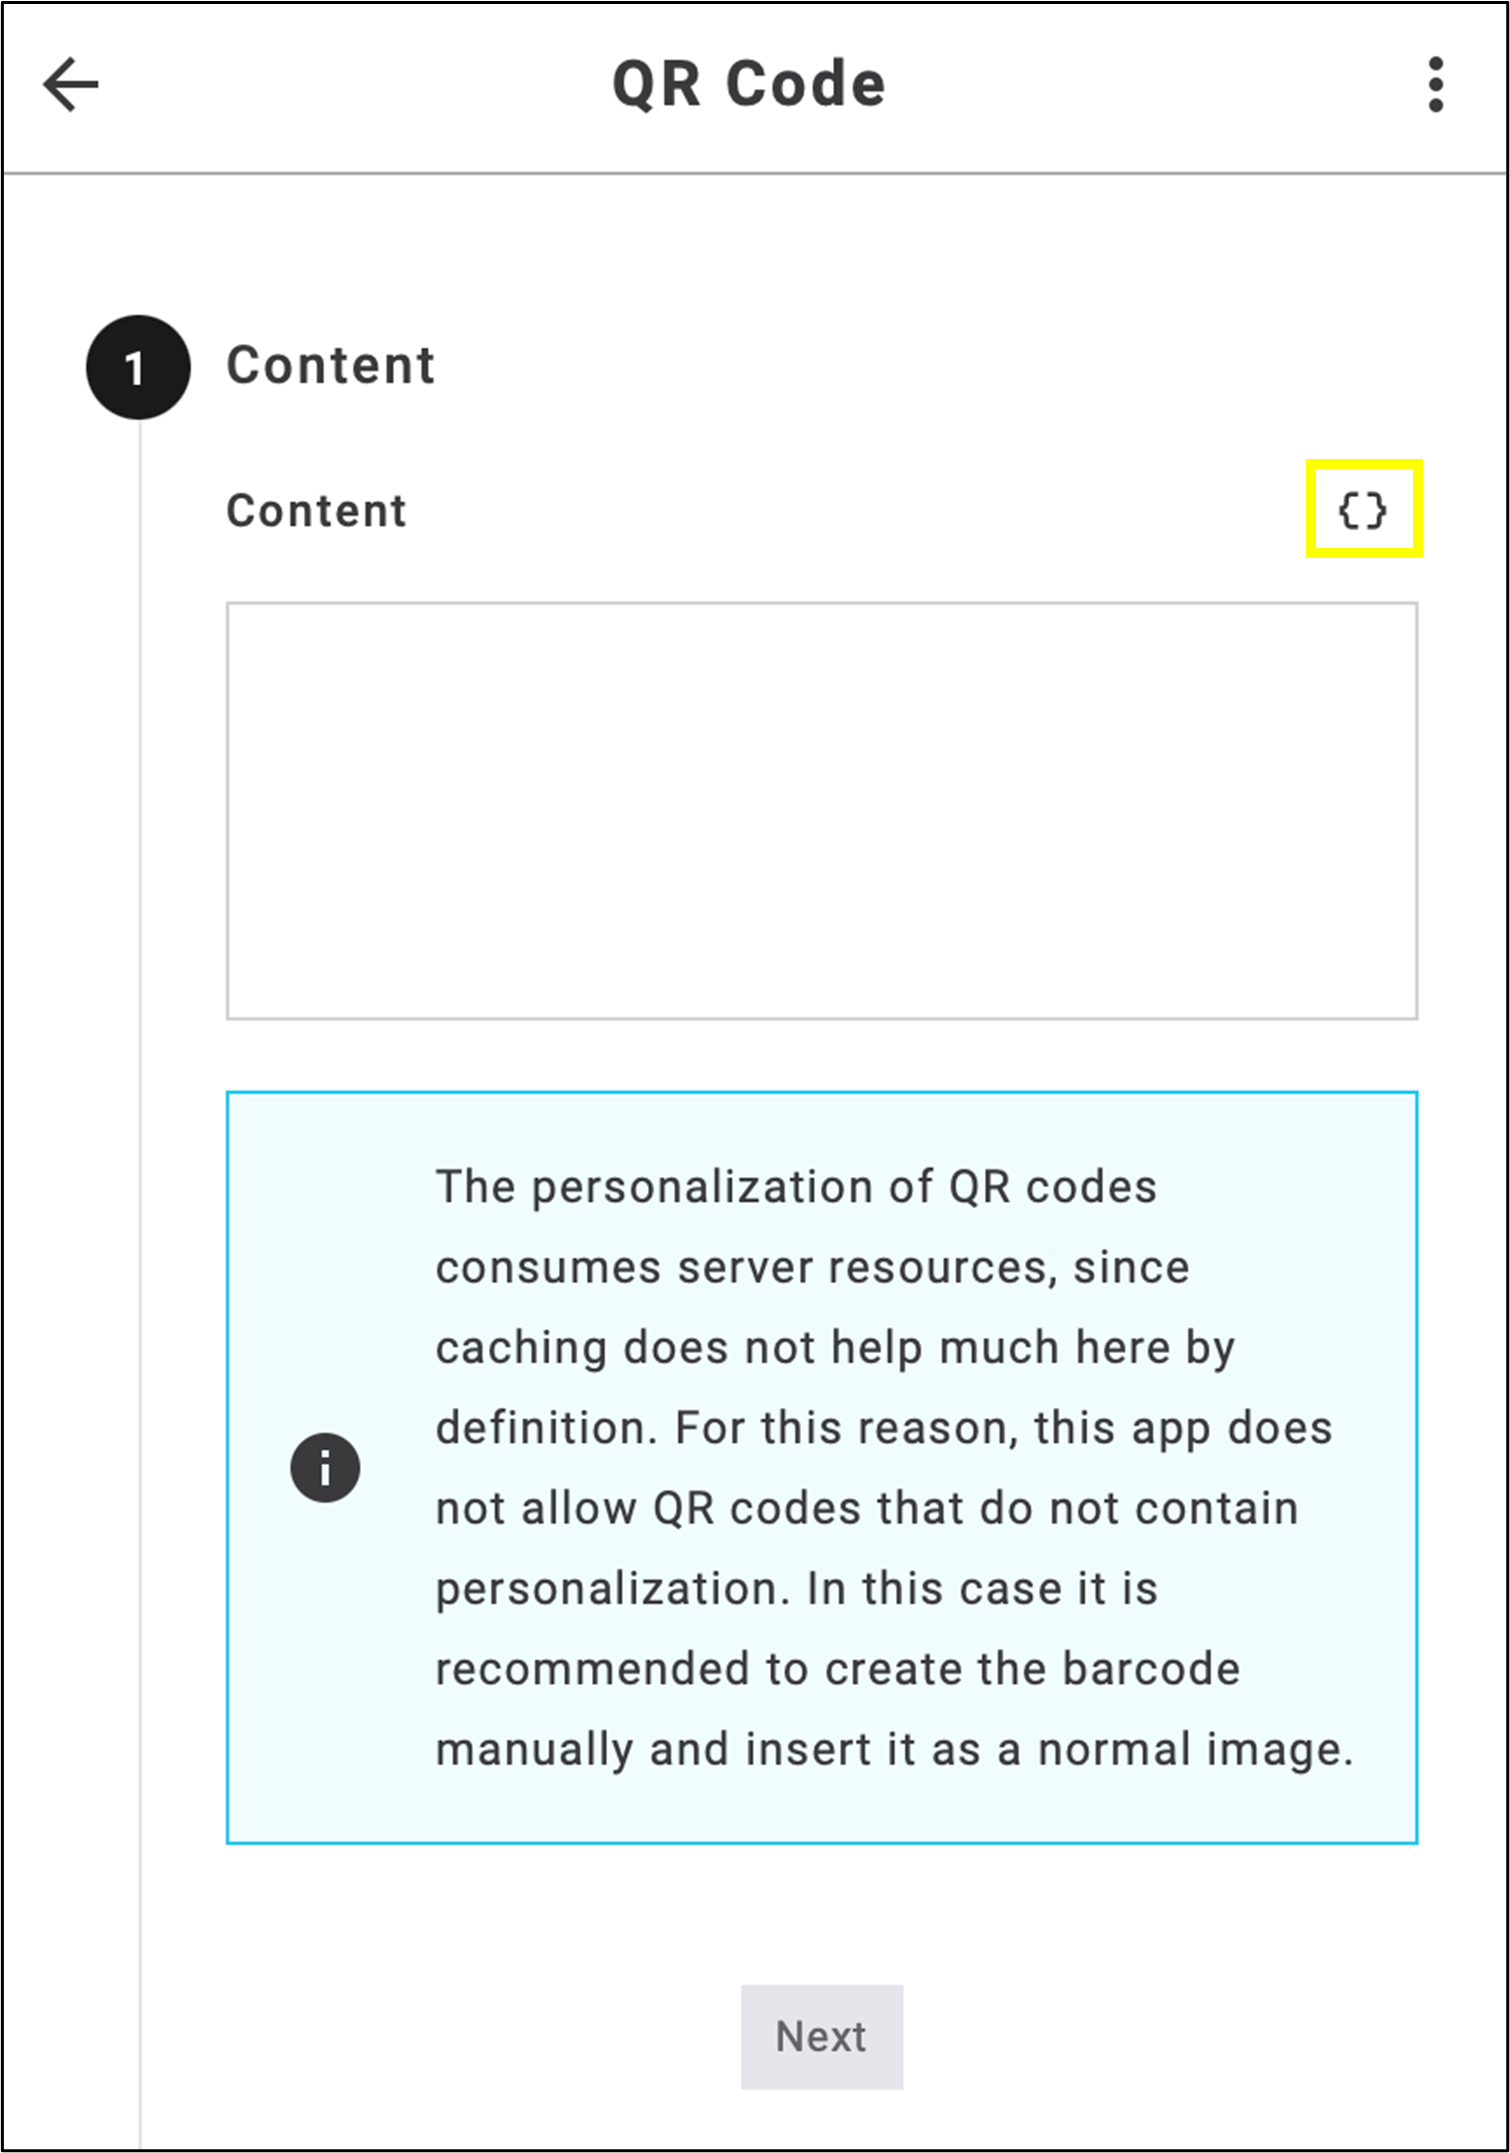
fig. 60: Click the placeholder icon to select and insert a placeholder into the QR code.
After clicking the placeholder icon, select the type of placeholder you want to insert.
The following placeholders are available:
- Contact fields: Contact properties such as first and last name.
- RSS placeholders: Placeholders for RSS feed properties such as the title of a feed item.
- Email properties: Email properties such as the send date and the subject line.
- YouTube placeholders: Placeholders for YouTube videos such as the title of a video.
- Data extension placeholders: Placeholders for adding data extension record information.
- Conditional contents: Rule-based output, e. g. Salutation depending on gender.
- Voucher codes: Assign vouchers from the account’s voucher pools.
- Account placeholder: Integration of placeholders managed on account level.
- Magento placeholders: Placeholders for Magento products such as the title of a product.
- Shopware placeholders: Placeholders for Shopware products such as the title of a product.
- Smartbot placeholders: Placeholders for Smartbot such as the name of a product.
- TYPO3 placeholders: Placeholders for TYPO3 page properties such as the title of a page.
- WordPress placeholders: Placeholders for WordPress pages or posts such as the title of a post.
- CSV placeholders: Placeholders for import of CSV file.
In this example, we demonstrate the use of QR Code through a contact field placeholder. Select Voucher Codes option within the Contact fields placeholder and click Insert placeholder (fig. 61).
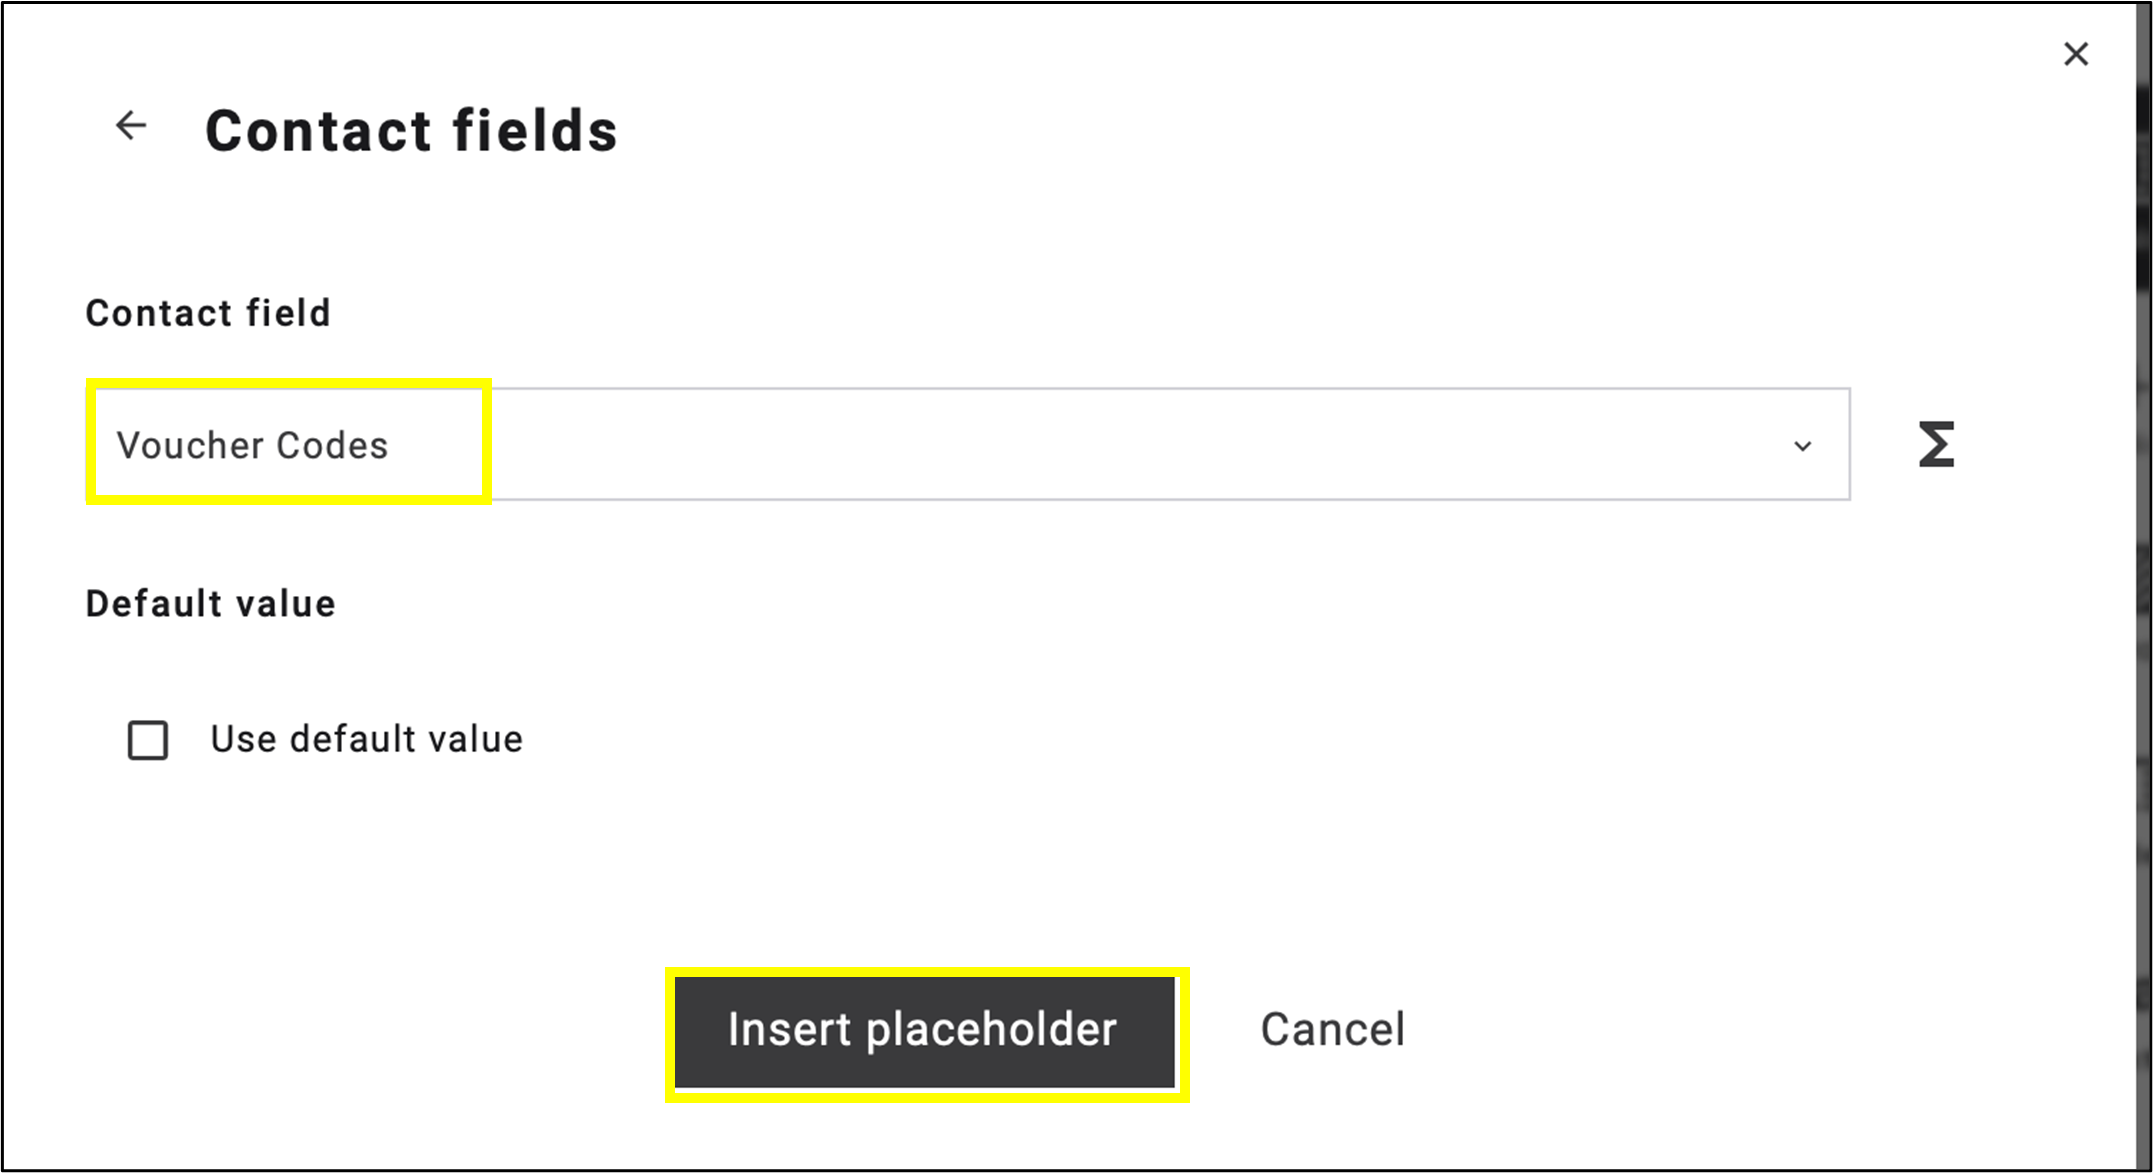
fig. 61: In the contact field, select Voucher Codes, then click ’Insert placeholder’.
The merge tag is now displayed in the Content area and embedded directly into the emailing (fig. 62). Click Next to continue.
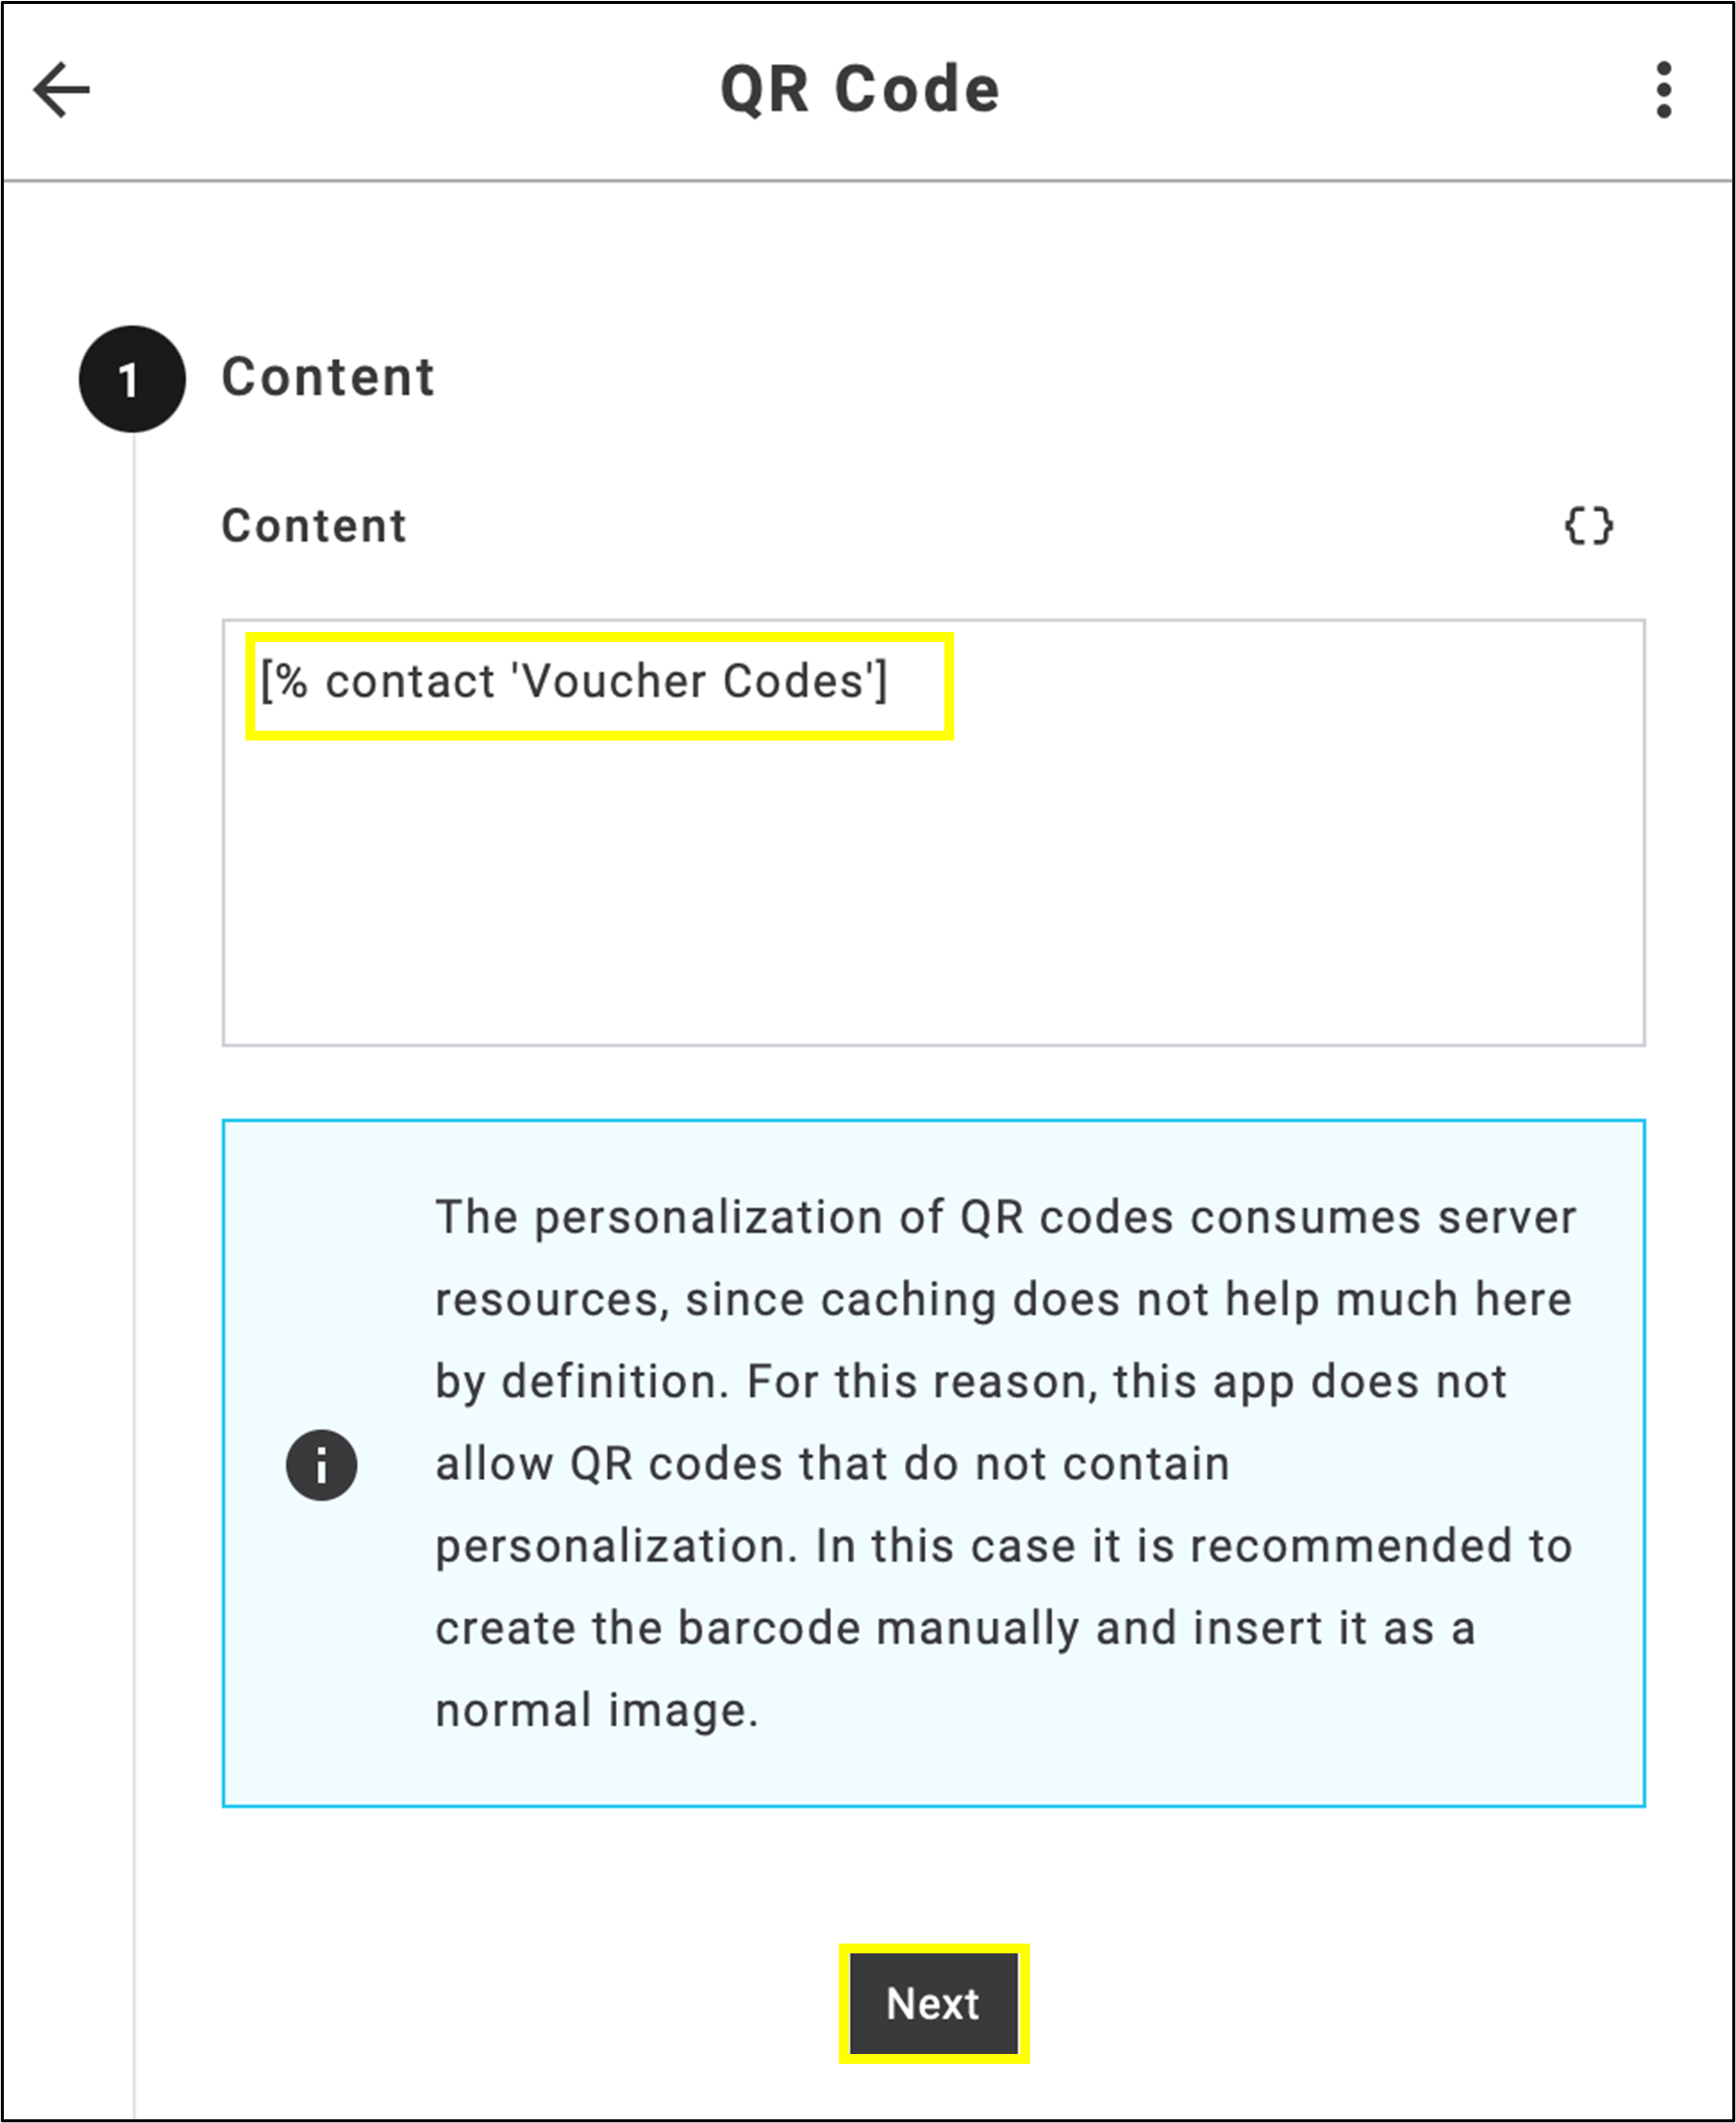
fig. 62: The placeholder is now added to the content area and integrated directly into the emailing.
Here, you can configure the background and foreground colors of the QR code (fig. 63).
Note: Use high-contrast colors to ensure the QR code can be scanned properly by mobile devices. Very light colors are not recommended and should be avoided.
After completing the settings, click Next to continue.

fig. 63: Customize the QR code colors, use high-contrast settings for optimal mobile scanning.
The QR code is generated based on the selected settings. To insert the generated QR code into the message, click the code and drag it into the message body.
Note: Drag and drop it directly from the QR code icon (fig. 64).
Once the process was complete, click Done.
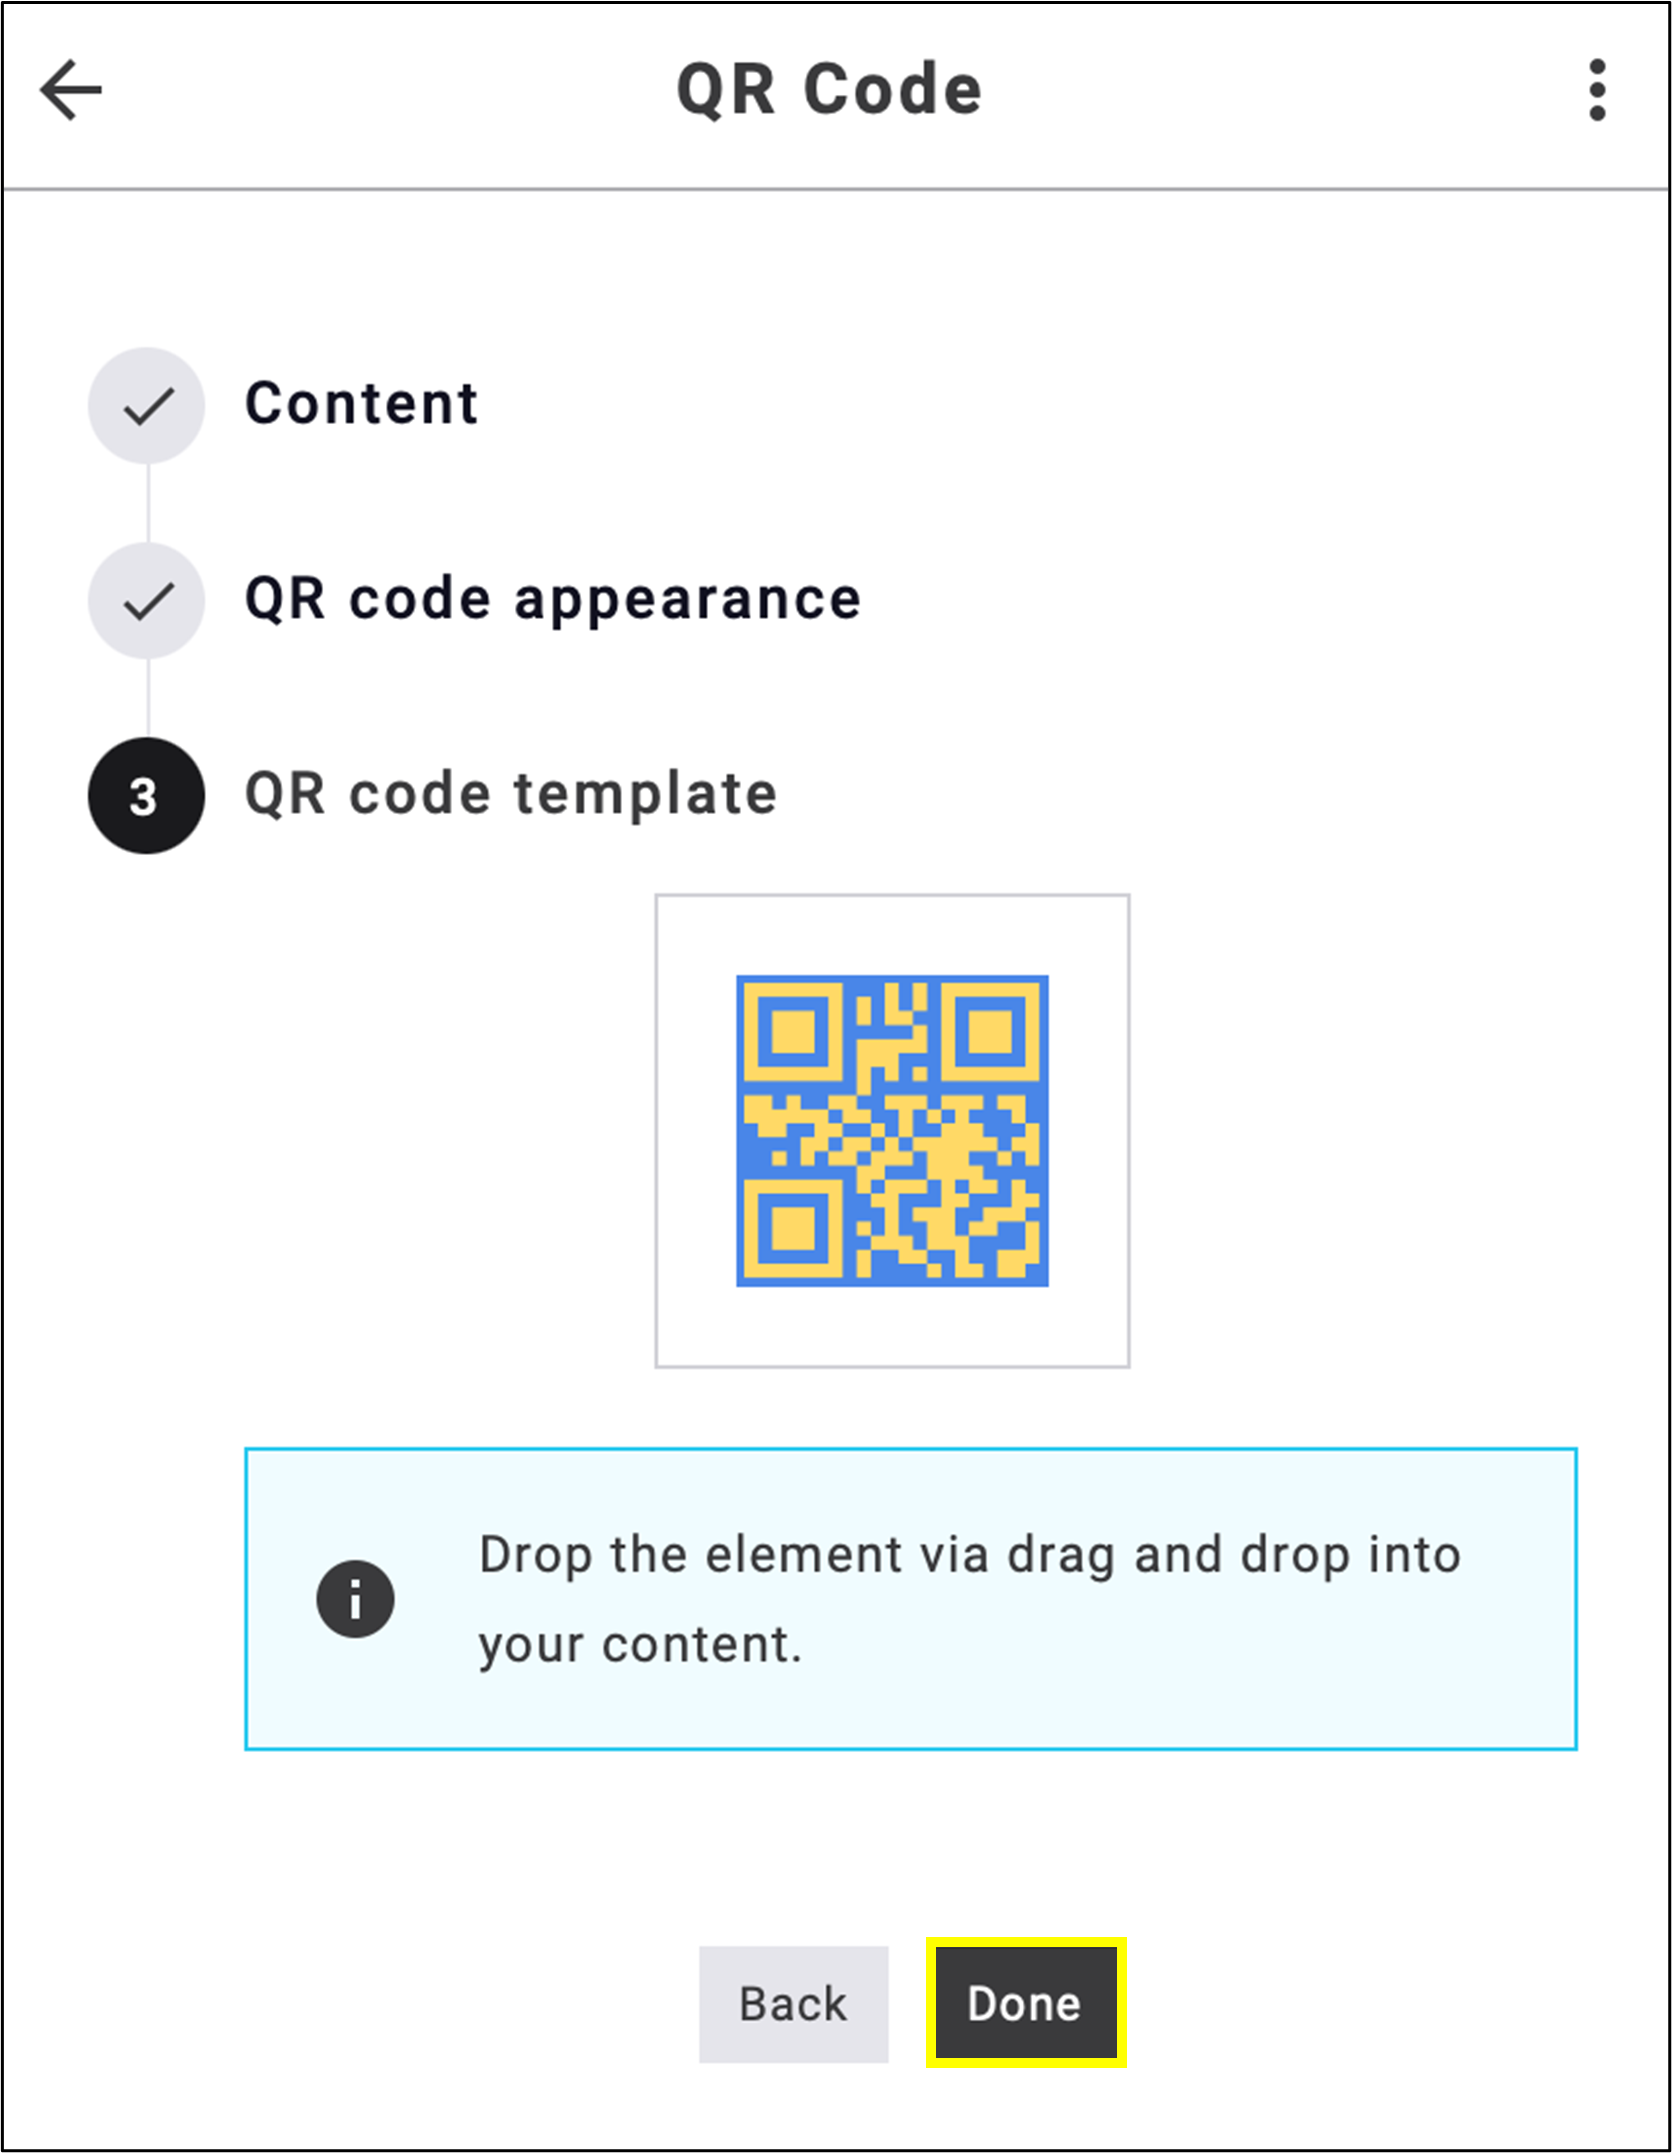
fig. 64: Drag and drop the generated QR code directly into the message body.
The inserted code may not appear the same in the emailing body. To verify it, view the emailing in Preview mode (fig. 65).
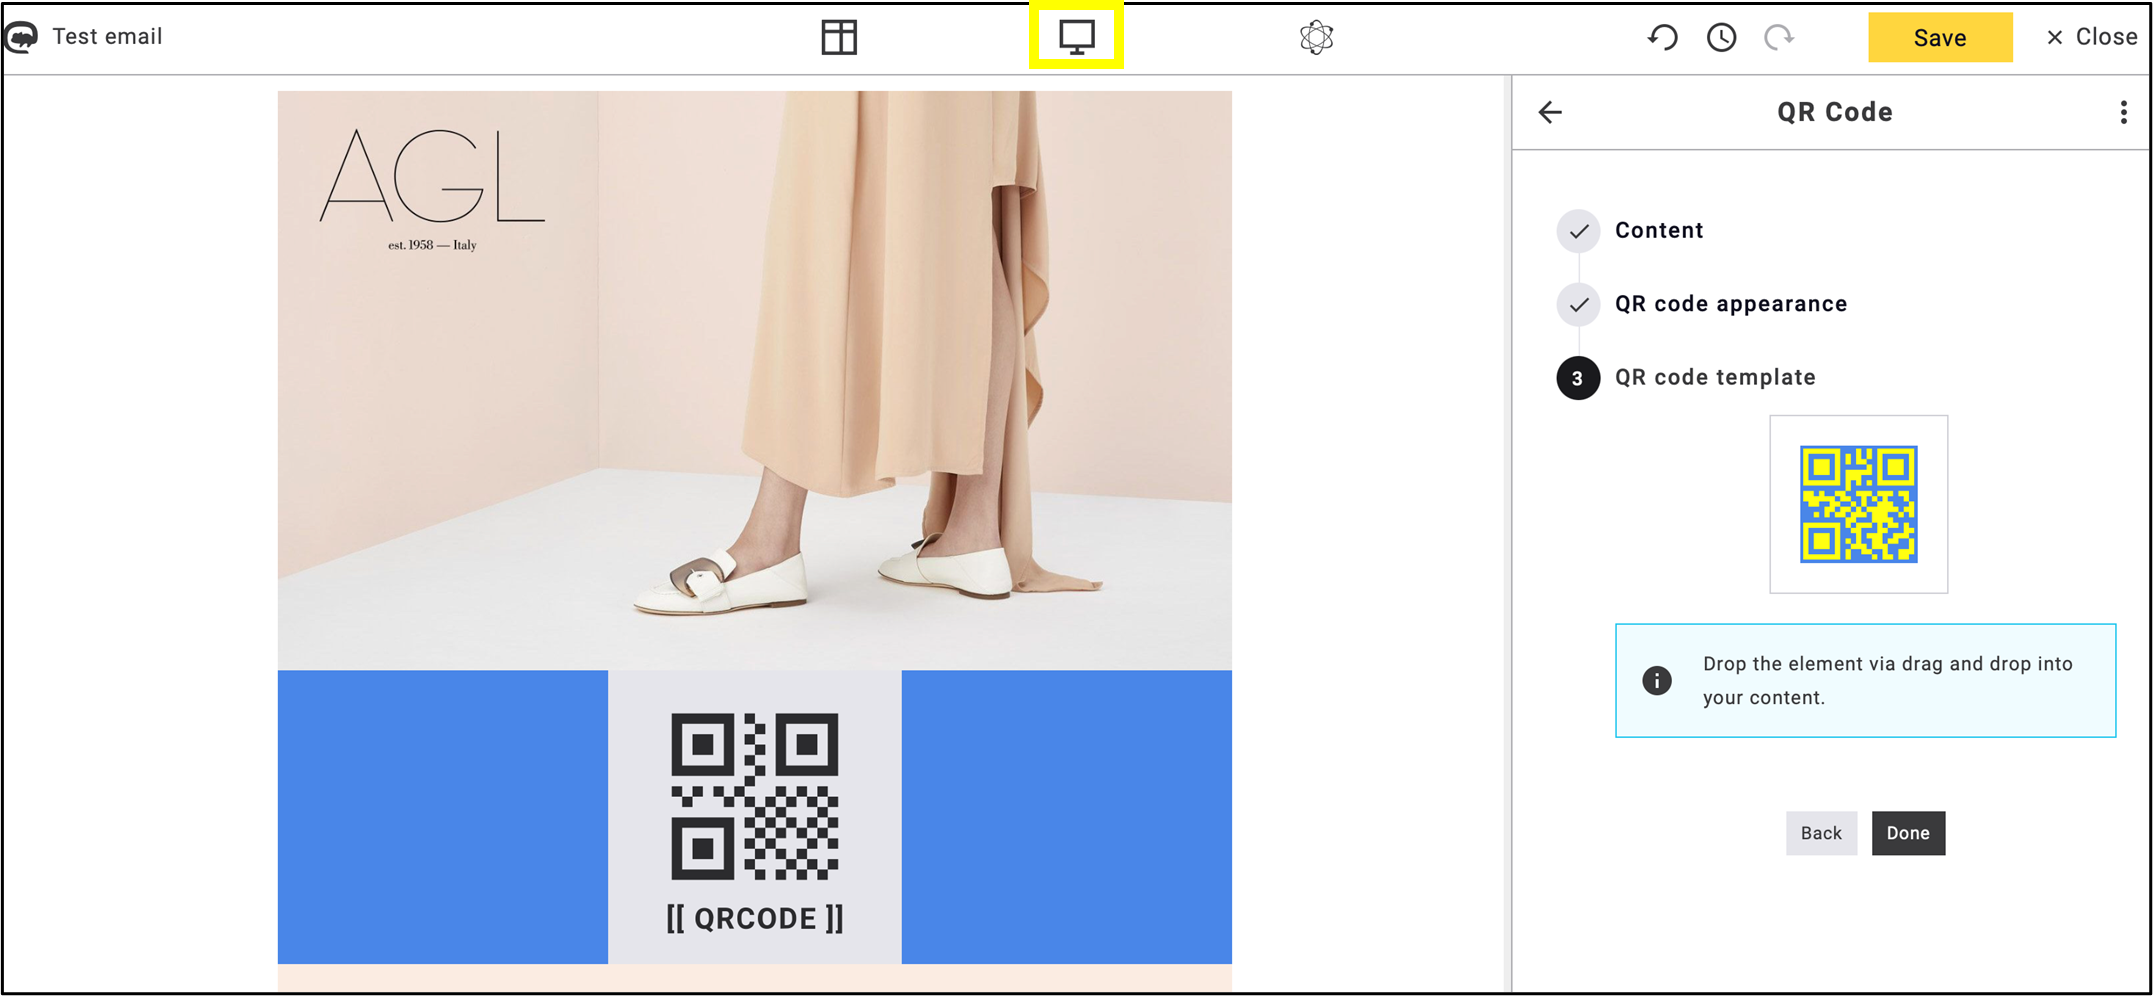
fig. 65: Preview the emailing to verify how the inserted QR code appears in the message body.
In Preview mode, click Contact, and then click the arrow under Contact (fig. 66) to view the QR code style changes.
Note: Content generation may fail if the data required for personalization is missing. This usually occurs when no target group has been assigned to the emailing campaign.
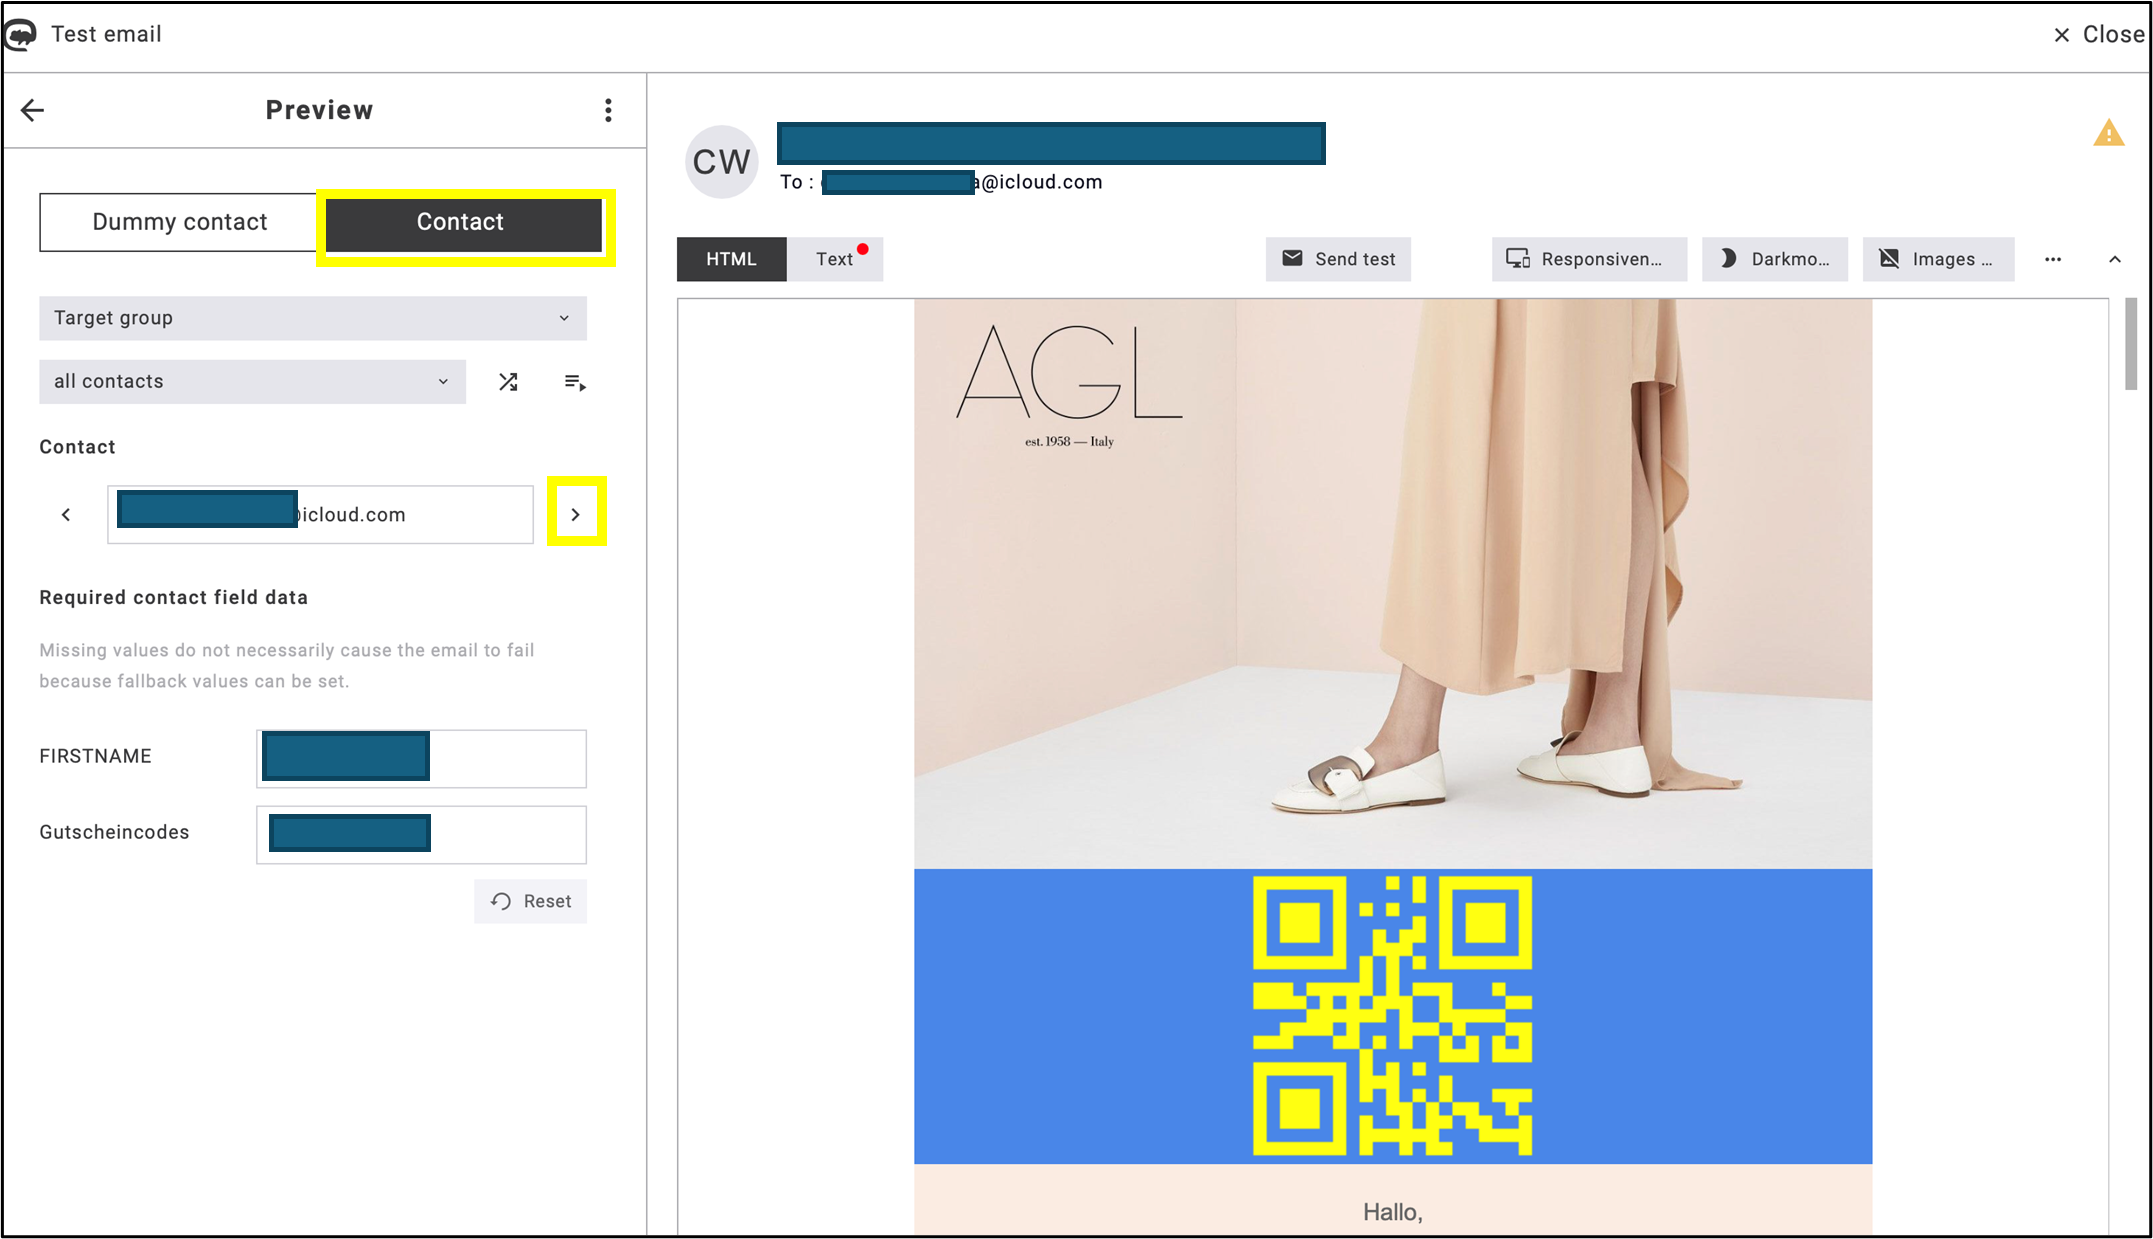
fig. 66: Click on the arrow under ’Contact’ to view QR code style changes.
The generated QR code should now contain the correct settings. Verify the accuracy of the code using a mobile scanner. When scanning the QR code, the encoded voucher code should be displayed by the QR scanner.
Use the QR code widget with any placeholder or variable inserted into the emailing. It can also include last names, postcodes, or data from RSS feeds. Any placeholder can be displayed as a QR code.
7. WYSIWYGizer
The Maileon WYSIWYGizer widget allows users to create and edit emailing content visually in the emailing editor without requiring HTML knowledge. It simplifies the emailing design process by importing HTML files, automatically splitting them into editable sections, and enabling user-friendly content management (fig. 67).
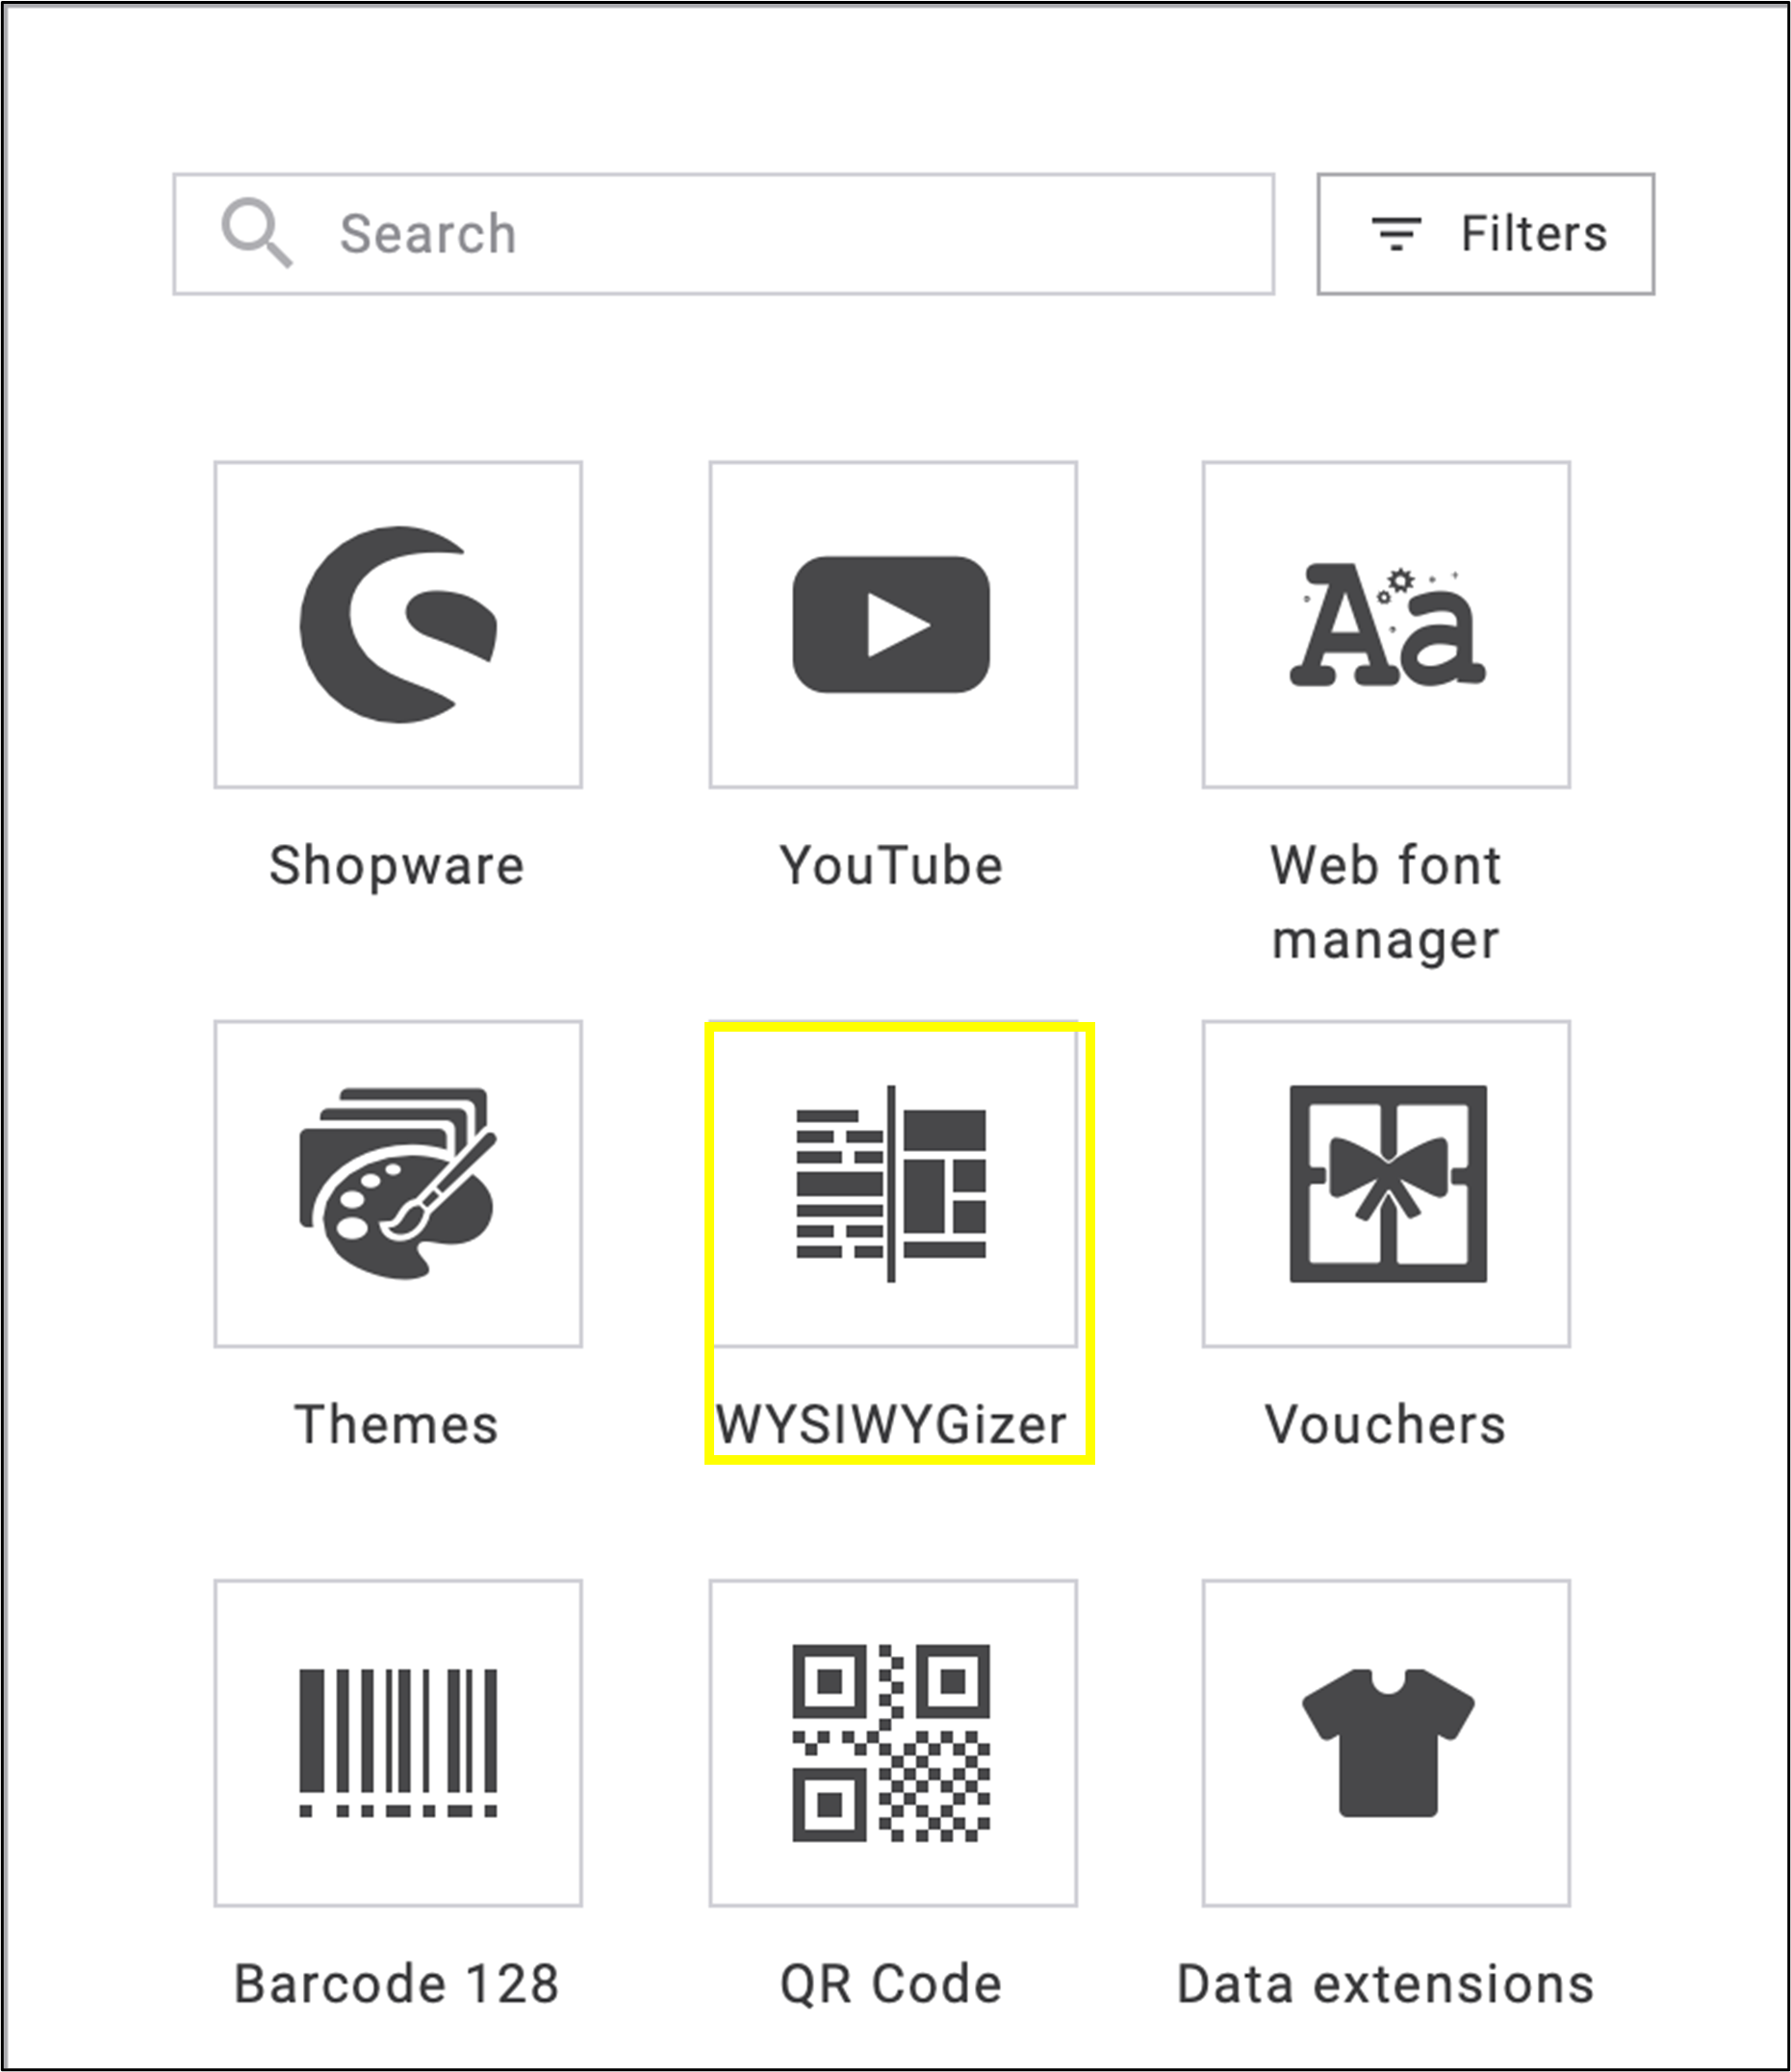
fig. 67: Design your emailings visually with Maileon’s WYSIWYGizer without HTML knowledge.
To start using the WYSIWYGizer, first import an HTML file or a ZIP file into the editor.
The file should contain images and data needed for the emailing campaign, as shown in the following example (fig. 68).
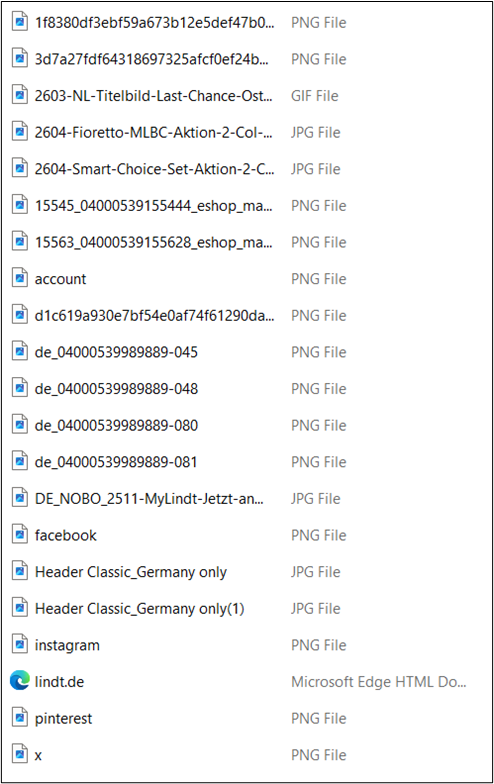
fig. 68: The uploaded HTML or ZIP file must contain all necessary data to display the emailing.
Click on + Add newsletter in Campaigns → Newsletters → Drafts to create a new emailing for the upload (fig. 69).
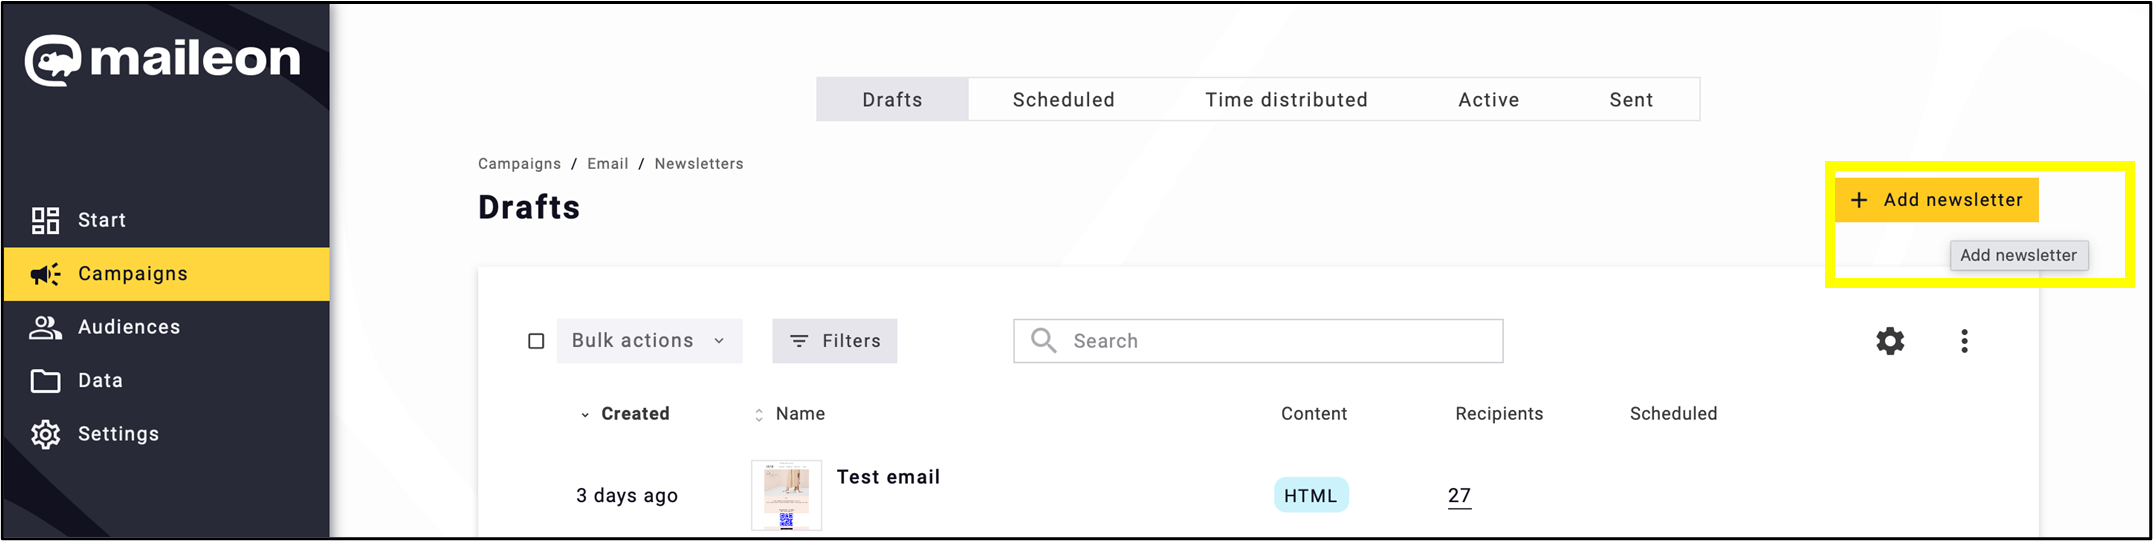
fig. 69: Start creating a new emailing by clicking ‘+ Add newsletter’.
Click + Create content (fig. 70) to upload the HTML / Zip file.
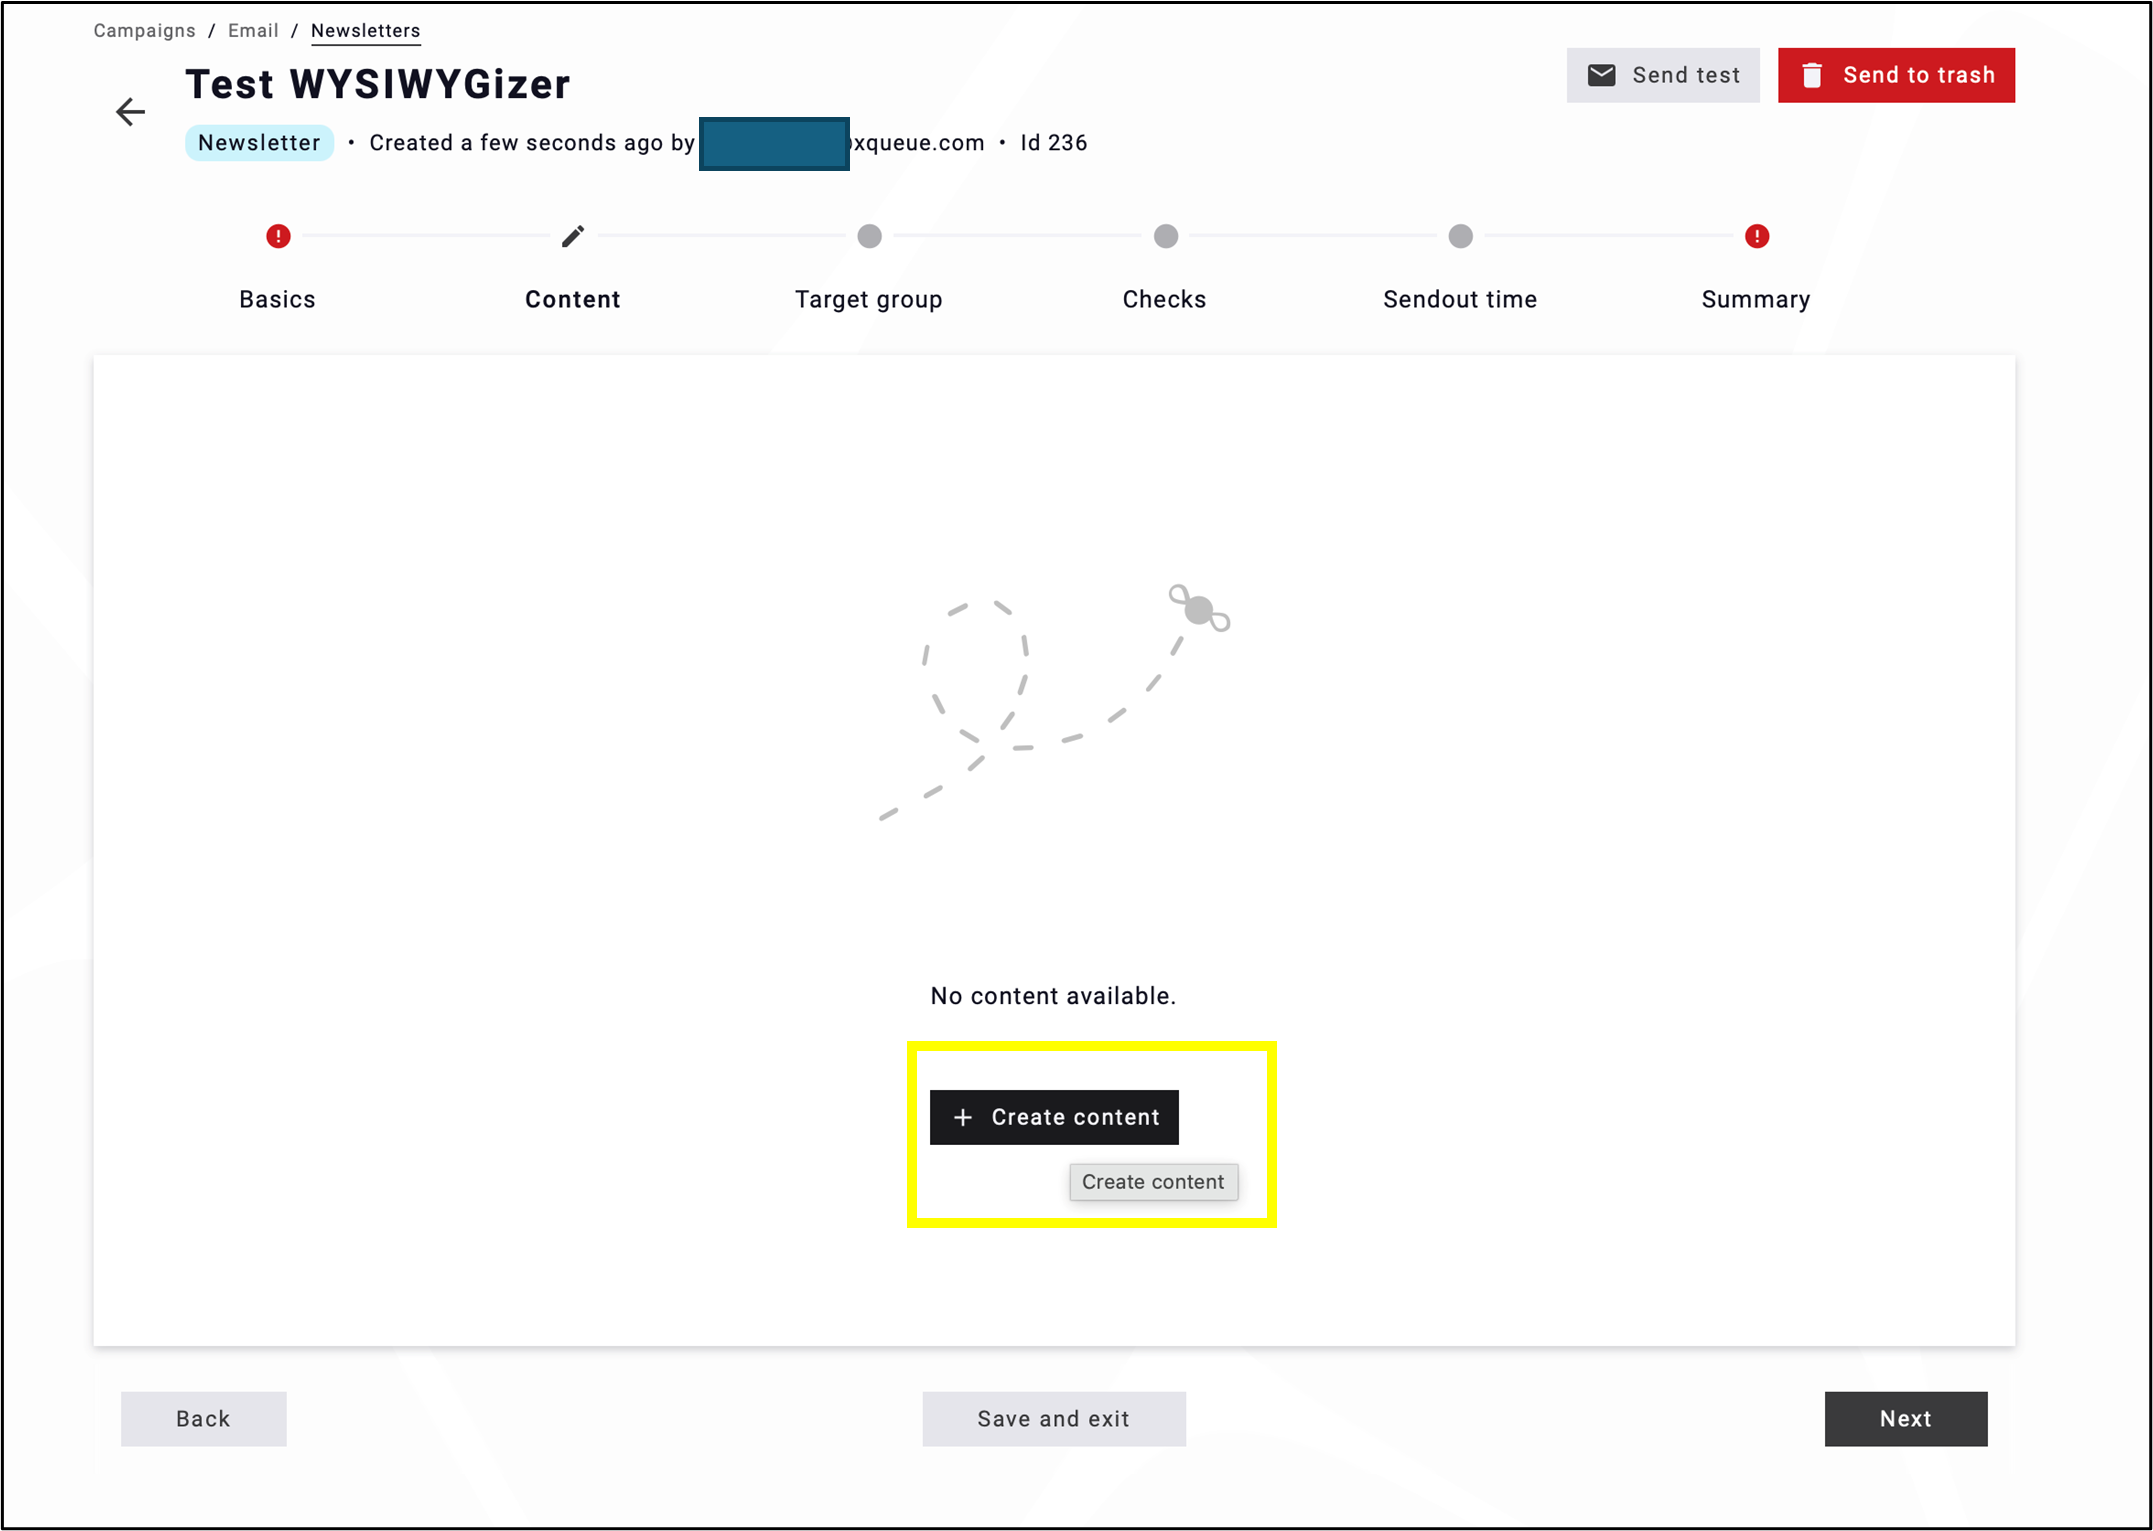
fig. 70: Use ‘+ Create content’ to import your HTML or ZIP file.
Click Import HTML and drag and drop the specific file to upload or browse to choose a file (fig. 71).
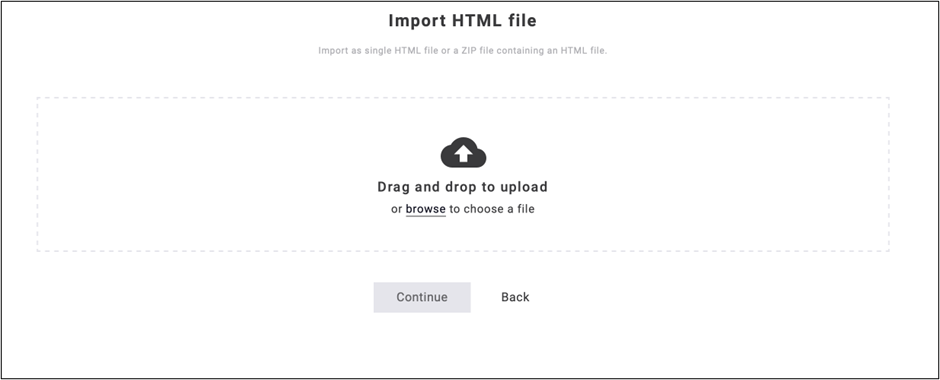
fig. 71: Click Import HTML, then drag and drop a file or browse to select one.
The data and images included in the HTML / Zip file will be embedded in the emailing (fig. 72). Click on the WYSIWYGizer widget to complete the transform by clicking on Transform template.
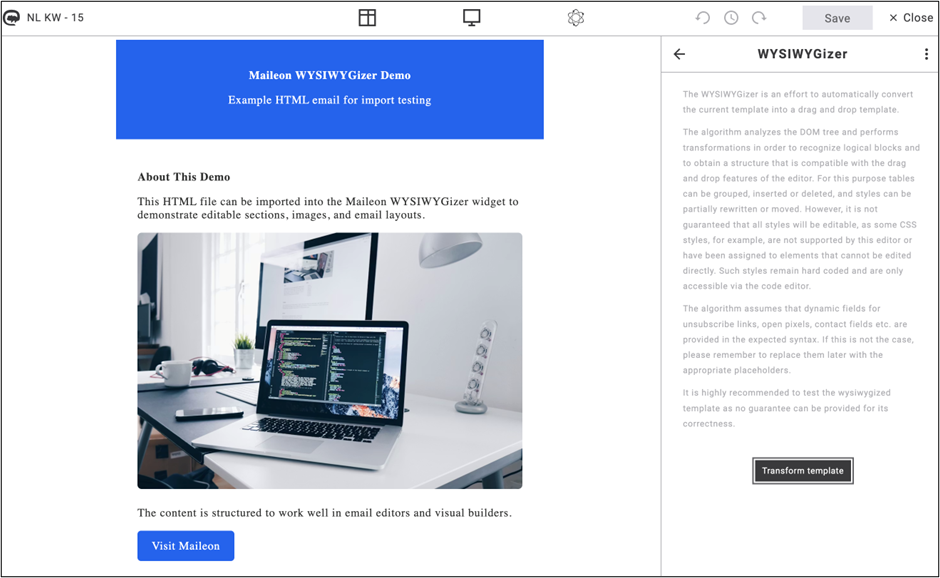
fig. 72: Once the emailing has loaded, click on the WYSIWYGizer widget, then select ‘Convert Template’.
The emailing is divided into separate blocks that can be moved and edited.
If you click on the widget again, you can quickly and easily reposition any element within the editor directly from the HTML source code.
Styles can also be modified here, allowing you to work as if the emailing had been created directly in the editor. In addition, buttons and entire articles can be copied or deleted.
Note: The quality of the responsive version should also be checked.
Requirements & Permissions
To use SmartContent options in Maileon, the corresponding permission must be activated in XACT (e.g., ‘Shopware SmartContent’, ‘Magento SmartContent’, etc.).
The user role settings in the admin area determine whether a user can see and use these feature options.
Note: In case of questions regarding YouTube and Web Font Manager SmartContents, please contact us at support@xqueue.com or contact your dedicated account manager.