
Im Maileon Help-Center finden Sie umfassende Dokumentationen zu unserem System.
Beliebte Suchanfragen: Importe | Rest-API | Integrationen | SMS
Contact Management – Subscribing and Unsubscribing Management
Contact Management – Subscribing and Unsubscribing Management
General description
The Contact Management tool assists in configuring the Double Opt-In (DOI) subscription process and setting up the default landing pages for sending out the default Double Opt-In emailings, as well as the landing pages displayed to subscribers.
This section is closely related to Lists & Contacts, and particularly regarding Contact Export in the case of unsubscription.
You will find it in Settings > Lists & Contacts > Contact Management, along with further submenus (fig. 1).
![[AS1.1][OS1.2]Fig. 1: [AS2.1]Please locate contact management in the Settings.](https://support.maileon.com/wp-content/uploads/2026/10/Contact_Management_SUM_Bild01.png)
Fig. 1: Please locate contact management in the Settings.
Note: The functions highlighted in red are always available and should be executed only at the explicit direction of the account administrator (fig. 2):
- Delete all contacts in the contact list
- Delete all unsubscribed and anonymized contacts in the contact list
Delete all entries at the unsubscriber database

Fig. 2: Features highlighted in red may affect the entire subscription list.
Clicking on these functions can delete the entire contact lists or unsubscriber lists.
Therefore, after clicking, a warning message and a confirmation prompt will be displayed in a pop-up window (fig. 3).
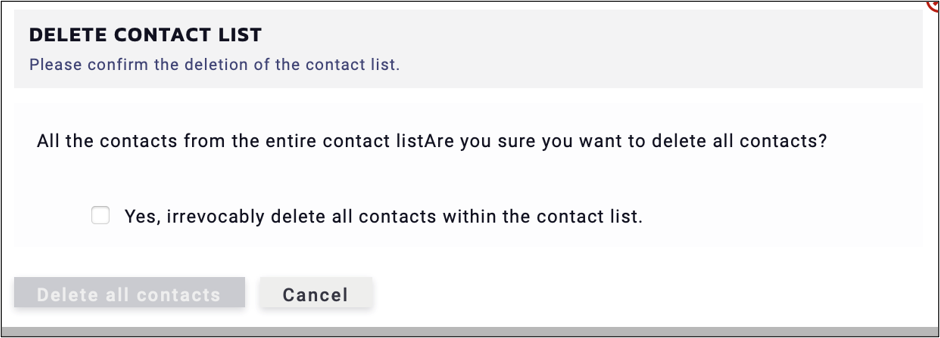
Fig. 3: A warning pop-up window appears to confirm the final deletion of important data.
Below these, please find the submenus, which include detailed sections on Subscriber Management and Unsubscriber Management.
1. Subscriber Management
In the Subscriber Management section, the default and process settings for the Double Opt-In (DOI) procedures can be defined (fig. 4).
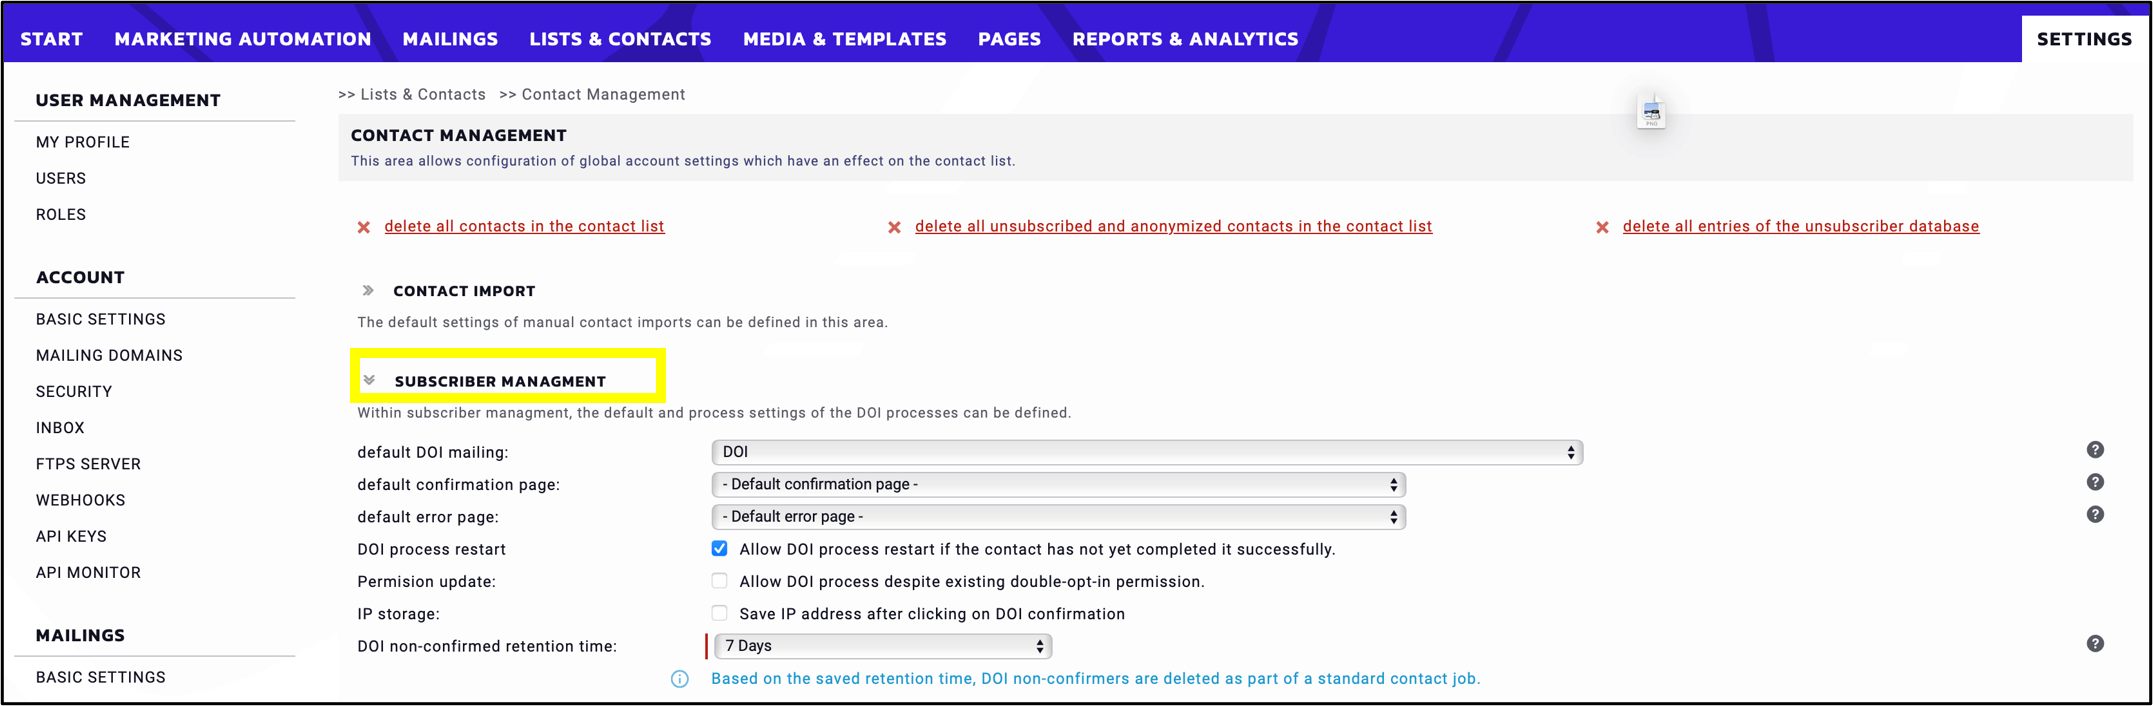
Fig. 4: Subscriber management can be set up in a few simple steps.
1.1 Default DOI-Mailing
The first step to address is the default Double Opt-In (DOI) emailing. This is the that is utilised when no specific DOI key is provided.
Please navigate to Mailings > Active DOIs. For further processing, it is necessary to operate with the DOI key. Maileon allows for only one default DOI mailing in the setting.
If only one DOI mailing is available, it can be selected as default (fig. 5).
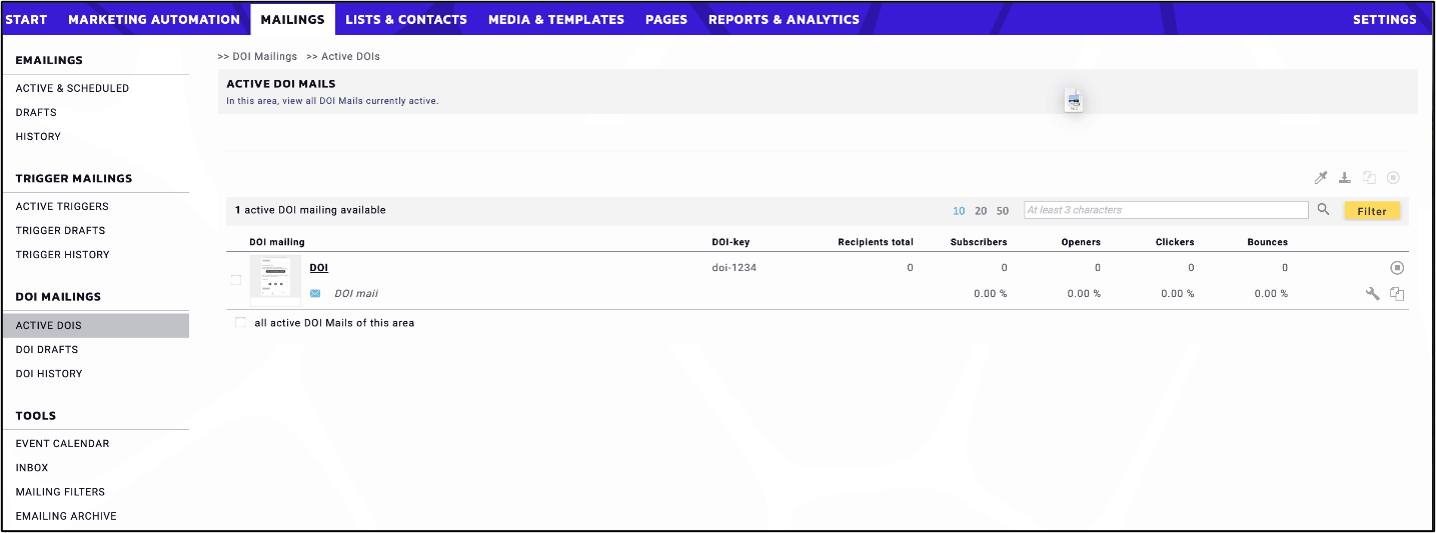
Fig. 5: Only one DOI mailing can be utilised.
1.2 Using DOI Keys
If several DOI mailings exist, a specific DOI mailing can be addressed using its DOI key. (fig. 6). This key can be selected using either the PHP Code Generator or the Landing Page Editor.
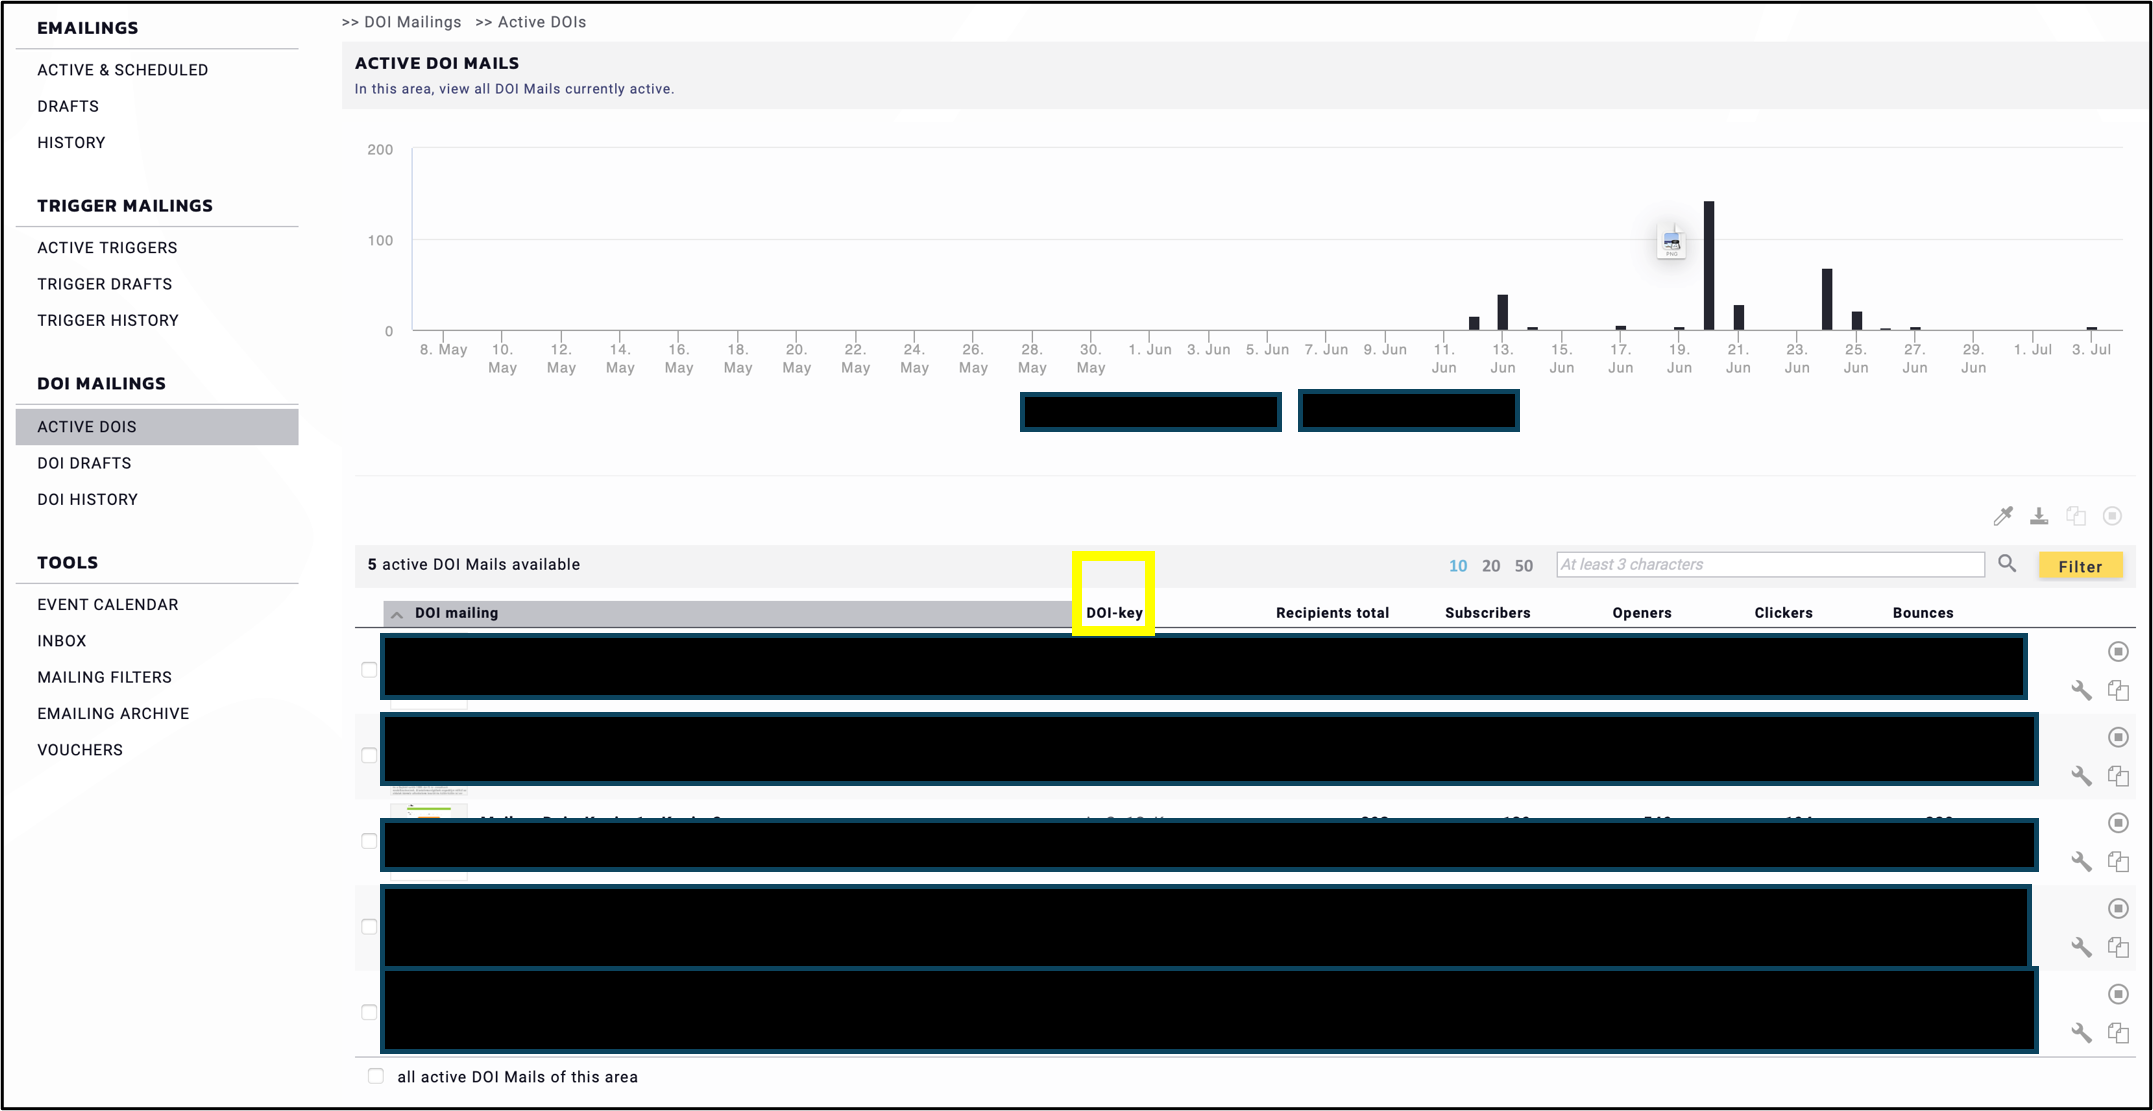
Fig. 6: Please note: data not visible for privacy reasons.
1.3 Confirmation and Error Pages
Please click on the edit “DOI mailing icon” (screwdriver icon) to access the “Standard confirmation page” and the “Standard error page” (fig. 7, fig. 8).
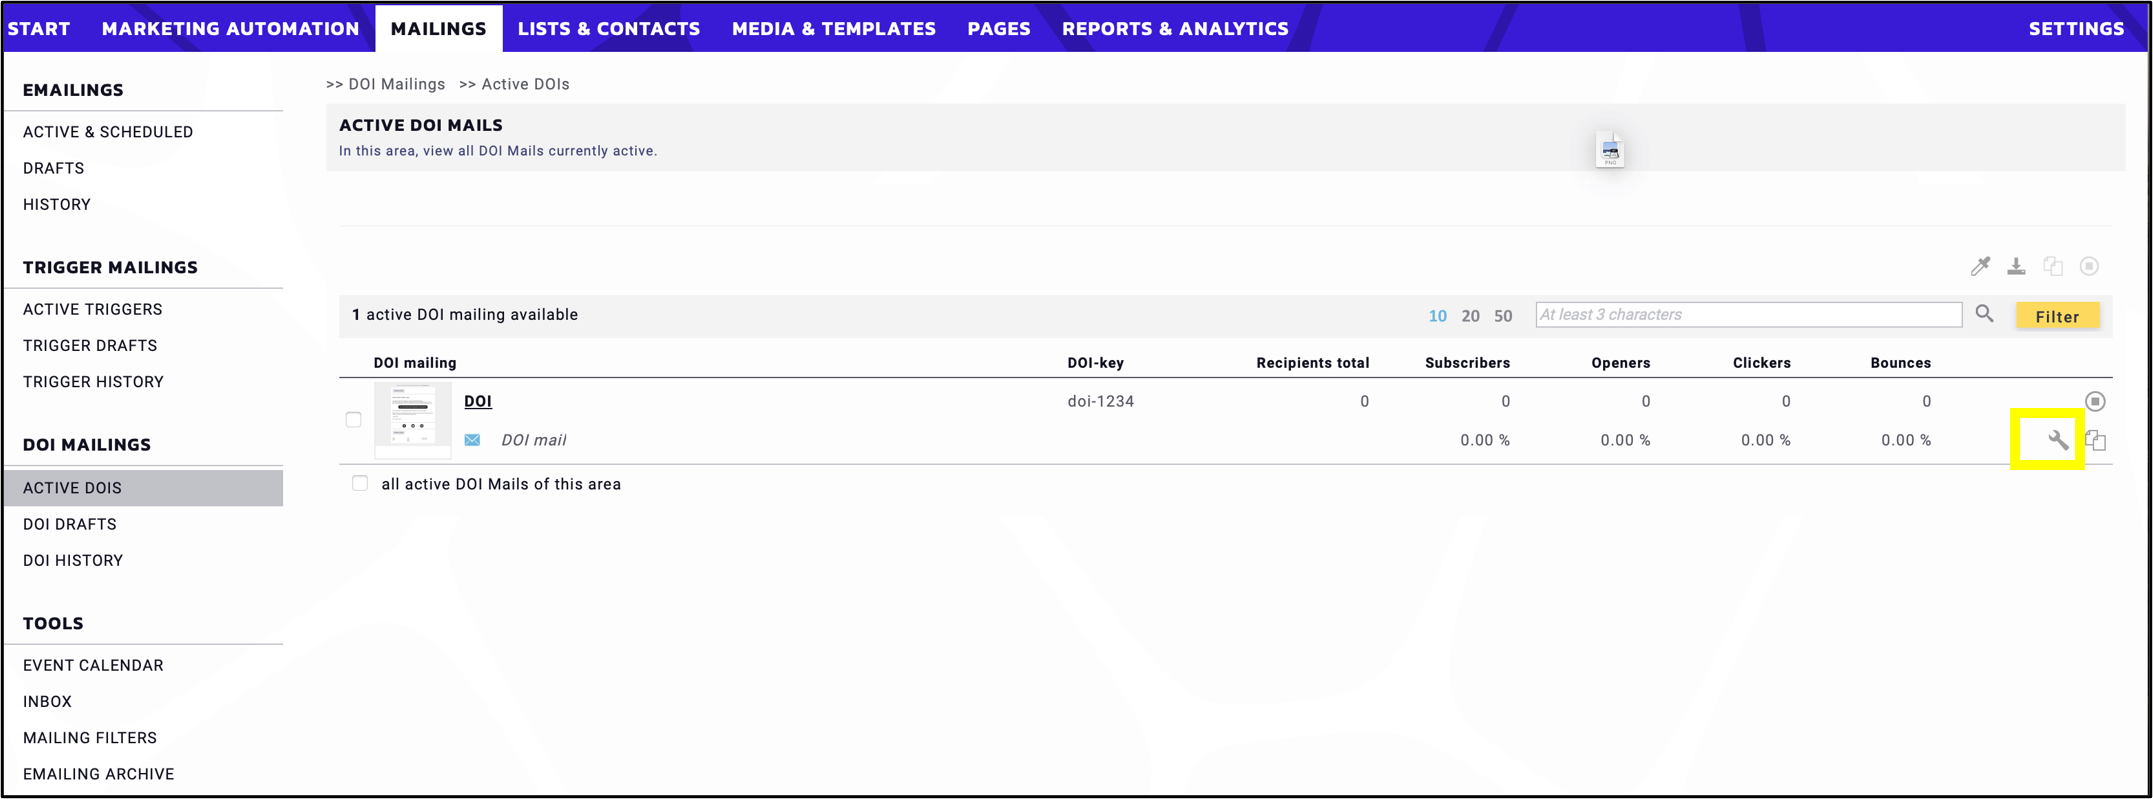
Fig. 7: Access Standard confirmation page” and the “Standard error page with one click.
Here you can find the landing pages that will be displayed upon clicking the DOI link, indicating either standard “Confirmation page“ or standard “Error page” during the subscription.
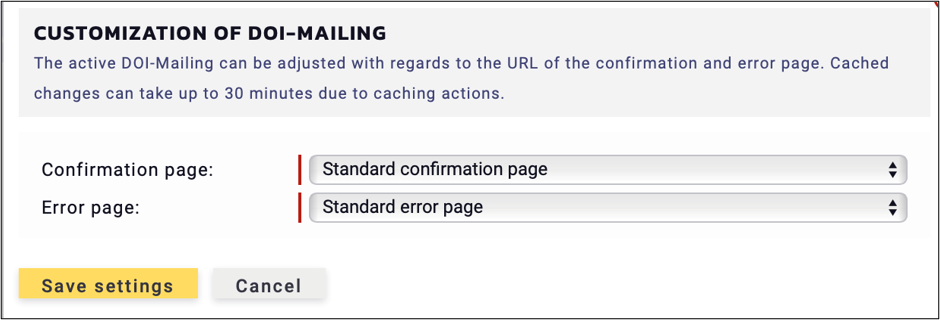
Fig. 8: Landing page options.
Within the drop-down menu, you will find the pages that have been designated as your default destination pages in the general settings. Here you have the option to modify the default confirmation page and error page (fig. 9).
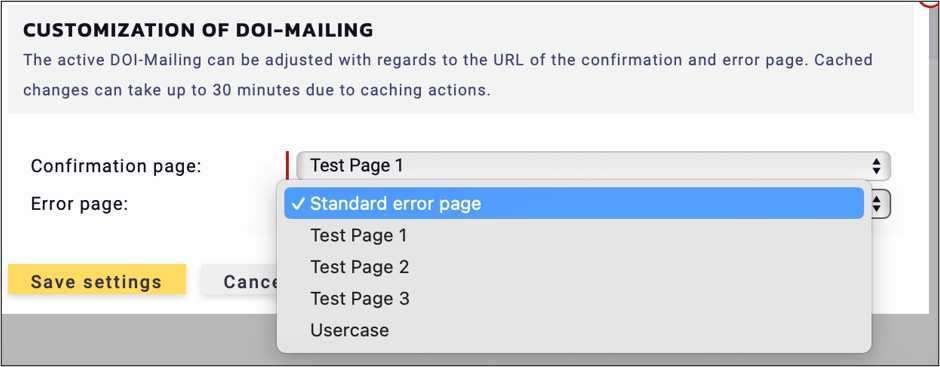
Fig. 9: Options to modify landing page settings.
1.4 DOI Process Settings
- DOI Process Restart
- Permission Update
- IP Storage
After saving, please navigate to Settings > Pages > Page Management. Here, the special pages are saved: you can view the hyperlinks and landing pages previously entered in the drop-down menu. In this section, manage all external pages, which can be referenced in the DOI process settings.
Here, you also have the option to register on a new page (fig. 10, fig. 11).
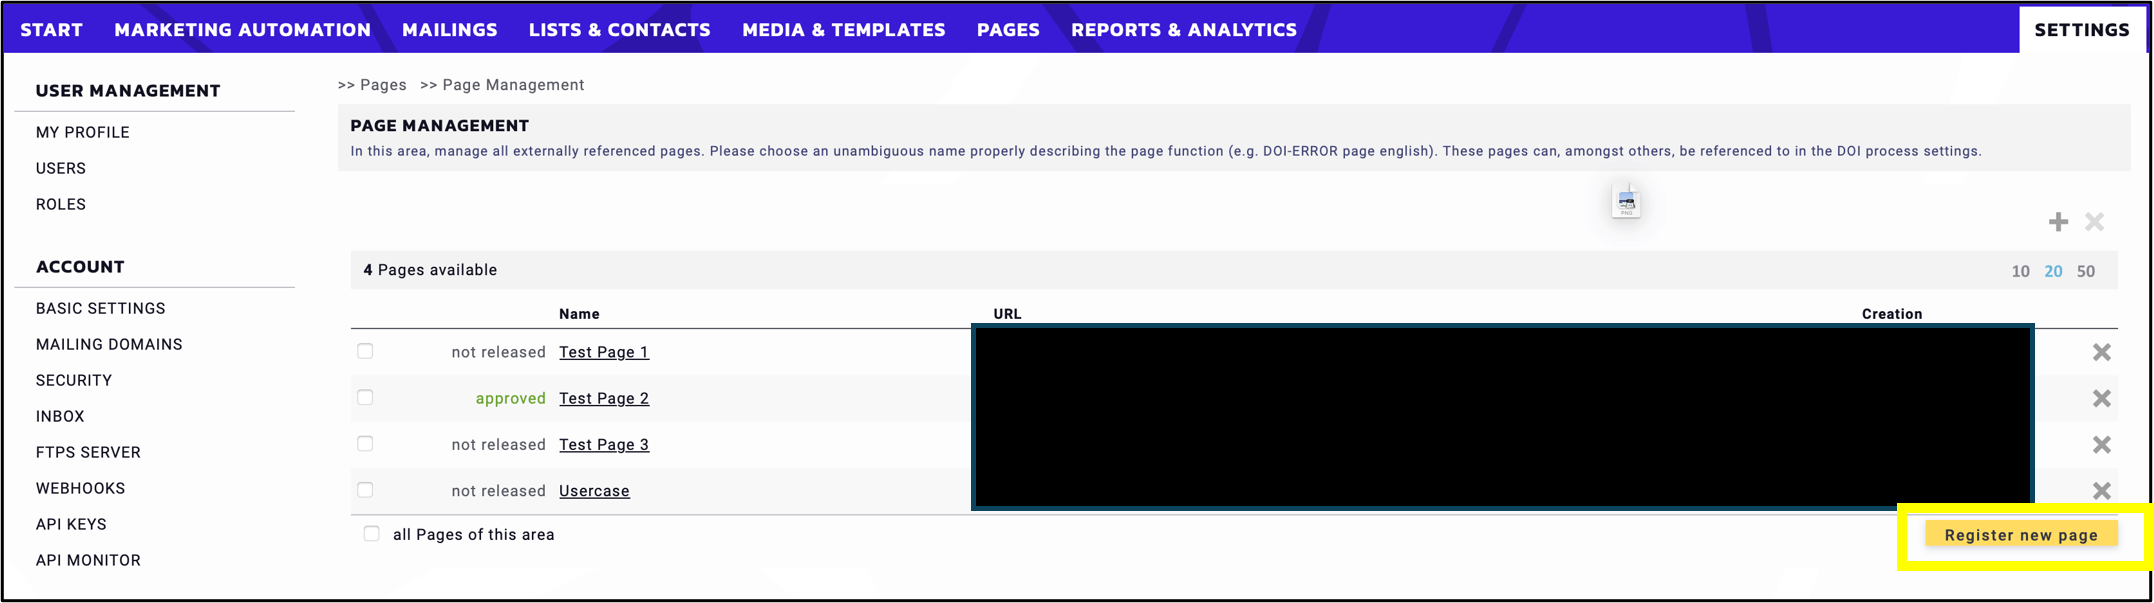
Fig. 10: New page registration.
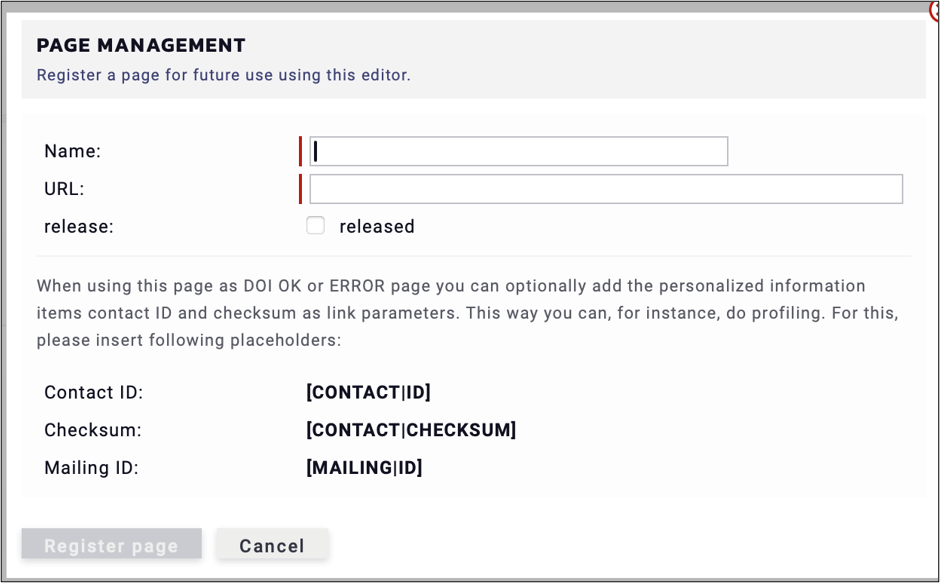
Fig. 11: Page registering process.
Now go back to Settings > Lists & Contacts > Contact Management > Subscriber Management, where you can choose the Default Confirmation Page and the Default Error Page from the drop-down menu (fig. 12).
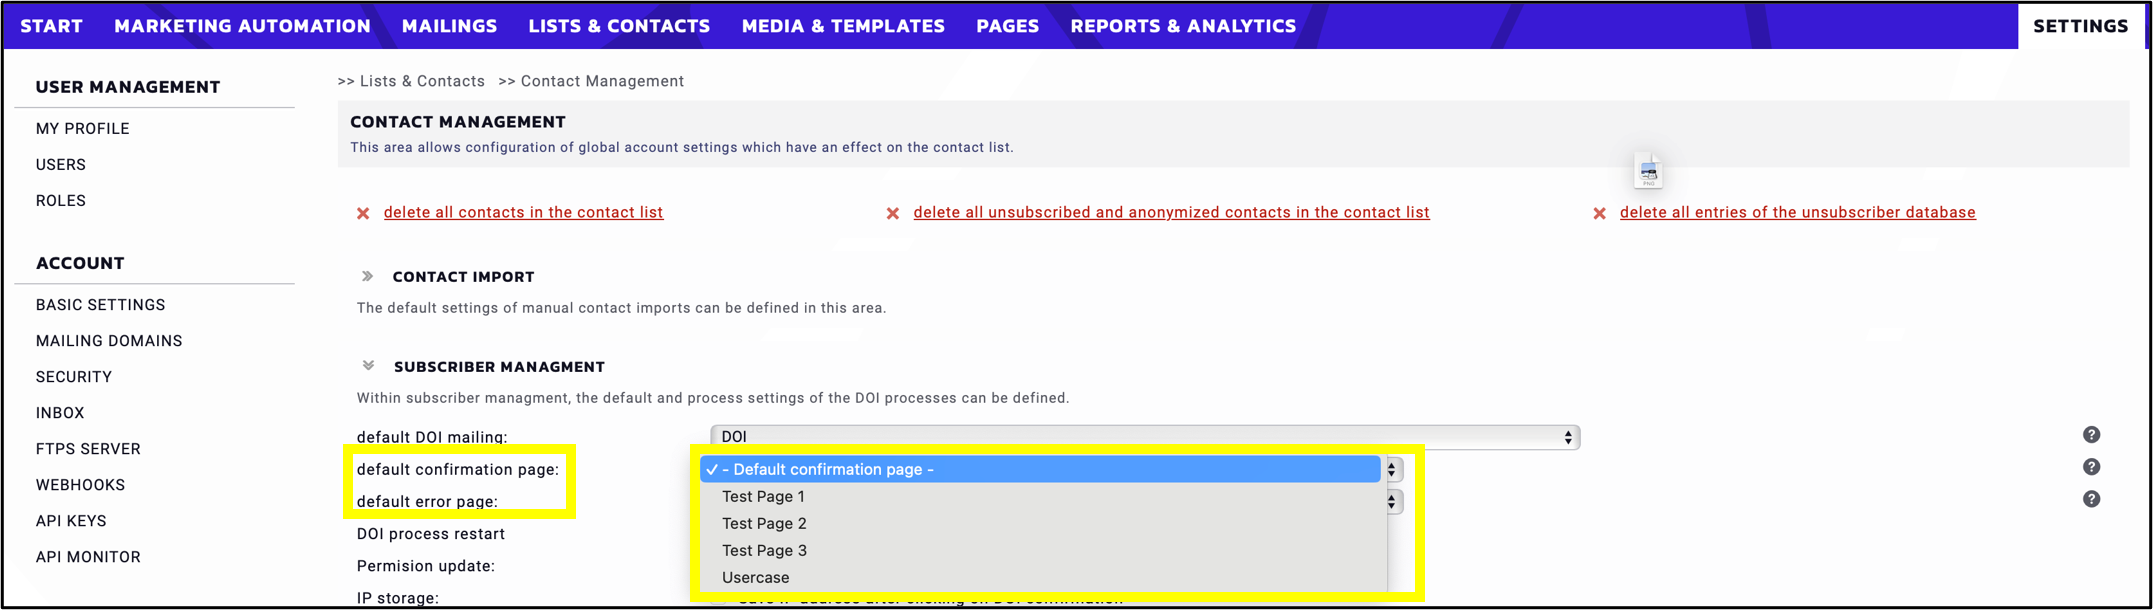
Fig. 12: Please choose the default Confirmation and Error page.
The following section contains three checkboxes that you will encounter during the subscriber management process (fig. 13).
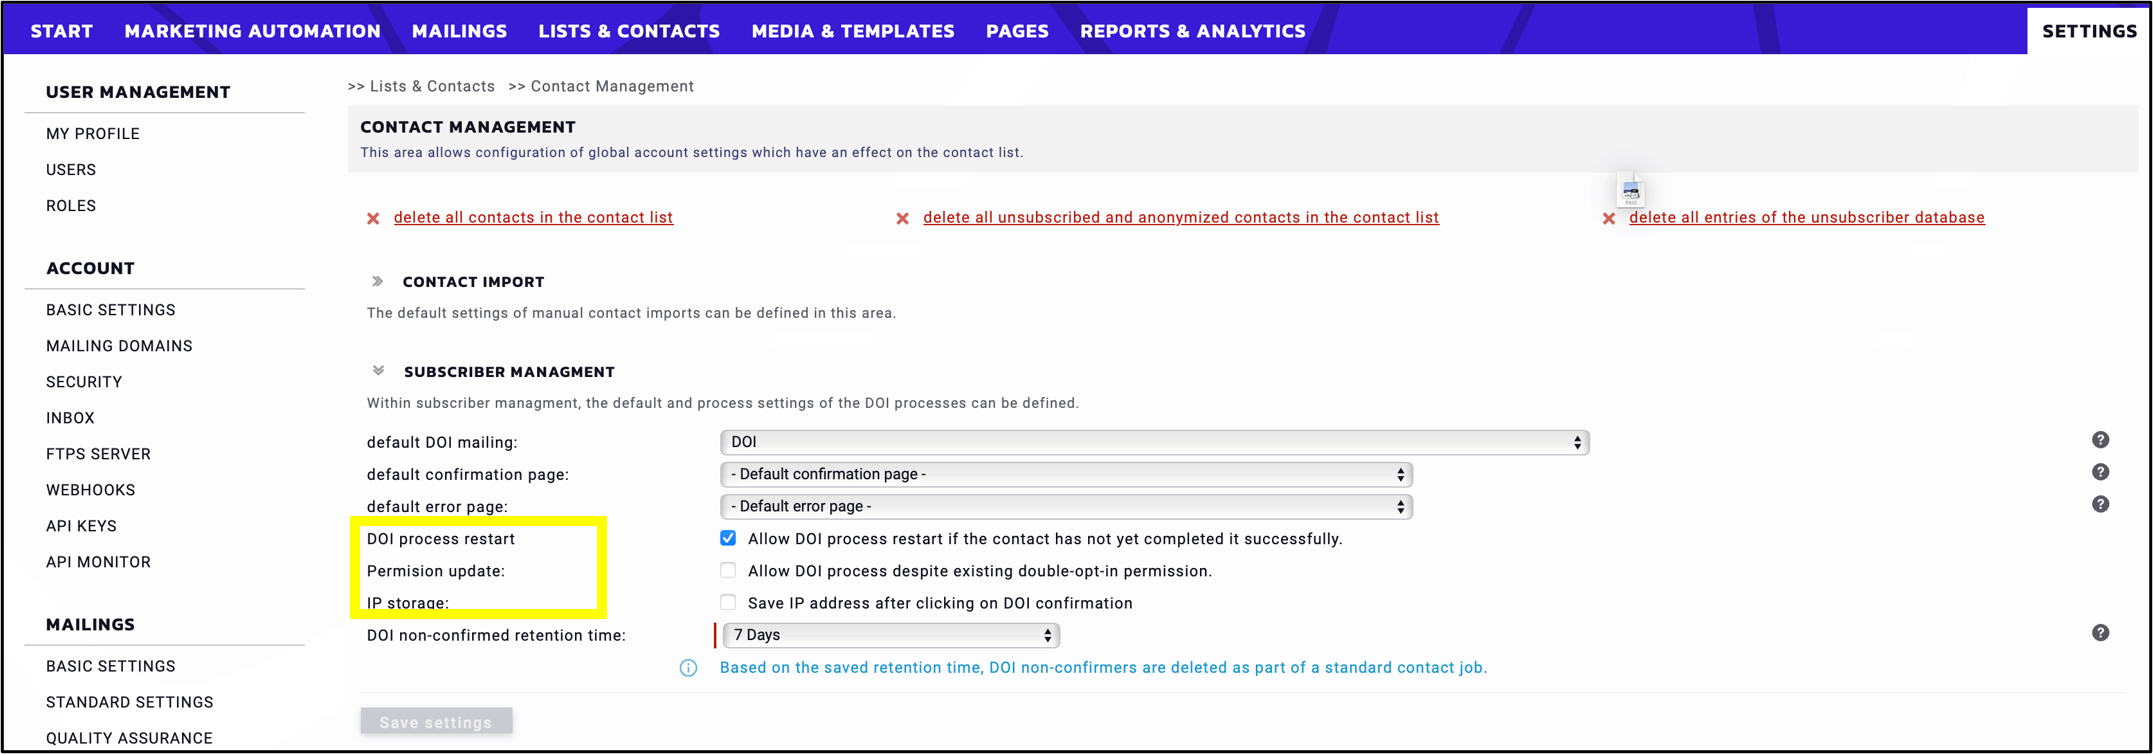
Fig. 13: Make sure you use checkboxes correctly.
- DOI process restart: The “Allow DOI process restart if the contact has not yet completed it successfully” checkbox is set by default. This is the standard case.
If the email address is NOT in the contact list and the user has not previously completed the DOI process, the DOI mailing will be sent out.
- Permission update is not activated by default. This option allows the DOI process to proceed despite existing DOI permission. By selecting this checkbox, the contacts from your list will receive the DOI mailing even if they have previously confirmed this permission. Consequently, the user will receive the DOI mailing for a second time.
This usually occurs in the case of a second business division, where a separate license is required, because one company cannot transfer its directory to another due to data protection regulations. Consequently, repeated DOI confirmation is necessary. Therefore, we provide the option to update the DOI authorisation.
- IP storage: Maileon minimises data collection in accordance with data protection laws. By default, the IP address is not saved; however, many customers request this information.Here you have the option to collect the IP address. When the DOI link is clicked, the data is transmitted to Maileon and stored in the background. The default retention time for non-confirmed DOI is 7 days. After this period, contacts with a status of „no permission“ will be automatically deleted from Lists & Contacts.
Note: The DOI-Nonconfirmer-Cleanup runs daily and removes non-confirmed contacts whose configured retention period has expired. If you need unsubscriber data longer than 7 days (default time) please adjust the settings according to your requirements.
1.5 DOI Non-Confirmer Retention
The retention period can be adjusted at any time from 1 to 14 days, and to an „unlimited“ duration. However, if an unlimited retention period is selected, a warning message will be issued, advising that and is not recommended (fig. 14). Despite this, many users require unlimited retention.
The system also notifies users that DOI non-confirmers will be deleted according to the specified retention period.
Please note: Activation of this function only affects new contacts.
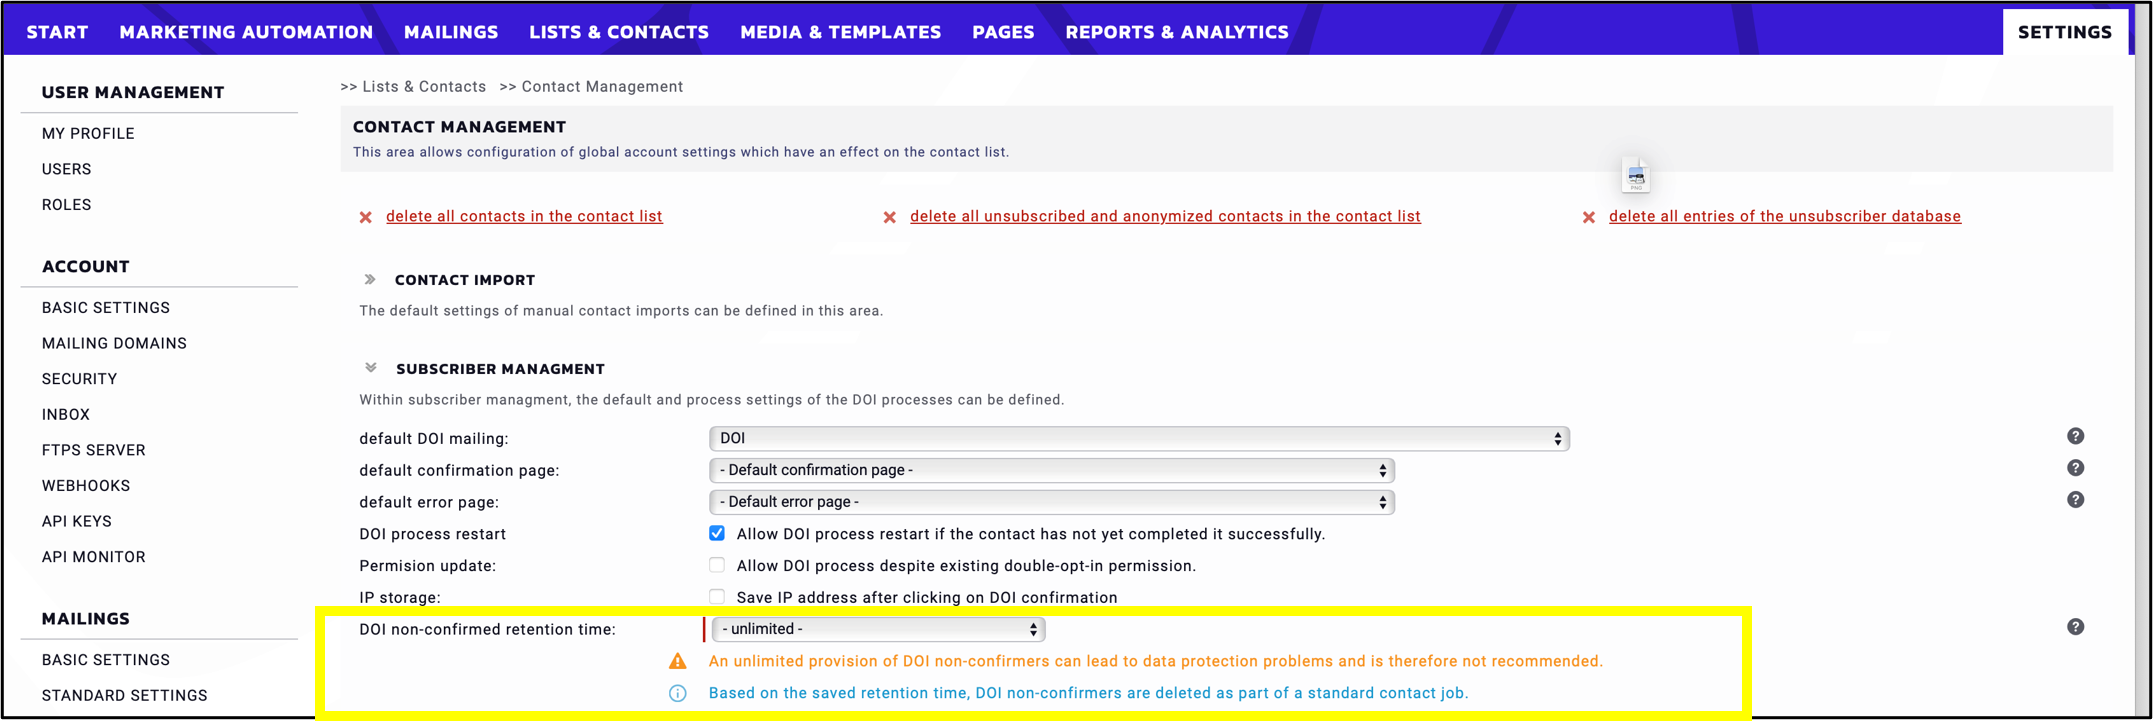
Fig. 14: Indefinitely retaining DOI non-confirmers may lead to privacy concerns.
The deletion process can be tracked in the system in the Lists & Contacts > Contacts > Contact Jobs > DOI-Nonconfirmer-Cleanup (fig. 15).
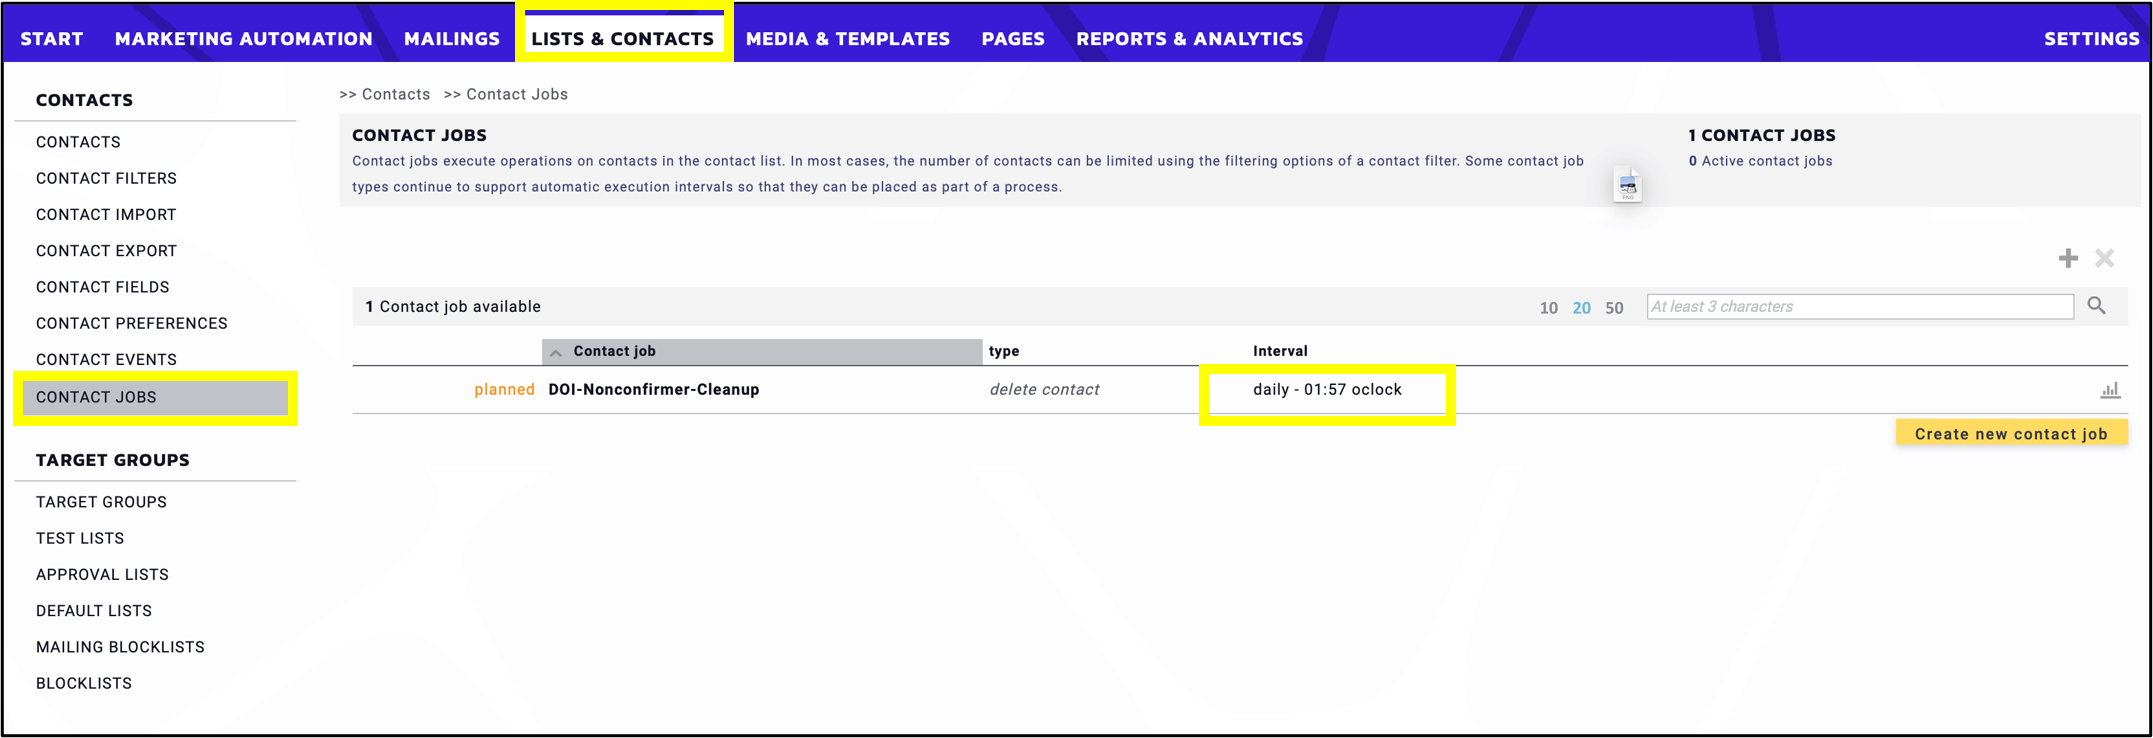
Fig. 15: The contacts with the „Without Permission“ status are deleted from the contact list daily.
1.6 DOI Non-Confirmer Cleanup
The DOI-Nonconfirmer-Cleanup runs daily, during which all non-confirmed contacts with the „Without Permission“ status are deleted from the contact list. The Contact Job also checks if a contact is older than 7 days; if so, the contact is removed from the list.
At the end of the process go back to Settings > Lists & Contacts > Contact Management > Subscriber management to Save the settings.
For further questions, please refer to the explanations behind the question marks on the right. These are available with a simple mouseover (fig. 16).
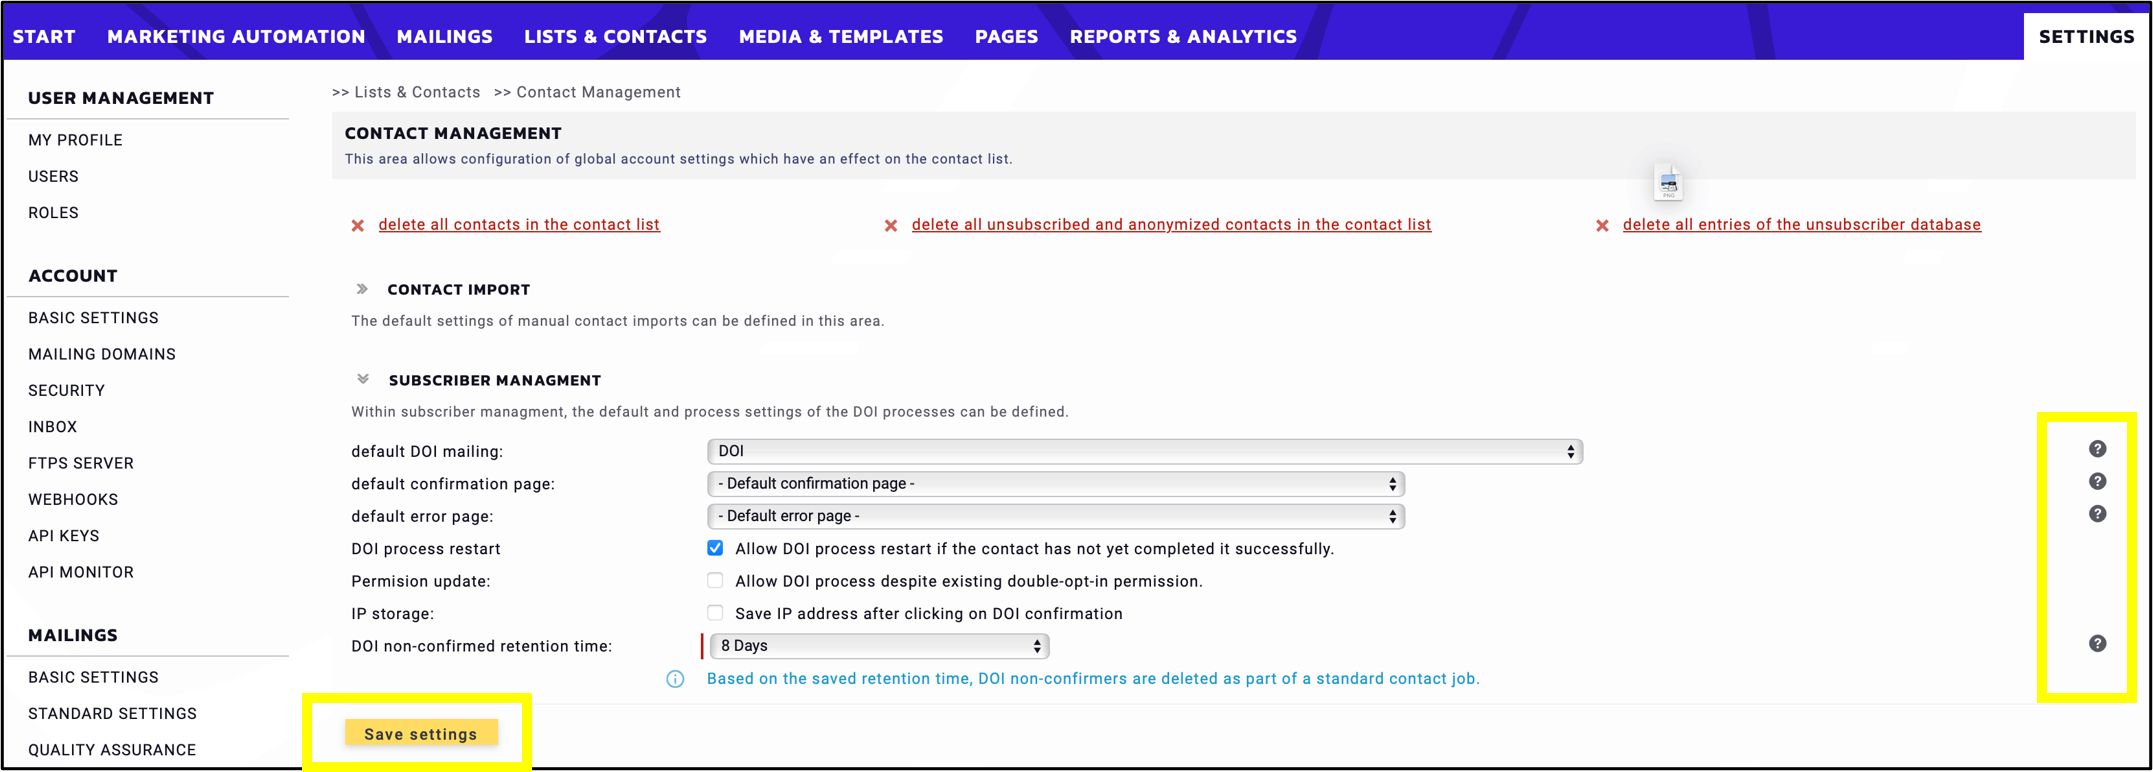
Fig. 16: The question marks on the right help in case of further questions.
2. Unsubscriber Management
In this form, specify the global settings for the retention period of unsubscribed contacts. These contacts are maintained separately in the unsubscriber database to ensure that unsubscribed contacts remain excluded from mailings.
2.1 Indirect Unsubscribing Process
The first step is the option to activate the „Indirect Unsubscribing Process“ checkbox. If this checkbox is activated, the unsubscribers won’t be immediately deleted from the contact list but will be redirected to a confirmation page where they must explicitly confirm the unsubscription. Activation is recommended if antivirus or firewall programs are in use, as these programs often click every link in the newsletter for security reasons (fig. 17).

Fig. 17: If the indirect unsubscribe process is activated, the unsubscription must be confirmed separately.
Additionally, by using the Unsubscription link and activating this checkbox, you can prevent the contact from being deleted by a bot.
2.2 Unsubscriber Retention
As in previous instances, there is a section below with three circular (radio).
- The option “Unsubscribers in plain text will be kept in the unsubscriber database” applies for an indefinite period.
- With the second option, plain text subscribers can be retained in the subscriber database for a predefined period (fig. 18).

Fig. 18: Retention period can be divided into days, weeks or months.
- By clicking the third circular button, plain text subscribers will be automatically deleted from the subscriber database after the entry.
2.3 Exporting Unsubscribers
The list from which unsubscribers are deleted can be found under Lists & Contacts > Contacts > Contact Export > Export all unsubscribes (fig. 19).
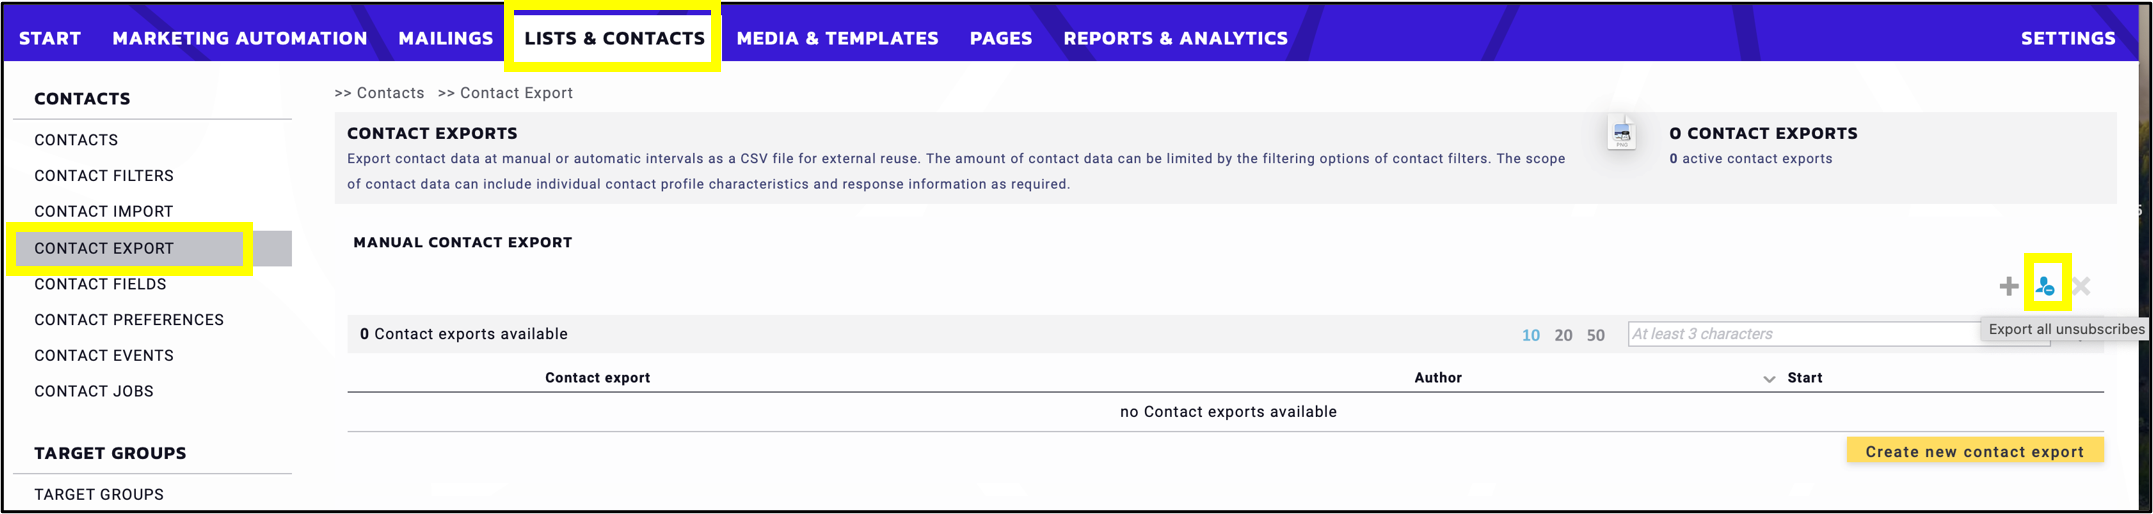
Fig. 19: Deleted unsubscribers can be retrieved afterward.
By clicking on the “Export all unsubscribes” icon you can download the list of unsubscribers. Unsubscribers will be automatically deleted from this list according to the settings of the “Unsubscribe Management” (fig. 20).
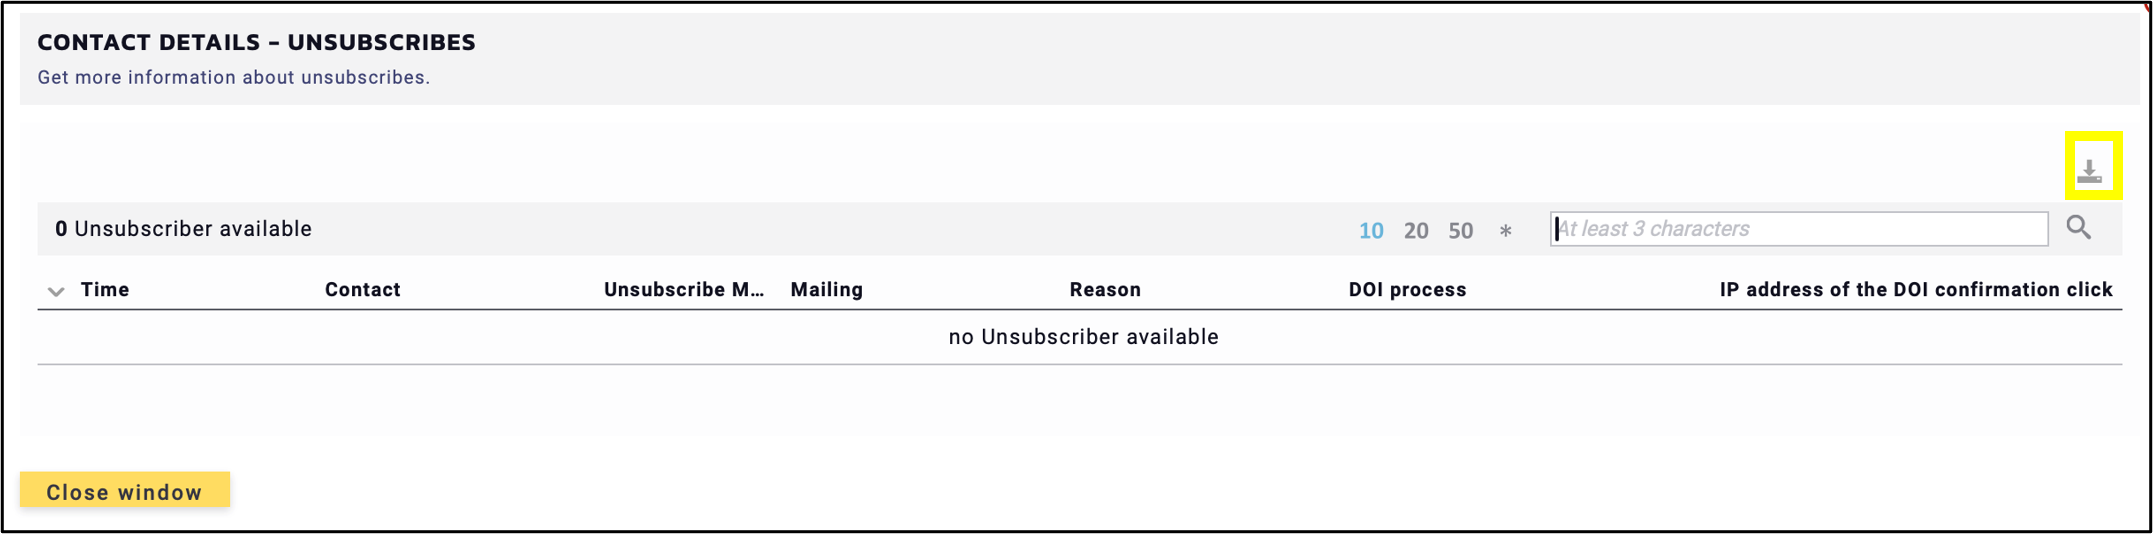
Fig. 20: Download the list of unsubscribers in one click.
2.4 Exporting Unsubscribers
If you click on an unsubscribe link in the newsletter, all related data will be deleted from contact list.
In the unsubscriber list only email address will be kept for identification purposes about unsubscriptions in a dedicated list (default setting). You have the option to select which contact fields should be anonymised by choosing the data and using the arrows (fig. 21).
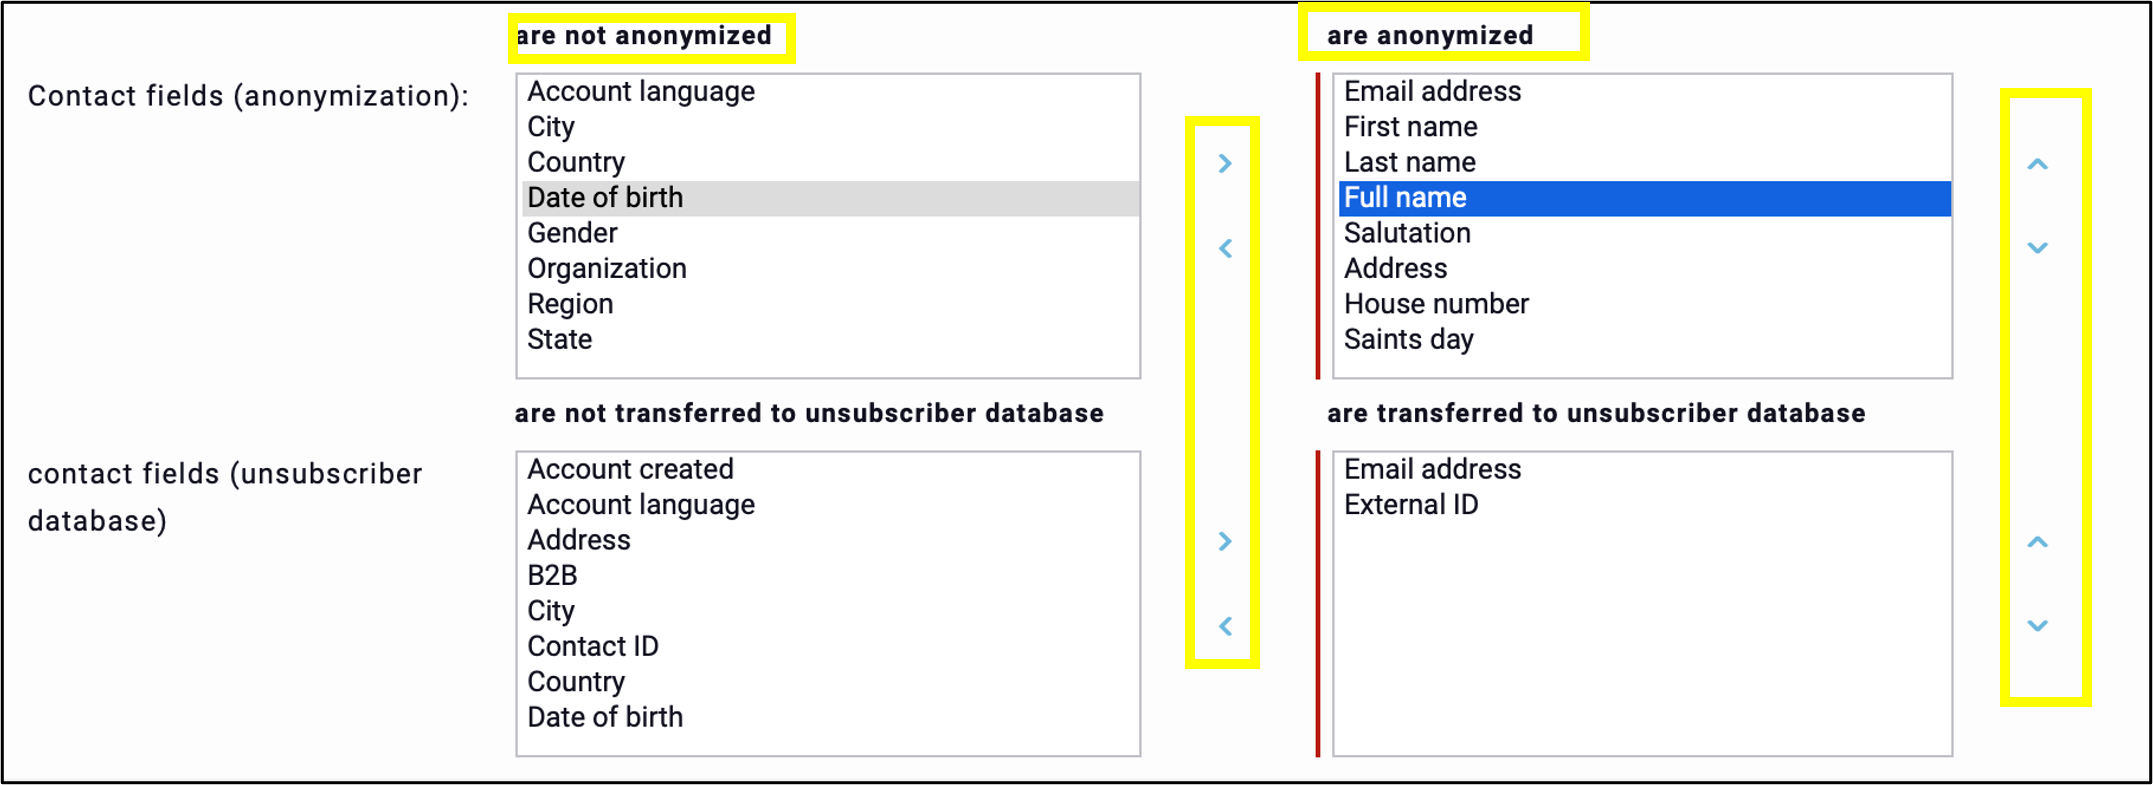
Fig. 21: Use the arrows to specify which data should be anonymised.
2.5 Data Stored in the Unsubscriber Database
You can use the same straightforward method to determine what is included in the unsubscribe database and what is not (fig. 22).
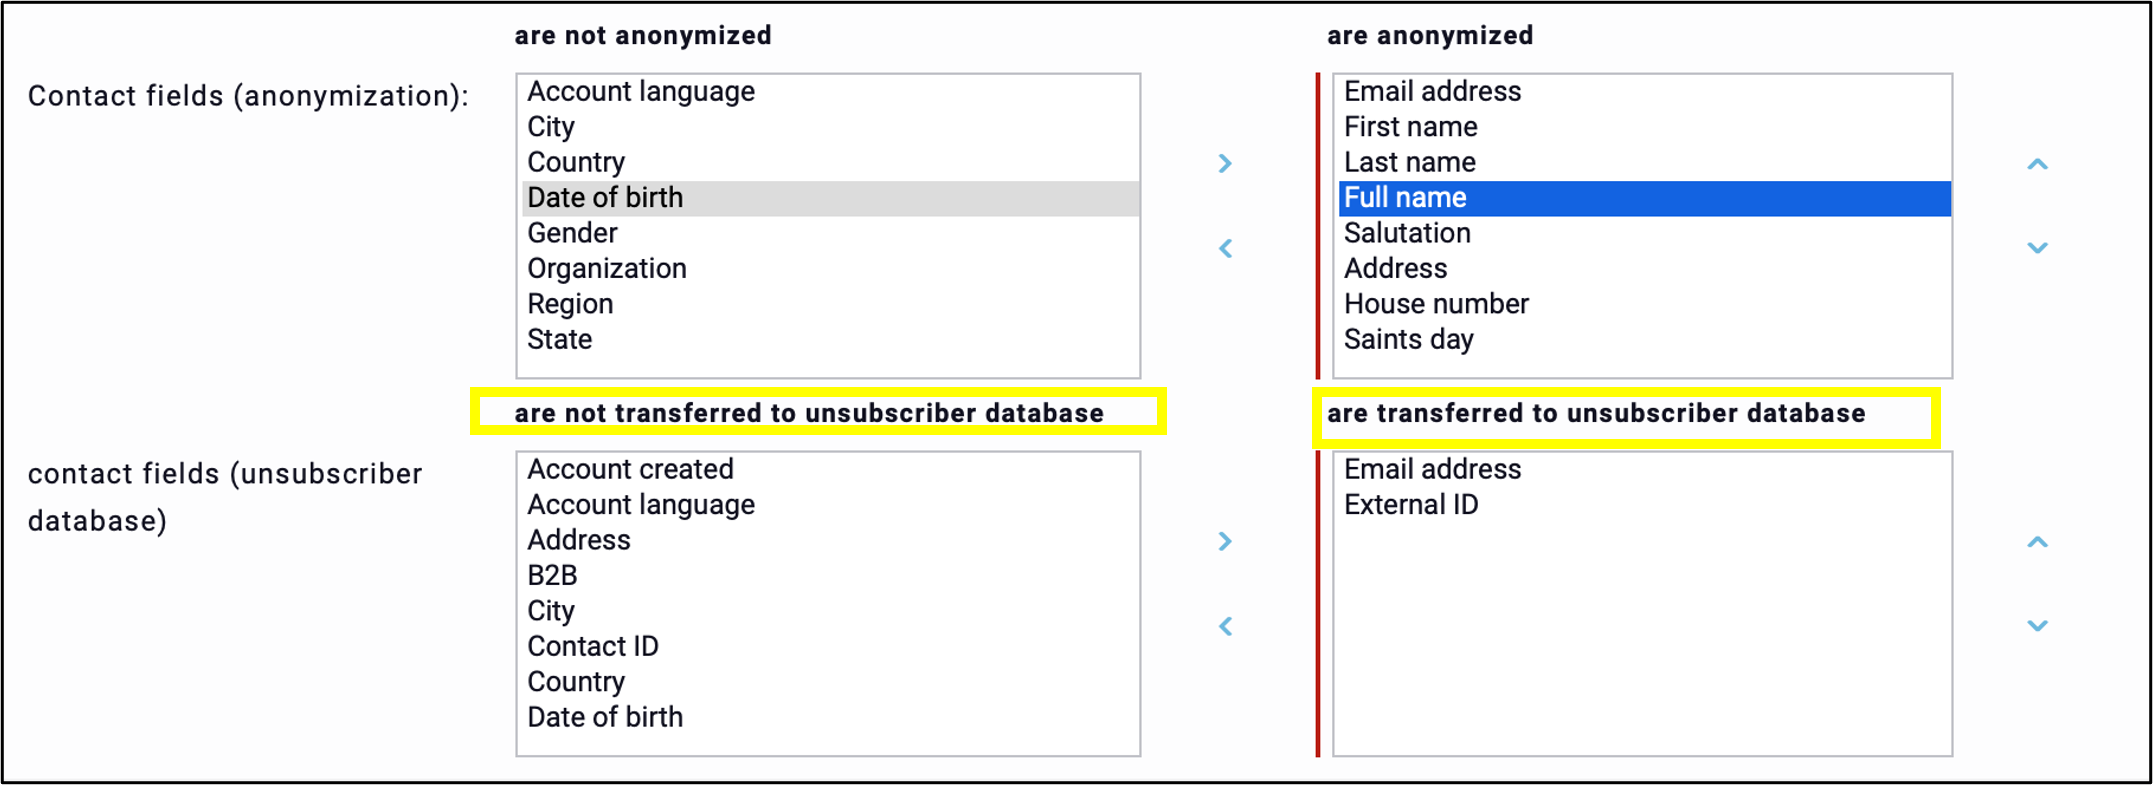
Fig. 22: The same method can be used to determine the content of the unsubscribed database.
Please note: Only system-defined contact fields are available. Changing the key contact field Email address is not possible.
In the case of detailed unsubscription the contact field’s Email address and External ID are transferred to the unsubscriber database. With this option, further contact fields can be defined, which are copied to the unsubscriber database. A maximum of 10 contact fields can be selected.
Please remember to click the Save button at the end of the process.
As in the previous case, the explanations behind the question marks may assist you during the process. These can be accessed by a simply mouseover.
Final note: Each country has different data protection laws that may impact how subscription and unsubscription processes are managed.