
Im Maileon Help-Center finden Sie umfassende Dokumentationen zu unserem System.
Beliebte Suchanfragen: Importe | Rest-API | Integrationen | SMS
Contact Import Via FTPS Server In UI2
Contact Import Via FTPS Server In UI2
1. General Information
The abbreviation FTPS stands for ‘File Transfer Protocol Secure’. It is a common file transfer method that allows data to be transferred quickly, easily, and securely, regardless of the operating system or connection method used. In the Maileon system, contact data can be imported and exported using either an internal or external FTPS server. Once activated and configured, this eliminates the need for manual file handling.
Increased security with FTPS: Your data is encrypted during transmission using TLS (Transport Layer Security), providing an additional layer of security.
2. Enable FTPS Contact Imports
To create automated contact imports, you must first enable contact imports via FTPS in your account settings. Go to Settings > Audiences > FTPS Server (fig. 1).
The following data transfers can be performed via FTPS:
- Enable media synchronization via FTPS server: Media can be uploaded via an FTPS server. The server only supports explicit FTP over TLS. Afterwards, the files will be made available in a special folder in the media library.
- Contact import via FTPS server: This setting allows the import of contacts via FTPS server into the account’s contact database.
- Contact export via FTPS server: Here you can configure the export of contacts via the system’s FTPS server.
Select FTPS server is activated to enable automated contact transfers.
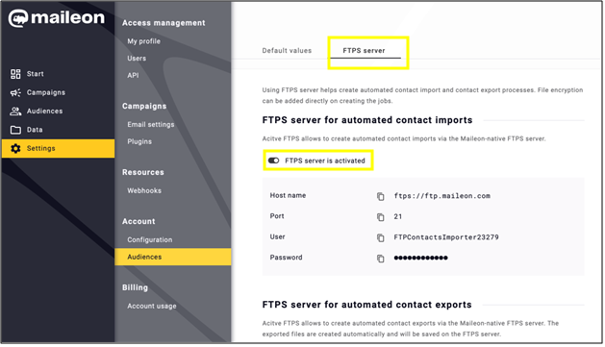
fig. 1: Enable the FTPS server to automatically transfer contacts and synchronize media.
Activating FTPS resource transfer automatically creates two folders named ‘contacts’ and ‘unsubscribers’ on our FTPS server for each account. These folders must also exist if you are using an external server. The files to be imported must be located in the corresponding folders at the selected import time (regular contacts in the ‘contacts’ folder and unsubscribers in the ‘unsubscribers’ folder). You can use CSV, TXT, or ZIP to archive files. Maileon system will then import all detected files at the scheduled time.
3. Create A New Automated Contact Import via an External Server
Navigate to Audiences > Contact Imports > Automated contact imports and click + Add automated contact import to create a new FTPS contact import (fig. 2).
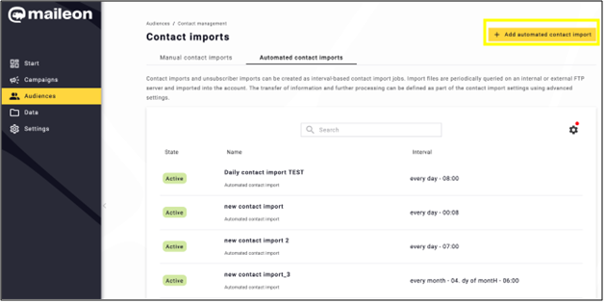
fig. 2: Navigate to ‘+Add automated contact import’ in ‘Audiences’ > ‘Contact imports’ > ‘Automated contact imports’ to start a new process.
Decide whether to import contacts via the Maileon FTPS server or from an external FTPS server (fig. 3).
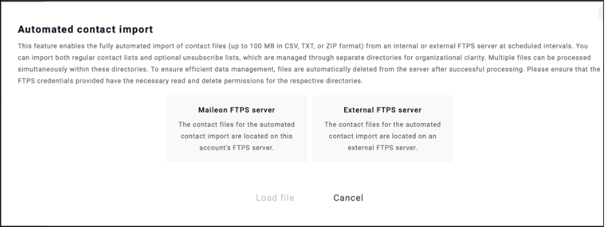
fig. 3: There are two ways to start the import process: via Maileon or via an external FTPS server.
Note: Both features enable the fully automated import of contact files (up to 100 MB in CSV, TXT, or ZIP format) from an internal or external FTPS server at scheduled intervals. You can import both regular contact lists and optional unsubscribe lists, which are managed in separate directories for better organization. Multiple files can be processed simultaneously from these directories. To ensure efficient data management, files are automatically deleted from the server after successful processing. Make sure that the FTPS credentials provided have the necessary to read and delete permissions for the respective directories.
3.1. If you choose the contact import from an external FTPS server, add the Common information, such as Label (name), Execution interval (Choose to import hourly, daily, weekly, or monthly), Day of the week and Time.
Optionally, you can add password protection.
Enter the required details and select the folders needed to import contacts and unsubscribes (fig. 4).
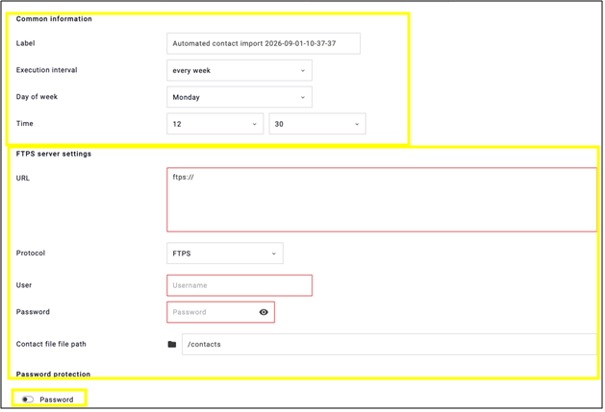
fig. 4: Enter the required details, including the label, execution interval, day, time, and data for importing contacts and unsubscribes.
Click on Load file at the bottom of the page (fig. 5).
Note: Once the FTPS configuration is complete, upload a sample file to the server that matches your future contact import files exactly in terms of format, encoding, and column structure. You will use this file in the next step to configure content settings, such as defining the character encoding and mapping the data fields correctly.
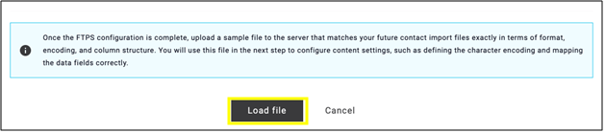
fig. 5: Click ‘Load file’ after the FTPS configuration is complete.
The rest of the process is the same as importing contacts via the Maileon server. To continue, please see the steps below.
3.2. To import contacts via Maileon FTPS server, select this option in the popup window (fig. 6).

fig. 6: Select ’Maileon FTPS server’ in the popup window to import contacts via the Maileon FTPS server.
Add the common information such as Label (name), Execution interval (Choose to import hourly, daily, weekly, or monthly), Day of the week, and Time (fig. 7).
In this case the Credentials:
- URL
- Port
- User
- Password have been provided by Maileon.
Optionally, you can add password protection in this case too.
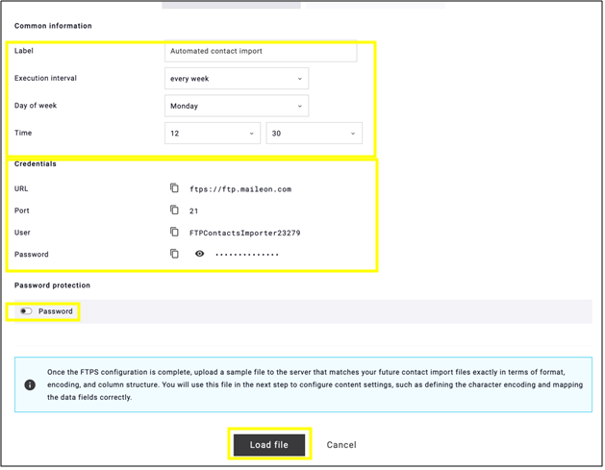
fig. 7: Enter the import label, execution interval, day, and time.
Then load the file by clicking Load file.
3.3. To proceed with this step, you must first upload the contact list to the external server. To do this, you will need a secure server, such as FileZilla or WS_FTP. The file formats supported for uploading are CSV, TXT and ZIP files, which must not exceed 100 MB in size.
In this example, the process is shown in FileZilla Server. For data protection reasons, this documentation does not show every step of the process.
Enter the required credentials in the top row, such as
- Host
- Username
- Password
- Port
To determine these values, enter the information shown in Figure 7. At the end of the process, click Quickconnect (fig. 8).
Note: In the Host field, enter only ftp.maileon.com (without the ftps:// prefix); the FTPS protocol is configured separately via the Encryption setting.
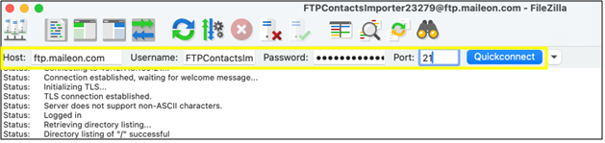
fig. 8: Enter the required login details in the top line, then click the ‘Quickconnect’ at the end of the process.
The Local site loads on the left-hand panel, from which you can select the contact list you want to upload (fig. 9).
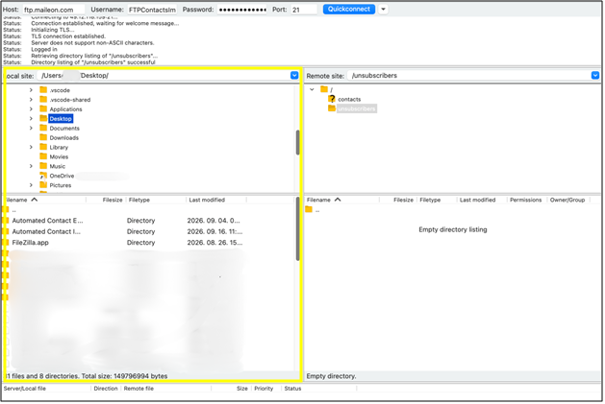
fig. 9: Select the contact list and open the target folder on the ‘Remote site’.
Select the contact list, then open the folder on the Remote site where you want to import it (fig. 10).

fig. 10: After selecting the contact list, open the target folder on the ‘Remote site’.
Click the list to start the import. The contact list then appears on the Remote site (fig. 11).
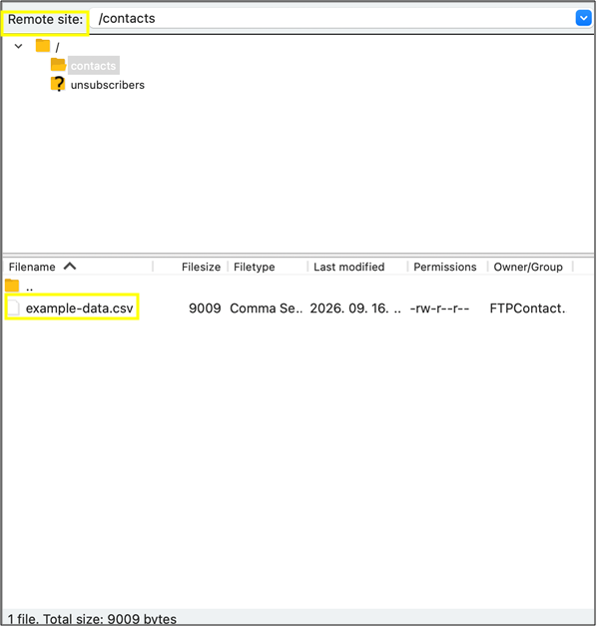
fig. 11: The contact list appears on the ‘Remote’ site after the import.
At this point, return to Maileon and the file loading process (see above at fig. 7).
Note: The import process only begins once the entire workflow has been successfully completed. It does not start immediately after this step.
4. Setting the Permission Method and Managing Automated Contact Imports
The columns in the uploaded contact import list can be mapped to contact fields or contact settings. The values are saved during the contact import. Mapping the ‘email address’ or ‘external ID’ contact field is mandatory if the ‘external ID’ option is enabled for a column (fig. 12).
Edit the columns using the gear icon or delete them using the trash can
  icon.
icon.
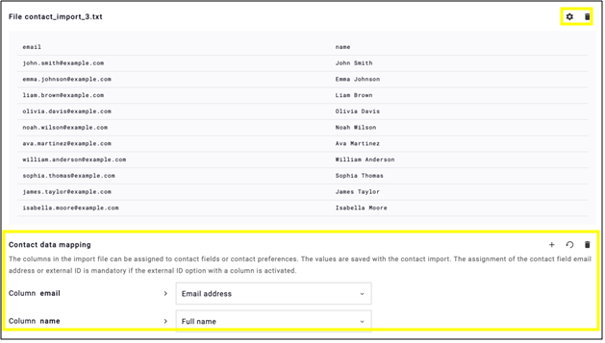
fig. 12: Map the columns in your import file to contact fields or settings. Mapping an email address or external ID is mandatory when the external ID option is enabled.
In the Contact data mapping section, you can
- Add contact field with the + icon
- Start an automated mapping with the arrow
 icon
icon
- Delete mapping with the trash can icon
Permission
For the contact list in the import file, choose the appropriate permission method: either Send DOI mail (to request confirmation from each contact) or Set permission method manually (to assign a permission status yourself). This choice determines the scope of tracking available for these contacts. (fig. 13).
If you choose to set the permission method manually, you can select one of the following options from the drop-down menu:
- None
- Single opt-in
- Confirmed opt-in
- Double opt-in without consent to single-user tracking
- Double opt-in including consent to single-user tracking
- Other permission type
The selected permission method is applied manually to the imported contacts. The contacts become available for advertising campaigns once the contact import is complete.
You can also optionally select Permission update.
Once you have selected the permission method, save the process by clicking Save.
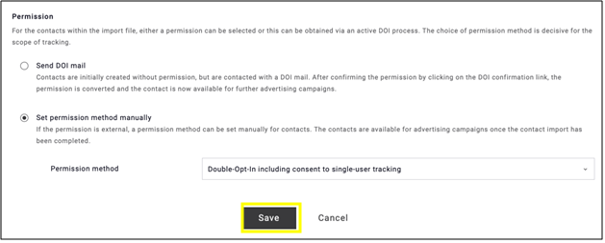
fig. 13: Select the permission method for the imported contacts, define how tracking is handled, and click ‘Save’ to complete the process.
The process will then return to the Automated contact imports tab, where you will find the automated contact import you have created (fig. 14).
The import can be paused, resumed, or cancelled at any time using the icons displayed in the same row as the import name (triangle, square, and bin icons).
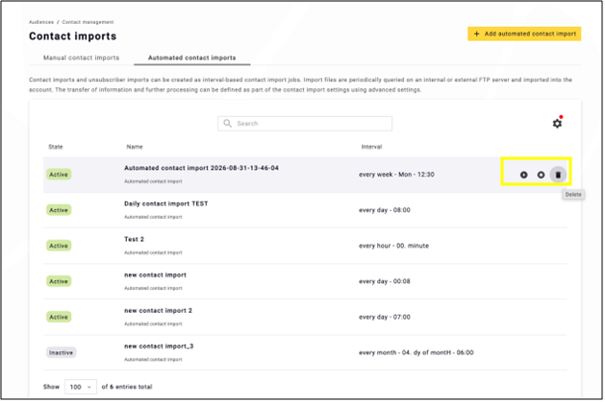
fig. 14: Find your automated import under the ‘Automated contact imports’ tab and use the icons to pause, resume, or cancel it.
Click on the name of the contact import, and under Settings tab, you can reconfigure the import (fig. 15).
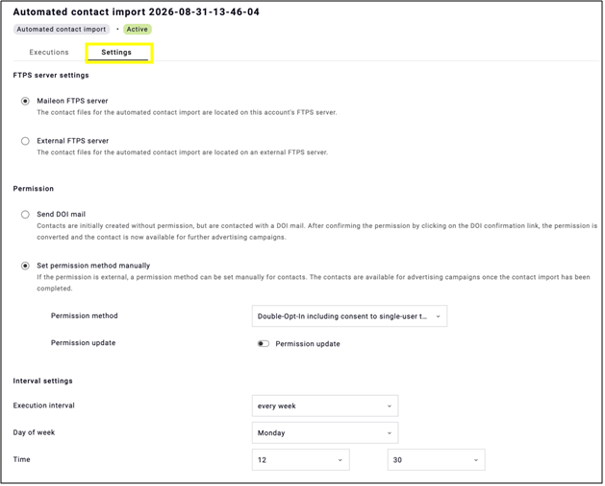
fig. 15: Click the name of the contact import and go to the ‘Settings’ tab to reconfigure the import.
Finalise the changes by clicking Save at the bottom of the page (fig. 16).
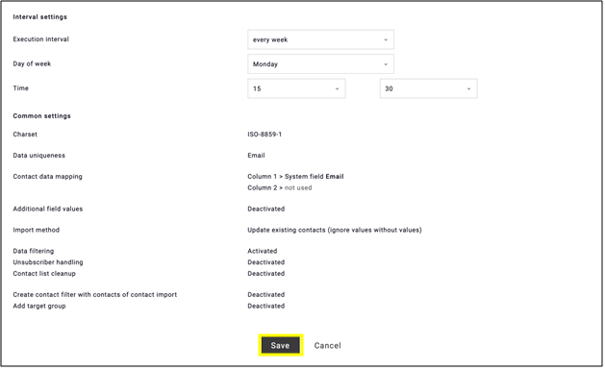
fig. 16: Click ‘Save’ to finish the process.