Im Maileon Help-Center finden Sie umfassende Dokumentationen zu unserem System.
Beliebte Suchanfragen: Importe | Rest-API | Integrationen | SMS
-
Maileon Anleitungen
-
-
- Bald verfügbar
-
-
-
- Bald verfügbar
-
-
-
-
- Bald verfügbar
-
FAQs
-
Grundlagen
-
Für Entwickler
-
-
- Adding Unsubscription Reason to Already Unsubscribed Contact
- Contacts
- Count Active Contacts By Filter ID
- Count Contacts By Filter ID
- Create Contact
- Create Contact (JSON)
- Create Contact by External ID
- Create Contact by External ID (JSON)
- Create Contact Preference
- Create Contact Preference Category
- Create Custom Field
- Custom Contact Fields
- Delete All Contacts
- Delete Contact By Maileon ID
- Delete Contact Preference
- Delete Contact Preference Category
- Delete Contacts By Email
- Delete Contacts By External ID
- Delete Custom Field
- Delete Custom Field Values
- Delete Standard Field Values
- Delete Unsubscription-Marker
- Get Blocked Contacts
- Get Contact By Email
- Get Contact By Maileon ID
- Get Contact Preference
- Get Contact Preference Categories
- Get Contact Preference Category by Name
- Get Contacts
- Get Contacts By Email
- Get Contacts By External Id
- Get Contacts By Filter Id
- Get Count Contacts
- Get Custom Fields
- Get Preferences of Contact Preferences Category
- Get Unsubscription-Marker
- Rename Custom Field
- Set Unsubscription-Marker
- Standard Contact Fields
- Synchronize Contacts
- Synchronize Contacts Error Codes
- Unsubscribe Contact By Maileon Id
- Unsubscribe Contacts By Email
- Unsubscribe Contacts by External Id
- Update Contact By Email
- Update Contact By External ID
- Update Contact By Maileon ID
- Update Contact Preference
- Update Contact Preference Category
- Alle Artikel anzeigen ( 34 ) Artikel zusammenklappen
-
- Get Blocks
- Get Bounces
- Get Clicks
- Get Conversions
- Get Filtered Contacts
- Get Opens
- Get Recipients
- Get Revenue
- Get Subscribers
- Get Unique Bounces
- Get Unique Clicks
- Get Unique Conversions
- Get Unique Opens
- Get Unsubscription Reasons
- Get Unsubscriptions
- Social Networks List
- Alle Artikel anzeigen ( 1 ) Artikel zusammenklappen
-
- Add Mailing Blacklist to Mailing
- Copy Mailing
- Create Dispatching
- Create Mailing
- Delete Mailing
- Delete Mailing Blacklist from Mailing
- Delete Trigger
- Get CMS2 Mailing As Zip
- Get Dispatching
- Get limit on number of contacts
- Get Mailing Archive URL
- Get Mailing Blacklists for Mailing
- Get Mailing ID By Name
- Get Mailing Report URL
- Get Mailing Summaries
- Get Mailing Thumbnail
- Get Mailing Thumbnail URL
- Get Mailings By Creator Name
- Get Mailings By Keywords
- Get Mailings By Schedule Time
- Get Mailings By States
- Get Mailings By Subject
- Get Mailings By Types
- Get Preview
- Get Preview Text
- Get Template
- Get Templates for CMS2
- Get The Reply-To Address
- Mailing – Add Attachment
- Mailing – Add Custom Mailing Properties
- Mailing – Copy Attachments
- Mailing – Create Schedule
- Mailing – Delete Attachment
- Mailing – Delete Attachments
- Mailing – Delete Schedule
- Mailing – Disable QoS Checks
- Mailing – Enable Target Group Update
- Mailing – Fill RSS SmartMailing Tags
- Mailing – Get “Ignore Permission” State
- Mailing – Get “Post Sendout Cleanup” State
- Mailing – Get Archival Duration
- Mailing – Get Attachment
- Mailing – Get Attachments
- Mailing – Get Count Attachments
- Mailing – Get DOI Mailing Key
- Mailing – Get HTML
- Mailing – Get List of Custom Mailing Properties
- Mailing – Get Locale
- Mailing – Get Mailing Domain
- Mailing – Get Max Attachment Size
- Mailing – Get Max Content Size
- Mailing – Get Name
- Mailing – Get Recipient Alias
- Mailing – Get result for Link Quality Check
- Mailing – Get result for Message Size Quality Check
- Mailing – Get result for Personalization Quality Check
- Mailing – Get result for Spam Quality Check
- Mailing – Get results for Approval Sendout Quality Check
- Mailing – Get results for Bounce Quality Check
- Mailing – Get results for Display Quality Check
- Mailing – Get results for Image Quality Check
- Mailing – Get results for Test Mail Sendout
- Mailing – Get Schedule
- Mailing – Get Sender Address
- Mailing – Get Sender Alias
- Mailing – Get Speed Level
- Mailing – Get State
- Mailing – Get Subject
- Mailing – Get Tags
- Mailing – Get Target Group Id
- Mailing – Get Target Group Update status
- Mailing – Get Text
- Mailing – Get Tracking Duration
- Mailing – Get Tracking Strategy
- Mailing – Get Type
- Mailing – Is Sealed
- Mailing – Remove Custom Mailing Property
- Mailing – Send Approval Mail to Targetgroup
- Mailing – Send Now
- Mailing – Send Testmail to Single Emailaddress
- Mailing – Send Testmail to Targetgroup
- Mailing – Set “Ignore Permission” State
- Mailing – Set “Post Sendout Cleanup” State
- Mailing – Set DOI Mailing Key
- Mailing – Set Html
- Mailing – Set Locale
- Mailing – Set Name
- Mailing – Set Recipient Alias
- Mailing – Set Sender Address
- Mailing – Set Sender Alias
- Mailing – Set Speed Level
- Mailing – Set Subject
- Mailing – Set Tags
- Mailing – Set Target Group Id
- Mailing – Set Text
- Mailing – Set Tracking Strategy
- Mailing – Start Bounce Quality Check
- Mailing – Start Image Quality Check
- Mailing – Start Link Quality Check
- Mailing – Start Message Size Quality Check
- Mailing – Start Personalization Quality Check
- Mailing – Start Quality Check
- Mailing – Update Custom Mailing Property
- Mailing – Update Schedule
- Reset Contents to Template
- Save CMS2 Mailing to Media Library
- Set limit on number of contacts before sending mailing
- Set Preview Text
- Set Template
- Set Template for CMS2 Mailing
- Set The Reply-To Address
- Upload CMS2 Mailing Contents
- Alle Artikel anzeigen ( 97 ) Artikel zusammenklappen
UI2 Section 3
UI2 documentation
Section 3
1. Introduction
Maileon UI2—officially known as Editor 2.0 or UI2—is the latest generation of Maileon’s email marketing platform interface. It represents a significant upgrade over the classic editor, featuring a new template editor and a completely redesigned Marketing Automation interface.
The new UI2 offers a major improvement in simplicity, usability, and performance. The interface is more intuitive, visually appealing, and supports faster workflow.
While UI2 follows the overall concept of UI1, the general workflows remain the same, though arranged in a clearer, more efficient way.
This documentation highlights the key new developments and solutions in the UI2 interface. The documentation is divided into three sections. Please find the first and the second section in Maileon’s Help Center.
Note: Section 1 covers the general key features. This section continues from Section 2, so the specific information you may be looking for might not be found here.
In case of questions, contact us at support@xqueue.com.
2. Data: All templates, media, pages and data extensions in one place
All Libraries, Data and Pages are located in the Data section for easier access and greater transparency (fig. 1).

Fig. 1: Find all ’Libraries’, ’Data’ and ’Pages’ in the ’Data’ section for easier access.
-
Libraries
The Media, Articles, and Templates became more organised and easier to access (fig. 2).
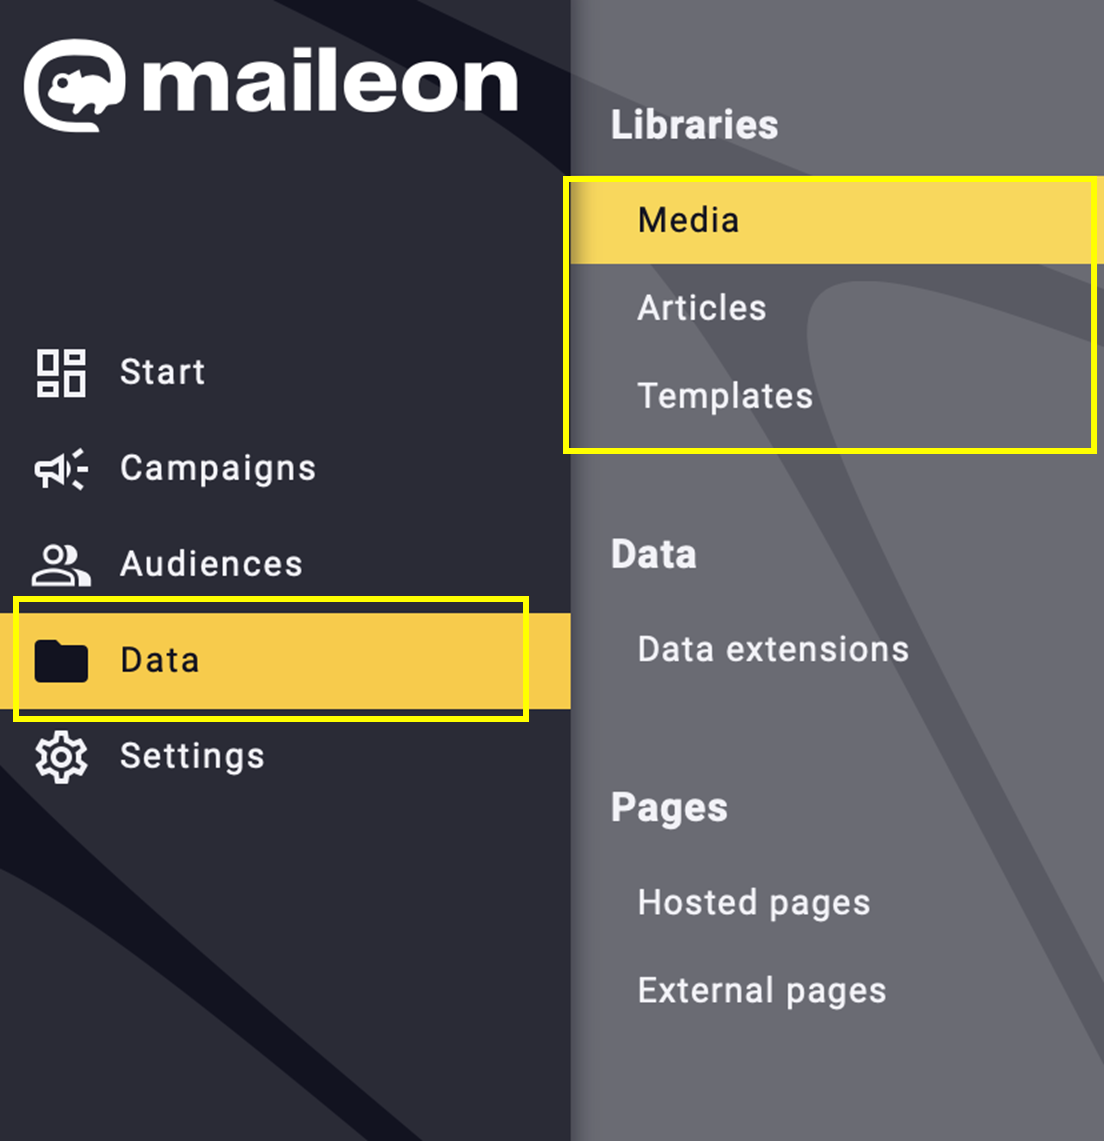
Fig. 2. ‘Media’, ‘Articles’, and ‘Templates’ are now organised into one section for easier access.
-
Data extensions
With the Data extensions option, you can connect different types of lists or databases to your account. In the new interface, this feature is even simpler and more efficient under Data – > Data extensions. To add a new one, click + Add data extension (fig. 3).
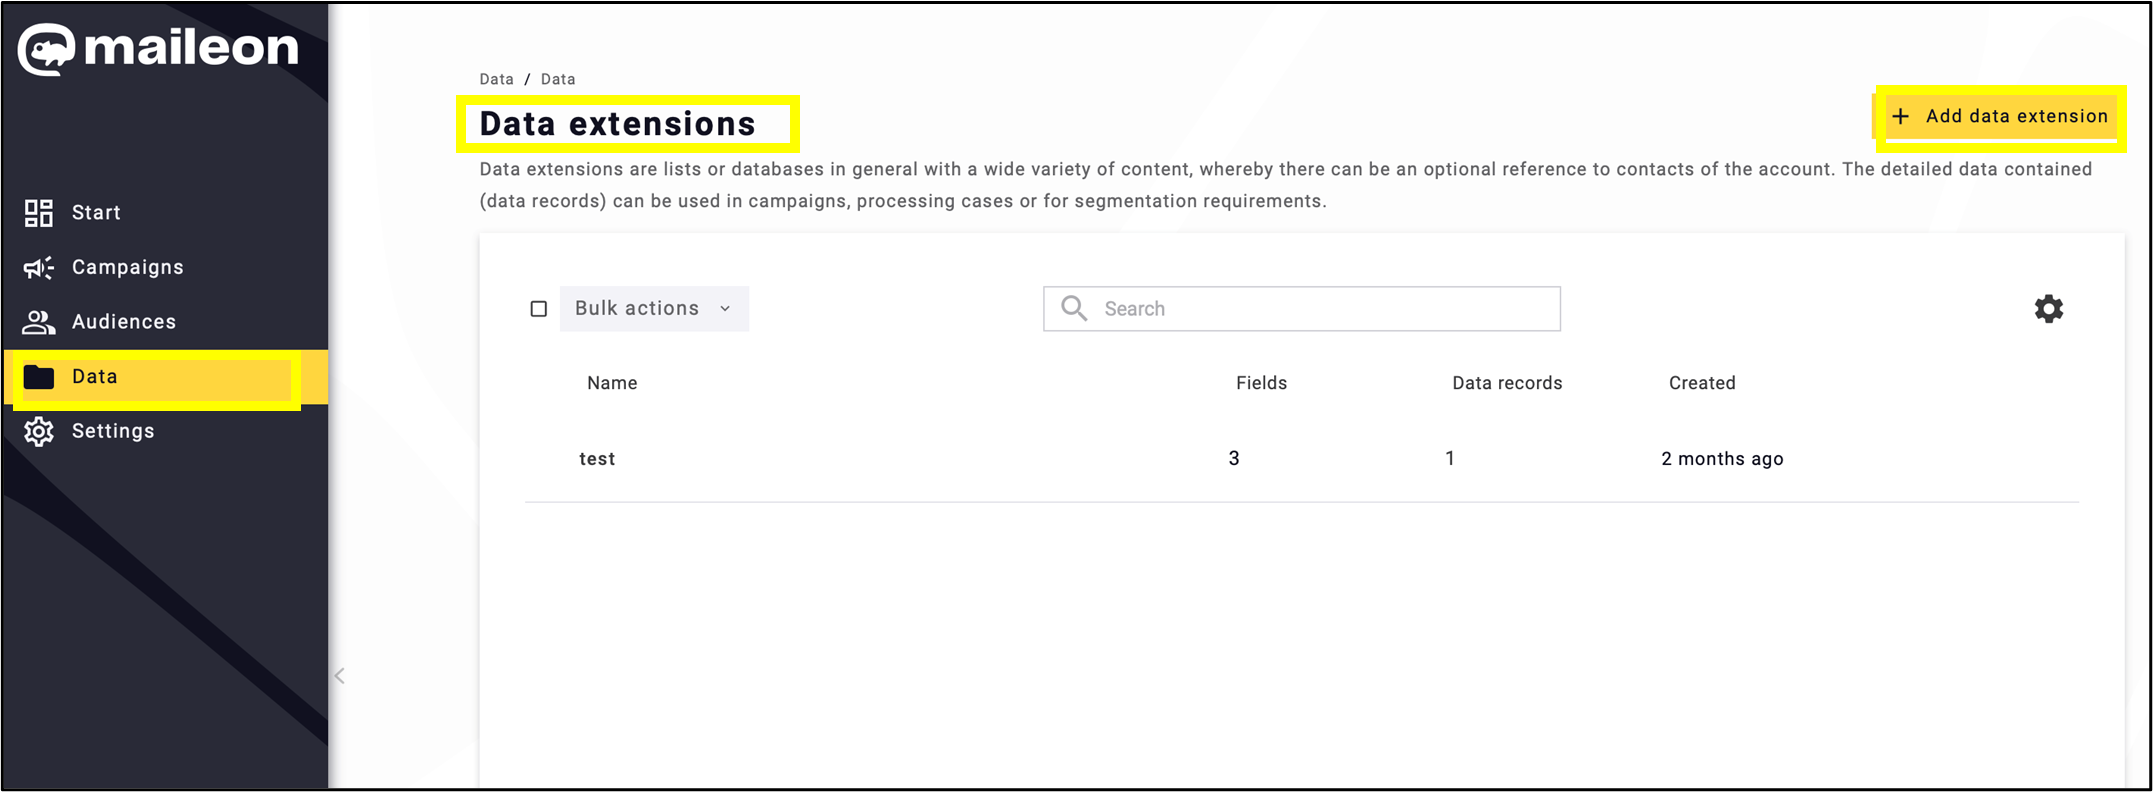
Fig. 3: Connect easily your lists and databases with the new, more efficient data extension feature.
Fill out the data sheet, paying particular attention to setting the correct time period in Retention policy, then click + Add field (fig. 4).

Fig. 4: Complete the data sheet, ensuring that the correct time period is specified.
Filling in the fields is quick and easy, just as before (fig. 5). After completing Field management, click Save.
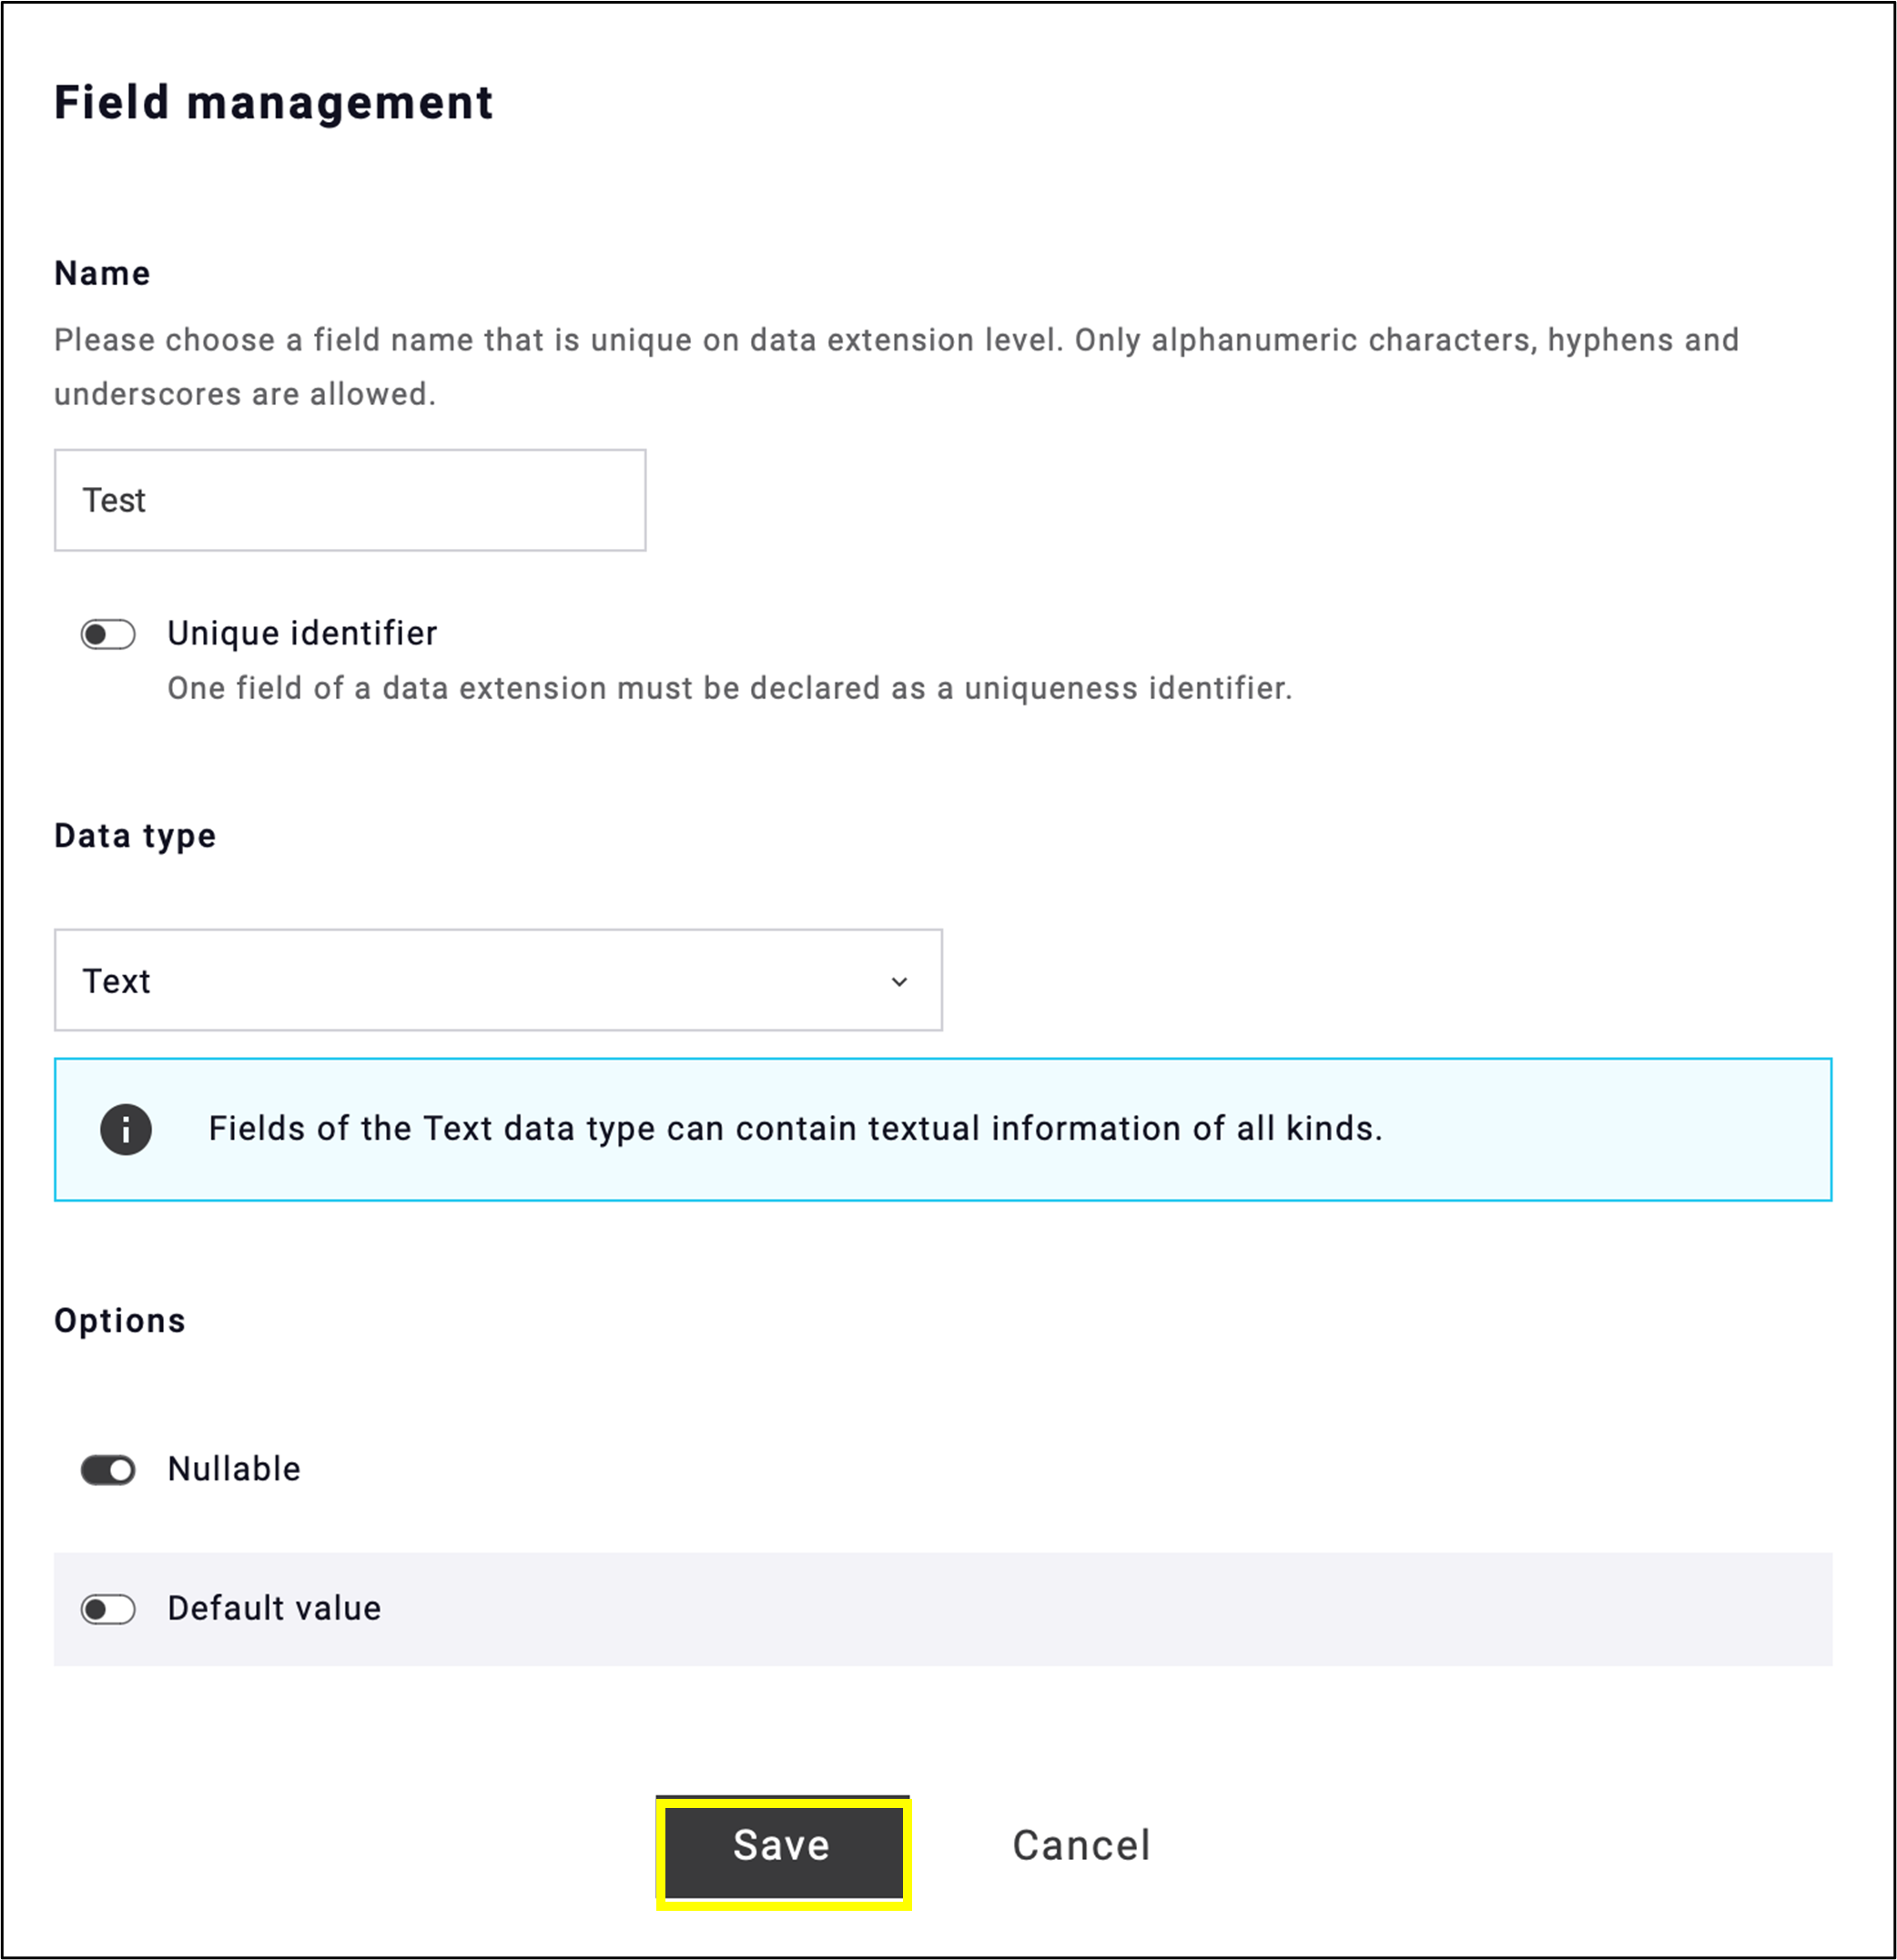
Fig. 5: Complete ‘Field management’ and click ‘Save’ to finish.
3. Settings: A simplified, more transparent menu bar that focuses on the essentials and introduces a new area
In the new interface, Settings section (fig. 6) includes only the most essential menu items, such as
- Access management,
- Campaigns,
- Resources,
- Account,
- and a new area: Billing.

Fig. 6: ‘Settings’ section keeps only the essentials and has been expanded with a new area.
To improve readability and transparency, the Settings section now features vertical grouping of menu items instead of the previous horizontal layout, as demonstrated in the Email settings (fig. 7).
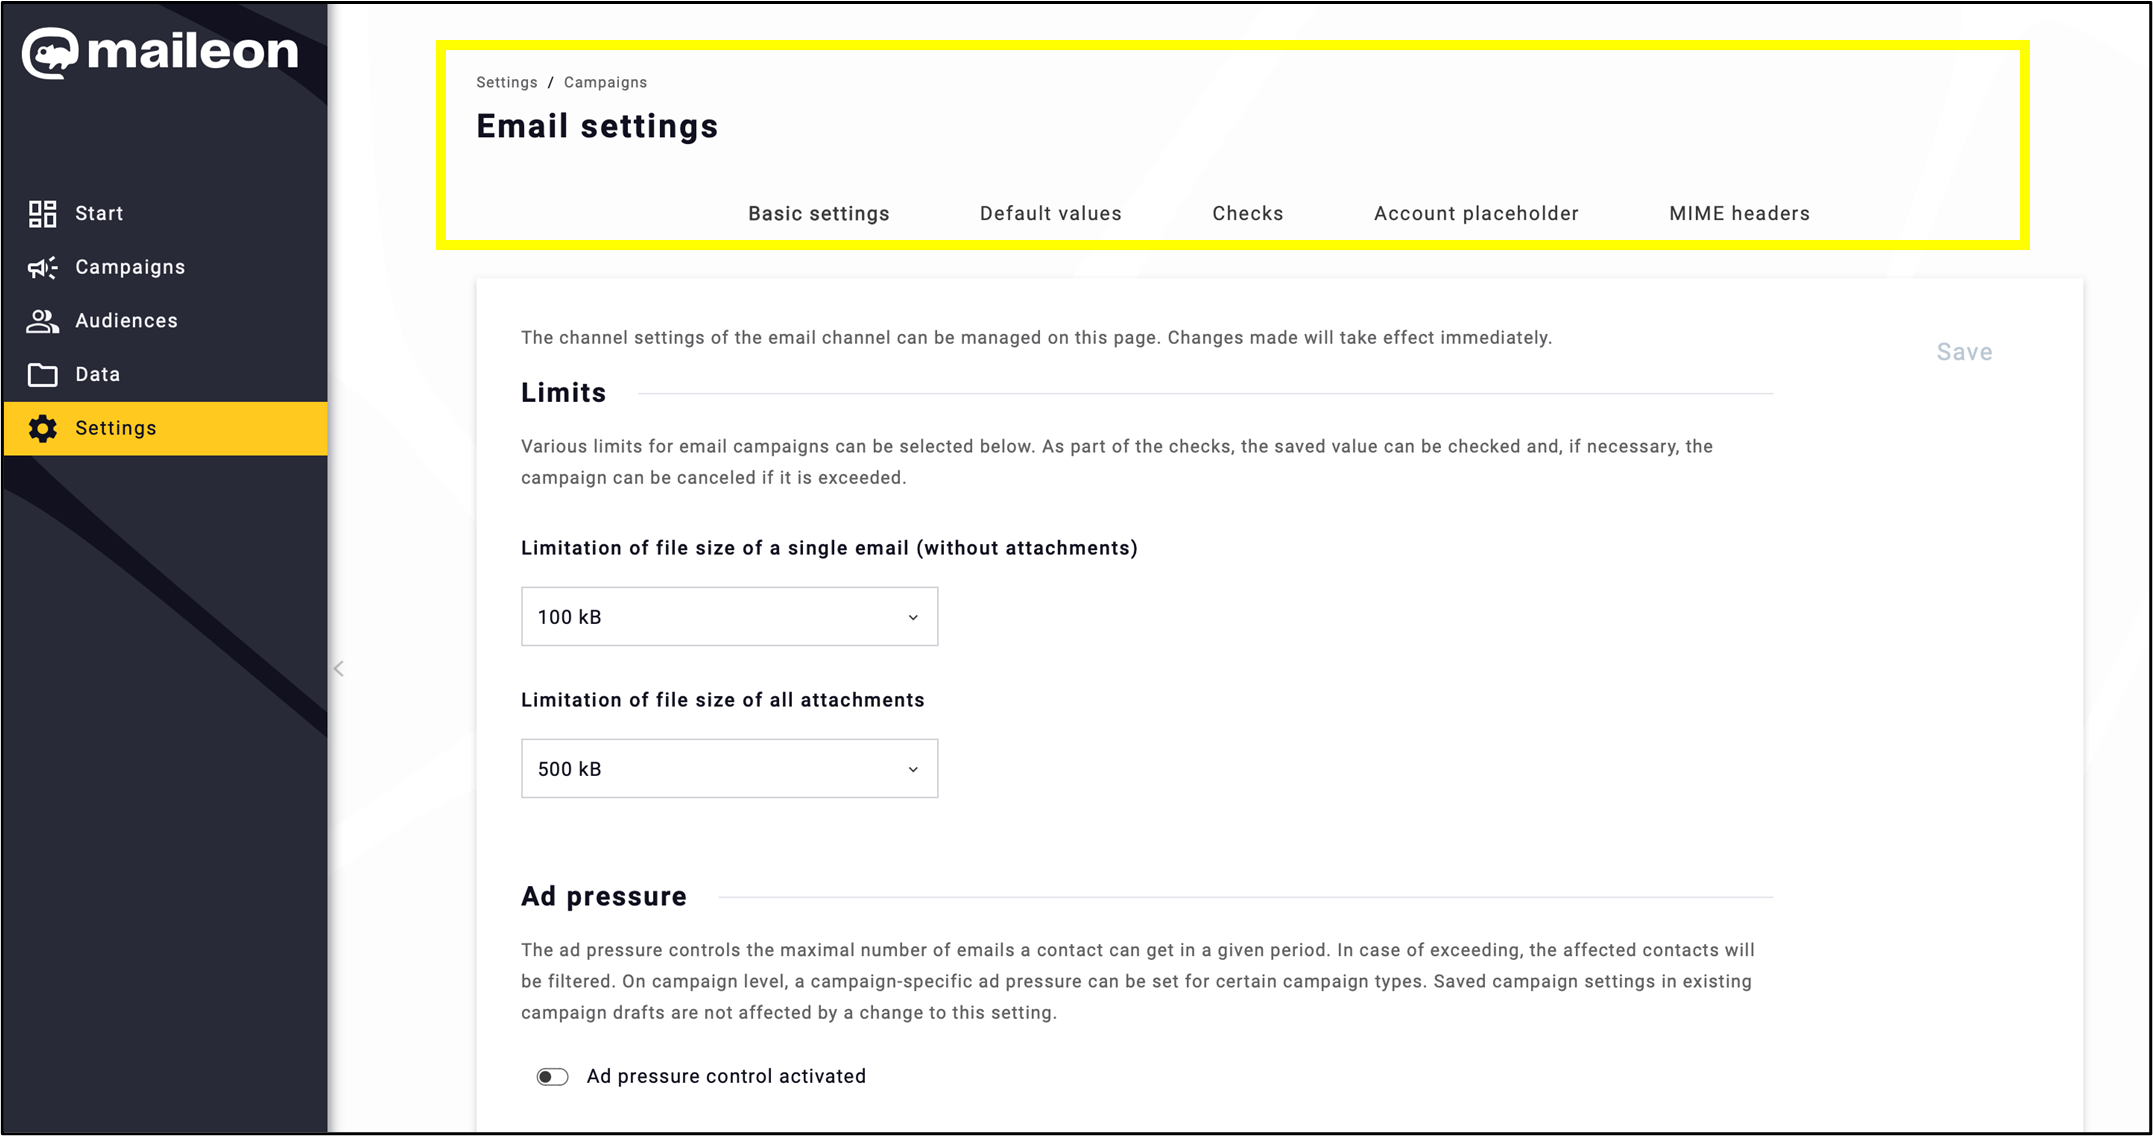
Fig. 7: Vertical grouping in ’Settings’ submenus for clarity and transparency.
In some subsections within Settings, you will find a summary and update at the top of the page, providing the most relevant information. For example, in My Profile (fig. 8).
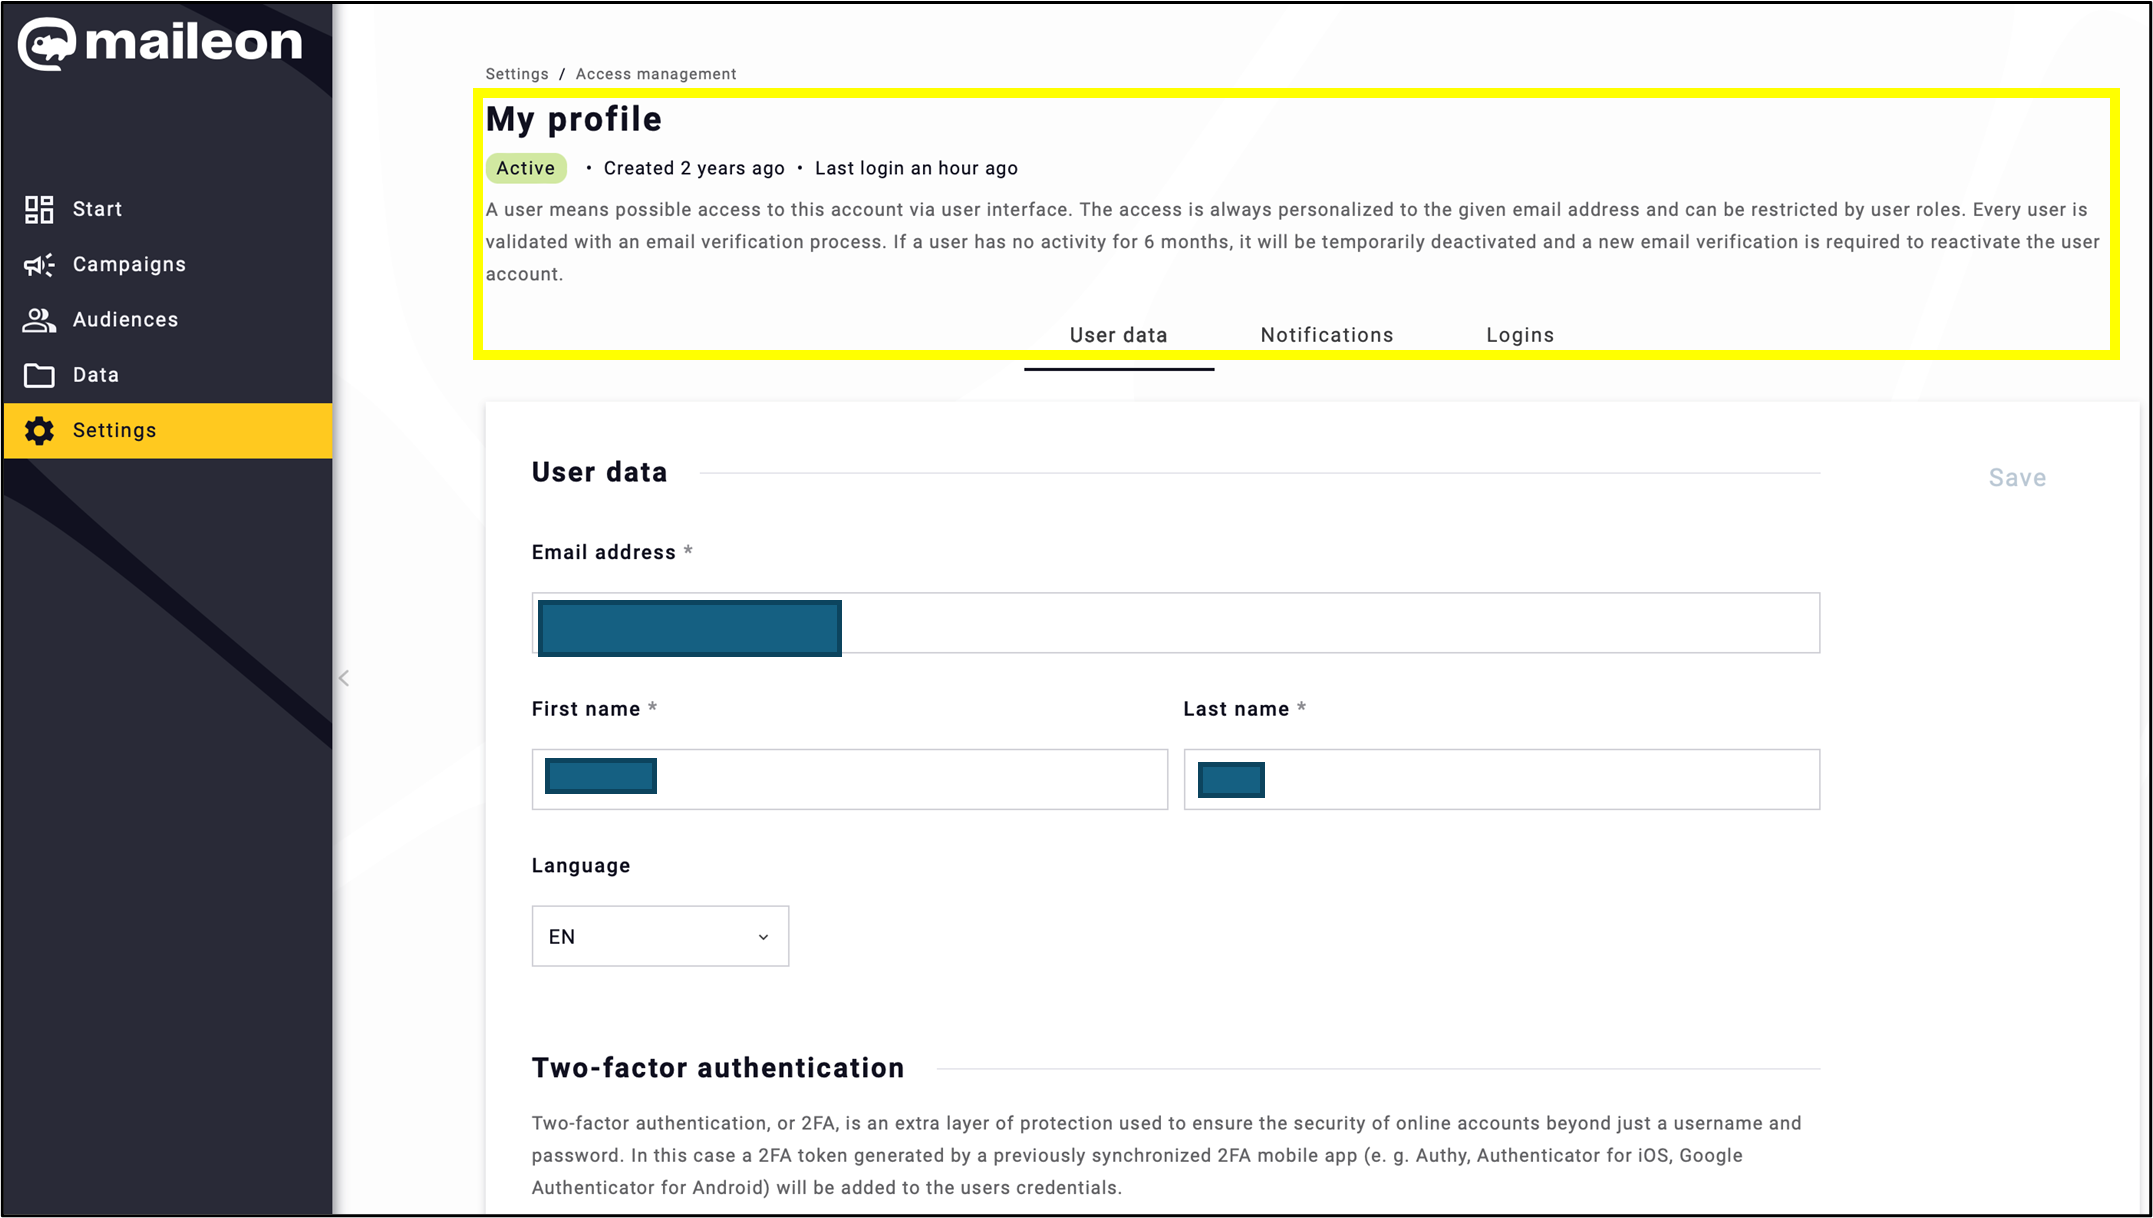
Fig. 8: Key updates appear at the top of some ’Settings’ pages.
-
New area in Settings -> Billing – > Account usage
Access reports on monthly email send volumes—including chargeable sandbox messages—with a single click in the Settings – > Billing -> Account usage section of the new interface (fig. 9).
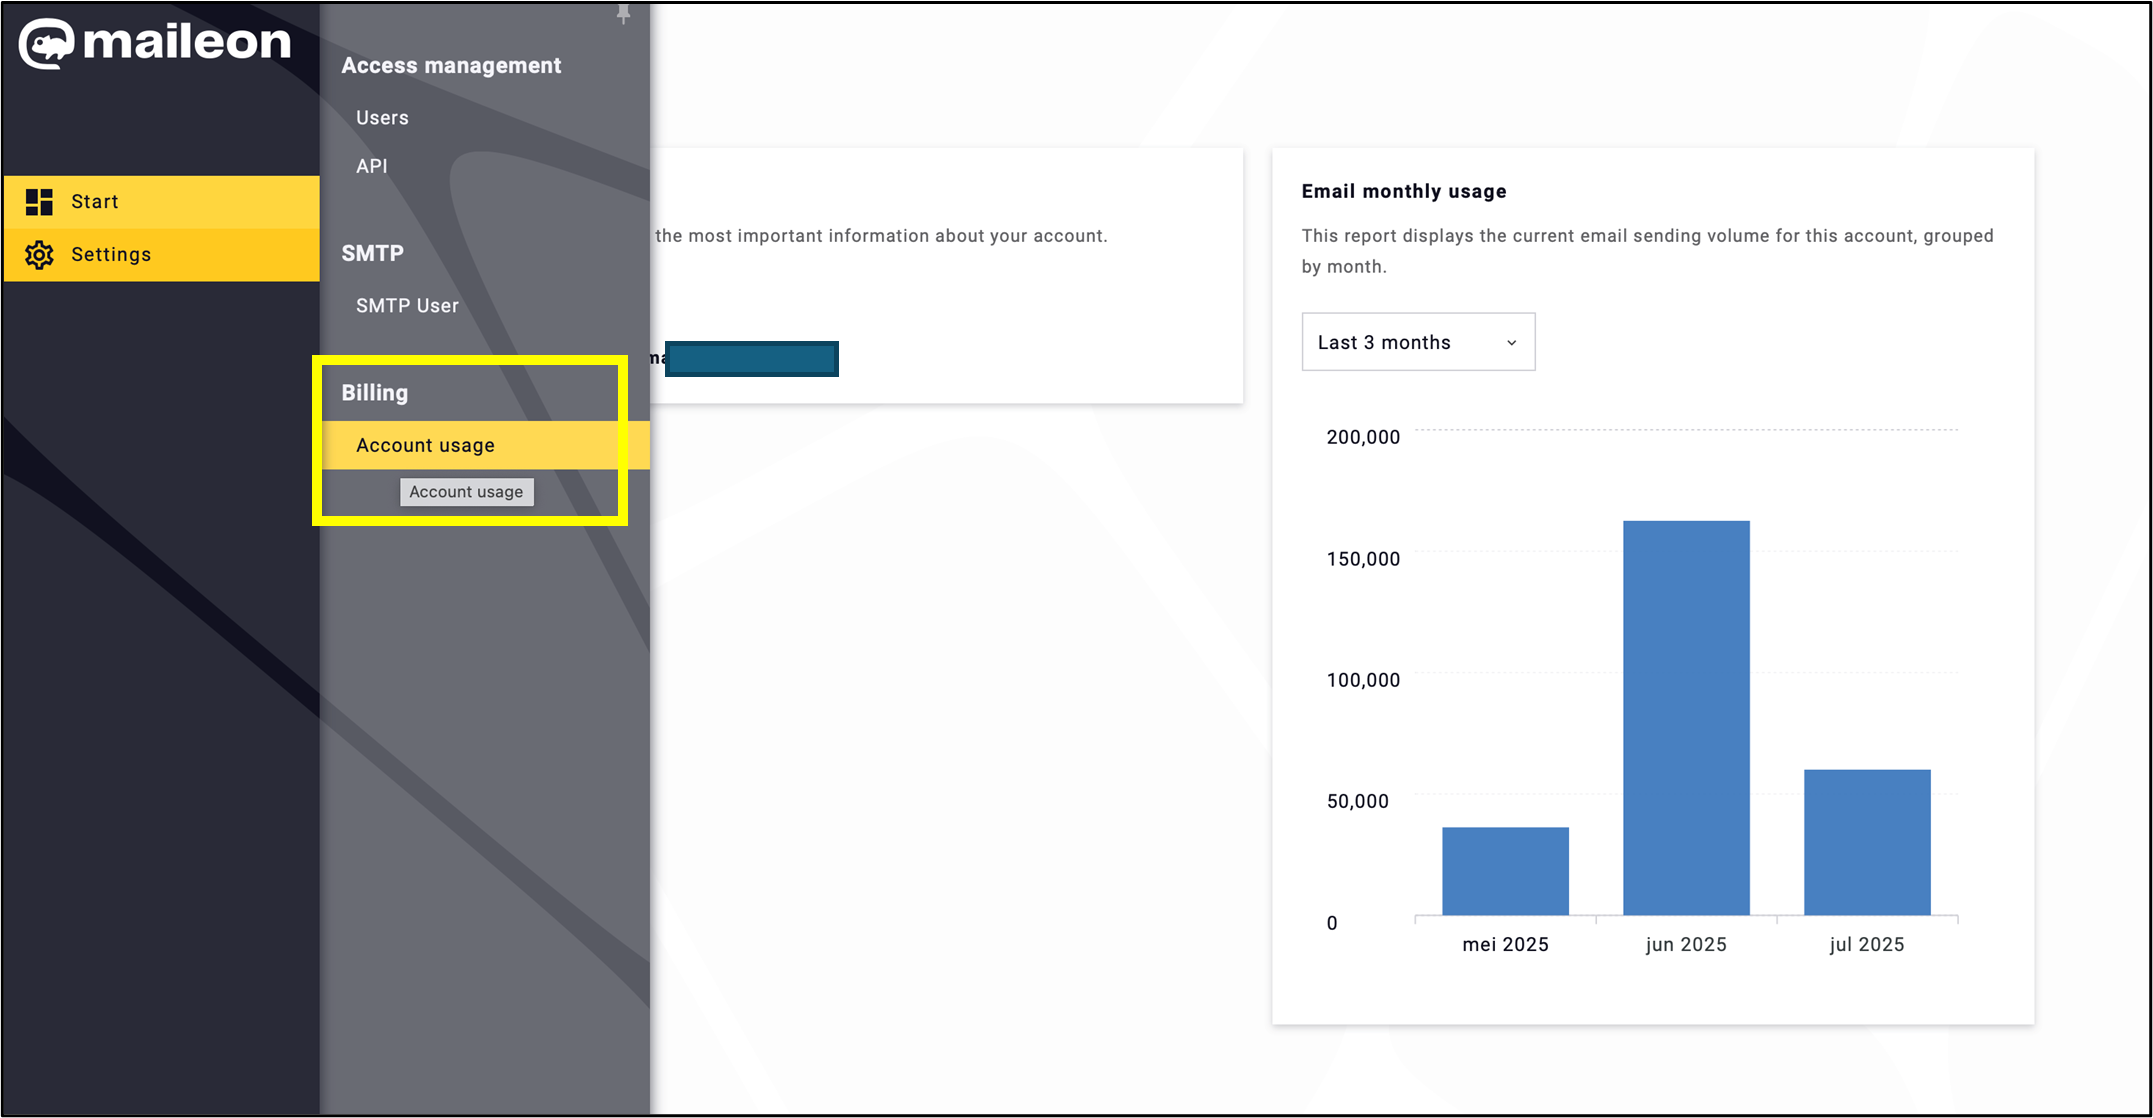
Fig. 9: In Settings -> Billing -> Account usage provides one-click access to monthly send volume reports.
Note 1: Because of the way send volumes are recorded, emails sent in the final hours of a month may appear in the following month’s data, which can result in slight differences compared to API metrics. Emails are never counted twice.
Note 2: Report data may be delayed by up to 30 minutes.
The time interval can be set for up to 12 months. The charts are available to download (fig. 10).
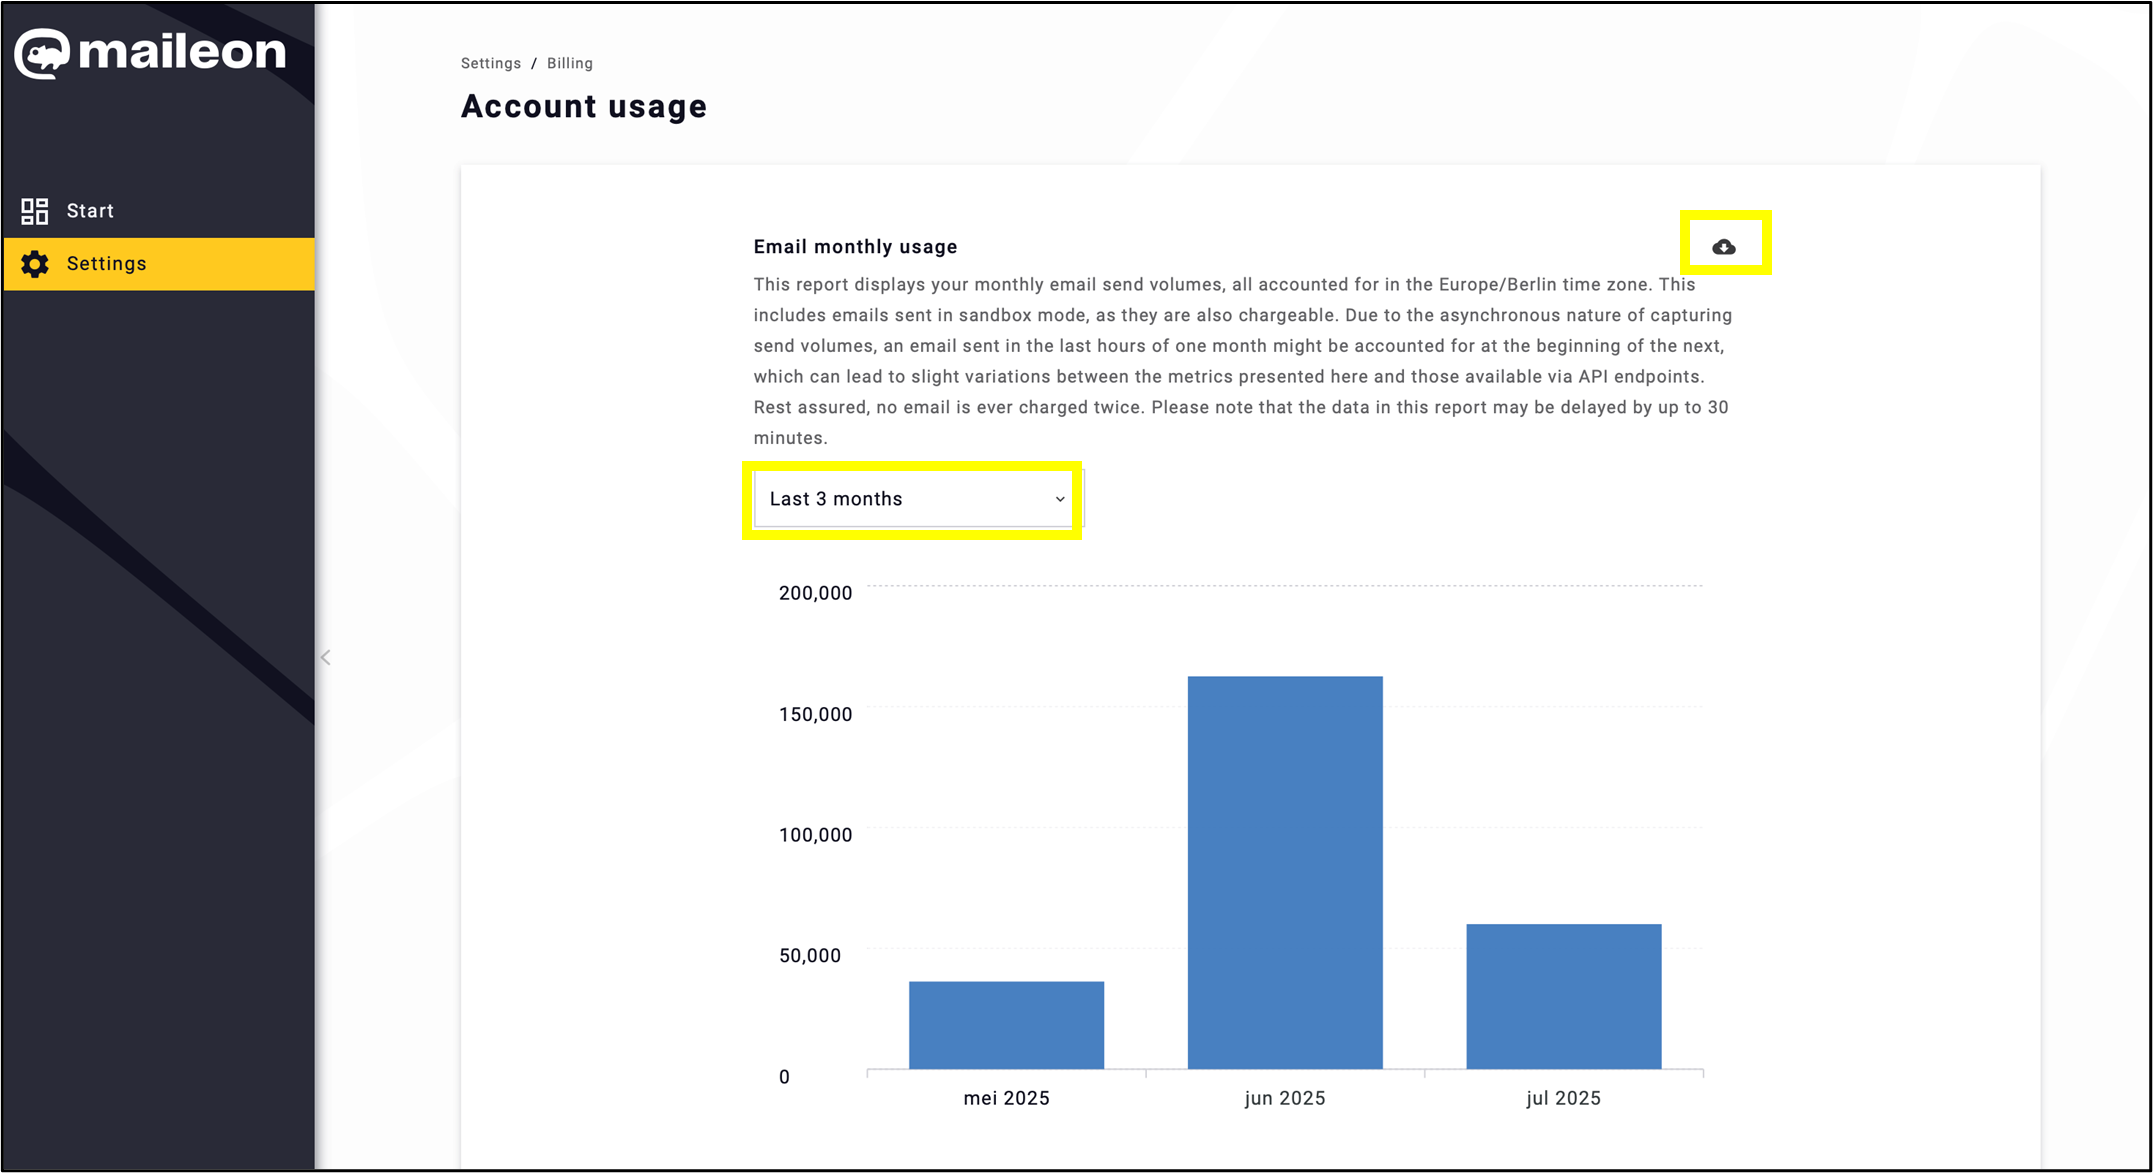
Fig. 10: Set time intervals up to 12 months and download charts easily.
-
Account switch: Useful tool for those who manage multiple accounts
Switch accounts with a few clicks, making it easier to manage multiple accounts simultaneously.
Click on your account name at the bottom of the menu bar (fig. 11).
Fig. 11: Switch accounts easily by clicking on your account name in the menu bar.
Select the account you would like to switch to, and the change will take effect immediately (fig. 12).

Fig. 12: Two-step account switching with a few clicks.
Click Close at the end of the process (fig. 13).
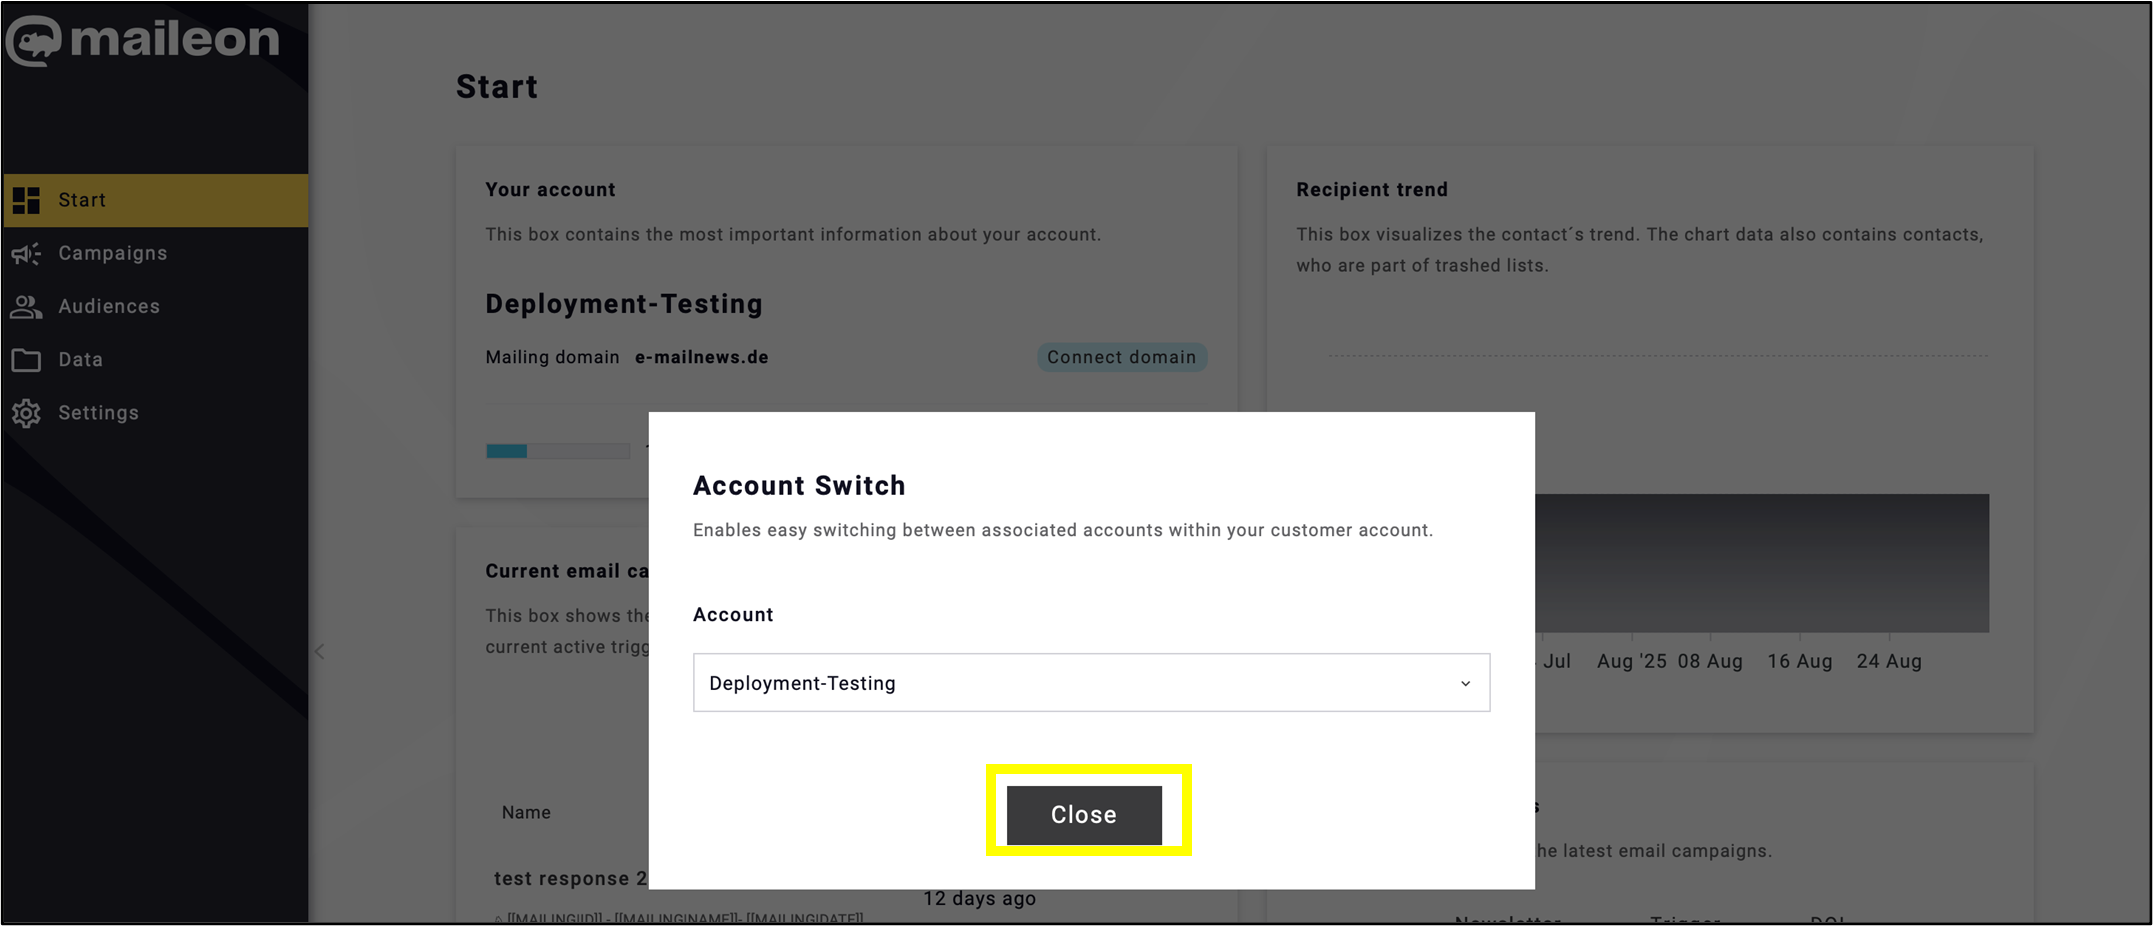
Fig. 13: Finish by clicking ’Close’.
-
Log out link and change to UI 1: All in one place
In addition to the personal account, the Log out and Switch to UI 1 functions have been moved to the bottom of the menu bar (fig. 14, fig. 15), providing easier access.
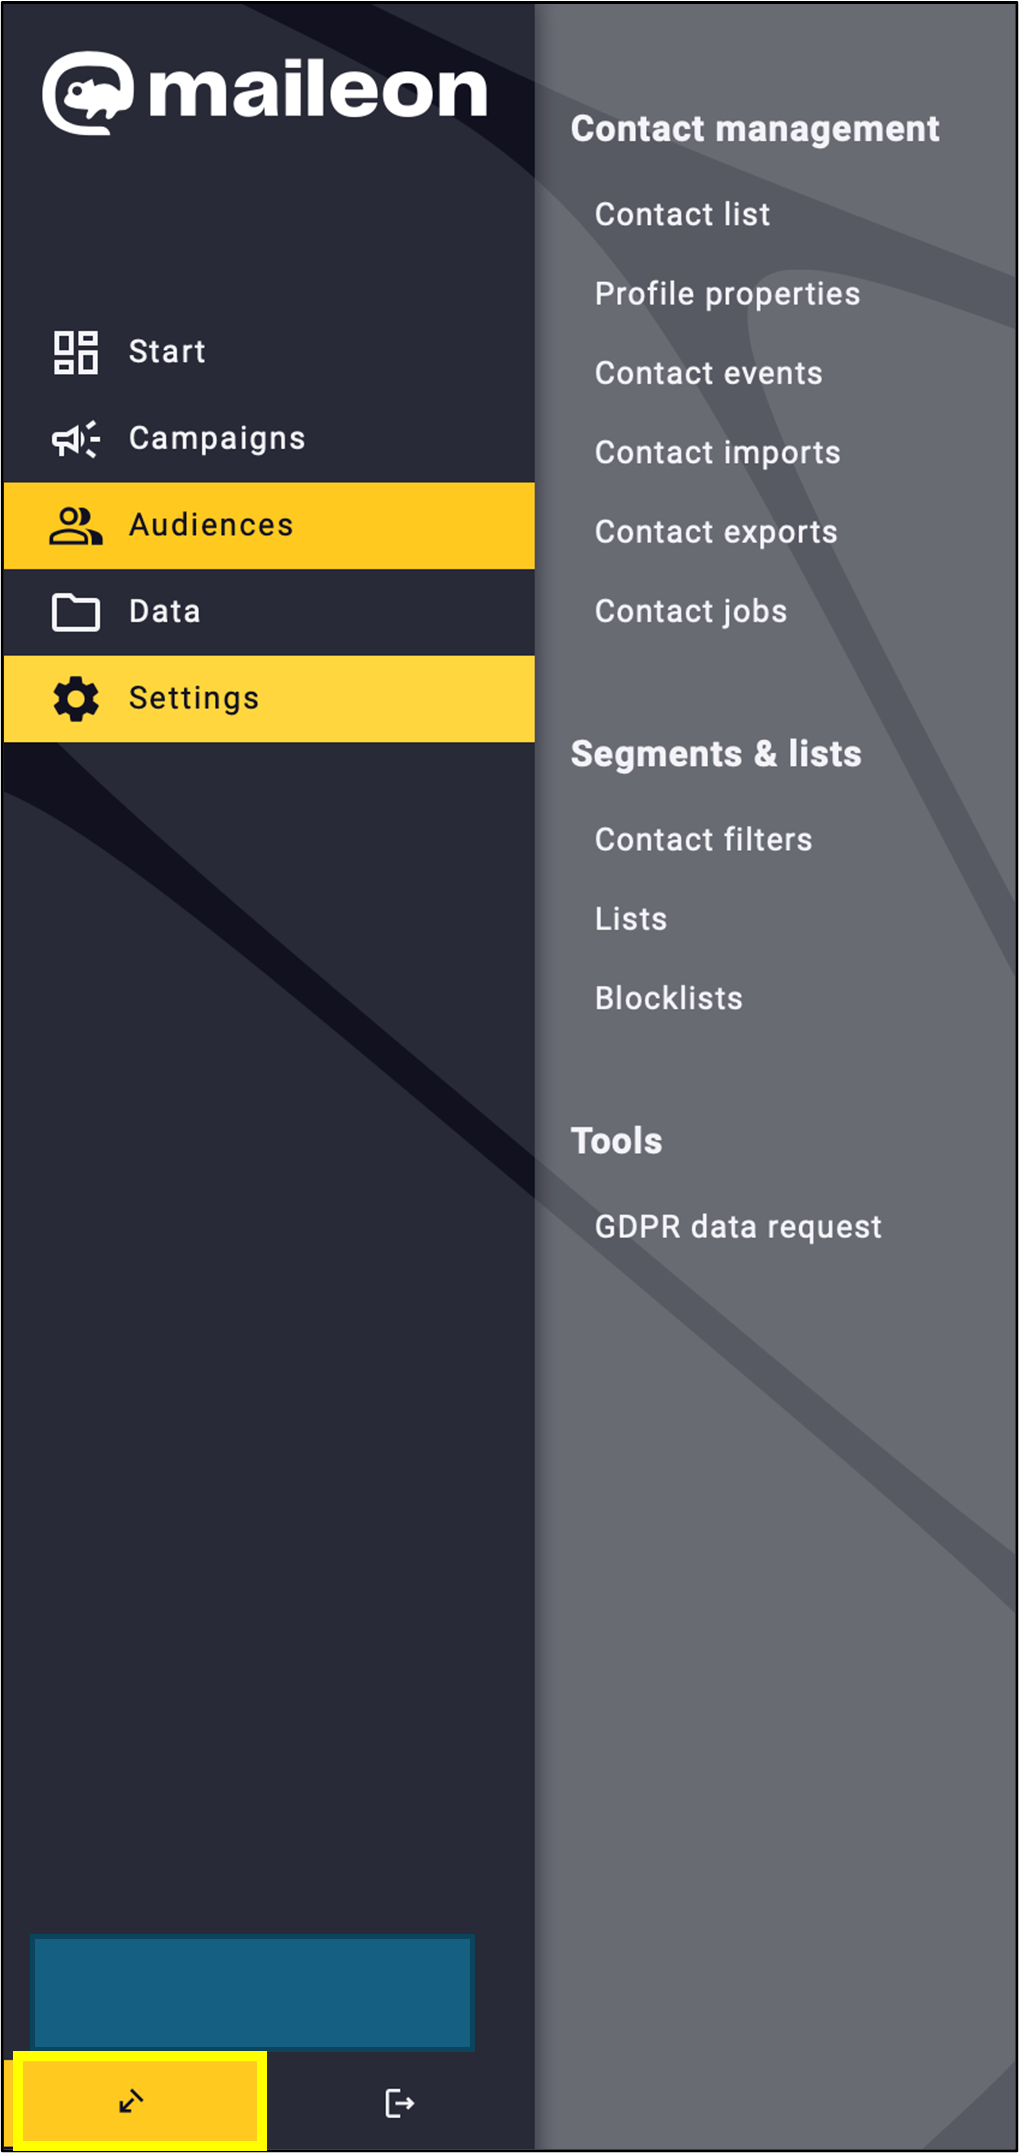
Fig. 14: Switch to UI1 is easy to access.
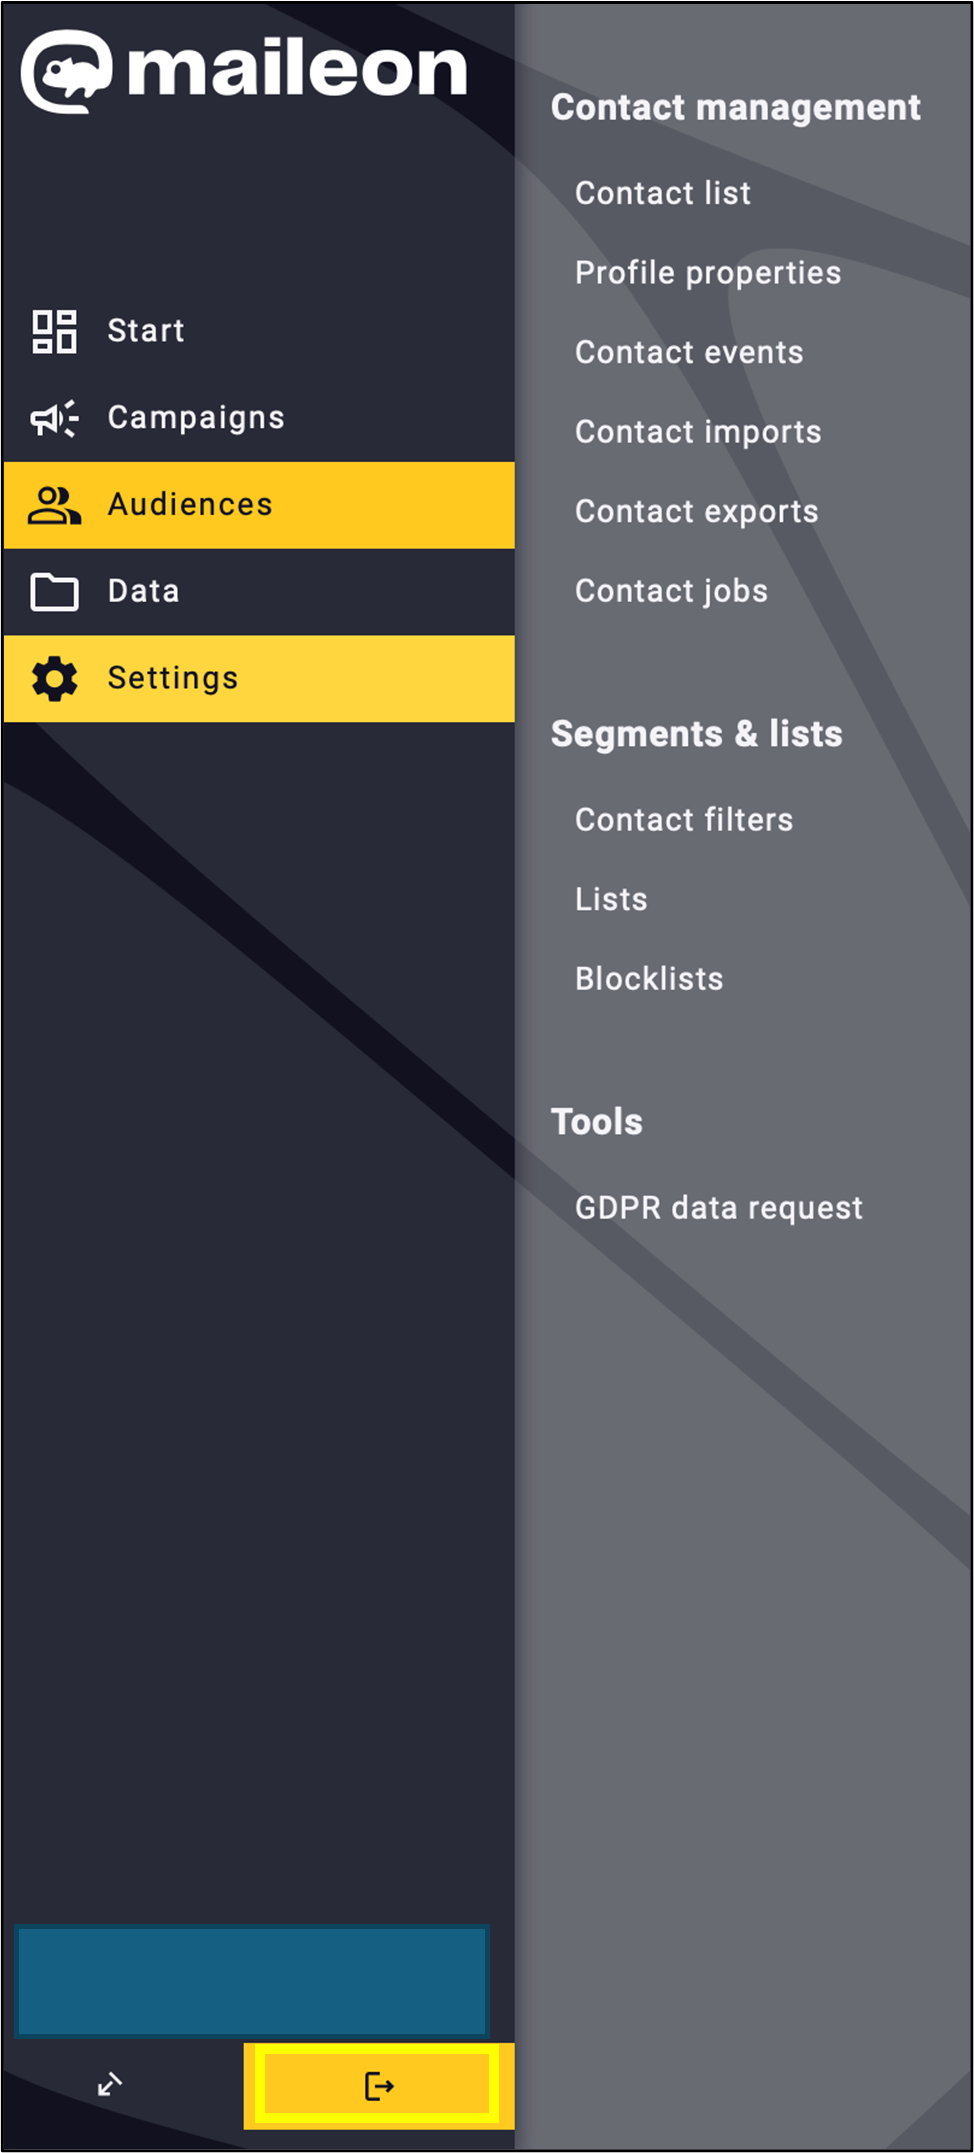
Fig. 15: The ‘Log out’ function is located at the bottom of the menu bar.