Im Maileon Help-Center finden Sie umfassende Dokumentationen zu unserem System.
Beliebte Suchanfragen: Importe | Rest-API | Integrationen | SMS
Split Test (A/B test)
Introduction
A/B testing – referred to as split testing in Maileon – helps evaluate engagement by comparing different versions of the same emailing with a sample of your recipients. Once you’ve created your draft emailing, you can easily and quickly create a second or third variant to assess how a single change impacts open rates, click-throughs, and other key metrics.
Possible testing ideas include
- changing the subject line,
- editing the number of blocks,
- editing the content,
- editing the styling,
- changing the sending date or time, or even the sender details.
Please find below the detailed steps you need to take to start an A/B (split) test in Maileon.
Note: Only test one/two changes at a time to ensure the validity of your results.
There are two ways to start an A/B (split) test in Maileon:
- For a regularly scheduled email campaign, initiate it directly from a draft campaign using the scissor button in the tabular overview of emailing drafts.
- In the Marketing Automation (MA) flow: trigger it for automated emailings.
Method 1: Initiate a draft campaign
To access the Split Test, go to Mailings > Emailings > Drafts.
You will see the scissors icon in the table row of the emailing drafts.

Note: The scissors icon will only be visible when a Target group is assigned to the campaign.
Below is a brief description of how you can assign a Target group to your campaign.
- Select an emailing where the scissors icon is not visible:

- Click on an emailing without the scissors icon in the drafts > go to the tab Target Group > assign a Target group by selecting the radio button at the beginning of the row:

- By clicking on Continue at the bottom of the page, then overview:
![]()
- The scissors icon is now visible, indicating that the emailing is suitable for split testing:
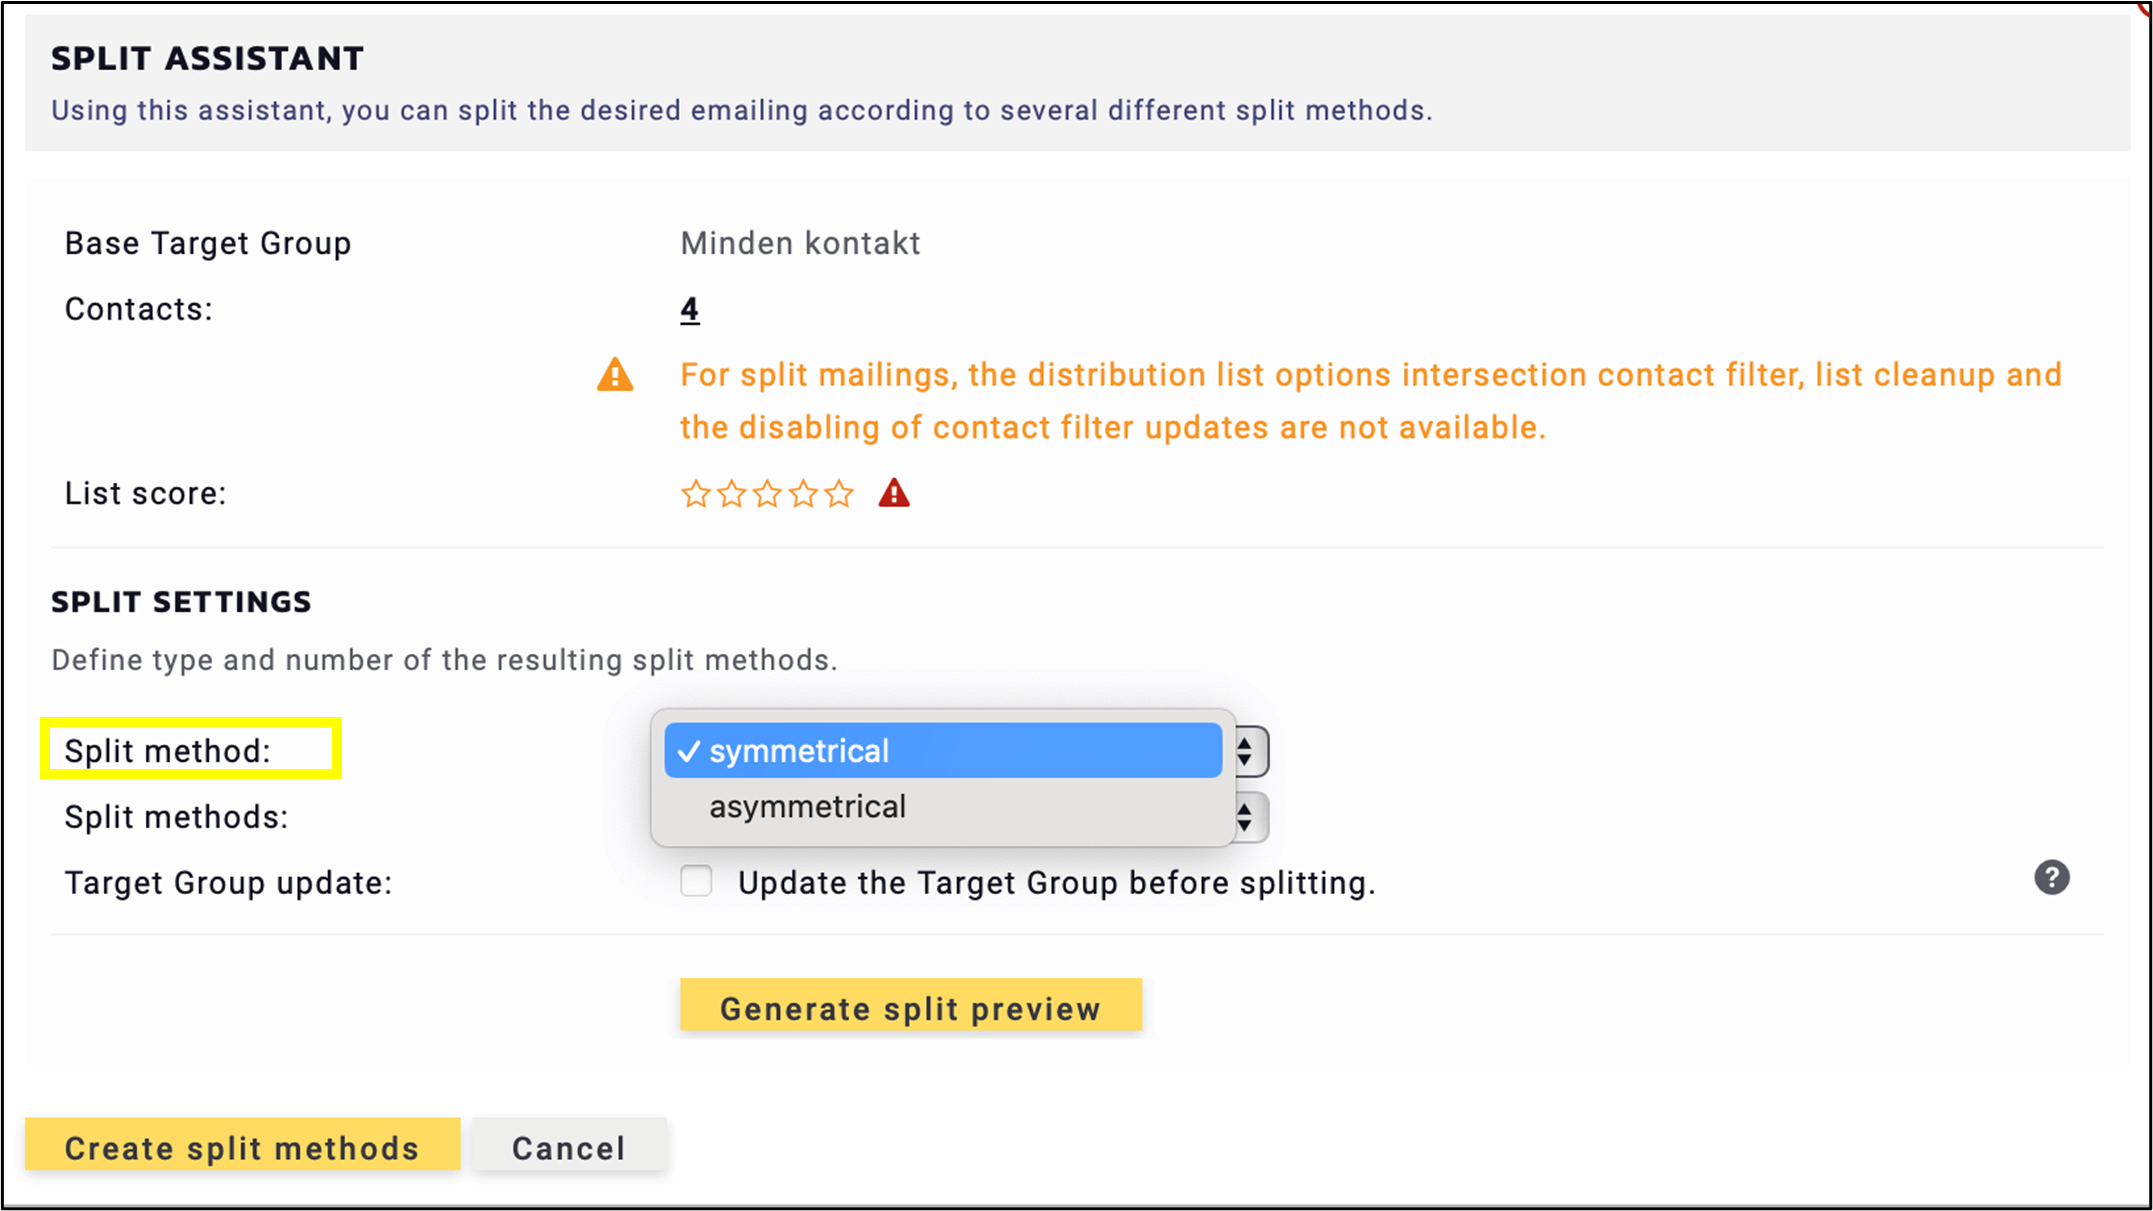
Split Assistant
Clicking the scissors icon will open the Split Assistant. This tool allows you to divide your emailing campaign using various split-testing methods.
Here you will find information about the
- Base Target Group, the
- Number of contacts from the Target group, and the
- Split settings.

In the Split Settings, the Split method can be either symmetrical or asymmetrical. Both options are explained step by step below.
Symmetrical Test
The symmetrical A/B test is a monadic test in which the number of all participants is equally distributed across the variants.
The amount of all recipients will be divided through the number of split methods.
If the number of recipients is not completely divisible by the number of split methods, a split will leave a remainder of one emailing address. However, this is negligible and does not affect the overall results.
Once the split mailing is sent, the individual variants are recorded in the mailing history, allowing for a quick overview of performance.
Important: All participants/recipients are randomly selected from the contact list.
The symmetrical test is selected via Split methods.
There are split methods ranging from 2 to 10 types, meaning 10 is the maximum of types for a symmetrical split. Note: Avoid using too many splits, as the results may become irrelevant.

You have the option to update your Target group before splitting by selecting the checkbox. This is an optional feature if you desire to send the mailing to the last registered contact. If the checkbox is not selected, any new contacts registered after the split is created will not be assigned to any target group and, therefore, will not receive the emailing.
Note that depending on the complexity of the rules, it may take some time – as the text below the question mark indicates, which becomes visible on mouseover. If you don’t see the text right away, hover your mouse directly over the question mark, as the text may not appear immediately.

After selecting the Split settings, click on Generate split preview.

You will see the Split review with the
- name of the Emailing, the
- number of Recipients and the
- Percentage Target Group.
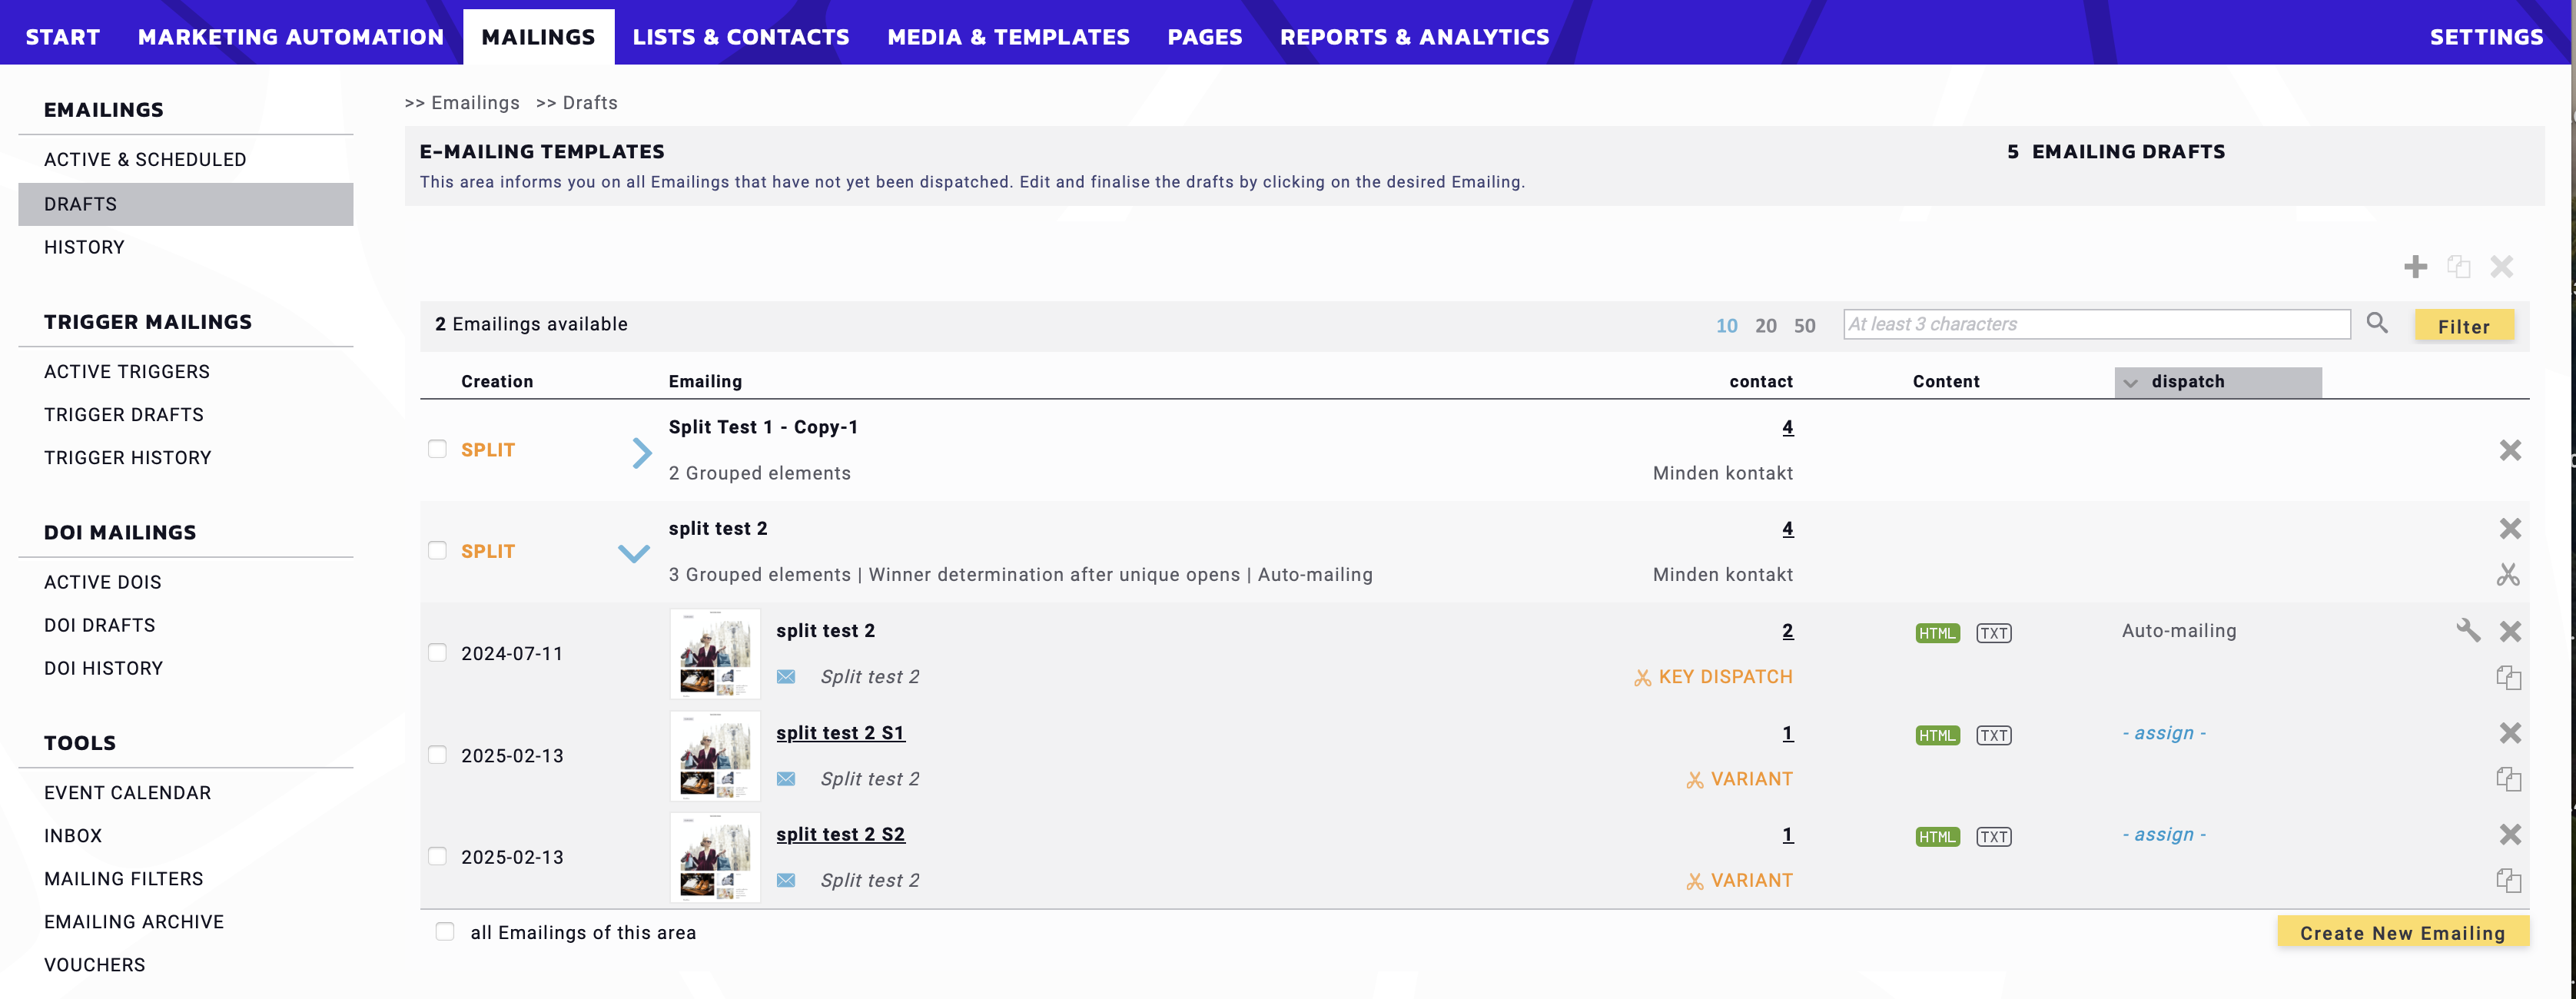
Click on Create split methods to find the split emailings among the drafts. In the Drafts overview click on the arrow icon next to “SPLIT” to show the variants prepared for testing indicated with S1 and S2 in the emailing name.

By clicking on the name of each emailing variant, you have the option to change what you desire to test in the emailing.
Asymmetrical Test
The asymmetrical test is also a monadic test because it splits participants into groups and allows each participant to evaluate only one product, just like the symmetrical test (so there is no rotation test!).
The main difference compared to the symmetrical test is the Contact Share per method option, which can be
- absolute (with optional number of contacts),
- relative, and
- statistically recommended.
A small sample size is initially selected, either as an absolute number or a percentage of the total distribution list. The success of these test candidates is then measured within a short, specified period.
The campaign or test that achieves better results is then applied to the main campaign.
This means that, after a short time delay, most recipients on the overall distribution list receive the campaign variant that was successfully tested by the previous test recipients.
The asymmetrical test is selected via Split methods, similar to the symmetrical test with the split method options ranging from 2 to 10.
In the case of ‘absolute’ contact share per method you assign the number of contacts you desire to include in the test in relation to the total number of contacts.

The specified number of contacts will receive variant 1 and variant 2 of the test emailing, assigned to the groups with the specified number. Once the results are received within a certain timeframe, the rest of the contacts will automatically receive the more successful variant.
‘Relative’ contact share per method is usually 5% of the Target Group.

This means that a fixed (5) percentage of the contacts in the target group will receive variant 1, and another 5 percentage will receive variant 2 of the split tests. The rest will automatically receive the more successful version.
The ‘statistically recommended’ option includes an additional step by clicking on the ‘initiate strength calculator’.

With this option, a popup will display with the Test Power Computation for split checks.
Here, choose the following parameters for the power analysis:
- target variable,
- anticipated average value of the target variable,
- smallest relevant target variable divergence of 2 split methods,
- maximum risk, that the observed response lift of the better split version is not statistically significant, but random (type I error),
- Maximum risk of split test failing to detect a significant response difference (type II error).
Based on these inputs, the result will give the calculated minimum number of cases required for the selected power analysis.

Note: If, as in this case, you select unique openings, the average value means the average unique openings achieved with the mailing list.
In general, you can say that with a type 1 error, the deviation can be stated that the difference in response is purely coincidental, i. e. it is not reflected in the total number. With a type 2 error, the deviation is that the difference in response is overlooked, i. e. there is a difference in response, but it does not appear in the number of cases tested. Type 1 and type 2 errors are therefore opposites.
With the asymmetrical split method, you also have the possibility to Update the Target group before splitting by selecting the checkbox.

In the case of the asymmetric test, there is an option to automatically accept the settings of the profit variant for profit calculation. Selecting the checkbox is recommended.

By checking the box, you can select a runtime to measure the time between days and hours, as well as the Decision base from Opens unique to unsubscribe rate.
Note: Recommended runtime per method is at least one entire day.
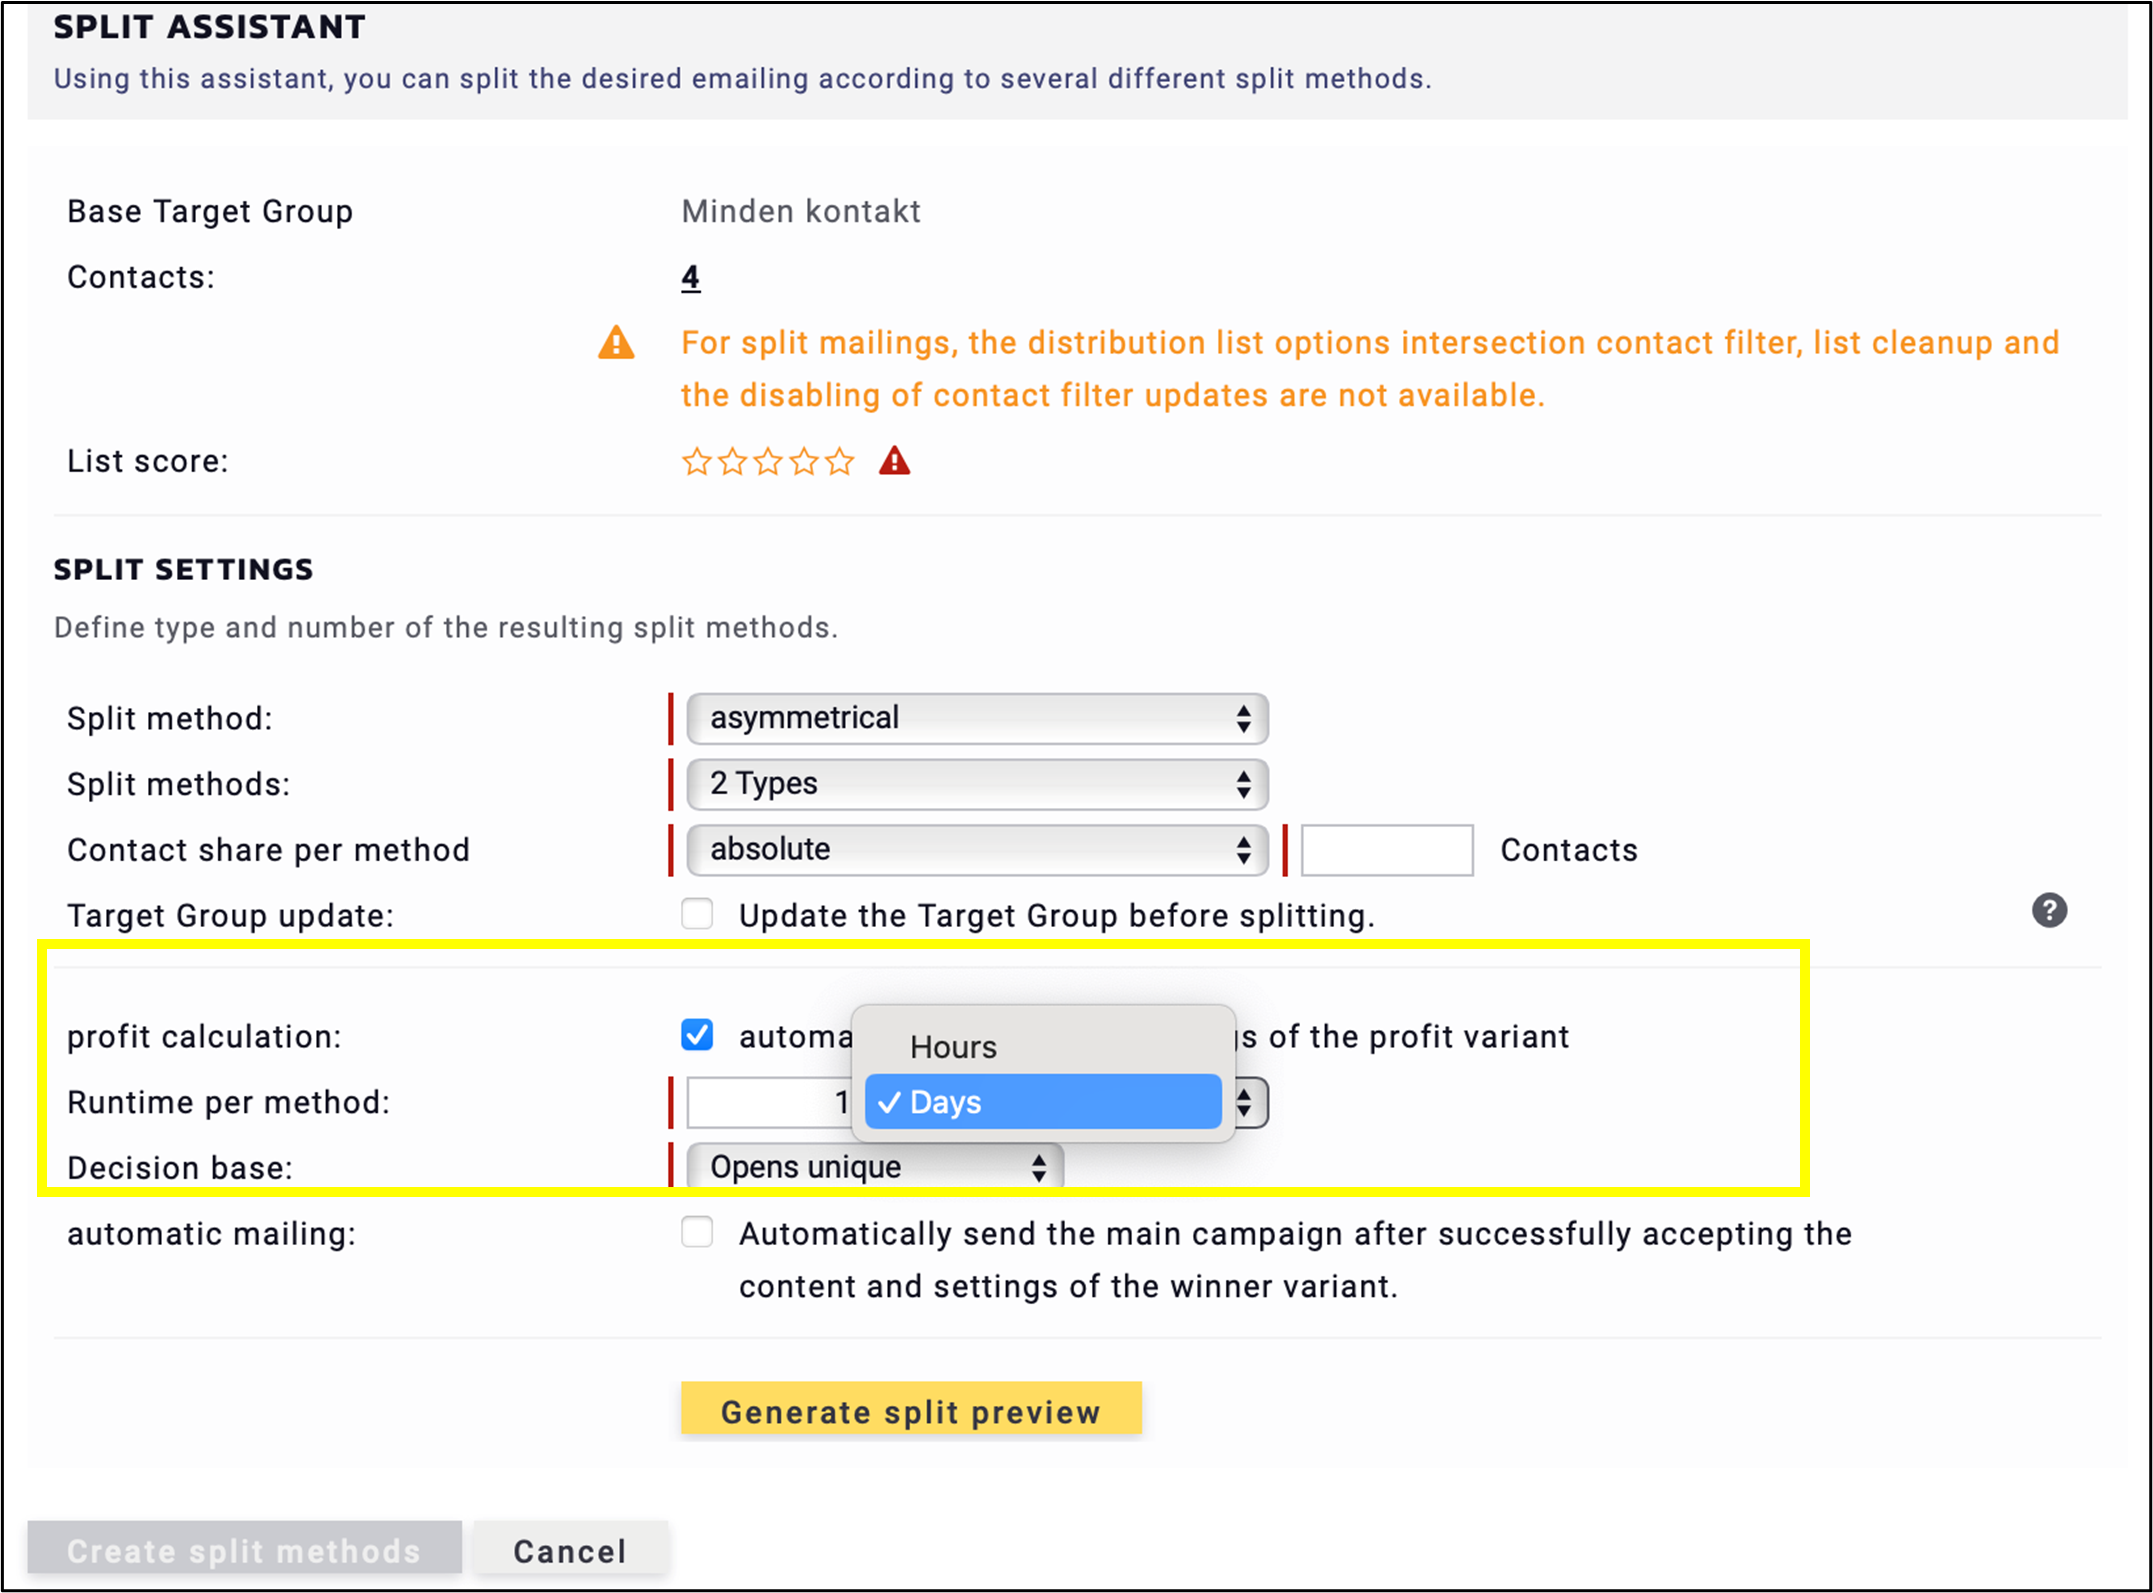
Among the decision base methods, the Opens unique and Clicks unique are the most common testing bases, while Conversions unique can be important for webshop owners.
The unique open rate, unique click rate, and CTO (click-to-open) rate are related to the percentage base of the openness, while bounce rate is a method to test which mailings have more bounces. The unsubscriber and unsubscriber rate are options to test which mailing generated more unsubscribes.

It is recommended to select the Automatically send the main campaign after successfully accepting the content and settings of the winner variant checkbox, because this will ensure the main – and more successful – campaign will be sent out automatically.

After setting the Split assistant, click on Generate split preview to see the preview in the bottom of the popup. As in the case of the symmetrical method, here you will find the key dispatch (main campaign), which will be sent out based on the measurement, along with the variants you have defined.

After the measured time period, the key dispatch will be filled in and sent out automatically with the content of the more successful version, which generated more unique openings.
Clicking on Create split methods will lead you back to the Drafts overview to select the testing options in the generated variants, just as in the symmetrical method. In the Dafts overview click on the arrow icon next to “SPLIT” to view the variants prepared for testing indicated with S1 and S2.
By clicking on the name of each emailing variant, you have the option to change what you desire to test in the emailing.
Testing tips in Mailings
A useful testing option is to replace or personalise the text in the subject line, and / or adding emojis to it.

It is also worth changing the heading part in the content of the emailing. In most cases, this is the introduction and / or the first mentioned product.

Test the effectiveness of the mailing by changing the visuals or highlighting the first paragraph.

Note 1: Avoid negative messages, red color (reminder of danger) and don’t forget to save the test variants.
Note 2: When split testing, never apply more than 2 (maximum 3) changes in a mailing to ensure you can track the results accurately. Less is more!
Back to Drafts
Copy and / or delete the test variants with the same functions as with normal drafts.
Please note: Once split, there is no option to copy the original mailing, only to delete it. Once deleted, it cannot be restored! Before creating the variants of a mailing, we strongly recommend creating a copy to preserve the original version as a back-up.

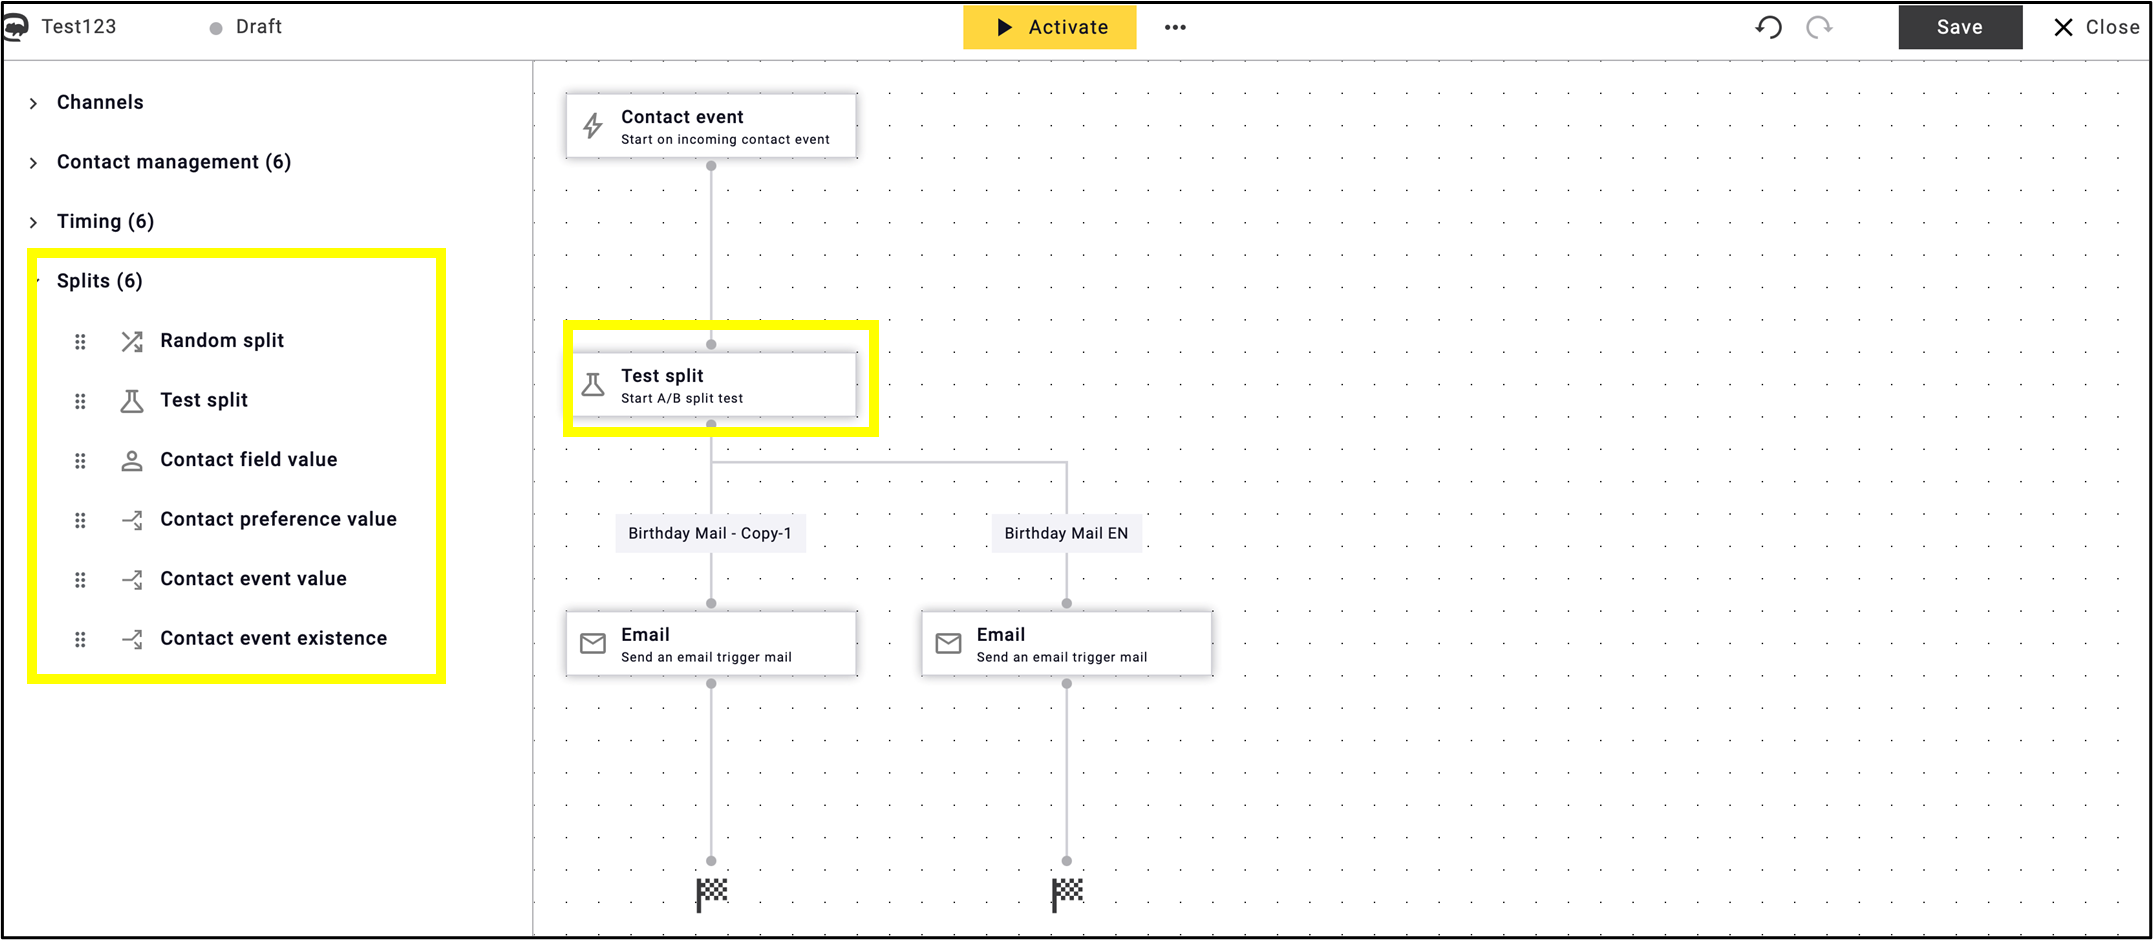
Method 2: split testing in Marketing Automations
The second testing method is to set up an A/B split testing in a Marketing Automation program . This can be done either as a standalone test or as a part of an existing program.
Using the Branch Nodes either in the standard version or in the new design of Marketing Automation you can set up split tests by configuring the (number of) variants and the duration or split logic.
Below are 1-to-1 examples of both versions. For more details on using branch nodes, please refer to the documentation for both the standard version of Marketing Automation and the new design.
Branch Nodes and split testing structure in the standard version of Marketing Automation:

Splits (branch nodes) and split testing structure in the new design of Marketing Automation: